Create a voyage
Generally, a voyage represents a vessel. Depending on the organization, a voyage can also represent a vendor, purchase order, or a type of item that makes sense for your business. A voyage is linked to shipping containers and folios. A shipping container is linked to the purchase lines. Also, you can link shipping containers and folios directly to a voyage even if they're switched off. Furthermore, costs that you've entered in the voyage are allocated to all associated purchase lines.
Watch this video to learn more about voyages.
The following graphic shows the high-level process for a voyage, starting with a purchase order.

The All voyages page contains information about voyages, such as delivery and costing, and information about items, purchase orders, and transfer orders. To access the All voyages page, go to Landed cost > Voyages > All voyages. This page contains a list of all current voyages where you can create and manage voyages. To view the specifics of a particular voyage, select a record in the list.
On the All voyages page, the Action Pane has buttons that allow you to work with a specific voyage. Each button completes a single function. In addition, the Action Pane has tabs, each having a set of associated buttons. Unless otherwise specified, all buttons and tabs are available in the list view of the All voyages page and the detailed view for a single selected voyage.
- New
- Delete
- Voyage costs
- Shipping containers
- Folios
- Voyage
- Manage
- General
- Options
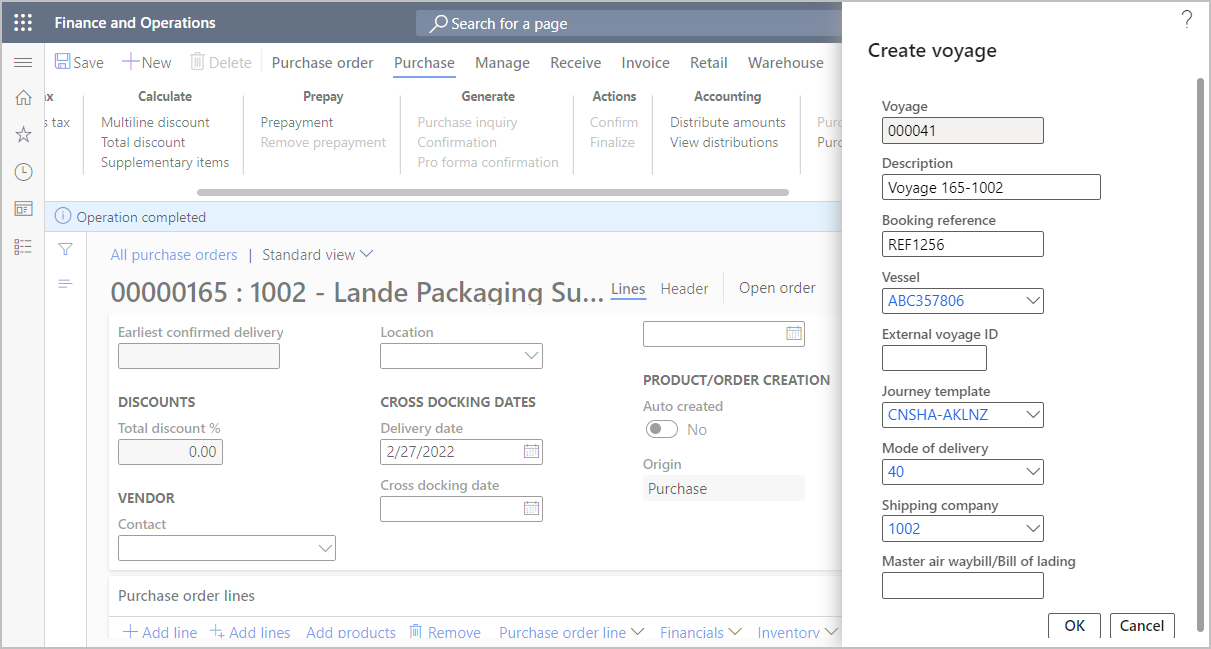
Create a new voyage
When you're creating a new voyage, many of the fields that you specify will help determine the auto costs for the voyage. Auto costs are discussed in the Estimate and manage landed costs unit of this module.
To create a new voyage, you'll begin on the All voyages page.
Go to Landed cost > Voyages > All voyages.
Select New on the Action Pane.
Generally, a number sequence will be assigned to the Voyage ID.
Enter a Description for the voyage.
If your shipper or shipping center provides a reference number to identify the voyage, you can enter this information in the Booking reference field.
In the Vessel field, you can enter or select the vessel for the voyage. This field is a free text field, or you can select from the list of vessels that you've set up or used previously.
In the External voyage ID field, enter the publicly available ID for the voyage. This ID might be a flight number.
Select the Journey template for the voyage. You can use the journey template to enter the To port and From port for the voyage. This information is important in helping determine the auto costs that are associated with the voyage. For more information, see Set up multi-leg journeys.
Select the Mode of delivery for the voyage, such as air, truck, rail, or ocean. This field can also help you determine the auto costs for the voyage.
Select the Shipping company for the voyage. This field also helps you determine the auto costs for the voyage.
Optionally, in the Master air waybill/Bill of lading field, you can enter the master air waybill or bill of lading number. You can specify this value when you ship by air.
Select OK to create the voyage.
When you've created a voyage, you can add more details, such as shipping containers and folios, by using the Voyage editor.
Create a voyage from a purchase order
You can create voyages from a purchase order. To do so, follow these steps:
Go to Procurement and sourcing > Purchase orders > All purchase orders (or go to Accounts payable > Purchase orders > All purchase orders).
Select New on the Action Pane.
Select a vendor.
Specify the Site and Warehouse for goods in transit, and then select OK.
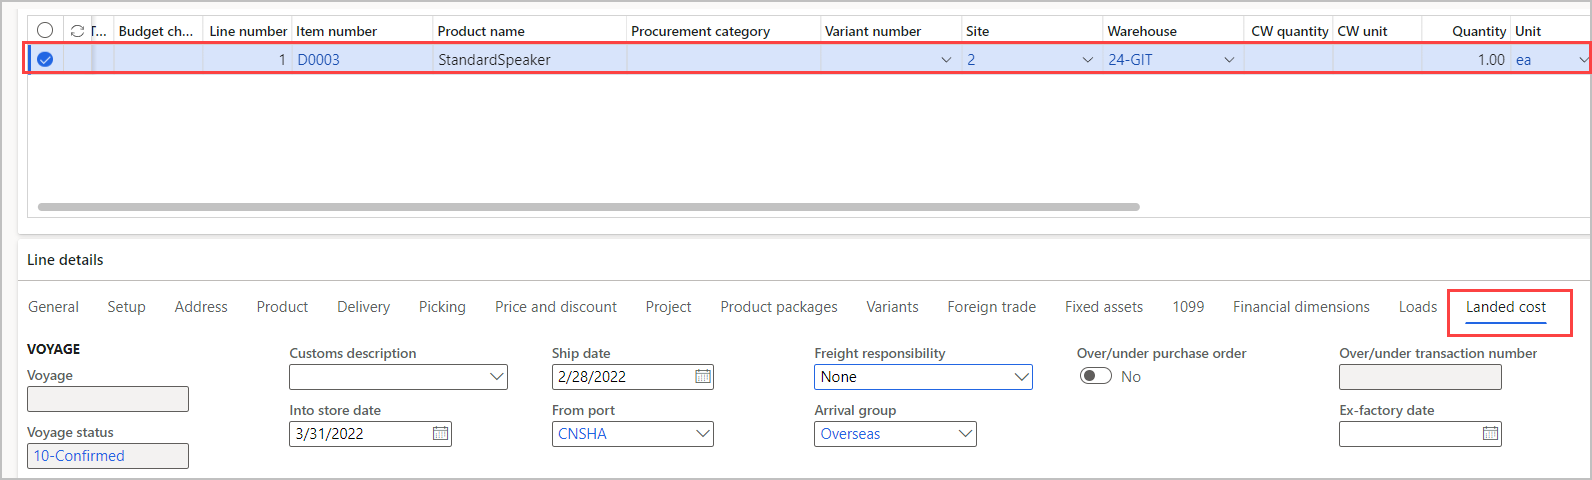
As necessary, add purchase order lines by selecting Add line in the Purchase order lines FastTab.
For each line on the purchase order, you can define other landed cost details in the Line details FastTab.
Open the Header view on the purchase order.
Ensure that the Mode of delivery, Delivery terms, and Mode are specified.
Expand the Landed cost FastTab in the Header view, where you can specify header level landed cost details.
On the Purchase tab on the Action Pane, select Confirm.
On the Purchase tab on the Action Pane, go to the Landed cost group and select Create new voyage.
In the Create voyage dialog, enter the voyage details and then select OK.