Grant a virtual network sole access to Azure Cloud Services (extended support)
This article discusses how to limit access in Microsoft Azure Cloud Services (extended support) to only a specified virtual network. It outlines how to use Azure Load Balancer to create an internal (or private) load balancer to block clients that try to communicate through other virtual networks or the internet.
Interaction between Load Balancer and Cloud Services (extended support)
Azure Load Balancer is a service that's responsible for automatically load balancing and routing the incoming traffic to different back-end servers. For Cloud Services (extended support), these servers are the different WebRole and WorkerRole instances. Load Balancer works on layer 4 of the Open System Interconnection (OSI) system.
The following table details the important components in Load Balancer.
| Component | Description |
|---|---|
| Front-end IP address | The front-end IP address is how the Load Balancer exposes itself to its clients. Depending on the configuration, the Load Balancer might be more than one front-end IP address. Additionally, there might be a public front-end IP address, a private front-end IP address, or both. |
| Back-end pool | The back-end pool is where the Load Balancer groups the back-end server instances. For Cloud Services, the Load Balancer creates a back-end pool for each role. Then, the Load Balancer adds the instances of the same role to the same back-end pool. |
The following diagram is an example of how you can configure the Load Balancer in a cloud service that's open to only the public internet.
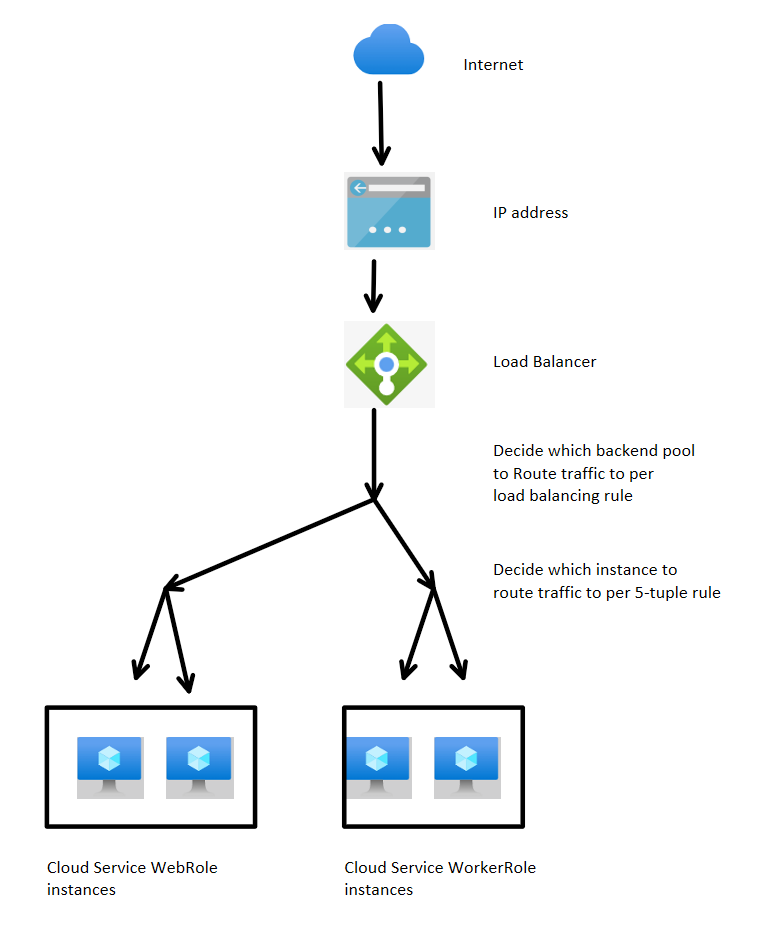
When the Load Balancer receives a client request, it takes the following actions to determine which back-end instance to route traffic to:
The Load Balancer verifies the load balancing rule that checks the front-end IP address and the port of the incoming request. In every load balancing rule, we can specify how to route traffic to back-end pools by configuring a specific combination of front-end IP address and incoming request port. Because our cloud service typically has only one public IP address, the main difference within the load balancing rule is the port configuration.
After it verifies the load balancing rule, the Load Balancer distributes the traffic by using the 5-tuple rule. This rule applies a hash of five different values:
- Source IP
- Source port
- Destination IP
- Destination port
- Protocol type
Does your cloud service handle only HTTP requests, and does it have only one public IP address? In that case, requests that are sent from the same client will always be handled by the same back-end server instance.
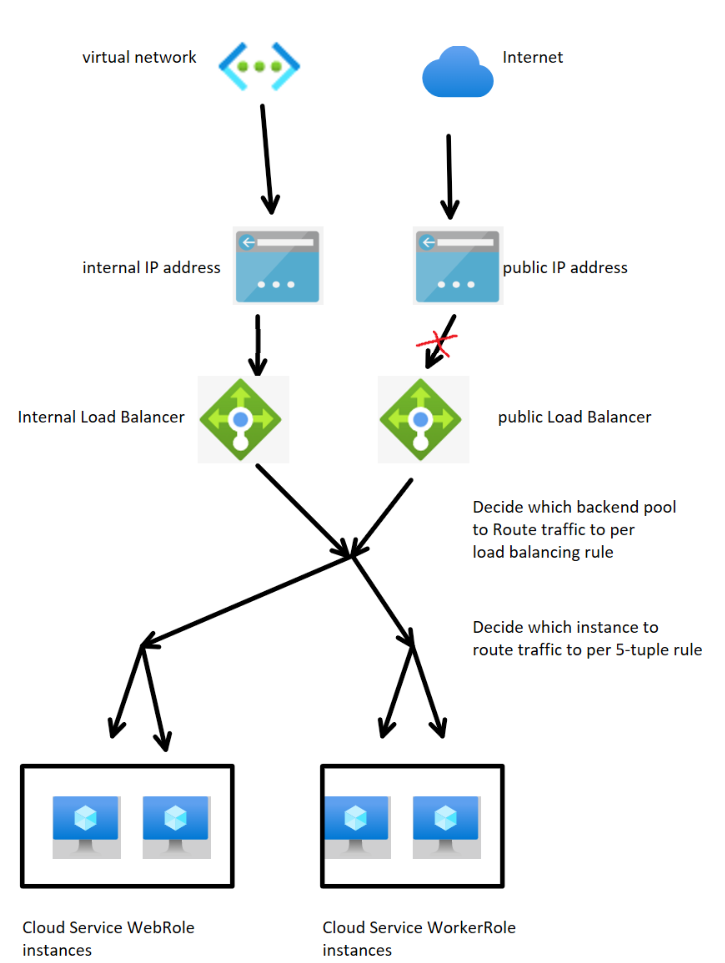
How an internal load balancer can restrict access
When you configure a cloud service to use an internal load balancer, the service will have both a public and internal load balancer. You have to change the configuration settings to make the server accessible to only a specific virtual network.
If you don't expose the public load balancer to a public IP address, internet clients won't be able to find or send requests to the public load balancer.
Here's a diagram of this cloud service-load balancer architecture.
Implement access restriction using an unexposed public load balancer
To restrict access to a single virtual network, begin by reading Get started creating an internal load balancer (classic) for cloud services. More detailed instructions are described in the following procedure:
Follow the instructions in the Step 1 subheading. This step modifies the service configuration (.cscfg) file of your cloud service to include the front-end IP address of your internal load balancer. The added XML code is a
<LoadBalancers>code block that contains only one<LoadBalancers>element that is for the internal (not public) code balancer. This block must follow the<AddressAssignments>element within the<NetworkConfiguration.element. It specifies the following items:- The name of the internal load balancer
- The front-end IP address type (that should be
private) - The internal IP address
- The subnet that the IP address is in
You don't have to make the internal load balancer's subnet the same as the subnet of the roles. However, we recommend that you use the last IP addresses within the IP range of the role subnets. Doing this enables the internal load balancer subnet to avoid the network traffic block between the subnets that the network security group uses. This setup also prevents discontinuity in the private IP address of the back-end server instances.
Follow the instructions in the Step 2 subheading. This step modifies the service definition (.csdef) file of your cloud service to include the internal load balancer's input endpoint. The added XML code is an
<InputEndpoint>element within the<Endpoints>element. This element is, itself, inside a<WebRole>or<WorkerRole>element. The added code specifies the following items:- The name of the input endpoint
- The protocol type
- The local port number to use to communicate with back-end server instances
- The port number for incoming client requests (we recommend that you use the local port number)
- The name of the internal load balancer that you specified in the service configuration (.cscfg) file
After you modify the service configuration (.cscfg) file and the service definition (.csdef) file, redeploy the project.
Verify the access restriction setup
After you redeploy the cloud service (extended support) project, you can verify the access restriction by following these steps:
In the Azure portal, search for and select Resource groups.
In the list of resource groups, select the name of the resource group that contains the cloud service. The Overview page of your resource group appears. Under the Resources tab, the following resources are listed:
- Your cloud service (extended support)
- The virtual network that has sole access to your cloud service
- The public IP address
- The public load balancer
- The internal load balancer
Under Resources, select the name of your cloud service. On the Overview page of the cloud service, make sure that the Public IP address field displays a hyperlink to your public IP address resource, and then select that link.
On the Overview page of the public IP address, under Essentials, make sure that the IP address field doesn't contain an IP address number. The blank IP address field is expected for our design so that it doesn't expose the public load balancer to a public IP address. The public load balancer must use the public IP address as the front-end IP address, but the public IP address resource won't have a real IP address configured here.
To return to the previous page, select the Resource group name, and then select the name of the internal load balancer.
In the load balancer menu pane, verify that the settings that you configured in the previous section were added correctly. To do this, specify the following selections under the Settings heading:
- Frontend IP configuration
- Backend pools
- Load balancing rules
Contact us for help
If you have questions or need help, create a support request, or ask Azure community support. You can also submit product feedback to Azure feedback community.
Feedback
Coming soon: Throughout 2024 we will be phasing out GitHub Issues as the feedback mechanism for content and replacing it with a new feedback system. For more information see: https://aka.ms/ContentUserFeedback.
Submit and view feedback for