Note
Access to this page requires authorization. You can try signing in or changing directories.
Access to this page requires authorization. You can try changing directories.
This article discusses problems that might occur when you try to perform Git clone or Git push function to an Azure DevOps repository.
Applies to: Azure DevOps Services, Azure DevOps Server
Issues while performing Git clone or Git push to the Azure DevOps repositories
When you try to clone or push a repository in GitHub, some issues with proxy configuration, SSL certificate, or credential cache might cause the Git clone operation to fail.
Troubleshooting checklist
To identify the cause of the issues, follow these steps:
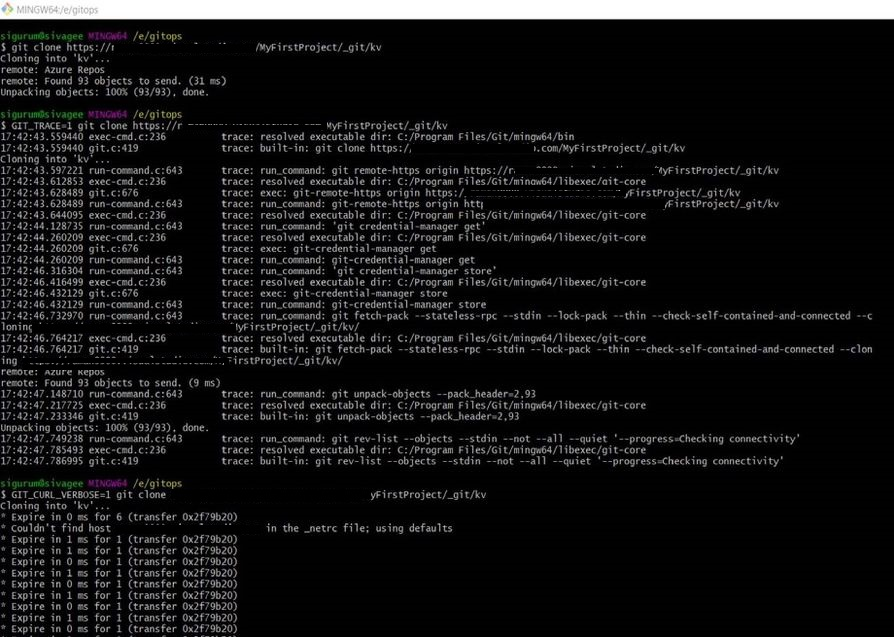
Enable verbose tracing to set the verbose level of tracing for the Git commands that you're running.
Set the following variables in sequence, and run the Git commands for each set variable to get more information on the errors.
GIT_TRACE=1GIT_TRACE_PACKET=1GIT_TRACE_CURL_NO_DATA=1GIT_CURL_VERBOSE=1
The level of tracing set for these variables provides more information similar to the following example about the errors that cause issue:
To learn more about Git environment variables, see Git Internals - Environment Variables.
Cause 1: Git can't connect through the proxy server
If you're using a proxy server but the Git configuration isn't set to connect through the proxy server, you might see the 407 or 502 error messages. This issue also occurs when the connection can't establish through the proxy server, and you see the errors similar to "unable to access <your github url>:" or "couldn't resolve host github.com".
Recommendation: Configure Git to use the proxy server
Run git config --list to get a list of all the Git configuration on the system, and check whether the proxy server is in use.
If you see multiple configuration files such as repo or system root, run the git config --list --show-origin command, and then see the path from where Git retrieves the configuration information.
If you don't find a proxy server in the configurations list, run the git config --global command to set a proxy server in configuration.
For example, http.proxy http://proxyUsername:proxyPassword@proxy.server.com:port.
To use specific proxy for some of URLs, configure the proxy URL in Git config subsection as http.<url\>.key notation: similar to the following example:
git config --global
http.https://domain.com.proxy http://proxyUsername:proxyPassword@proxy.server.com:port
If the proxy uses https, set the Git configuration with https proxy URL in the example above. Otherwise, keep http.
For more information on Git configuration, see Git Config Documentation.
Cause 2: Git uses a local self-signed certificate
If Git is using a local self-signed certificate, you might see the error "SSL certificate problem: unable to get local issuer certificate."
Recommendation 1: Disable the TLS/SSL verification
If you've installed a local Team Foundation Server (TFS) and if you want to disable the TLS/SSL verification that Git performs, run the following command:
git config --global http.sslVerify false
Recommendation 2: Configure the self-signed certificates in Git
If you want to continue the TLS/SSL verification that Git does, follow these steps to add the root certificate in the local Git:
Export the root certificate as Base-64 encoded X.509 (.CER) file by following these steps:
Open Microsoft Edge browser and enter the URL of your TFS server in the address bar such as
https://<servername>/tfs.On the address bar, select the
 icon, and then select the Connection is secure link.
Select the
 icon to open the Certification window.
In the Certification Path tab, select the upper-left certificate, which is the root certificate.
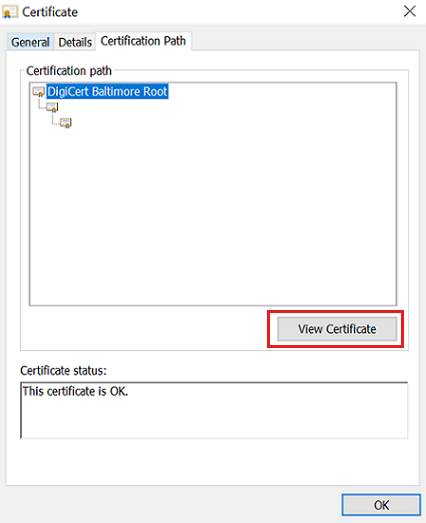
Select View Certificate to open Certificate window for the root certificate.
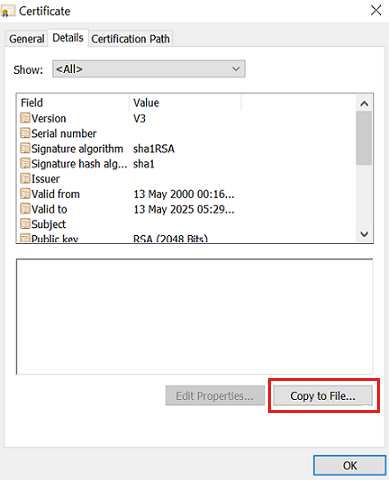
On the Details tab, select Copy to File... .
On the Certificate Export Wizard, select Next, and then select Base-64 encoded X.509 (.CER) file format to export.
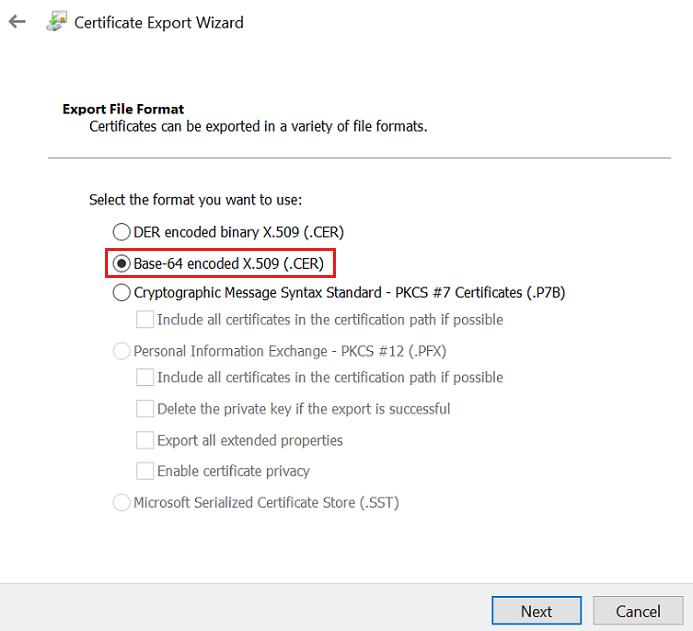
Save the root certificate on the local disk.
Configure Git to use local directory for Git certificates store by following these steps:
Go to the C:\Program Files\Git\bin path on your local disk, and then make a copy of the curl-ca-bundle.crt file.
Note
- When you install Git for Windows (
msysgit) on your device, a curl-ca-bundle.crt file is stored in your Program Files directory. This file is the root certificate store for git.exe that contains all the certificates that Git trusts. - The curl-ca-bundle.crt file, which stores on a per-device basis, is private to your local Windows client. The text file has UNIX (
\n) line endings. - In the Git for Windows 2.x series, the path will change to C:\Program Files (x86)\Git\mingw32\ssl\certs\ca-bundle.crt or C:\Program Files\Git\mingw64\ssl\certs\ca-bundle.crt. If you are using a 32-bit Windows client, you can fix the folder path such that the Program Files part doesn't appear with x86.
- When you install Git for Windows (
Copy the curl-ca-bundle.crt file to your user profile directory (C:\Users\<yourname>). Or run a copy command similar to the
copy "C:\Program Files (x86)\Git\bin\curl-ca-bundle.crt" C:\Users\<yourname>example.Run the following command to configure Git to use local copy of certificate store from your Windows client:
git config --global http.sslCAInfo C:/Users/<yourname>/curl-ca-bundle.crt
Add the exported root certificate to the local copy of Git certificate store by following these steps:
Open the exported root certificate in Notepad, and then copy entire contents on to the clipboard.
Open the curl-ca-bundle.crt file by going to the C:/Users/<yourname>/curl-ca-bundle.crt path in a text editor.
Tip
You can use the unix2dos tool to change the line endings in the file from \n to \r\n and be able to open the file in Notepad.
Add an entry for the root certificate at the end, and then paste the certificate contents into the curl-ca-bundle.crt file.
Save the curl-ca-bundle.crt file.
Perform the cloning operation to verify if the SSL error is resolved.
Cause 3: Authentication error or credential cache issues
If your account name or domain password has changed, or you're getting an authentication error, there could be authentication and credential cache issues.
Recommendation: Reset the Git credentials manager (GCM)
To resolve the authentication error or credentials cache issues, begin by following the Troubleshooting checklist to get the error information, and then follow these steps:
Run the
git config --listcommand, and then check if you're using Git Credentials Manager (GCM). If thecredential.helperis set to manager, GCM is in use.Follow these steps to reset the GCM:
- Run the
git config --global --unset credential.helpercommand to unset the GCM. - Run the
git config --global credential.helper managercommand to set the GCM back.
Alternatively, you can follow these steps to remove cached credentials:
On Windows, Git credentials are stored in the Windows Credential Manager. You can access it in the following ways:
Using GUI (Windows Credential Manager):
- Open Control Panel and select User Accounts > Credential Manager.
- Select Windows Credentials.
- Look for entries related to
git:https://dev.azure.com/<orgname>or your Git provider and manage them. For github, it's likegit:https://github.com/.
Using command line:
- Run
cmdkey /list | findstr "git"to list Git credentials. - Run
cmdkey /delete:https://dev.azure.com/<orgname>to delete the credentials. - If you need to reset credentials and re-enter them, run
git credential reject https://dev.azure.com/<orgname>.
- Run
On MacOS:
git credential reject https://dev.azure.com/<orgname>When you run this command, you're instructing Git to invalidate or remove the stored credentials for the specified URL. This means that the next time you try to access the repository at that URL, Git will prompt you to enter your credentials again. This is useful if you need to reset your credentials.
git credential approve https://dev.azure.com/<orgname>to approve the credentials.This command is used to manually store and approve credentials for future use, which ensures that you won't be prompted for credentials each time.
- Run the
Perform the cloning operation to verify if the issue is resolved.
Note
Depending on the version of Git for Windows, the credential.helper value is different. See the following table for details:
| Versions of Git for Windows | Git Credential Manager for Windows | Git Credential Manager Core | Git Credential Manager (Renamed from GCM Core) |
|---|---|---|---|
| 2.27 and earlier | manager |
||
| 2.28 to 2.33.0 | manager (optional) |
manager-core(optional) |
|
| 2.33.1 to 2.34.0 | manager-core |
||
| 2.34.1 to 2.38 | manager-core |
||
| 2.39 and later | manager |