Azure VM Guest OS firewall is blocking inbound traffic
Applies to: ✔️ Windows VMs
This article discusses how to fix the Remote Desktop Portal (RDP) issue that occurs if the guest operating system firewall blocks inbound traffic.
Symptoms
You cannot use an RDP connection to connect to an Azure virtual machine (VM). From Boot diagnostics -> Screenshot, it shows that the operating system is fully loaded at the Welcome screen (Ctrl+Alt+Del).
Cause
Cause 1
The RDP rule is not set up to allow the RDP traffic.
Cause 2
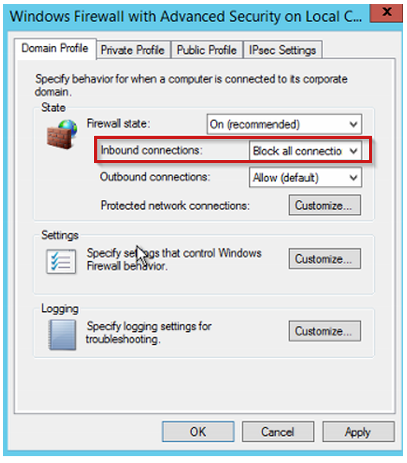
The guest system firewall profiles are set up to block all inbound connections, including the RDP traffic.

Solution
Before you follow these steps, take a snapshot of the system disk of the affected VM as a backup. For more information, see Snapshot a disk.
To fix the issue, use one of the methods in How to use remote tools to troubleshoot Azure VM issues to connect to the VM remotely, and then edit the guest operating system firewall rules to Allow RDP traffic.
Online troubleshooting
Connect to the Serial Console, and then open a PowerShell instance. If the Serial Console is not enabled on the VM, go to "Repair the VM Offline.
Mitigation 1
If Azure Agent is installed and working correctly on the VM, you can use the "Reset configuration only" option under Help > Reset password on the VM menu.
Running this recovery option does the following:
Enables an RDP component if it's disabled.
Enables all Windows firewall profiles.
Make sure that the RDP rule is turned on in Windows Firewall.
If the previous steps don't work, manually reset the firewall rule. To do this, query all the rules that contain the name "Remote Desktop" by running the following command:
netsh advfirewall firewall show rule dir=in name=all | select-string -pattern "(Name.*Remote Desktop)" -context 9,4 | moreIf the RDP port was set to any other port other than 3389, you have to find any custom rule that might have been created and set to this port. To query for all the inbound rules that have a custom port, run the following command:
netsh advfirewall firewall show rule dir=in name=all | select-string -pattern "(LocalPort.*<CUSTOM PORT>)" -context 9,4 | more
If you see that the rule is disabled, enable it. To open a whole group, such as the built-in Remote Desktop group, run the following command:
netsh advfirewall firewall set rule group="Remote Desktop" new enable=yesOtherwise, to open the specific Remote Desktop (TCP-In) rule, run the following command:
netsh advfirewall firewall set rule name="<CUSTOM RULE NAME>" new enable=yesFor troubleshooting, you can turn the firewall profiles to OFF:
netsh advfirewall set allprofiles state offAfter you finish troubleshooting and setting the firewall correctly, re-enable the firewall.
Note
You don't have to restart the VM to apply these changes.
Try to make an RDP connection to access the VM.
Mitigation 2
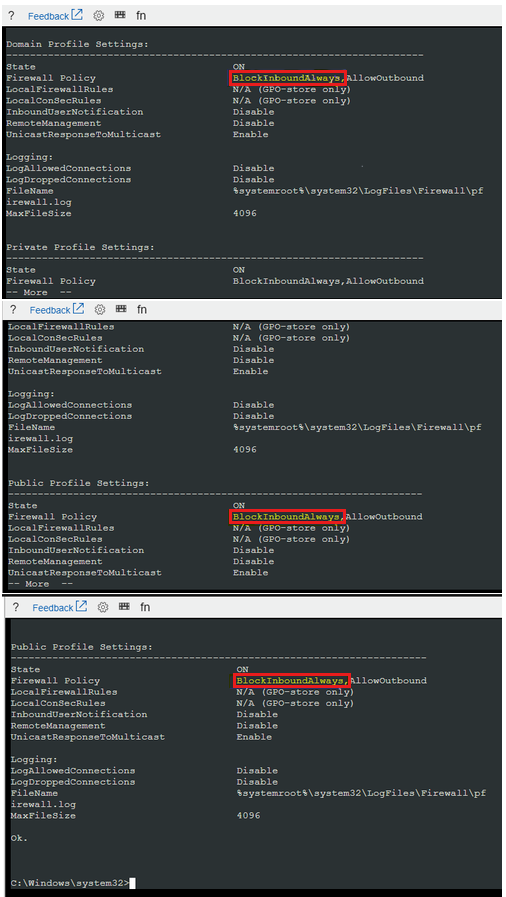
Query the firewall profiles to determine whether the inbound firewall policy is set to BlockInboundAlways:
netsh advfirewall show allprofiles | more
Note
The following guidelines apply to the firewall policy, depending on how it's set up:
- BlockInbound: All inbound traffic will be blocked unless you have a rule in effect to allow that traffic.
- BlockInboundAlways: All firewall rules will be ignored and all traffic will be blocked.
Set the DefaultInboundAction to not always blocked traffic. To do this, run the following command:
netsh advfirewall set allprofiles firewallpolicy blockinbound,allowoutboundQuery the profiles again to make sure that your change was made successfully. To do this, run the following command:
netsh advfirewall show allprofiles | moreNote
You don't have to restart the VM to apply the changes.
Make sure that you add the inbound rule for RDP connection.
Try again to access your VM through RDP.
Offline Mitigations
Start a Remote Desktop connection to the recovery VM.
Make sure that the disk is flagged as Online in the Disk Management console. Note the drive letter that is assigned to the attached system disk.
Mitigation 1
See How to Enable-Disable a Firewall rule on a Guest OS.
Mitigation 2
Start a Remote Desktop connection to the recovery VM.
After the system disk is attached to the recovery VM, make sure that the disk is flagged as Online in the Disk Management console. Note the drive letter that is assigned to the attached OS disk.
Open an elevated PowerShell instance, and then run the following script:
REM Backup the registry prior doing any change robocopy f:\windows\system32\config f:\windows\system32\config.BACK /MT REM Mount the hive reg load HKLM\BROKENSYSTEM f:\windows\system32\config\SYSTEM REM Delete the keys to block all inbound connection scenario REG DELETE "HKLM\BROKENSYSTEM\ControlSet001\services\SharedAccess\Parameters\FirewallPolicy\DomainProfile" /v DoNotAllowExceptions REG DELETE "HKLM\BROKENSYSTEM\ControlSet001\services\SharedAccess\Parameters\FirewallPolicy\PublicProfile" /v DoNotAllowExceptions REG DELETE "HKLM\BROKENSYSTEM\ControlSet001\services\SharedAccess\Parameters\FirewallPolicy\StandardProfile" /v DoNotAllowExceptions REG DELETE "HKLM\BROKENSYSTEM\ControlSet002\services\SharedAccess\Parameters\FirewallPolicy\DomainProfile" /v DoNotAllowExceptions REG DELETE "HKLM\BROKENSYSTEM\ControlSet002\services\SharedAccess\Parameters\FirewallPolicy\PublicProfile" /v DoNotAllowExceptions REG DELETE "HKLM\BROKENSYSTEM\ControlSet002\services\SharedAccess\Parameters\FirewallPolicy\StandardProfile" /v DoNotAllowExceptions REM Unmount the hive reg unload HKLM\BROKENSYSTEMCheck whether the issue is resolved.
Contact us for help
If you have questions or need help, create a support request, or ask Azure community support. You can also submit product feedback to Azure feedback community.