Applies to: ✔️ Linux VMs
This article provides instructions to configure custom DNS servers and search domains on Microsoft Azure Linux virtual machines (VMs).
Note
This article uses DNS servers 1.2.3.4 and 5.6.7.8 and search domain "test.example.com" as examples. Replace these values with your actual DNS server addresses and search domain path.
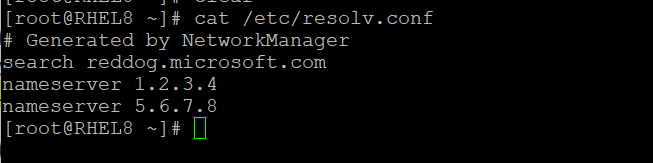
The initial configuration of the /etc/resolv.conf file in an Azure Linux VM is as shown in the following screenshot.

Configure custom DNS servers at the Azure virtual network or network interface level. For more information, see Steps to change DNS servers at virtual network/network interface level.
Note
In Azure, you can set custom DNS servers at the virtual network level or the network interface level. If you set custom DNS servers at the network interface level, it will override the custom DNS servers configuration in the virtual network.
Restart the NetworkManager service, and then check the /etc/resolv.conf file. The file should contain the DNS servers that you configured in the step 2.
sudo systemctl restart NetworkManager
The following screenshot shows an example of /etc/resolv.conf after you configure the DNS servers.
Run the following command to determinate whether the DNS servers are successfully added to the network interface:
sudo systemd-resolve --status
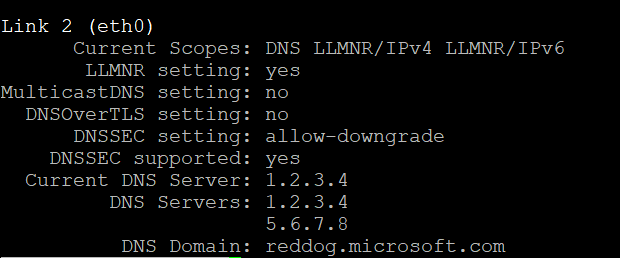
The following screenshot shows an example of the network interface after you configure the DNS servers.
Configure search domains
To change the search domain, add the domain name as follows in /etc/dhcp/dhclient.conf. To specify multiple search domains, separate them by using commas (for example: "test.example.com, test1.example.com, test2.example.com"):
append domain-search "test.example.com";
Example of /etc/dhcp/dhclient.conf file after you add the search domain:

Restart the NetworkManager service, and then check whether the search domain is updated in /etc/resolv.conffile:
sudo systemctl restart NetworkManager
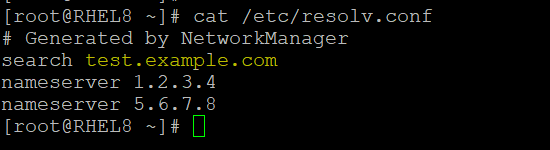
The following screenshot shows an example of /etc/resolv.conf file after you configure the search domain.
Run the following command to determinate whether the search domain is successfully added to the network interface:
sudo systemd-resolve --status
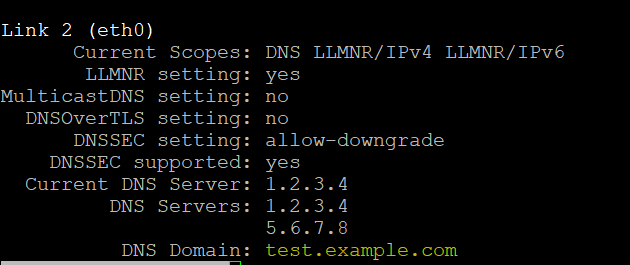
The following screenshot shows an example of the network interface after you configure the search domain.
Guidance for configuring custom DNS on RHEL 10 is currently being developed in collaboration with Red Hat. This section will be updated once validated instructions are available. Please check back for the latest information.
The initial configuration of the /etc/resolv.conf file in an Azure Ubuntu VM is as shown in the following screenshot.
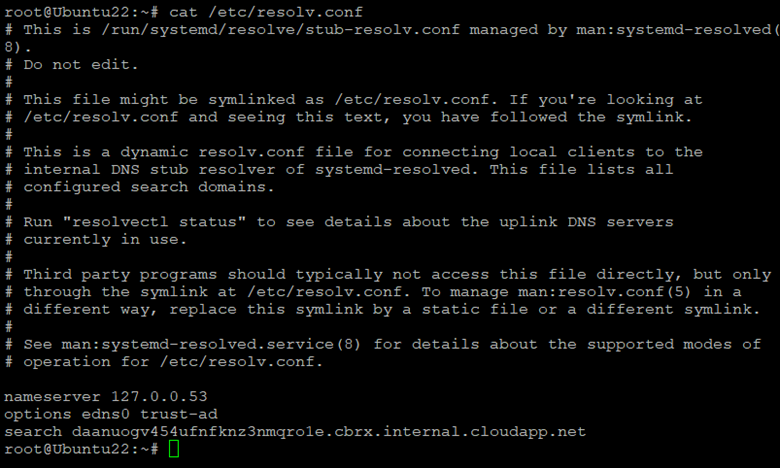
Starting with Ubuntu 20.04, resolv.conf file is a symbolic link to /run/systemd/resolve/stub-resolv.conf. For more information about this stub file, significance and usage of different resolv.conf files, and systemd-resolved service, see systemd-resolved

Configure custom DNS servers at either the Azure virtual network or network interface level. For more information, see Steps to change DNS servers at virtual network/network interface level.
Note
In Azure, you can set custom DNS servers at the virtual network level or the network interface level. If you set custom DNS servers at the network interface level, this will override the custom DNS servers configuration in the virtual network.
Run the following command to apply the custom DNS configuration:
sudo netplan apply
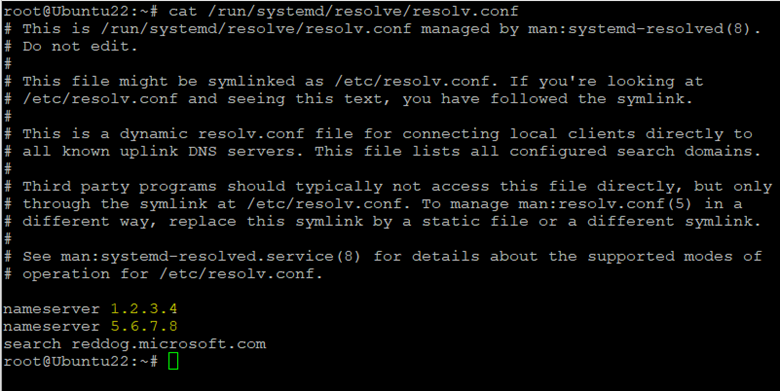
Verify the contents of /run/systemd/resolve/resolv.conf file. It should list the DNS servers configured in step 3.
The following screenshot shows an example of /run/systemd/resolve/resolv.conf after configuring custom DNS servers.
Since /etc/resolv.conf is still linked to stub file, unlink and create a new link to /run/systemd/resolve/resolv.conf, so that DNS queries the updated custom DNS servers.
 unlink /etc/resolv.conf
 ln -s /run/systemd/resolve/resolv.conf /etc/resolv.conf
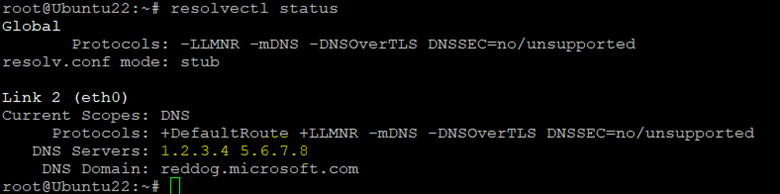
The following screenshot shows an example output of the resolvecl status command:
Configure search domains
Use a text editor (such as Nano or Vim) to create a YAML configuration file in the /etc/netplan/ for the DNS servers. For example:
sudo nano /etc/netplan/custom-dns-01.yaml
or
sudo vi /etc/netplan/custom-dns-01.yaml
Add the following configuration, and then save and exit. If you’re use Nano, press CTRL + O to save and CTRL + X to exit. If you use Vim, press ESC, type :wq, and then press Enter to save and exit.
network:
    ethernets:
      eth0:
        nameservers:
          search: [ test.example.com ]
The configuration might conatin multiple search domains separated by commas. For example: '["test.example.com", "test1.example.com", "test2.example.com"]`.
Run the following command to apply the search domain changes:
sudo netplan apply
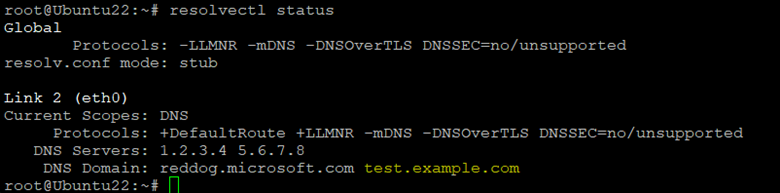
View the resolvectl status to determinate whether the search domain is added successfully:
sudo resolvectl status
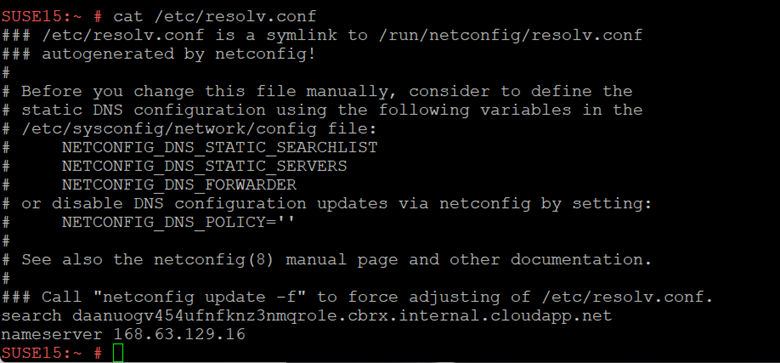
The initial configuration of the /etc/resolv.conf file in an Azure SLES VM is as shown in the following screenshot.
Configure custom DNS servers at the Azure virtual network or network interface level. For more information, see Steps to change DNS servers at virtual network/network interface level.
Note
In Azure, you can set custom DNS servers at the virtual network level or the network interface level. If you set custom DNS servers at the network interface level, this will override the custom DNS servers configuration in the virtual network.
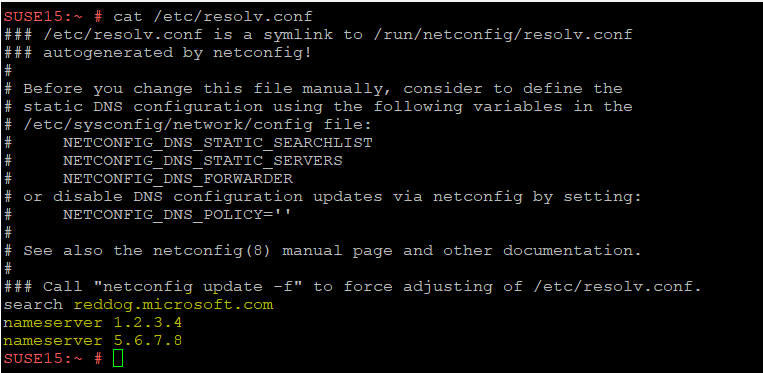
Restart the wicked.service, and then check the /etc/resolv.conf file. The file should contain the DNS servers that you configured in step 2:
sudo systemctl restart wicked.service
Configure search domains
Edit the /etc/sysconfig/network/config file.
Add a line for the search domain, as shown in the following example:
NETCONFIG_DNS_STATIC_SEARCHLIST="test.example.com"
Multiple search domains can be declared by using a space separator, as follows:
NETCONFIG_DNS_STATIC_SEARCHLIST="test.example.com test1.example.com"
Restart wicked.service or update netconfig, and then check whether the search domain is updated in the /etc/resolv.conf file.
sudo systemctl restart wicked.service
or
sudo netconfig update
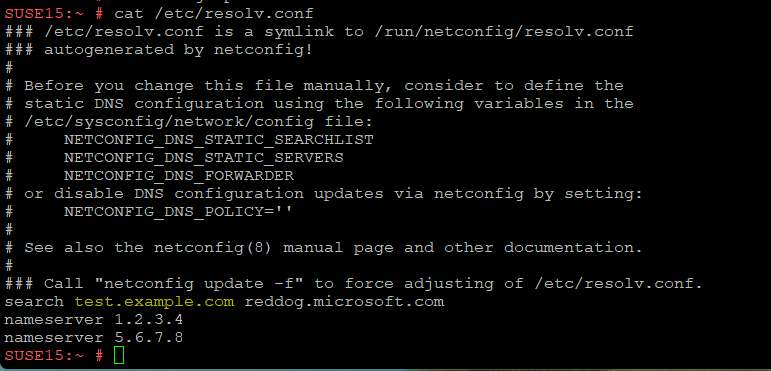
The following screenshot is an example of the /etc/resolv.conf file after you configure the search domains.
If you have questions, you can ask Azure community support. You can also submit product feedback to Azure feedback community.