Applies to: ✔️ Linux VMs
Note
CentOS referenced in this article is a Linux distribution and will reach End Of Life (EOL). Consider your use and plan accordingly. For more information, see CentOS End Of Life guidance.
Summary
This article discusses how to configure multiple virtual network interfaces in Azure Linux virtual machines (VMs) that run the most common Linux distributions.
You can create an Azure VM that has multiple network interfaces attached to it. A common scenario is to have different subnets for front-end and back-end connectivity, or a network that's dedicated to a monitoring or backup solution.
This article provides the required configuration for multiple network interfaces to work in an Azure Linux VM that's based on the following sample scenario:
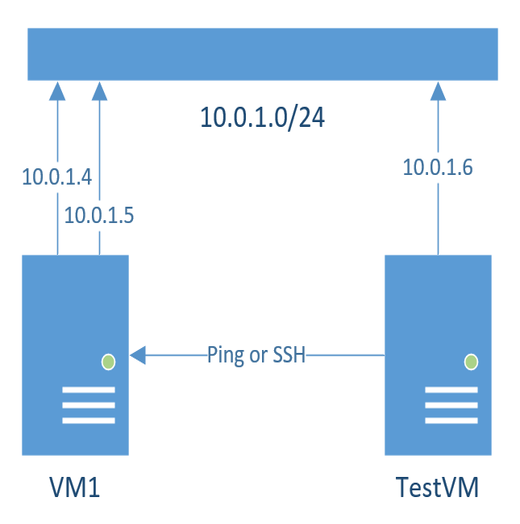
- The VM has two or more network interfaces in the same subnet.
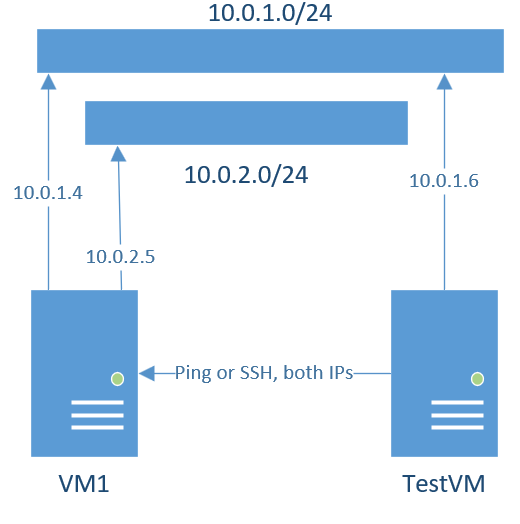
- The VM has two or more network interfaces in different subnets but in the same Virtual Network (VNET).
For details, see the following screenshots:
In each scenario, the connectivity can be tested from any VM in the same VNET.
Important
This same process could also be followed in VMs with more than two NICs.
When you add multiple network interfaces to a Linux VM, you have to create routing rules. These rules enable the VM to send and receive traffic that belongs to a specific network interface. Otherwise, traffic can't be processed correctly. For example, traffic that belongs to eth1 can't be processed correctly by the defined default route.
The following sections provides the required configuration for two network interfaces to work in Linux VMs that run the most common Linux distributions.
Note
Run all the commands in the following sections by using root privileges (by switching to the root or by using the sudo command utility).
In each section, assume that the VM has two network interfaces that have any of the following settings:
Add two routing tables to the /etc/iproute2/rt_tables file by running the following commands (you need one entry per NIC):
sudo echo "200 eth0-rt" >> /etc/iproute2/rt_tables
sudo echo "201 eth1-rt" >> /etc/iproute2/rt_tables
If more network interfaces are attached to the VM, add extra routing tables (for example, 202 eth2-rt, 203 eth3-rt, and so on).
Make sure a configuration file exists for each network interface in the /etc/sysconfig/network-scripts/ directory. You can create new network interface configuration files based on the ifcfg-eth0 configuration file (modify the DEVICE line and remove the DHCP_HOSTNAME and HWADDR lines from the new file). To do this, run the following commands:
sudo cat /etc/sysconfig/network-scripts/ifcfg-eth0 > /etc/sysconfig/network-scripts/ifcfg-eth1
sudo sed -i 's/DEVICE=eth0/DEVICE=eth1/' /etc/sysconfig/network-scripts/ifcfg-eth1
sudo sed -i '/DHCP_HOSTNAME/d' /etc/sysconfig/network-scripts/ifcfg-eth1
sudo sed -i '/HWADDR/d' /etc/sysconfig/network-scripts/ifcfg-eth1
To make the change persistent and applied during network stack activation, edit the files /etc/sysconfig/network-scripts/ifcfg-eth0 and /etc/sysconfig/network-scripts/ifcfg-eth1 (ifcfg-eth2, ifcfg-eth3, and so on, if the VM has more than two network interfaces) and change the value of NM_CONTROLLED from yes to no. To do this, run the following commands:
sudo cp -rp /etc/sysconfig/network-scripts/ifcfg-eth0 /tmp/ifcfg-eth0.bkp
sudo cp -rp /etc/sysconfig/network-scripts/ifcfg-eth1 /tmp/ifcfg-eth1.bkp
sudo sed -i 's/NM_CONTROLLED=yes/NM_CONTROLLED=no/' /etc/sysconfig/network-scripts/ifcfg-eth0
sudo sed -i 's/NM_CONTROLLED=yes/NM_CONTROLLED=no/' /etc/sysconfig/network-scripts/ifcfg-eth1
Note
Verify that the NM_CONTROLLED=no line is added to both the /etc/sysconfig/network-scripts/ifcfg-eth0 and /etc/sysconfig/network-scripts/ifcfg-eth1 files by using the cat /etc/sysconfig/network-scripts/ifcfg-eth* command. If the line isn't in the files, add it manually by using the sudo echo "NM_CONTROLLED=no" >> /etc/sysconfig/network-scripts/ifcfg-eth0 and sudo echo "NM_CONTROLLED=no" >> /etc/sysconfig/network-scripts/ifcfg-eth1 commands.
After modifying this configuration, restart network services to apply the changes by running the following command:
sudo systemctl restart network
Create corresponding rule and route files by using any text editor (in the following examples, the vi editor is used), and add appropriate rules and routes to each file. Use the following steps to create one set of rule-eth# and route-eth# files per network interface. Replace the IP address and subnet information accordingly in every step. If you have more network interfaces, create the same set of rule-eth# and route-eth# files for each interface by using the corresponding IP address, network, and gateway details.
To apply the changes, run the following command to restart the network service:
sudo systemctl restart network
The routing rules are now correctly set, and connectivity should work from any network interface. You can test the connectivity by using Secure Shell (SSH) or pinging both IPs from a VM in the same VNET.
Verify that the current routes and rules are loaded by using the following commands:
sudo ip route show
sudo ip rule show
Important
If you still have issues communicating with the second NIC, restart the VM by using the sudo reboot command, repeat step 7, and test the connectivity again.
By default, policy routing isn't installed in Red Hat Enterprise Linux (RHEL)/CentOS 8.x. To configure multiple network interfaces, install and enable the policy routing. To do this, run the following commands:
sudo yum install NetworkManager-dispatcher-routing-rules -y
sudo systemctl enable NetworkManager-dispatcher.service
sudo systemctl start NetworkManager-dispatcher.service
In RHEL/CentOS 8.x, the NM_CONTROLLED setting is set to yes in each network configuration file (/etc/sysconfig/network-scripts/ifcfg-eth#) by default. To avoid issues, make sure this setting isn't set to no in your specific configuration file. Also, make sure that a corresponding network configuration file is created per each network interface. The following is the sample configuration for network configuration files:
/etc/sysconfig/network-scripts/ifcfg-eth0:
sudo cat /etc/sysconfig/network-scripts/ifcfg-eth0
DEVICE=eth0
ONBOOT=yes
BOOTPROTO=dhcp
TYPE=Ethernet
USERCTL=no
PEERDNS=yes
IPV6INIT=no
PERSISTENT_DHCLIENT=yes
/etc/sysconfig/network-scripts/ifcfg-eth1:
sudo cat /etc/sysconfig/network-scripts/ifcfg-eth1
DEVICE=eth1
ONBOOT=yes
BOOTPROTO=dhcp
TYPE=Ethernet
USERCTL=no
PEERDNS=yes
IPV6INIT=no
PERSISTENT_DHCLIENT=yes
Run the following commands to add two routing tables to the /etc/iproute2/rt_tables file:
sudo echo "200 eth0-rt" >> /etc/iproute2/rt_tables
sudo echo "201 eth1-rt" >> /etc/iproute2/rt_tables
If more network interfaces are attached to the VM, add extra routing tables (for example, 202 eth2-rt, 203 eth3-rt, and so on).
Create the corresponding rules and routes configuration files for each of your NICs, and add the appropriate rules and routes to each. To create one set of rule-eth# and route-eth# files per network interface, follow the steps below. Replace the IP address and subnet information accordingly in every step. If you have more network interfaces, create the same set of rule-eth# and route-eth# files for each interface by using the corresponding IP and subnet details.
To apply the changes, restart the network service by running the following command:
sudo systemctl restart NetworkManager
The routing rules are now correctly set, and connectivity should work from any network interface. You can test the connectivity by using Secure Shell (SSH) or pinging both IPs from a VM in the same VNET.
Verify that the current routes and rules are loaded by using the following commands:
sudo ip route show
sudo ip rule show
Important
If you still don't have connectivity to the second NIC, restart the VM by using the sudo reboot command, repeat step 6, and test the connectivity again.
Add two routing tables to the /etc/iproute2/rt_tables file by running the following commands:
sudo echo "200 eth0-rt" >> /etc/iproute2/rt_tables
sudo echo "201 eth1-rt" >> /etc/iproute2/rt_tables
If more network interfaces are attached to the VM, add extra routing tables (for example, 202 eth2-rt, 203 eth3-rt, and so on).
If Cloud-Init automation is set (by default, it's set in the Azure Ubuntu images), make sure that the network CI automation is disabled so that the /etc/netplan/50-cloud-init.yaml file doesn't get overwritten every time the system is restarted.
Create the /etc/cloud/cloud.cfg.d/99-disable-network-config.cfg file by using the following command and content:
sudo vi /etc/cloud/cloud.cfg.d/99-disable-network-config.cfg
network:
   config: disabled
Modify the netplan configuration file /etc/netplan/50-cloud-init.yaml by using any text editor, and include the following routes and policy-routing blocks for each network interface section:
routes:
 - to: <subnet>/24
   via: <gatewayIP>
   metric: 200
   table: 201
 - to: 0.0.0.0/0
   via: <gatewayIP>
   table: <routingTableID>
routing-policy:
 - from: <NICIP>/32
   table: <routingTableID>
 - to: <NICIP>/32
   table: <routingTableID>
Replace the subnet, MAC address, and IP address information for each network interface (eth0 and eth1) accordingly. Make sure the 32-bit value is preserved in the routing-policy block.
Here's the sample configuration file that uses the given sample details:
sudo vi /etc/netplan/50-cloud-init.yaml
Two NICs in the same subnet:
network:
    ethernets:
        eth0:
            dhcp4: true
            dhcp4-overrides:
                route-metric: 100
            dhcp6: false
            match:
                driver: hv_netvsc
                macaddress: 00:0d:3a:9d:60:e6
            set-name: eth0
            routes:
             - to: 10.0.1.0/24
               via: 10.0.1.1
               metric: 200
               table: 200
             - to: 0.0.0.0/0
               via: 10.0.1.1
               table: 200
            routing-policy:
             - from: 10.0.1.4/32
               table: 200
             - to: 10.0.1.4/32
               table: 200
        eth1:
            dhcp4: true
            dhcp4-overrides:
                route-metric: 200
            dhcp6: false
            match:
                driver: hv_netvsc
                macaddress: 00:0d:3a:9a:25:5f
            set-name: eth1
            routes:
             - to: 10.0.1.0/24
               via: 10.0.1.1
               metric: 200
               table: 201
             - to: 0.0.0.0/0
               via: 10.0.1.1
               table: 201
            routing-policy:
             - from: 10.0.1.5/32
               table: 201
             - to: 10.0.1.5/32
               table: 201
      version: 2
Two NICs in different subnets but in the same VNET:
network:
    ethernets:
        eth0:
            dhcp4: true
            dhcp4-overrides:
                route-metric: 100
            dhcp6: false
            match:
                driver: hv_netvsc
                macaddress: 00:0d:3a:9d:60:e6
            set-name: eth0
            routes:
             - to: 10.0.1.0/24
               via: 10.0.1.1
               metric: 200
               table: 200
             - to: 0.0.0.0/0
               via: 10.0.1.1
               table: 200
            routing-policy:
             - from: 10.0.1.4/32
               table: 200
             - to: 10.0.1.4/32
               table: 200
        eth1:
            dhcp4: true
            dhcp4-overrides:
                route-metric: 200
            dhcp6: false
            match:
                driver: hv_netvsc
                macaddress: 00:0x:3x:9x:03:5f
            set-name: eth1
            routes:
             - to: 10.0.2.0/24
               via: 10.0.2.1
               metric: 200
               table: 201
             - to: 0.0.0.0/0
               via: 10.0.2.1
               table: 201
            routing-policy:
             - from: 10.0.2.5/32
               table: 201
             - to: 10.0.2.5/32
               table: 201
      version: 2
Important
If you use any of the previous configuration file samples, make sure the MAC address value is replaced accordingly. You can get the corresponding NIC MAC address from the output of the ip a | grep ether | awk '{print $2}' command.
Apply the changes by running the following command:
sudo netplan apply
To test the connectivity, ping or SSH both IPs from another VM in the same VNET:
ping 10.0.1.4
ping 10.0.1.5
Add two routing tables to the /etc/iproute2/rt_tables file by running the following commands:
sudo echo "200 eth0-rt" >> /etc/iproute2/rt_tables
sudo echo "201 eth1-rt" >> /etc/iproute2/rt_tables
If more network interfaces are attached to the VM, add extra routing tables (for example, 202 eth2-rt, 203 eth3-rt, and so on).
Create the scripts that have the routes and rules for each network interface in the /etc/sysconfig/network/scripts/ directory by using any text editor (in the following commands, the vi text editor is used).
/etc/sysconfig/network/scripts/ifup-route.eth0
sudo vi /etc/sysconfig/network/scripts/ifup-route.eth0
#!/bin/bash

/sbin/ip route add default via 10.0.1.1 dev eth0 table eth0-rt
/sbin/ip rule add from 10.0.1.4/32 table eth0-rt
/sbin/ip rule add to 10.0.1.4/32 table eth0-rt
/etc/sysconfig/network/scripts/ifup-route.eth1
sudo vi /etc/sysconfig/network/scripts/ifup-route.eth1
Two NICs in the same subnet:
#!/bin/bash

/sbin/ip route add 10.0.1.0/24 dev eth1 table eth1-rt
/sbin/ip route add default via 10.0.1.1 dev eth1 table eth1-rt
/sbin/ip rule add from 10.0.1.5/32 table eth1-rt
/sbin/ip rule add to 10.0.1.5/32 table eth1-rt
Two NICs in different subnets but in the same VNET:
#!/bin/bash

/sbin/ip route add 10.0.2.0/24 dev eth1 table eth1-rt
/sbin/ip route add default via 10.0.2.1 dev eth1 table eth1-rt
/sbin/ip rule add from 10.0.2.5/32 table eth1-rt
/sbin/ip rule add to 10.0.2.5/32 table eth1-rt
Adjust the network and IP address information accordingly, and preserve the 32-bit value. If there are more than two NICs, make sure that the corresponding IP rules and IP routes are included for each one.
Provide execution permissions for both scripts by using the following commands:
sudo chmod +x /etc/sysconfig/network/scripts/ifup-route.eth0
sudo chmod +x /etc/sysconfig/network/scripts/ifup-route.eth1
Modify the network configuration files for both eth0 and eth1 (/etc/sysconfig/network/ifcfg-eth#) by using any text editor, and include the following line in both files to point to the corresponding script:
In the network configuration file /etc/sysconfig/network/ifcfg-eth0:
POST_UP_SCRIPT='compat:suse:/etc/sysconfig/network/scripts/ifup-route.eth0'
In the network configuration file /etc/sysconfig/network/ifcfg-eth1:
POST_UP_SCRIPT='compat:suse:/etc/sysconfig/network/scripts/ifup-route.eth1'
Here's a sample of both configuration files:
sudo cat /etc/sysconfig/network/ifcfg-eth0
BOOTPROTO='dhcp'
DHCLIENT6_MODE='managed'
MTU=''
REMOTE_IPADDR=''
STARTMODE='onboot'
CLOUD_NETCONFIG_MANAGE='yes'
POST_UP_SCRIPT='compat:suse:/etc/sysconfig/network/scripts/ifup-route.eth0'
sudo cat /etc/sysconfig/network/ifcfg-eth1
STARTMODE='hotplug'
BOOTPROTO='dhcp'
DHCLIENT_SET_DEFAULT_ROUTE='yes'
DHCLIENT_ROUTE_PRIORITY='10100'
CLOUD_NETCONFIG_MANAGE='yes'
POST_DOWN_SCRIPT='compat:suse:cloud-netconfig-cleanup'
POST_UP_SCRIPT='compat:suse:/etc/sysconfig/network/scripts/ifup-route.eth1'
If the /etc/sysconfig/network/ifcfg-eth1 file doesn't exist, create it by using the content from the /etc/sysconfig/network/ifcfg-eth0 file. Make sure the POST_UP_SCRIPT is adjusted to use the corresponding script. To do this, execute the following command:
sudo cat /etc/sysconfig/network/ifcfg-eth0 > /etc/sysconfig/network/ifcfg-eth1
To apply the changes, restart the network service:
sudo systemctl restart network
The routing rules are now correctly set, and connectivity should work from any network interface. You can test the connectivity by using Secure Shell (SSH) or pinging both IPs from a VM in the same VNET.
Verify that the current routes and rules are loaded by using the following commands:
sudo ip route show
sudo ip rule show
Important
If you still don't have connectivity to the second NIC, restart the VM by using the sudo reboot command, repeat step 6, and test the connectivity again.
Add two routing tables to the /etc/iproute2/rt_tables file by running the following commands:
sudo echo "200 eth0-rt" >> /etc/iproute2/rt_tables
sudo echo "201 eth1-rt" >> /etc/iproute2/rt_tables
If more network interfaces are attached to the VM, add extra routing tables (for example, 202 eth2-rt, 203 eth3-rt, and so on).
Create or modify the configuration file /etc/network/interfaces.d/50-cloud-init with any text editor.
sudo vi /etc/network/interfaces.d/50-cloud-init
Use the following configuration:
Two NICs in the same subnet:
auto lo
iface lo inet loopback

auto eth0
iface eth0 inet dhcp
metric 100
up /usr/sbin/ip route add default via 10.0.1.1 dev eth0 table eth0-rt
up /usr/sbin/ip rule add from 10.0.1.4/32 table eth0-rt
up /usr/sbin/ip rule add to 10.0.1.4/32 table eth0-rt

auto eth1
iface eth1 inet dhcp
metric 200
up /usr/sbin/ip route add 10.0.1.0/24 dev eth1 table eth1-rt
up /usr/sbin/ip route add default via 10.0.1.1 dev eth1 table eth1-rt
up /usr/sbin/ip rule add from 10.0.1.5/32 table eth1-rt
up /usr/sbin/ip rule add to 10.0.1.5/32 table eth1-rt
Two NICs in different subnets but in the same VNET:
auto lo
iface lo inet loopback

auto eth0
iface eth0 inet dhcp
metric 100
up /usr/sbin/ip route add default via 10.0.1.1 dev eth0 table eth0-rt
up /usr/sbin/ip rule add from 10.0.1.4/32 table eth0-rt
up /usr/sbin/ip rule add to 10.0.1.4/32 table eth0-rt

auto eth1
iface eth1 inet dhcp
metric 200
up /usr/sbin/ip route add 10.0.2.0/24 dev eth1 table eth1-rt
up /usr/sbin/ip route add default via 10.0.2.1 dev eth1 table eth1-rt
up /usr/sbin/ip rule add from 10.0.2.5/32 table eth1-rt
up /usr/sbin/ip rule add to 10.0.2.5/32 table eth1-rt
Adjust the network and IP address information accordingly, and preserve the 32-bit value. If there are more than two NICs, make sure that the corresponding IP rules and IP routes are included for each one.
Activate the new configuration by using the following command:
sudo systemctl restart networking
The routing rules are now correctly set, and connectivity should work from any network interface. You can test the connectivity by using Secure Shell (SSH) or pinging both IPs from a VM in the same VNET.
Verify that the current routes and rules are loaded by using the following commands:
sudo ip route show
sudo ip rule show
Important
If you still don't have connectivity to the second NIC, restart the VM by using the sudo reboot command, repeat step 4, and test the connectivity again.