Note
Access to this page requires authorization. You can try signing in or changing directories.
Access to this page requires authorization. You can try changing directories.
Applies to: ✔️ Linux VMs
This article shows how to resolve the error "Failed to start Switch Root" for an Azure Linux Virtual Machine (VM). This issue can occur when you update to the following GRUB package versions on Oracle 8 SP2:
- grub2-common-2.02-78.0.3.el8_1.1.noarch
- grub2-pc-modules-2.02-78.0.3.el8_1.1.noarch
- grub2-efi-x64-2.02-78.0.3.el8_1.1.x86_64
- grub2-tools-extra-2.02-78.0.3.el8_1.1.x86_64
- grub2-tools-2.02-78.0.3.el8_1.1.x86_64
- grub2-pc-2.02-78.0.3.el8_1.1.x86_64
- grub2-tools-minimal-2.02-78.0.3.el8_1.1.x86_64
If your Azure issue is not addressed in this article, visit the Azure forums on MSDN and Stack Overflow. Post your issue in either these forums or to @AzureSupport on Twitter.
To submit an Azure support request on the Azure support page, select Get support.
Manually fix the issue in the Guest OS
If you have access to the Azure Serial Console proceed with the steps in the following Azure Serial Console method section.
If you're unable to use the Azure Serial Console section, proceed to the Offline method.
Azure Serial Console method
Reboot the VM using the Azure Serial Console, and hold the Escape key to access the GRUB menu.
Select the entry for the rescue kernel.
Copy the
kerneloptsvalue from thegrubenvfile. The path of thegrubenvfile in Linux can vary depending on the distribution and configuration of the system. It is commonly located at/boot/efi/EFI/redhat/grubenvor/boot/grub2/gubenv.Example:
cat /boot/grub2/gubenvEdit the desired boot entry from
/boot/loader/entries:Example:
vi /boot/loader/entries/a358b364a6d3492898bedc8d1dea3e92-4.18.0-147.8.1.el8_1.x86_64.confManually add the
kerneloptsvalue that you copied andearlyprintk=ttyS0to the boot entry file.Reboot the VM. If more than one kernel is installed, you might need to select the modified entry from the GRUB menu.
Offline method
If you're unable to access the VM using the Azure Serial Console, then the repair must be done in offline mode, as the VM isn't booting.
Use steps 1-3 of the VM Repair Commands to prepare a Repair VM.
Using SSH, connect to the Repair VM.
Once connected to the repair VM, use
lsblkto find your boot and efi partitions: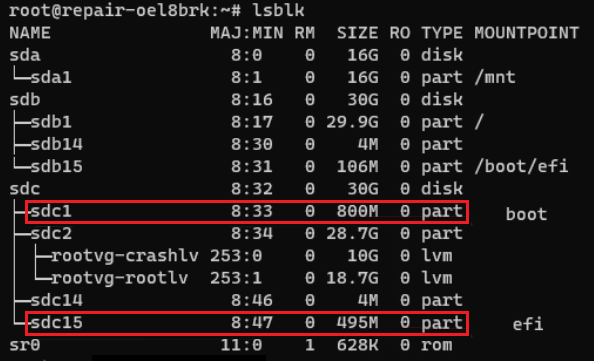
Create a temporary mount point. For example, use
/repair.mkdir /repairMount the boot partition on the temporary mount point. For example, use
/dev/sdc1.mount /dev/sdc1 /repair/Mount the efi partition under
efion the temporary mount point. For example, use/dev/sdc15.mount /dev/sdc15 /repair/efi/Copy the
kerneloptsvalue from thegrubenvfile. The path of thegrubenvfile in Linux can vary depending on the distribution and configuration of the system. It is commonly located at/boot/efi/EFI/redhat/grubenvor/boot/grub2/gubenv.Example:
cat /boot/efi/EFI/redhat/grubenvEdit the desired boot entry from
/boot/loader/entries:Example:
vi /boot/loader/entries/a358b364a6d3492898bedc8d1dea3e92-4.18.0-147.8.1.el8_1.x86_64.confManually add the
kerneloptsvalue that you copied andearlyprintk=ttyS0to the boot entry file.Unmount the efi partition. For example,
/repair/efi/.umount /repair/efiUnmount the boot partition. For example,
/repair/.umount /repairUse step 5 of VM Repair Commands to rebuild the VM.
Start the VM. If more than one kernel is installed, you might need to select the modified entry from the GRUB menu.
Contact us for help
If you have questions or need help, create a support request, or ask Azure community support. You can also submit product feedback to Azure feedback community.