How to reset network interface for Azure Windows VM
This article shows how to reset the network interface for Azure Windows VM to resolve issues when you cannot connect to Microsoft Azure Windows Virtual Machine (VM) after:
- You disable the default Network Interface (NIC).
- You manually set a static IP for the NIC.
If your Azure issue is not addressed in this article, visit the Azure forums on MSDN and Stack Overflow. You can post your issue in these forums, or post to @AzureSupport on Twitter. You also can submit an Azure support request. To submit a support request, on the Azure support page, select Get support.
Reset network interface
For VMs deployed in Resource Manager model
Use Azure portal
Go to the Azure portal.
Select the affected Virtual Machine.
Select Networking and then select the network Interface of the VM.
Select IP configurations.
Select the IP.
If the Private IP assignment is not Static, change it to Static.
Change the IP address to another IP address that is available in the Subnet.
The virtual machine will restart to initialize the new NIC to the system.
Try to RDP to your machine. If successful, you can change the Private IP address back to the original if you would like. Otherwise, you can keep it.
Use Azure PowerShell
Make sure that you have the latest Azure PowerShell installed.
Open an elevated Azure PowerShell session (Run as administrator). Run the following commands:
#Set the variables $SubscriptionID = "<Subscription ID>" $ResourceGroup = "<Resource Group>" $NetInter="<The Network interface of the VM>" $VNET = "<Virtual network>" $subnet= "<The virtual network subnet>" $PrivateIP = "<New Private IP>" #You can ignore the publicIP variable if the VM does not have a public IP associated. $publicIP =Get-AzPublicIpAddress -Name <the public IP name> -ResourceGroupName $ResourceGroup #Log in to the subscription Add-AzAccount Select-AzSubscription -SubscriptionId $SubscriptionId #Check whether the new IP address is available in the virtual network. Get-AzVirtualNetwork -Name $VNET -ResourceGroupName $ResourceGroup | Test-AzPrivateIPAddressAvailability -IPAddress $PrivateIP #Add/Change static IP. This process will change MAC address $vnet = Get-AzVirtualNetwork -Name $VNET -ResourceGroupName $ResourceGroup $subnet = Get-AzVirtualNetworkSubnetConfig -Name $subnet -VirtualNetwork $vnet $nic = Get-AzNetworkInterface -Name $NetInter -ResourceGroupName $ResourceGroup #Remove the PublicIpAddress parameter if the VM does not have a public IP. $nic | Set-AzNetworkInterfaceIpConfig -Name ipconfig1 -PrivateIpAddress $PrivateIP -Subnet $subnet -PublicIpAddress $publicIP -Primary $nic | Set-AzNetworkInterface
The virtual machine will restart to initialize the new NIC to the system.
Try to RDP to your machine. If successful, you can change the Private IP address back to the original if you would like. Otherwise, you can keep it.
For Classic VMs
Important
Classic VMs will be retired on September 1, 2023
If you use IaaS resources from ASM, please complete your migration by September 1, 2023. We encourage you to make the switch sooner to take advantage of the many feature enhancements in Azure Resource Manager.
For more information, see Migrate your IaaS resources to Azure Resource Manager by September 1, 2023.
To reset network interface, follow these steps:
Use Azure portal
- Go to the Azure portal.
- Select Virtual Machines (Classic).
- Select the affected Virtual Machine.
- Select IP addresses.
- If the Private IP assignment is not Static, change it to Static.
- Change the IP address to another IP address that is available in the Subnet.
- Select Save.
- The virtual machine will restart to initialize the new NIC to the system.
- Try to RDP to your machine. If successful, you can choose to revert the Private IP address back to the original.
Use Azure PowerShell
Make sure that you have the latest Azure PowerShell installed.
Open an elevated Azure PowerShell session (Run as administrator). Run the following commands:
#Set the variables $SubscriptionID = "<Subscription ID>" $VM = "<VM Name>" $CloudService = "<Cloud Service>" $VNET = "<Virtual Network>" $IP = "NEWIP" #Log in to the subscription Add-AzureAccount Select-AzureSubscription -SubscriptionId $SubscriptionId #Check whether the new IP address is available in the virtual network. Test-AzureStaticVNetIP –VNetName $VNET –IPAddress $IP #Add/Change static IP. This process will not change MAC address Get-AzureVM -ResourceGroupName $CloudService -Name $VM | Set-AzureStaticVNetIP -IPAddress $IP |Update-AzureVM
Try to RDP to your machine. If successful, you can change the Private IP address back to the original if you would like. Otherwise, you can keep it.
Delete the unavailable NICs
After you can remote desktop to the machine, you must delete the old NICs to avoid the potential problem:
Open Device Manager.
Select View > Show hidden devices.
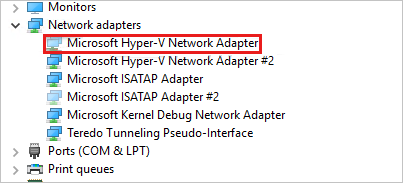
Select Network Adapters.
Check for the adapters named as "Microsoft Hyper-V Network Adapter".
You might see an unavailable adapter that is grayed out. Right-click the adapter and then select Uninstall.
Note
Only uninstall the unavailable adapters that have the name "Microsoft Hyper-V Network Adapter". If you uninstall any of the other hidden adapters, it could cause additional issues.
Now all unavailable adapters should be cleared of your system.
Contact us for help
If you have questions or need help, create a support request, or ask Azure community support. You can also submit product feedback to Azure community support.
Feedback
Submit and view feedback for