Note
Access to this page requires authorization. You can try signing in or changing directories.
Access to this page requires authorization. You can try changing directories.
Applies to: ✔️ Windows VMs
This article explains when the Windows VM boot manager is missing, and how to solve the problem.
Symptom
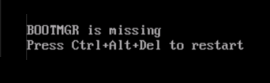
When you pull the screenshot of the VM, the OS boot process is stopped with the error:
BOOTMGR is missing
Press Ctrl+Alt+Del to restart
Cause
There are several reasons this error could occur:
- The operating system (OS) boot process could not locate an active system partition.
- There's a missing reference on the BCD store to locate the windows partition.
- There has been a Ransomware attack.
Solution
Tip
If you have a recent backup of the VM, you may try restoring the VM from the backup to fix the boot problem.
Process overview
- Create and access a Repair VM.
- Verify that the OS partition is active.
- Fix the missing reference in the BCD store
- Verify if a ransomware attack has occurred.
- Rebuild the VM.
Note
When encountering this error, the Guest OS is not operational. Troubleshoot this issue in offline mode to resolve this issue.
Create and access a repair VM
Tip
If you have a recent backup of the VM, you may try restoring the VM from the backup to fix the boot problem.
- Use steps 1-3 of the VM Repair Commands to prepare a Repair VM.
- Using Remote Desktop Connection, connect to the Repair VM.
Verify that the OS partition is active
Note
This mitigation applies only for Generation 1 VMs. Generation 2 VMs (using UEFI) don't use an active partition.
Start a Remote Desktop connection to the recovery VM.
Open Computer management > Disk management. Make sure that the disk is flagged as Online in the Disk Management console. Note the drive letter that is assigned to the attached system disk.
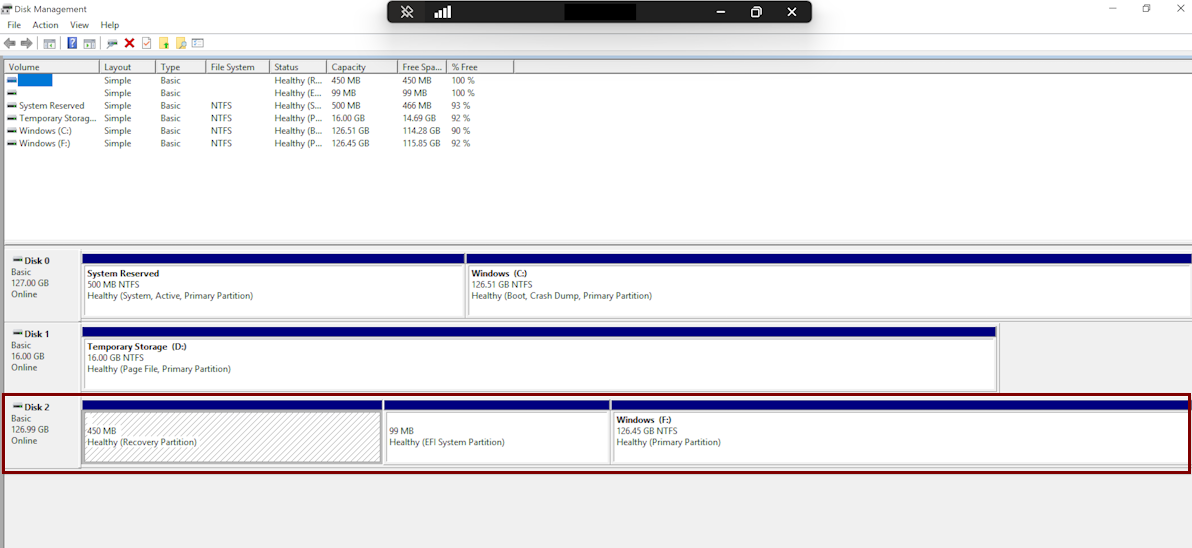
Identify the Boot partition and Windows partition. If there's only one partition on the OS disk, this partition is both Boot partition and Windows partition.
If the OS disk contains more than one partition, you can identify the partitions by viewing the folders in them:
The Windows partition contains a folder that is named Windows, and this partition is larger than the others.
The Boot partition contains a folder that is named Boot. This folder is hidden by default. To see the folder, you must display the hidden files and folders and disable the Hide protected operating system files (Recommended) option. The boot partition is typically 300 MB~500 MB.
Run the following command as an administrator to create a boot record:
bcdboot <Windows partition>:\Windows /S <windows partition>:Use the DISKPART tool to check whether the Windows partition is active:
Open an elevated command prompt and open the DISKPART tool.
diskpartList the disks on the system and look for added disks and proceed to select the new disk. In this example, the new disk is Disk 1.
list disk
sel disk 1
List all the partitions on that disk and then proceed to select the partition you want to check. Usually System Managed partitions are smaller and around 350 MB in size. In the following image, this partition is Partition 1.
list partition
sel partition 1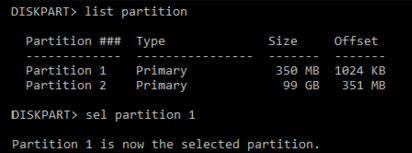
Check the status of the partition. In our example, Partition 1 is not active.
detail partition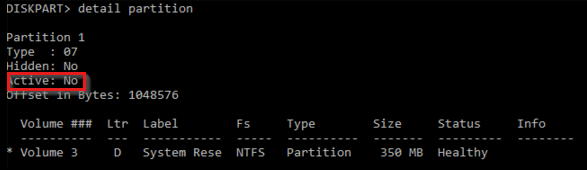
If the partition isn't active, change the Active flag and then recheck the change was done properly.
active
detail partition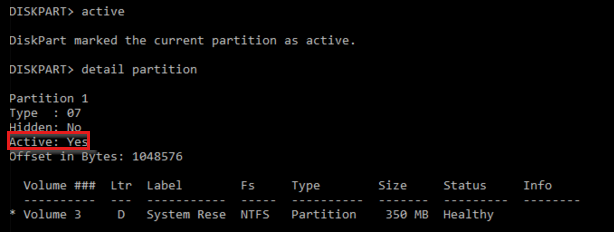
Exit the DISKPART tool.
exit

Fix the missing reference in the BCD store
Open up an elevated CMD and run CHKDSK on that disks.
chkdsk <DRIVE LETTER>: /fGather the current boot setup info and document it, take note of the identifier on the active partition.
For Generation 1 VM:
bcdedit /store <drive letter>:\boot\bcd /enumIf this command errors out due to
\boot\bcdnot being found, then go to the following mitigation.Write down the identifier of the Windows Boot loader. This identifier is the one with the path
\windows\system32\winload.exe.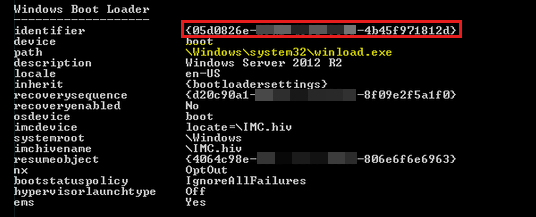
For Generation 2 VM:
bcdedit /store <Volume Letter of EFI System Partition>:EFI\Microsoft\boot\bcd /enumIf this command errors out due to
\boot\bcdnot being found, then go to the following mitigation.Write down the identifier of the Windows Boot loader. This identifier is the one with the path
\windows\system32\winload.efi.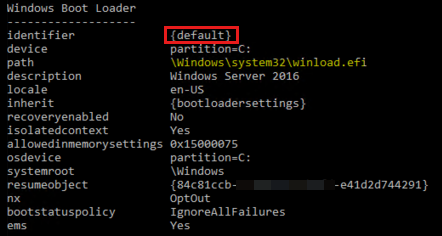
Run the following commands:
For Generation 1 VM:
bcdedit /store <BCD FOLDER - DRIVE LETTER>:\boot\bcd /set {bootmgr} device partition=<BCD FOLDER - DRIVE LETTER>:
bcdedit /store <BCD FOLDER - DRIVE LETTER>:\boot\bcd /set {bootmgr} integrityservices enable
bcdedit /store <BCD FOLDER - DRIVE LETTER>:\boot\bcd /set {<IDENTIFIER>} device partition=<WINDOWS FOLDER - DRIVE LETTER>:
bcdedit /store <BCD FOLDER - DRIVE LETTER>:\boot\bcd /set {<IDENTIFIER>} integrityservices enable
bcdedit /store <BCD FOLDER - DRIVE LETTER>:\boot\bcd /set {<IDENTIFIER>} recoveryenabled Off
bcdedit /store <BCD FOLDER - DRIVE LETTER>:\boot\bcd /set {<IDENTIFIER>} osdevice partition=<WINDOWS FOLDER - DRIVE LETTER>:
bcdedit /store <BCD FOLDER - DRIVE LETTER>:\boot\bcd /set {<IDENTIFIER>} bootstatuspolicy IgnoreAllFailures
Note
In case the VHD has a single partition and both the BCD Folder and Windows Folder are in the same volume, and if the above setup didn't work, then try replacing the partition values with boot.
bcdedit /store <BCD FOLDER - DRIVE LETTER>:\boot\bcd /set {bootmgr} device boot
bcdedit /store <BCD FOLDER - DRIVE LETTER>:\boot\bcd /set {bootmgr} integrityservices enable
bcdedit /store <BCD FOLDER - DRIVE LETTER>:\boot\bcd /set {<IDENTIFIER>} device boot
bcdedit /store <BCD FOLDER - DRIVE LETTER>:\boot\bcd /set {<IDENTIFIER>} integrityservices enable
bcdedit /store <BCD FOLDER - DRIVE LETTER>:\boot\bcd /set {<IDENTIFIER>} recoveryenabled Off
bcdedit /store <BCD FOLDER - DRIVE LETTER>:\boot\bcd /set {<IDENTIFIER>} osdevice boot
bcdedit /store <BCD FOLDER - DRIVE LETTER>:\boot\bcd /set {<IDENTIFIER>} bootstatuspolicy IgnoreAllFailures
For Generation 2 VM:
bcdedit /store <Volume Letter of EFI System Partition>:EFI\Microsoft\boot\bcd /set {bootmgr} device partition=<Volume Letter of EFI System Partition>:
bcdedit /store <Volume Letter of EFI System Partition>:EFI\Microsoft\boot\bcd /set {bootmgr} integrityservices enable
bcdedit /store <Volume Letter of EFI System Partition>:EFI\Microsoft\boot\bcd /set {<IDENTIFIER>} device partition=<WINDOWS FOLDER - DRIVE LETTER>:
bcdedit /store <Volume Letter of EFI System Partition>:EFI\Microsoft\boot\bcd /set {<IDENTIFIER>} integrityservices enable
bcdedit /store <Volume Letter of EFI System Partition>:EFI\Microsoft\boot\bcd /set {<IDENTIFIER>} recoveryenabled Off
bcdedit /store <Volume Letter of EFI System Partition>:EFI\Microsoft\boot\bcd /set {<IDENTIFIER>} osdevice partition=<WINDOWS FOLDER - DRIVE LETTER>:
bcdedit /store <Volume Letter of EFI System Partition>:EFI\Microsoft\boot\bcd /set {<IDENTIFIER>} bootstatuspolicy IgnoreAllFailures
Verify if a ransomware attack has occurred
If the above solutions did not resolve the issue, you may want to verify if a ransomware attack has occurred on your VM.
Once the disk is attached, set the Windows Explorer view to show "Hidden items".
View the disk and see if there are any .txt files on the root folder with instructions on how to regain access to the files of the VM:
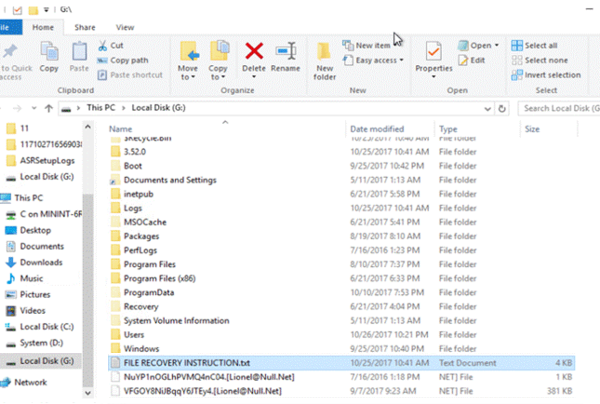
If you find a
.txtfile with content that is similar to the below example, it means that the machine was the target of a ransomware attack:Your files are now encrypted! Your personal ID : "XXXXXXX" What happened? Your important documents, databases, documents, network folders are encrypted for your PC security problems. No data from your computer has been stolen or deleted. Follow the instructions to restore the files. How to get the automatic decryptor: 1) Contact us by e-mail: xxxxx@xxxx.xxx. In the letter, indicate your personal identifier (look at the beginning of this document) and the external ip-address of the computer on which the encrypted files are located. 2) After answering your request, our operator will give you further instructions that will show what to do next (the answer you will receive as soon as possible) ** Second email address xxxxx@xxxx.xxx Free decryption as guarantee! Before paying you can send us up to 3 files for free decryption. The total size of files must be less than 10 Mb (non archived), and files should not contain valuable information (databases, backups, large excel sheets, etc.). __________________________________________________________________________________________________ | | | How to obtain Bitcoins? | | | | * The easiest way to buy bitcoins is LocalBitcoins site. You have to register, click | | 'Buy bitcoins', and select the seller by payment method and price: | | https://localbitcoins.com/buy_bitcoins | | * Also you can find other places to buy Bitcoins and beginners guide here: | | http://www.coindesk.com/information/how-can-i-buy-bitcoins | | | |__________________________________________________________________________________________________| __________________________________________________________________________________________________ | | | Attention! | | | | * Do not rename encrypted files. | | * Do not try to decrypt your data using third party software, it may cause permanent data loss. | | * Decryption of your files with the help of third parties may cause increased price | | (they add their fee to our) or you can become a victim of a scam. | | | |__________________________________________________________________________________________________|
At this point the VM needs to be restored from backup or rebuilt.
Rebuild the VM
Use step 5 of the VM Repair Commands to rebuild the VM.
Contact us for help
If you have questions or need help, create a support request, or ask Azure community support. You can also submit product feedback to Azure feedback community.