Note
Access to this page requires authorization. You can try signing in or changing directories.
Access to this page requires authorization. You can try changing directories.
Applies to: ✔️ Windows VMs
This article shows how to create a nested virtualization environment in Microsoft Azure, so you can mount the disk of the faulty virtual machine (VM) on the Hyper-V host (Repair/Rescue VM) for troubleshooting purposes.
Automatic process
To troubleshoot a faulty VM with a nested virtualization environment, we strongly recommend using Azure VM repair commands. You can create a Repair VM with nested Hyper-V and repair the faulty VM offline automatically VM by using the Azure VM repair commands.
Manual process
Note
Use this process only if Azure VM repair commands are unavailable or fail due to compatibility issues.
Step 1: Create a Rescue VM and install Hyper-V role
Create a new Rescue VM:
Operating system: Windows Server 2016 Datacenter or newer versions of Windows Server Datacenter.
Size: Select a series that supports nested virtualization. For example: Dv3 or Dv4.
Same location as the faulty VM.
Image: Choose either a Generation 2 image or a Generation 1 image.
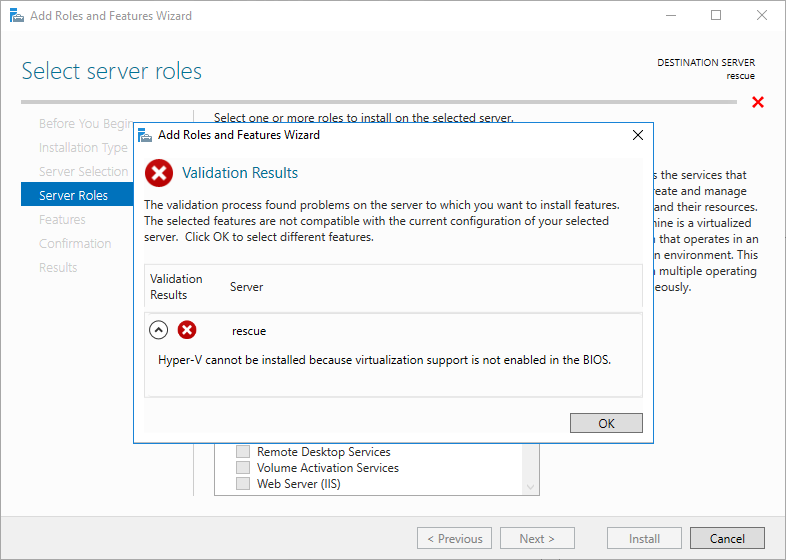
Security type: Change the security type to Standard. By default, the security type is Trusted launch virtual machines that doesn't support nested virtualization. If you set the security type to Trusted launch virtual machines, and attempt to add server roles on the Rescue VM, you'll encounter the following error message:
Hyper-V cannot be installed because virtualization support is not enabled in the BIOS.
Note
This error occurs because the hypervisor isn't enabled in the BCDEdit configuration of the VM. To fix this error, set the option before installing the Hyper-V role.
To check the
hypervisorlaunchtypeoption on the VM, run the following cmdlet from an elevated PowerShell command prompt:bcdedit /enumHere's an output example. In this example, the hypervisor parameter isn't included, indicating that the hypervisor isn't enabled.
Windows Boot Manager
--------------------
identifier              {bootmgr}
device                  partition=\Device\HarddiskVolume3
path                    \EFI\Microsoft\Boot\bootmgfw.efi
description             Windows Boot Manager
locale                  en-US
inherit                 {globalsettings}
bootshutdowndisabled    Yes
default                 {current}
resumeobject            {24089230-1111-2222-3333-6045bd34a71d}
displayorder            {current}
toolsdisplayorder       {memdiag}
timeout                 30

Windows Boot Loader
-------------------
identifier              {current}
device                  partition=C:
path                    \Windows\system32\winload.efi
description             Windows Server
locale                  en-US
inherit                 {bootloadersettings}
recoveryenabled         No
isolatedcontext         Yes
allowedinmemorysettings 0x15000075
osdevice                partition=C:
systemroot              \Windows
resumeobject            {24089230-1111-2222-3333-6045bd34a71d}
nx                      OptOut
bootstatuspolicy        IgnoreAllFailures
ems                     Yes
To set the
hypervisorlaunchtypeoption toautoand restart the VM, run the following cmdlet:bcdedit /set hypervisorlaunchtype auto Restart-Computer -Force
After the Rescue VM is created, remote desktop to the Rescue VM.
In Server Manager, select Manage > Add Roles and Features.
In the Installation Type section, select Role-based or feature-based installation.
In the Select destination server section, make sure that the Rescue VM is selected.
Select the Hyper-V role > Add Features.
Select Next on the Features section.
If a virtual switch is available, select it. Otherwise select Next.
On the Migration section, select Next
On the Default Stores section, select Next.
Check the box to restart the server automatically if required.
Select Install.
Allow the server to install the Hyper-V role. This takes a few minutes and the server will reboot automatically.

Step 2: Create the faulty VM on the Rescue VM's Hyper-V server
Create a snapshot disk for the OS disk of the VM that has problem, and then attach the snapshot disk to the Rescue VM.
Remote desktop to the Rescue VM.
Open Disk Management (diskmgmt.msc). Make sure that the disk of the faulty VM is set to Offline.
Open Hyper-V Manager: In Server Manager, select the Hyper-V role. Right-click the server, and then select the Hyper-V Manager.
In the Hyper-V Manager, right-click the Rescue VM, and then select New > Virtual Machine > Next.
Type a name for the VM, and then select Next.
Select Generation 1 or Generation 2 according to the faulty VM generation.
Set the startup memory at 1024 MB or more.
If applicable select the Hyper-V Network Switch that was created. Else move to the next page.
Select Attach a virtual hard disk later.
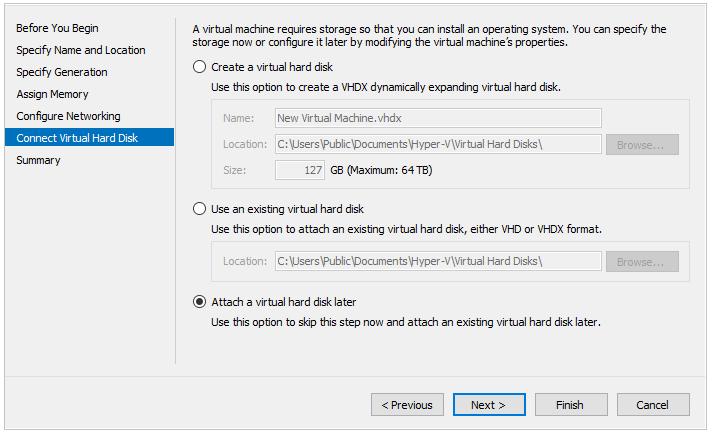
Select Finish when the VM is created.
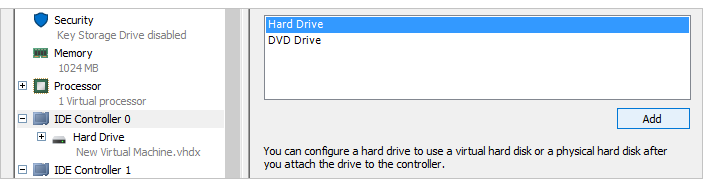
Right-click the VM that you created, and then select Settings.
Select IDE Controller 0 for generation 1 VMs or SCSI Controller for generation 2 VMs, select Hard Drive, and then click Add.
In Physical Hard Disk, select the disk of the faulty VM that you attached to the Azure VM. If you do not see any disks listed, check if the disk is set to offline by using Disk management.
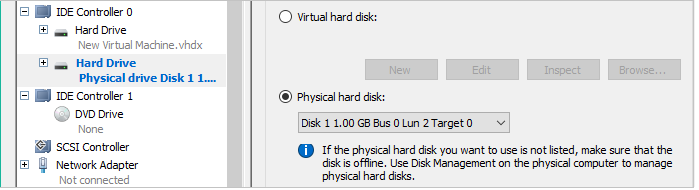
Select Apply, and then select OK.
Double-click on the VM, and then start it.
Now you can work on the VM as the on-premises VM. You could follow any troubleshooting steps you need.
Step 3: Replace the OS disk used by the faulty VM
After you get the VM back online, shut down the VM in the Hyper-V manager.
Detach the repaired OS disk.
Replace the OS disk used by the VM with the repaired OS disk.
Next steps
If you are having issues connecting to your VM, see Troubleshoot RDP connections to an Azure VM. For issues with accessing applications running on your VM, see Troubleshoot application connectivity issues on a Windows VM.
Contact us for help
If you have questions, you can ask Azure community support. You can also submit product feedback to Azure feedback community.