Attach an unmanaged disk to a VM for offline repair
Applies to: ✔️ Windows VMs
Some troubleshooting scenarios for Windows virtual machines (VMs), such as when a VM doesn't start, require you to repair its OS disk offline. This article describes how you can perform this kind of offline repair when the failed OS disk is unmanaged.
Determine if the OS disk is managed or unmanaged
Azure portal
Open the Overview blade for the VM. If the OS disk is unmanaged, an informational banner indicates that the VM is not using managed disks.

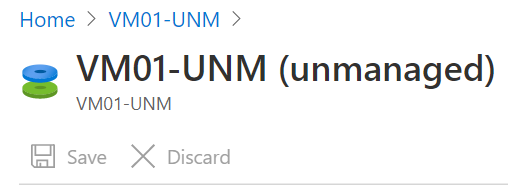
In addition, the Overview blade for the OS disk appends "(unmanaged)" to the disk name if the disk is unmanaged, as shown below:
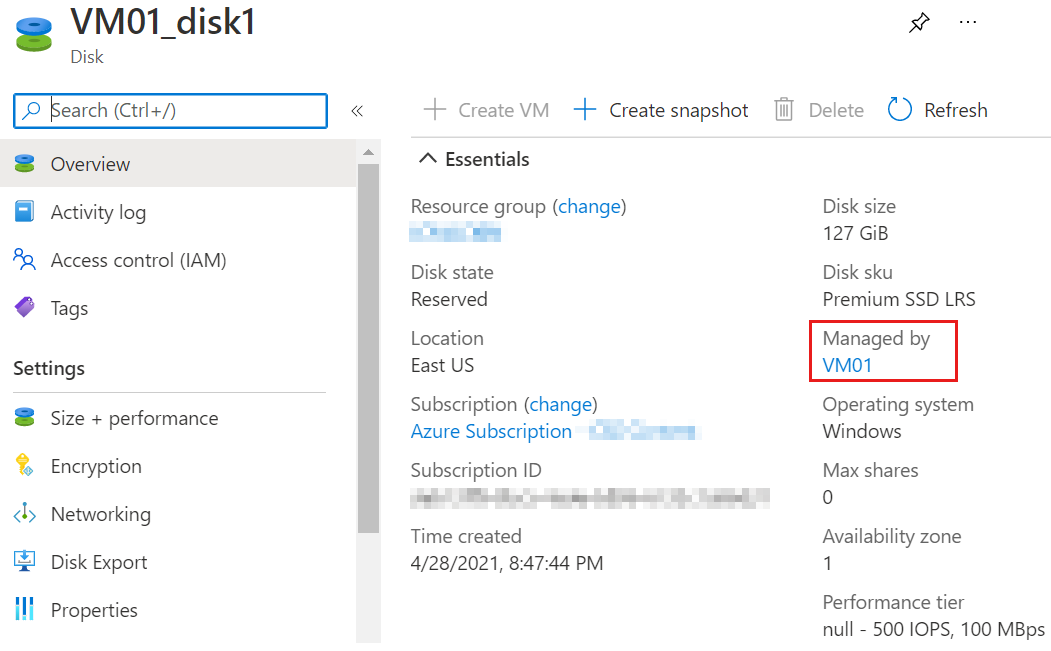
If the disk is managed, the Overview blade for the OS disk displays a Managed by field, as shown below:
PowerShell
You can verify that the OS disk is unmanaged by entering the following command. (Be sure to replace "MyResourceGroup" with the name of your resource group and "MyVM" with the name of your VM.)
(get-azvm -ResourceGroupName MyResourceGroup -Name MyVM).StorageProfile.OsDisk
If the disk is unmanaged, no value appears in the output next to ManagedDisk, as in the following example:
OsType                  : Windows
EncryptionSettings      :
Name                    : MyVM-Disk1
Vhd                     : Microsoft.Azure.Management.Compute.Models.VirtualHardDisk
Image                   :
Caching                 : ReadWrite
WriteAcceleratorEnabled :
DiffDiskSettings        :
CreateOption            : FromImage
DiskSizeGB              : 127
ManagedDisk             :
If the disk is a managed disk, you will see a value in the output next to ManagedDisk, as in the following example:
OsType                  : Windows
EncryptionSettings      :
Name                    : MyVM2-Disk1
Vhd                     :
Image                   :
Caching                 : ReadWrite
WriteAcceleratorEnabled :
DiffDiskSettings        :
CreateOption            : FromImage
DiskSizeGB              :
ManagedDisk             : Microsoft.Azure.Management.Compute.Models.ManagedDiskParameters
Azure command-line interface (Azure CLI)
You can use the az vm show command with the appended query "storageProfile.osDisk.managedDisk" to determine whether the disk has managed disks, as in the following example:
az vm show -n MyVM -g MyResourceGroup --query "storageProfile.osDisk.managedDisk"
If the disks are unmanaged, the command will generate no output. If the disks are managed, it will generate output like in the following example:
{
  "diskEncryptionSet": null,
  "id": "/subscriptions/xxxxxxxx-xxxx-xxxx-xxxx-xxxxxxxxxxxx/resourceGroups/MyResourceGroup/providers/Microsoft.Compute/disks/MyVm_OsDisk_1",
  "resourceGroup": "MyResourceGroup",
  "storageAccountType": null
}
Create a copy of the unmanaged OS disk attached to the source (failed) VM
In the Azure portal, stop the source VM whose OS disk is unmanaged.
On your local computer, download, install, and then start Microsoft Azure Storage Explorer. Supply your Azure credentials when you're prompted.
In the Storage Explorer navigation pane, expand the appropriate subscription.
Select the storage account in which the VHD is located, and then select the appropriate container for the disk. By default, unmanaged OS disks are stored in the vhds (Leased) container.
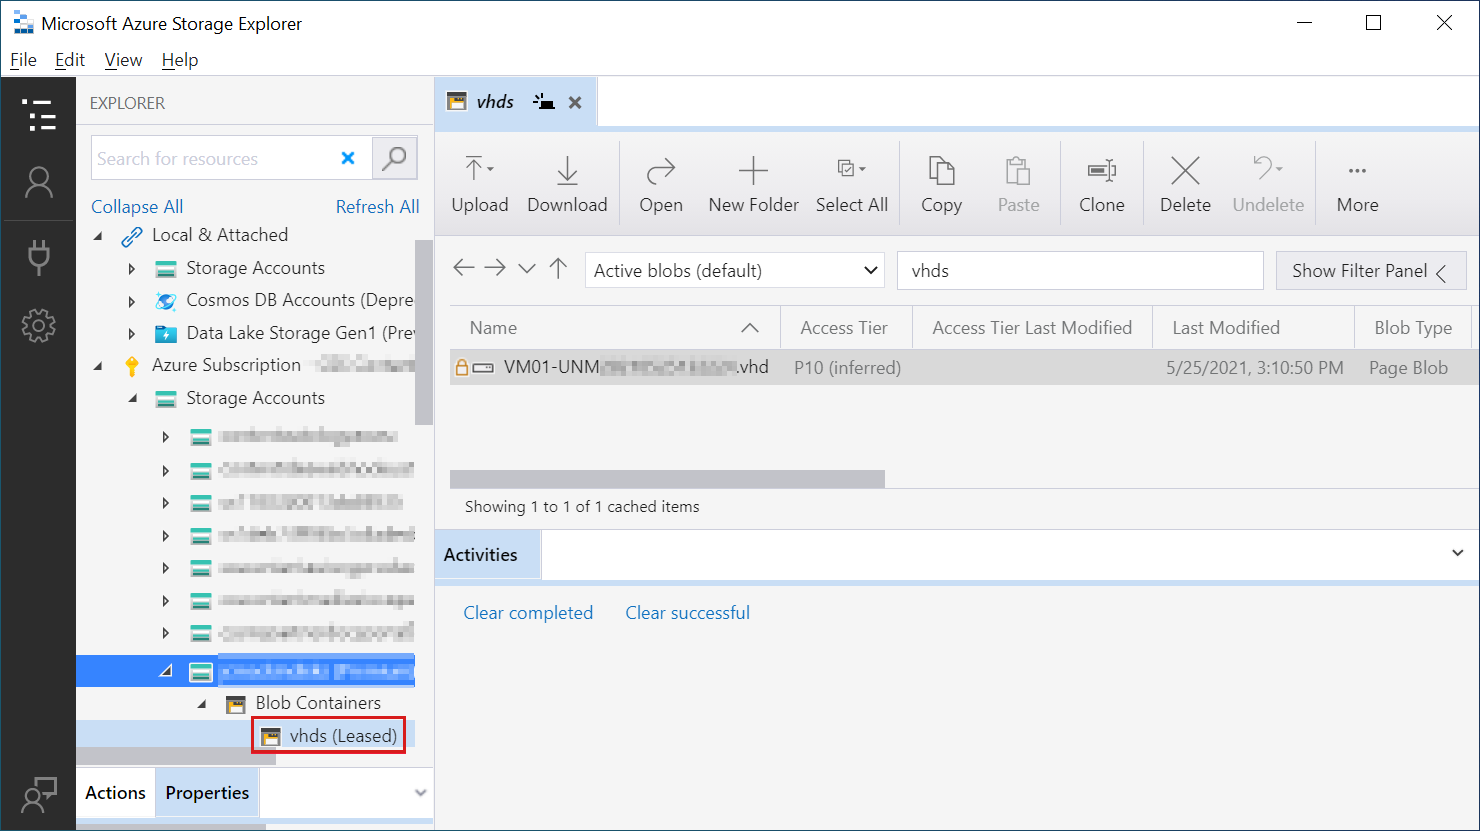
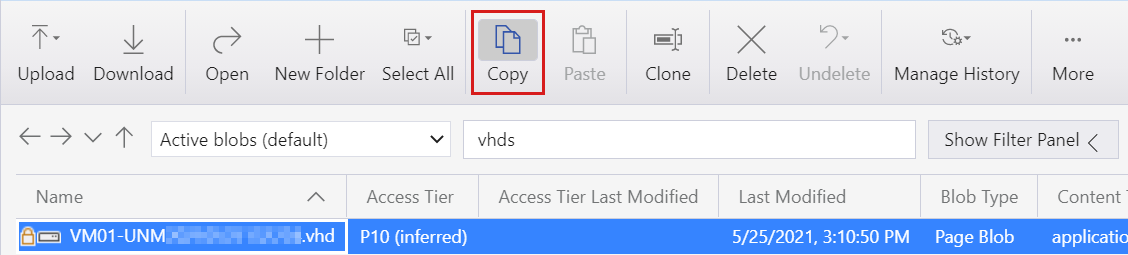
In the right pane, select the VHD that's attached to the source VM that you want to repair, and then select Copy at the top. Notice that the copied disk can be pasted only into a different blob container.
Create a new blob container by right-clicking Blob Container in the navigation pane, and then selecting Create Blob Container. Assign the new blob container a name of your choice, such as "disk-copies."
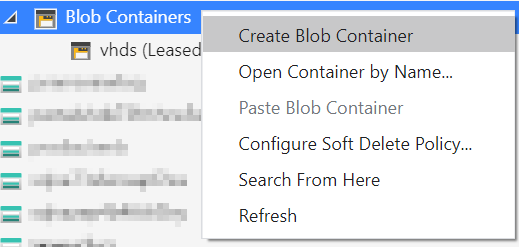
Select Paste to paste the copied disk into the new blob container.

Create a repair VM with an unmanaged OS disk
In the Azure portal, begin the process of creating a new VM that's based on Windows Server 2019. This new VM will act as your repair VM, and its own OS disk must be unmanaged.
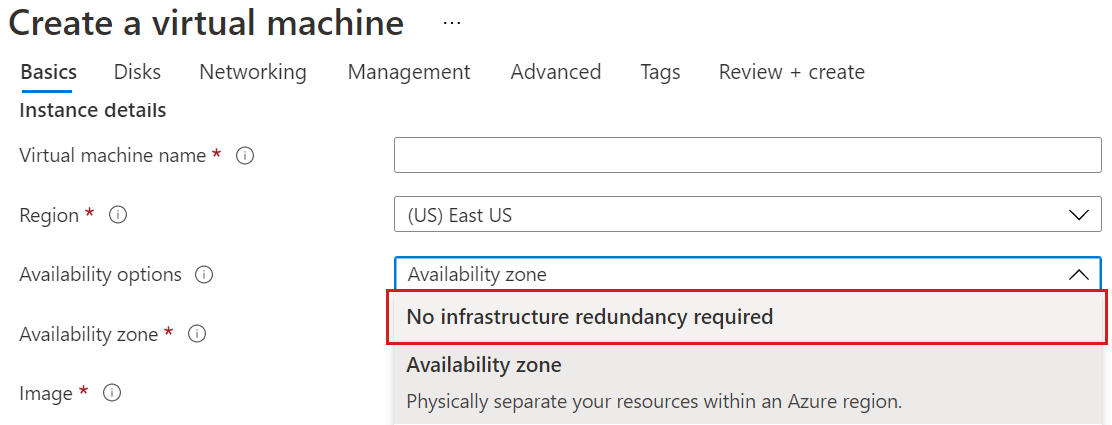
On the Basics page of the "Create a Virtual Machine" wizard, select No infrastructure redundancy required in the Availability options list.
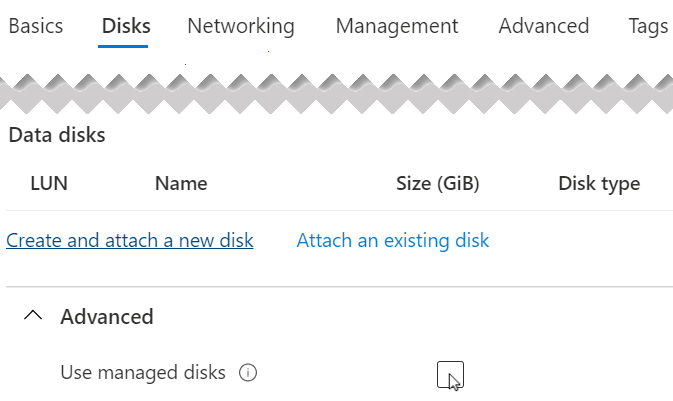
On the Disks page, expand Advanced below Data Disks and then clear the Use managed disks check box. Select a storage account for the unmanaged OS disk. Do not select to attach an existing disk.
 If the Use managed disks option cannot be unselected, try to create the VM by using the following commands:
## Get the subnet ID of the VM

$SubnetID = az network vnet subnet show --resource-group <RG name> --name <Subnet name> --vnet-name <VNet name> --query id -o tsv

## Create a VM with the unmanaged disk

az vm create \
    --resource-group <RG name>\
    --name <VM name>\
    --image <Image name>\
    --location <location of the VM>\
    --admin-username <Admin name>\
    --subnet $SubnetID\
    --size <VM size>\
    --use-unmanaged-disk
Complete the "Create a Virtual Machine" wizard by specifying configuration details that are appropriate for your organization.
Attach a copy of the unmanaged disk to the repair VM
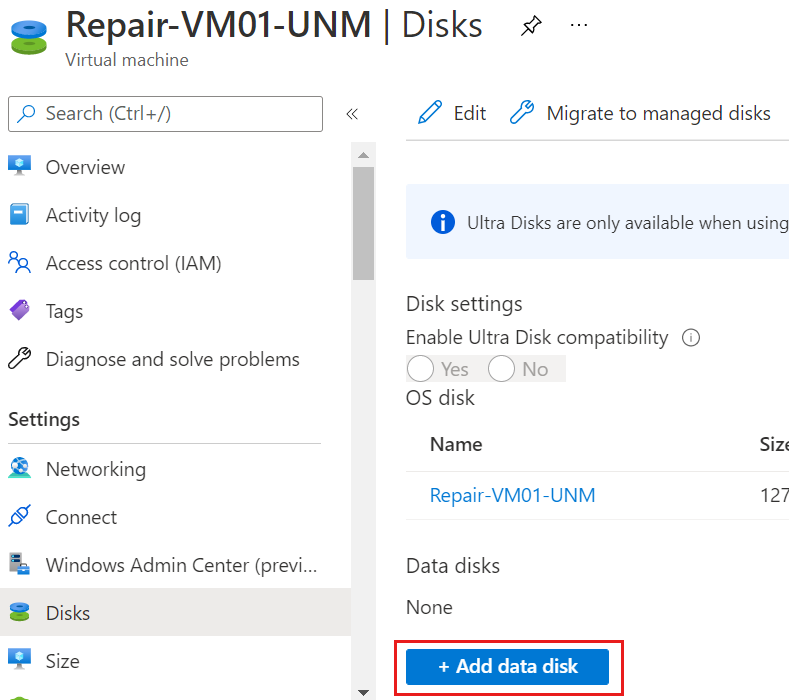
In the Azure portal, open the Disks blade for the new repair VM that you just created.
Select + Add data disk.
On the Attach Unmanaged Disk page, select Existing blob as the Source type.
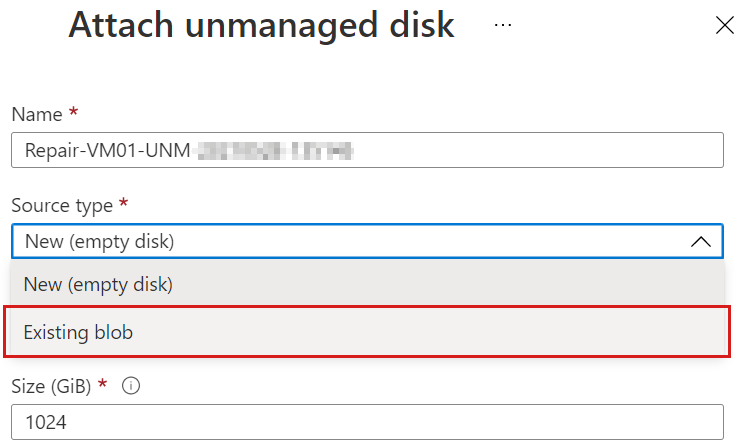
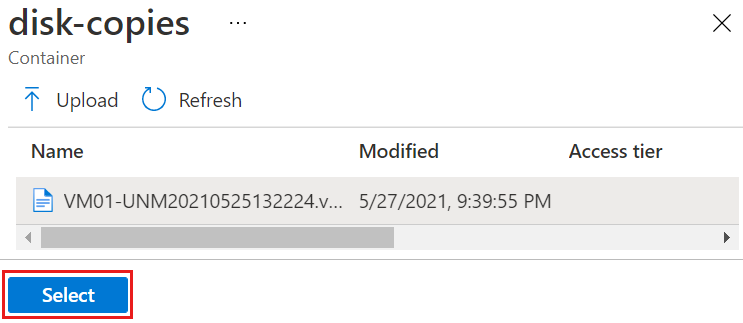
Beneath Source blob, select Browse, and then browse to select the OS disk copy that you created earlier.
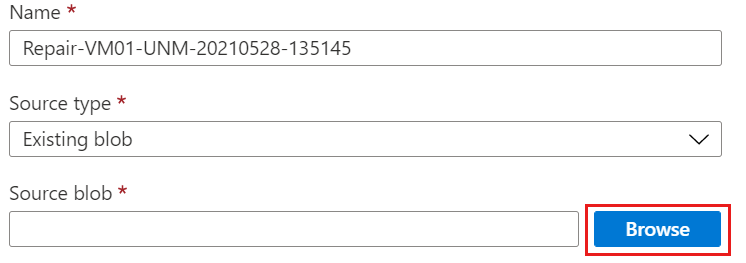
On the Attach Unmanaged Disk page, accept the default storage blob name, and then select OK.
On the Disks blade of the new repair VM, select Save.

Unlock the disk if it is encrypted
If the disk is encrypted with Azure Disk Encryption (ADE), you will need to unlock it before you can repair it. To do so, use the steps described in Resolution #3: Manual method to unlock an encrypted disk on a repair VM.
You can determine if the disk is encrypted by using the procedure here: Confirm that ADE is enabled on the disk
Replace the OS disk on the source VM
After you finish repairing the disk, follow these steps:
Detach the source VM OS disk by using either Azure CLI or PowerShell.
Azure CLI
Use the az vm unmanaged-disk detach command, as in the following example:
az vm unmanaged-disk detach -g MyResourceGroup --vm-name MyVm -n disk_namePowerShell
Enter the following commands in Azure Cloud Shell, one at time:
$VirtualMachine = Get-AzVM -ResourceGroupName "MyResourceGroup" -Name "MyVm"
Remove-AzVMDataDisk -VM $VirtualMachine -Name "disk_name"
Update-AzVM -ResourceGroupName "MyResourceGroup" -VM $VirtualMachine
After you detach the disk, you can replace the OS disk on the source VM.
When the prompt returns, open a text editor, such as Notepad, and record the following values:
- Subscription ID ($subscriptionID): The 32-digit globally unique identifier (GUID) that's associated with your Azure subscription.
- Resource group name ($rgname): The resource group of the source VM.
- VM name ($vmname): The name of the source (failed) VM.
- OS disk VHD URI ($vhduri): The URI of the copy of the unmanaged OS Disk that you just detached from the repair VM. (You can copy this value by right-clicking the disk in Storage Explorer and then selecting Copy URL.)
Enter the following commands at the PowerShell command prompt in Azure Cloud Shell, one at a time. In each command, replace the values "Subscription ID," "Resource group name," "VM name," and "OS disk VHD URI" with the corresponding values that you just recorded from your environment.
$subscriptionID = "Subscription ID"
$rgname = "Resource group name"
$vmname = "VM Name"
$vhduri = "OS disk VHD URI"
#Add-AzAccount
Select-AzSubscription -SubscriptionID $subscriptionID
Set-AzContext -SubscriptionID $subscriptionID
$vm = Get-AzVM -ResourceGroupName $rgname -Name $vmname
$vm.StorageProfile.OsDisk.Vhd.Uri = $vhduri
Update-AzVM -ResourceGroupName $rgname -VM $vm
After the operation finishes, you should see the following output:
RequestId IsSuccessStatusCode StatusCode ReasonPhrase
--------- ------------------- ---------- ------------
                         True         OK OK
In Azure portal, open the Disks blade on the VM. Select the OS disk, and then verify that the VHD URI matches the value you supplied in the last step.
Next Steps
To read an overview of ADE, see Enable Azure Disk Encryption for Windows VMs. For more information about commands you can use to manage unmanaged disks, see az vm unmanaged-disk.
Contact us for help
If you have questions or need help, create a support request, or ask Azure community support. You can also submit product feedback to Azure feedback community.