Note
Access to this page requires authorization. You can try signing in or changing directories.
Access to this page requires authorization. You can try changing directories.
Note
CentOS referenced in this article is a Linux distribution and will reach End Of Life (EOL). Consider your use and plan accordingly. For more information, see CentOS End Of Life guidance.
Applies to: .NET Core 2.1, .NET Core 3.1, .NET 5
Goal of this part
This part of the training is intended for users who don't have any Linux experience. It covers the following topics:
How to use Windows Azure to create a Linux virtual machine.
Note
You can skip this step if you already have a Linux virtual machine to use in the training.
How to connect to a Linux virtual machine from a Windows-based computer.
How to manage basic tasks when you work in Linux, such as creating and deleting files and folders, running commands as a privileged user, and installing applications by using package managers.
To make sure that all the labs in this guide work as intended, we recommend that you use an Ubuntu 18.04 LTS distribution because that's the distribution that was used to create the labs.
This part (1.1) contains the following steps:
If you're familiar with Linux, you might want to skip this part entirely and go directly to Part 1.2 - Linux special directories, elevated users, and package managers.
Create a Linux virtual machine in Windows Azure
Your first decision is which distribution of Linux you want to use. There are different flavors and distributions of the Linux operating system, commonly referred to as "distros". According to this Linux Documentation Project article, there are many similarities between the different distributions. The commands that are used in this series are almost the same for every Linux distro, although the installation package managers may differ. However, the general instructions will be same regardless of the distro that's used.
Note
As explained in Linux virtual machines in Azure, Microsoft Azure supports several popular Linux distributions that are provided and maintained by our partners. You can find distributions such as Red Hat Enterprise, CentOS, SUSE Linux Enterprise, Debian, Ubuntu, CoreOS, RancherOS, FreeBSD, and others in the Azure Marketplace.
The instructions to create a Linux virtual machine in Azure are clearly explained in QuickStart: Create a Linux virtual machine in the Azure portal.
Note
This article also has instructions to connect to the virtual machine and install the Nginx web server. It's your choice to follow those instructions and install Nginx. However, you don't have to decide that just yet because Nginx installation and configuration is covered in the next part.
This tutorial won't duplicate those steps because the instructions are clear enough. However, it's important to highlight some key points about how to create the virtual machine.
Authentication
You can choose from the following kinds of authentication when you create the virtual machine:
- Connect by using a password
- Connect by using an SSH public key
Although using password authentication is acceptable in the context of this training, we recommend that you use the SSH public key option because it provides better security. Also, this guide uses this option by default when you connect to a Linux virtual machine.
Azure automatically generates an SSH key pair for you, and lets you save it to disk so that you can use it later when you connect to the Linux virtual machine. This action simplifies the connection process.
Select the SSH public key and Generate new key pair options when you create the administrator account.
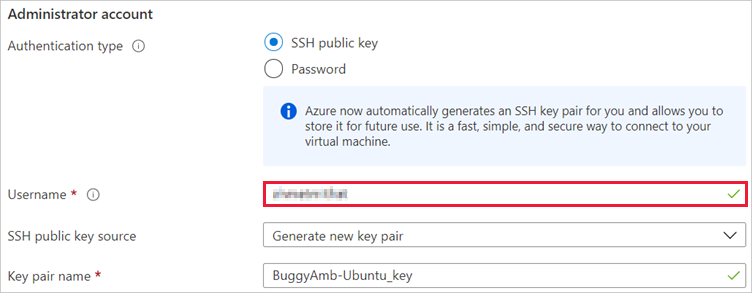
For the Username field, you can choose whichever name you want among the names that you provided when you created the virtual machine.
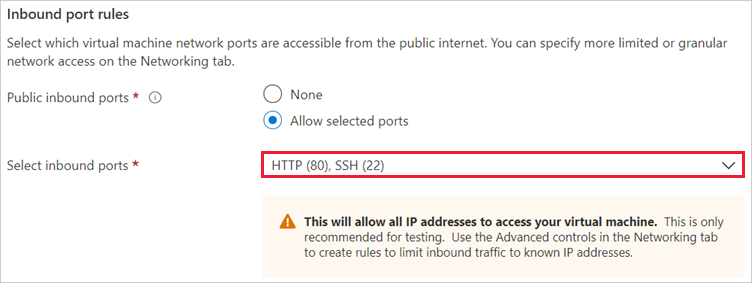
Inbound port rules
To enable connectivity to your newly created virtual machine, select both SSH and HTTP for inbound port rules. This is because you'll use the SSH protocol to connect to the virtual machine, and you'll use the HTTP protocol when you access the ASP.NET Core application that's running on Linux.
Save the private key
Because the SSK public key option is selected, you'll see the following message when you create the virtual machine:
Generate new key pair
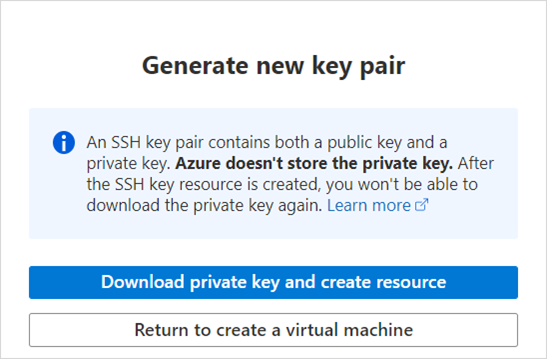
Select Download private key and create resource, and then save the private key to your local disk. The extension of the file is .pem (Privacy-Enhanced Mail).
Note
You use the private key to open your door when you connect to the Linux virtual machine. Therefore, you should not share this key with other people.
Determine the IP address
After the virtual machine is created, go to the resource page, and determine and note the public IP address of the virtual machine. You'll use this IP address to connect to the virtual machine.
Note
We recommend that you use a static IP address because you might have to restart the computer during the tests. Using a dynamic public IP will cause another IP address to be allocated to the virtual machine after it's restarted.
Connect to the Linux virtual machine
Now that you have a Linux virtual machine and you know its IP address, you also have your private key to authenticate by using SSH public key authentication, and you can log in. It's a good time to discuss some terminologies that you'll encounter when you connect to the Linux virtual machine.
You'll not use a GUI to connect to and manage your Linux virtual machine. Instead, you'll use a terminal to connect and a shell to run commands.
The UNIX terminal
The term "terminal" is based on early computer models that occupied a whole room and were controlled at a physical terminal through punch card readers and, later, keyboards. Today, a terminal is a software representation of physical terminals. PuTTY, for example, is a terminal.
The UNIX shell
The UNIX shell is an interface between the user and UNIX-like operating systems. A user is in a shell as soon as that user logs on to the system. The shell provides a command line interpreter (CLI) that reads and runs commands and scripts to control the system, and then displays the resulting output.
The shell is also referred to as the "command line" or "terminal", and these terms are interchangeable. The shell provides some commands and a programming language that you can use to write scripts. There are several different shell implementations. including the popular Bash.
This article covers the following connection options:
- Using PowerShell SSH terminal
- Using the PuTTy SSH terminal
Connect by using PowerShell SSH terminal
If you're running on Windows 10, version 1809 or a later version, you can use the built-in PowerShell SSH client. To connect to a virtual machine, open PowerShell, and run an SSH command in the following format:
ssh -i <path to .pem private key file> <user>@<host>
For example:
ssh -i d:\Learn\Linux\myPrivateKey.pem <UserName>@127.0.0.1
If you have never connected to this server before, you receive the following warning message:
The authenticity of host '<HostName>' can't be established.
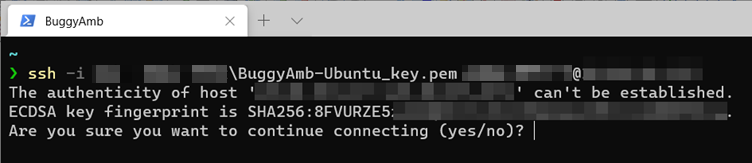
If you enter yes, you receive the following more warning:
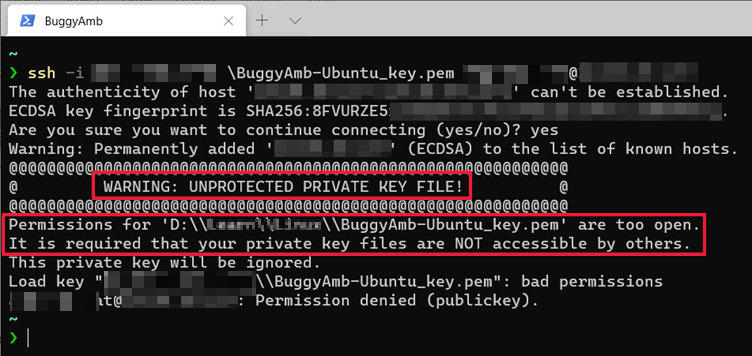
Essentially, the SSH client wants the private key to be "more private". In other words, the private key that is contained in the .pem file is accessible to other users on the computer that you're connecting to. The expectation is that a private key should be accessible to only the user who will initialize the connections to the Linux virtual machine.
To fix this problem, change the permissions on that private key file. To do this, follow these steps:
Locate and right-click the private key file, select Properties, and then select the Security tab. In this example, you see the following permissions that are inherited from the folder.
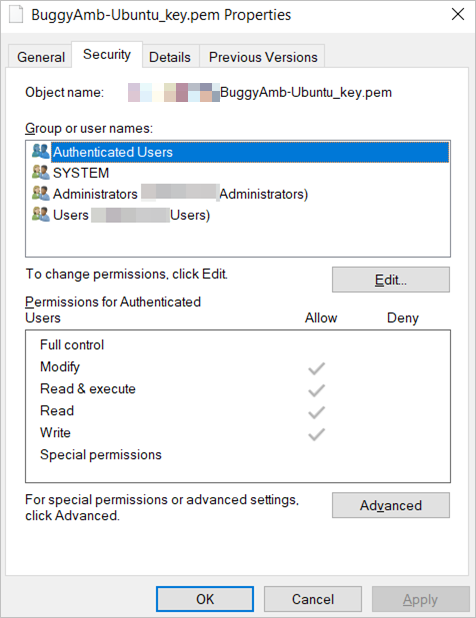
For this example, you want only the SYSTEM group and your account to have access to this file. Because the permissions are inherited from the folder, you must disable that inheritance before you can edit the permissions. Select Advanced, and then select Disable Inheritance. You're prompted by the following question:
What would like to do with the current inherited permissions?
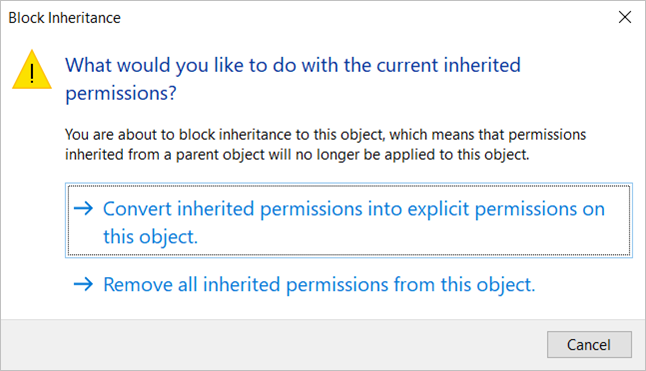
Select Convert inherited permissions into explicit permissions on this object.
Remove all the groups but SYSTEM, and then add your own account. The following are the final permissions that are granted for your private key.

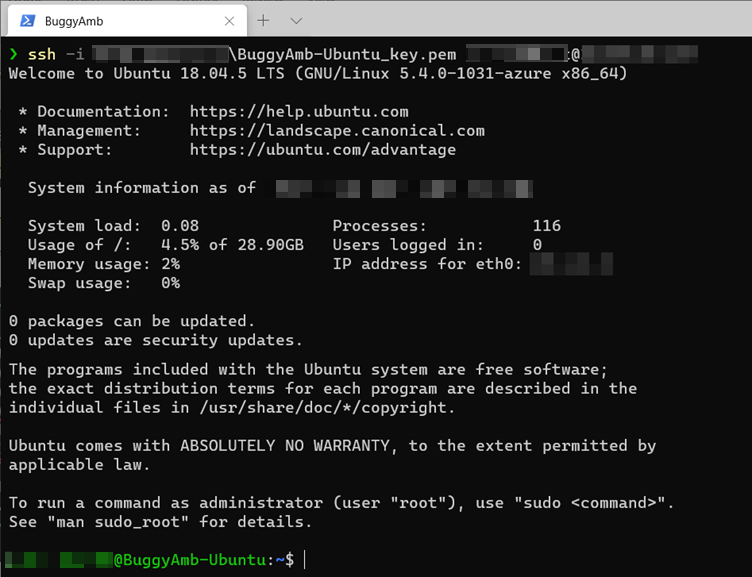
Try again to connect by using the same SSH command. This time, the connection should be established without any errors.
Connect by using PuTTY
PuTTY is among the most popular terminals for connecting to a Linux virtual machine. You can freely download and install PuTTY for Windows on your client computer.
PuTTY is easy to use. However, keep in mind that PuTTY doesn't accept the PEM format for private key. Therefore, you have to convert the key to the format that PuTTY expects to see (PPK). Fortunately, converting the PEM format is also easy because the PuTTY Key Generator (PuTTYgen) is installed together with the terminal software.
To convert files, follow these steps:
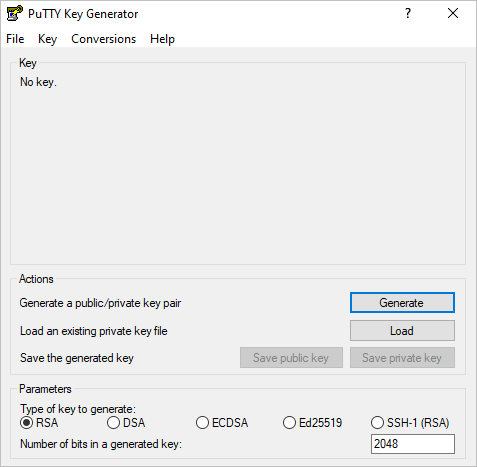
Start PuTTYgen, and make sure that RSA is selected as the type of key to generate.
Select Load to select the private key file that has the .pem extension.
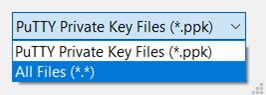
Make sure that All Files is selected because the default selection for PuTTYgen is PPK.
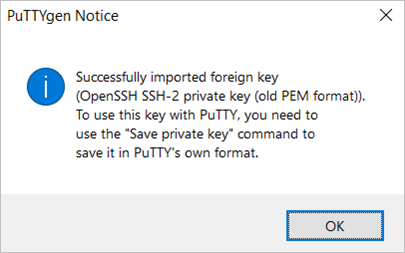
Locate and open the desired PEM file. You should see the following message that indicates that PuTTYgen was able to import the key. Now, you can save the private key in PPK format.
Select OK, and then select Save private key:
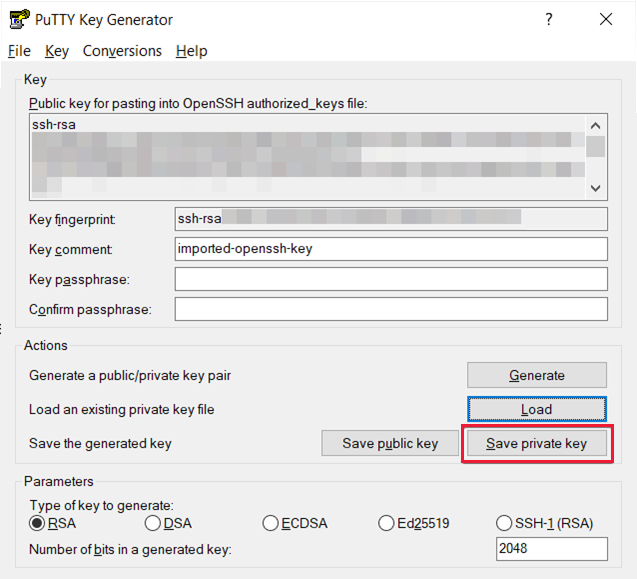
PuTTYgen will prompt you to confirm that you want to save the key without a passphrase. Select yes, and save the private key in PPK format.
Now, you're ready to connect to the virtual machine by using the PPK file.
Start PuTTY. You'll use the same <username>@<host | IP address> format for the connection information. You can save this session information to reuse later. The following screenshot shows the PuTTY Configuration dialog box after the current session was saved. The dialog box shows the host information in <username>@<host | IP address> format and the session name after it was selected from the available list.

Because you're using SSH public key authentication, you have to tell PuTTY where to find the private key. To do this, expand SSH, and select Auth in the Category pane, and then select Browse.
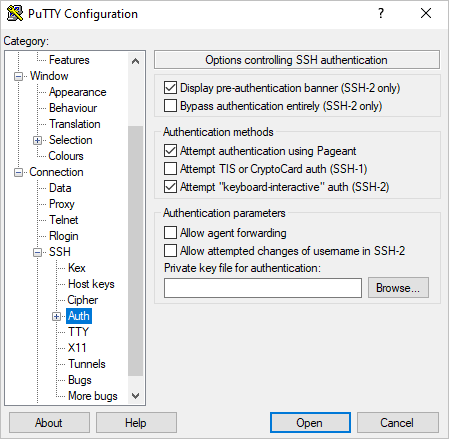
Locate and select the PPK file that you created by using PuTTYgen.
Select Open to start the session.
Note
When you first connect to the virtual machine, you receive the following warning message:
The server's host key isn't cached in the registry. You have no guarantee that the server is the computer you think it is.
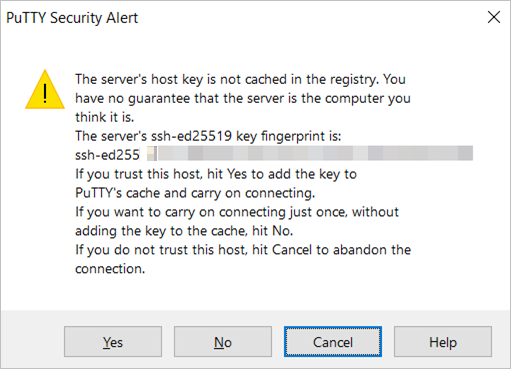
This message resembles the message that's generated the first time that you connect to the virtual machine by using an SSH client in PowerShell.
Select Yes to connect to the virtual machine.
Note
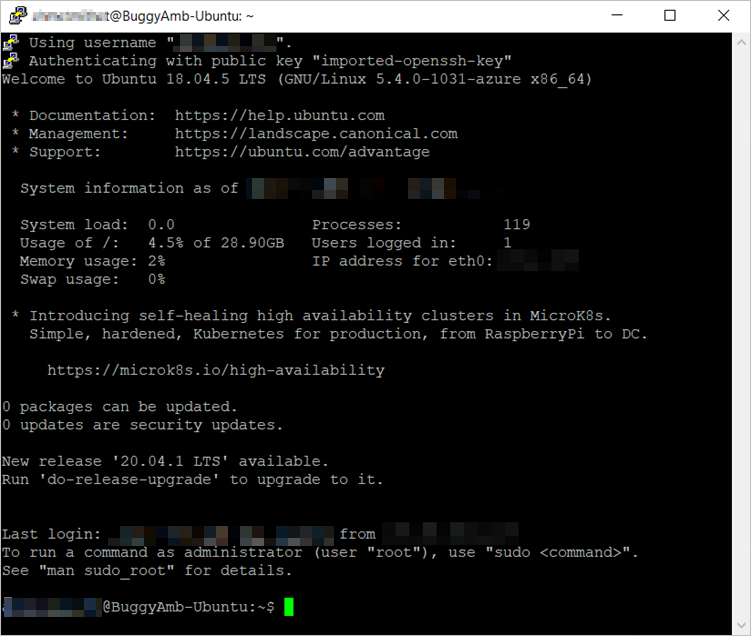
You'll use PowerShell SSH to connect to your virtual machine for the remainder of these tutorials.
Next steps
Part 1.2 - Basic operations on Linux
Third-party information disclaimer
The third-party products that this article discusses are manufactured by companies that are independent of Microsoft. Microsoft makes no warranty, implied or otherwise, about the performance or reliability of these products.