Note
Access to this page requires authorization. You can try signing in or changing directories.
Access to this page requires authorization. You can try changing directories.
Applies to: .NET Core 2.1, .NET Core 3.1, .NET 5
Goal of this part
In this part, you'll learn how to install .NET Core on Linux.
This topic assumes that you're running Ubuntu, and that you're using the APT command-line tool to install applications.
Prerequisites
This part assumes that you know the following processes:
- How to run commands as a superuser (root).
- How to install applications by using package managers.
If you're not at least familiar with these processes, refer to the previous parts before you continue.
Install .NET Core
For reference during this procedure, see Preparing your Linux system for .NET Core.
For the supported versions of .NET Core on different Linux distributions, see Install .NET on Linux.
In this article, you can select your Linux version to obtain instructions for your distribution. Because we're using Ubuntu 18.04, we'll be following the instructions from the "18.04" section of Install the .NET SDK or the .NET Runtime on Ubuntu.
Begin by running the following commands:
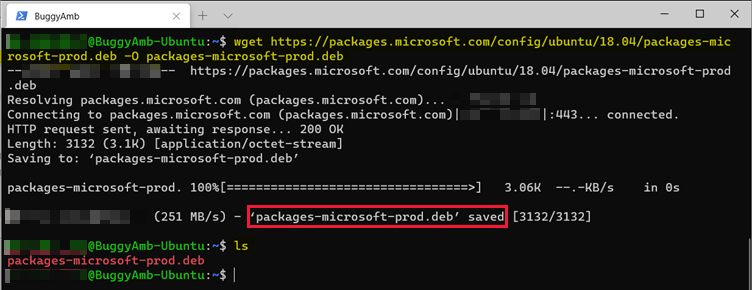
wget https://packages.microsoft.com/config/ubuntu/18.04/packages-microsoft-prod.deb -O packages-microsoft-prod.deb

sudo dpkg -i packages-microsoft-prod.deb
The first command is a wget command. According to its help page, wget is a non-interactive network downloader. It downloads files from HTTP servers in a directory. It can run in the background even if the user isn't logged in. This wget command downloads the Packages-microsoft-prod.deb file from packages.microsoft.com servers in the current directory.
If we run ls after we run the wget command, we should see that the package is downloaded in the current directory.
In the second command, dpkg is the package manager for Debian and Ubuntu. This command adds the Microsoft package signing key to the list of trusted keys, and then adds the package repository.

Because we've downloaded and added a new package repository, the package manager has to know about it. Therefore, we have to update the package manager by using the sudo apt update command.

Now, the package manager is aware of the Microsoft repository, and we can continue the installation.
.NET Core versions
At the time of this writing, the latest .NET Core version is 5.0. We recommend that you install the latest version. However, you should also install the .NET Core 3.1 SDK. This is necessary because the troubleshooting labs in this series of articles assume that you're using BuggyAmb -- a buggy ASP.NET Core application that we use to learn how to troubleshoot ASP.NET Core applications. The current version of BuggyAmb is .NET Core 3.1.
The different versions of these applications can successfully run side by side on the same computer.
Identify the correct package name
Per the "How to install other versions" section of Install the .NET SDK or the .NET Runtime on Ubuntu, the .NET Core packages are named in the format of {product}-{type}-{version}, and have the following conditions:
- The product is either dotnet or aspnetcore. Notice that aspnetcore is also installed when .NET Core is installed.
- The type is either sdk or runtime.
- At the time of this writing, the supported .NET Core versions are 5.0, 3.1, 3.0, and 2.1.
For example, if you want to install version 5.0 of ASP.NET Core runtime, then the product would be aspnetcore-runtime-5.0.
Because you have to install the .NET Core 3.1 SDK for this series of articles, the package name would be dotnet-sdk-3.1.
You should know how to install packages by using APT. If you don't, refer to the previous parts. To install the .NET Core 3.1 SDK, run sudo apt install dotnet-sdk-3.1.

Enter y and press Enter. The package manager downloads and installs both .NET Core and ASP.NET Core runtimes and SDKs.

Note
You can also installing the .NET 5.0 SDK by running the sudo apt install dotnet-sdk-5.0 command.
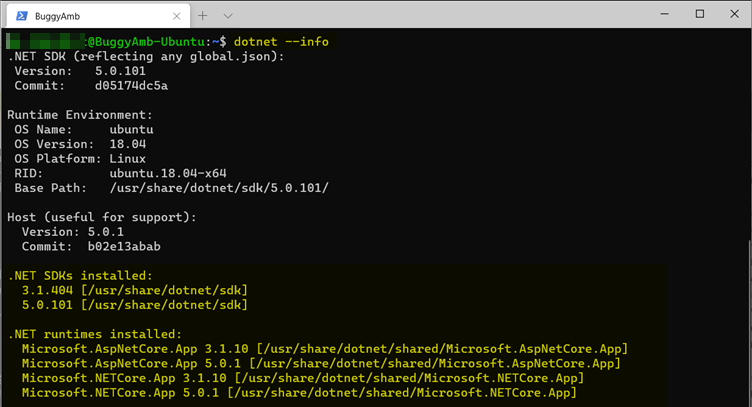
Now, verify the installation of the runtimes and SDKs by running dotnet --info. The following screenshot shows that .NET Core 3.1 and 5.0 runtimes and SDKs are installed side by side.
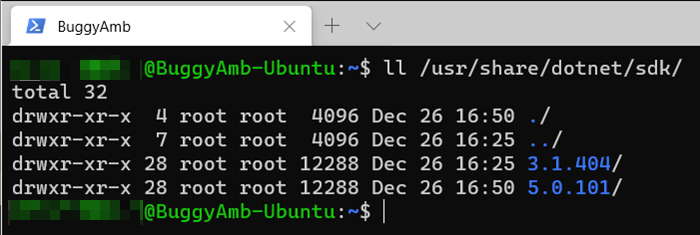
Both .NET Core and ASP.NET Core runtimes are installed together with the .NET Core SDK. If you examine the SDK folder by running ll /usr/share/dotnet/sdk, you can see both versions there, too.
The .NET Core SDKs and runtimes are now installed. In the next part, we'll create an ASP.NET Core application by using .NET CLI tools.
Third-party information disclaimer
The third-party products that this article discusses are manufactured by companies that are independent of Microsoft. Microsoft makes no warranty, implied or otherwise, about the performance or reliability of these products.