Note
Access to this page requires authorization. You can try signing in or changing directories.
Access to this page requires authorization. You can try changing directories.
Applies to: .NET Core 2.1, .NET Core 3.1, .NET 5
This article introduces how to configure a local firewall to secure your Linux virtual machine (VM).
Prerequisites
There are no prerequisites to complete this part of the tutorial.
Goal of this part
You'll learn how to secure your Linux VM by configuring a firewall.
Although there are no prerequisites for this part, the ideal setup would follow the guidance from the previous parts. You should have the following:
- Nginx running automatically and listening for requests sent on port 80
- Nginx configured as a reverse proxy and routing incoming requests to an ASP.NET Core application that is listening on port 5000.
- The ASP.NET Core application that is configured to start automatically after the server is restarted or when the process is stopped or crashes
Configure a local firewall to allow access from remote computers
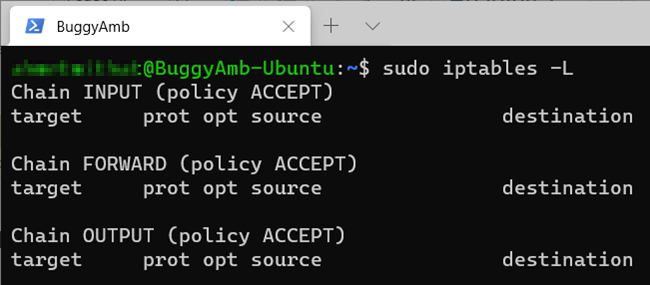
Almost all Linux distributions include a local firewall that is named iptables. This beginner's guide is enough for a quick start. Iptables is a lightweight yet powerful firewall that uses policy chains to allow or block traffic.
According to the Ubuntu community help page, by default, iptables is installed on all official Ubuntu distributions and is configured to allow all traffic.
Although iptables is a lightweight firewall, it isn't easy to manage the persistent rules. Fortunately, there are several firewall configuration tools that make the task of configuring firewall rules in Linux much easier. According to official Ubuntu firewall documentation, the default firewall configuration tool for Ubuntu is ufw. This tool provides a more user-friendly method than iptables provides to create an IPv4 or IPv6 host-based firewall.
Note
ufw is initially disabled by default. Therefore, you have to enable it to be able to use it.
The Linux VM that has been used throughout this tutorial isn't protected by any firewall rule. This is because, although iptables is installed and running, there are no defined rules.
The goal here's to allow only HTTP and SSH (Secure Shell) traffic to reach the VM from the outside. To achieve this, follow these steps:
- Before you enable
ufw, make sure that the default policy rule is set to allow. Otherwise, you run the risk losing the SSH connection to the VM. The default rule is the rule that is processed if no other rule is matched. Enabling the default "allow" rule will make sure that incoming SSH traffic isn't blocked. At this point, there is no "deny" rule at all. Therefore, all incoming traffic is allowed. -
Important
Explicitly add SSH and HTTP "allow" rules. Also notice that, if you configured the SSH port to a different value than the default of 22, you should allow that port. For example, if you changed the SSH port to 2222, you should run this command:
sudo ufw allow 2222. - Set the default rule as a "deny" rule. This makes sure that if the protocol is something different than SSH or HTTP, the default "deny" rule will deny the traffic. For example, incoming HTTP traffic will be denied.
- Enable the
ufw.
The commands for these steps are listed in the following screenshot.
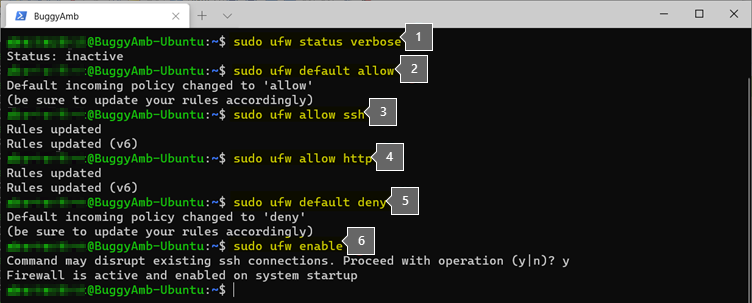
This is what occurs in each step.
checks the status of the ufw by running the
sudo ufw status verbosecommand. By default, the ufw isn't enabled and is inactive.runs
sudo ufw default allowcommand. Because there is no other rule than the default "allow" rule, every port on the VM will be considered to be open.-
Important
Add the SSH protocol to the allowed list by running the
sudo ufw allow sshcommand. Protocol.ssh is a known protocol and it is defined in the /etc/services file. Therefore, "ssh" can be used instead of "22". Remember that if you configure the SSH service to listen on a port other than the default port of 22, you should explicitly add the other port. For example, if you configure SSH to listen to port 2222, run this command:sudo ufw allow 2222. Allow the HTTP protocol by running
sudo ufw allow http. HTTP is a known protocol that is defined in the /etc/services file. Therefore, the protocol name can be used and thesudo ufw allow httpcommand can be run. Runningsudo ufw allow 80is also perfectly valid.Note
After you allow both the SSH and HTTP protocols, you'll want to add all the other protocols to the "deny" list.
You can do this by changing the default rule to deny by running the
sudo ufw default denycommand. Only the SSH and HTTP protocols will be allowed. The other protocols will be denied.Enable
ufw.
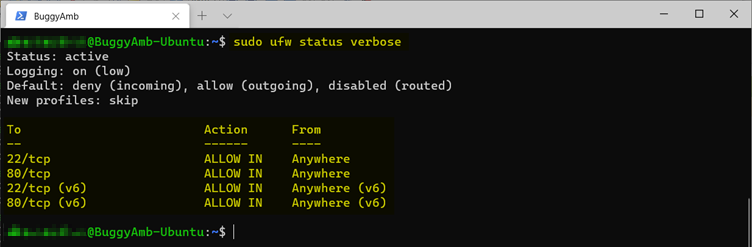
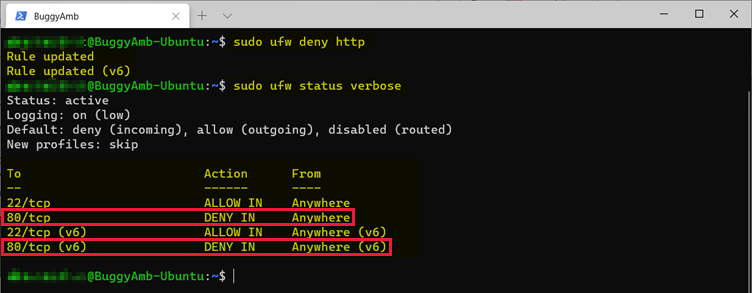
Here's the sudo ufw status verbose output after you complete this procedure.
After the firewall is configured, test whether it works.
Test the local firewall
Test the firewall is easy: Create a "deny" rule for the HTTP protocol, and then try to access the site from another computer. The request should be blocked.
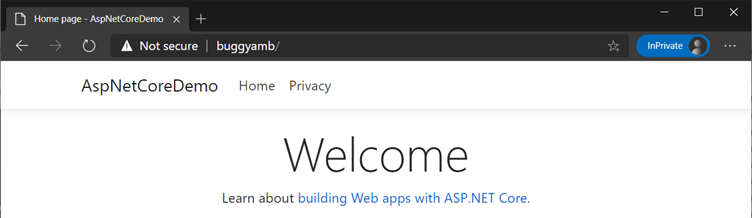
Before you create this "deny" rule, make sure that the application is accessible to the browser in its current configuration. To do this, edit the C:\Windows\System32\drivers\etc\hosts file on the client computer by adding the buggyamb hostname and using the public IP address of your Linux VM. The buggyamb hostname resolves the Linux VM IP address. You can add any hostname to your hosts file, or you can try to connect directly to the public IP address of your Linux VM.
After you verify that HTTP requests can reach the VM, try to enable a rule that blocks HTTP traffic. This is make sure that the firewall does work. To do this, add a "deny" rule for HTTP by running sudo ufw deny http. This adds two "deny" rules for the HTTP protocol (on port 80). One is for IPv4, the other is for IPv6.
Open the browser again, and then try to access the ASP.NET Core application that is running in Linux.
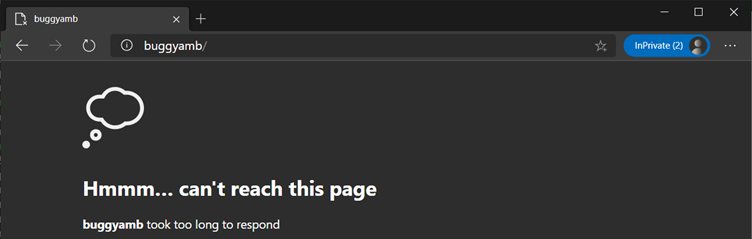
This screenshot shows the expected result.
You could run a similar test directly inside the Linux VM by using the wget command. The following screenshot shows the required steps for the same test by running wget.
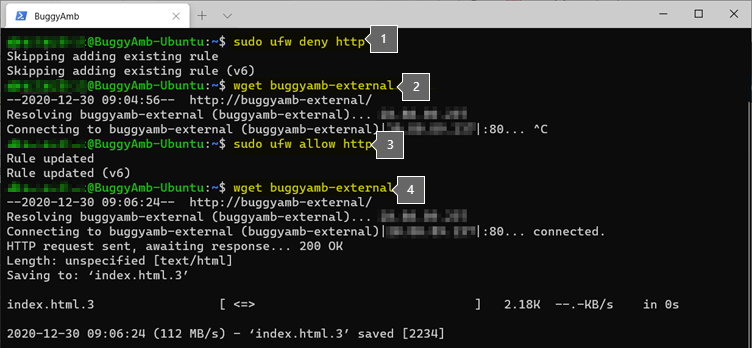
This is what occurs in each step.
The "deny" rule for the HTTP protocol was added.
The
wget buggyamb-externalcommand was run. As you might guess, the "buggyamb-external" hostname resolves the public IP address of the Linux VM. To do this, edit the/etc/hostsfile by using vi. As shown,wgettried to connect to it, but never succeeded. To break out of the operation, you had to press CTRL+C.An "allow" rule for the HTTP protocol was added.
Running the
wget buggyamb-externalcommand again produced different results. This time,wgetwas able to connect because the HTTP protocol was allowed. As shown,wgetdownloads the Index.html file to your current directory.
You're now one step closer to completing the required configuration to debug the ASP.NET Core application. Before you go to the next part, make sure again that both SSH and HTTP are allowed in the local firewall.
