Note
Access to this page requires authorization. You can try signing in or changing directories.
Access to this page requires authorization. You can try changing directories.
Applies to: .NET Core 2.1, .NET Core 3.1, .NET 5
This article discusses how to configure a second website in Nginx by using hostname, and how to test the configuration.
Prerequisites
For this part, you should have the following items set up:
- Nginx running automatically and listening for requests that are sent on port 80.
- Nginx configured as a reverse proxy, and routing all the incoming HTTP requests to the first ASP.NET Core application that's listening on port 5000 (you can use any ASP.NET Core application as a back-end application that's running on this port.)
- That first ASP.NET Core application configured to always run (if the process stops or the server is restarted, the ASP.NET Core application should start automatically.)
- The Linux local firewall enabled and configured to allow SSH and HTTP inbound traffic.
- A second ASP.NET Core application that's configured to listen on port 5001 (this application should also be configured to always run, and the BuggyAmb sample ASP.NET Core application should be configured as the second application in the setup.)
Goal of this part
Currently, there's one site configured in Nginx. Any request that arrives on port 80 to Nginx is routed to that site. The hostname doesn't matter in this setup. Use either the IP address or any hostname that resolves to the IP address. All requests will be routed to the default website. That default website acts as a reverse proxy and routes requests to the first ASP.NET Core application that's listening on port 5000.
In this part of the tutorial, you'll create a second website in Nginx. That website will also act as a reverse proxy, and any request that has a specific hostname will be routed to the second ASP.NET Core application that's listening on port 5001.
You'll also configure the website to listen to a specific hostname. In the end, there will be two sites that are accessible and that have these hostnames:
- First website:
http://myfirstwebsitewill be directing traffic to the first ASP.NET Core demo application. - Second website:
http://buggyambwill be directing traffic to the second ASP.NET Core sample buggy application.
Add myfirstwebsite and buggyamb to the hosts file of both your client Windows and Linux computers. In this way, you can use these URLs to test the new configuration.
These host names are for demonstration only. Feel free to use any other host names that you prefer, as long as you consistently use the same host names throughout the exercises in this part.
Configure a second web using a hostname in Nginx
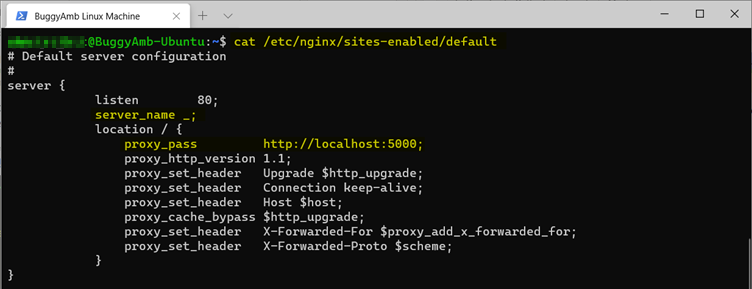
If you recall, one of the directories in which Nginx loads the site configurations is /etc/nginx/sites-enabled/. Currently, there's one default configuration file. The file resembles the following screenshot.
Note
Notice the highlighted parts because you're going to have to modify these:
server_name: You can set the desired hostname here. Currently, this is configured to the value_. This means any hostname.proxy_pass: This is actual ASP.NET Core application that's running and listening on a given URL. Requests are routed to this URL.
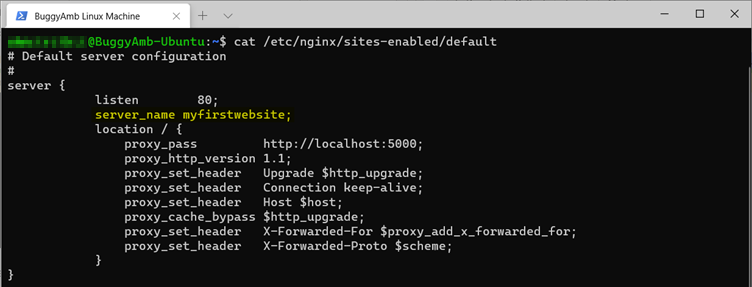
Configure the first website to listen on host header http://myfirstwebsite. To achieve this, change the server_name in the /etc/nginx/sites-enabled/default configuration file, as shown in the following screenshot. As a reminder, you'll have to use the sudo vi /etc/nginx/sites-enabled/default command to edit this file.
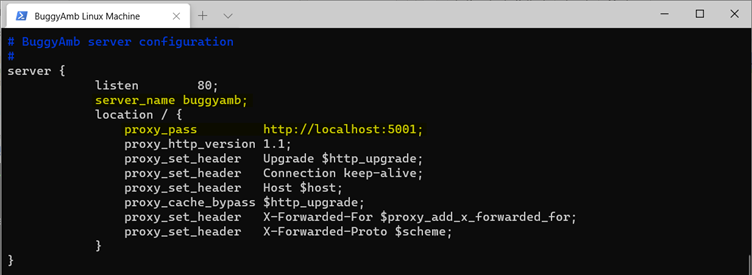
Create a second Nginx configuration file for the second website. Use this file as a template to create a copy of this file in the same configuration directory. Name the file buggyamb.config.
sudo cp /etc/nginx/sites-enabled/default /etc/nginx/sites-enabled/buggyamb.config
Edit the configuration file by running the sudo vi /etc/nginx/sites-enabled/buggyamb.config command. Here's the final version of the /etc/nginx/sites-enabled/buggyamb.config file.
The resulting setup should have two configuration files in the Nginx site configuration directory: buggyamb.config and default. You'll have to set Nginx to reload the configuration changes. However, you should first test the new configuration to make sure that no errors were introduced when you made changes. Run the sudo nginx -t command, and verify that the configuration is correct. Then, run sudo nginx -s reload to reload the configuration and read in the new changes.

Test the new configuration
Set the myfirstwebsite and buggyamb hostnames to resolve to the correct IP addresses. When you access the sites from the Linux computer, these hostnames should resolve to 127.0.0.1 and for the external clients, such as the client Windows computer. The hostnames should resolve to your Linux virtual machine's public IP address. You can retrieve that IP address from the Azure portal.
Note
The Hosts mappings are stored in the /etc/hosts file in Linux and in the C:\WINDOWS\System32\drivers\etc\hosts file in Windows.
This is the content of the Linux hosts file.

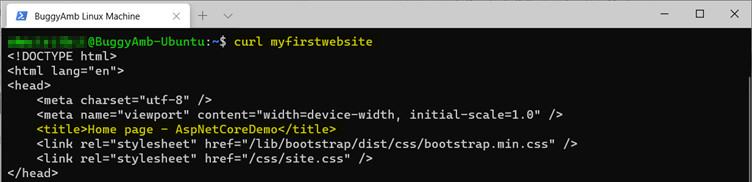
You can run the curl myfirstwebsite and curl buggyamb commands to make requests to each of the two sites.
Here's the curl myfirstwebsite output. The response seems to be correctly displaying the HTML content from the home page of the demonstration ASP.NET core application that was initially deployed and is listening on port 5000.
And here's the curl buggyamb output. This displays the HTML content from the home page of the BuggyAmb sample application that's running on port 5001.

You should be able to browse the same URLs from the client computer by using a browser. That should also work if you configure the hosts file correctly. This is what's displayed when browsing to http://buggaymb from a browser that's running on a Windows computer.

Up to this point, you have the following setup:
Nginx hosting two websites:
- The first website listens for requests by using the
myfirstwebsitehost header, and routes the requests to our demo ASP.NET Core application. This application listens on port 5000. - The second website listens for incoming HTTP traffic by using the host header value of
buggyamb, and routes the requests to the second ASP.NET Core sample buggy application. This application listens on port 5001.
- The first website listens for requests by using the
Both ASP.NET Core applications are running as services that restart automatically when the server is restarted, or the applications stop responding.
Linux local firewall is enabled and configured to allow SSH and HTTP traffics.
Troubleshooting tips
You may receive HTTP 502 - Bad Gateway error when you browse a site. "HTTP 502 - Bad Gateway" means that Nginx wasn't able to communicate with the back-end ASP.NET Core application. This occurs if the back-end application isn't running.
In this case:
- Make sure that both ASP.NET Core applications listen on different ports. One should listen on port 5000 while the other one should listen on port 5001.
- Make sure that both ASP.NET Core applications are configured to start automatically.
- Check the status of the ASP.NET Core application services that are using the
systemctl statuscommands. If one isn't running, troubleshoot it by examining the system logs by running thejournalctlcommand. UsesyslogIdentifierto filter the logs. - Makes sure that both .NET Core 3.1 and .NET 5.0 are installed. One site uses .NET Core 3.1, the other uses .NET 5.0.