Note
Access to this page requires authorization. You can try signing in or changing directories.
Access to this page requires authorization. You can try changing directories.
Applies to: .NET Core 2.1, .NET Core 3.1, .NET 5
This article discusses how to use Docker to open a core dump file on a Windows virtual machine (VM).
Prerequisites
To complete this section, you should have at least one core dump file copied on your Windows VM in any folder.
Goal of this lab
You'll learn how to open a core dump file on another Linux VM by using Docker.
About containers and Docker
According to the official documentation of Docker, a container is a standard unit of software that packages code and all its dependencies so that the application runs quickly and reliably from one computing environment to another. A Docker container image is a lightweight, standalone, executable software package that includes everything that's required to run an application: Code, runtime, system tools, system libraries, and settings.
Simply put, you can use Docker containers to run and deploy your applications. You can create Docker containers from different OS images, such as Windows Core or Ubuntu. In this exercise, you'll create an Ubuntu container to analyze your core dump file.
To create and use Docker containers on a Windows VM, install Docker Desktop for Windows. The linked article explains the requirements and installation steps. Per the requirements, Docker uses Windows Subsystem For Linux (WSL) for Linux containers.
Note
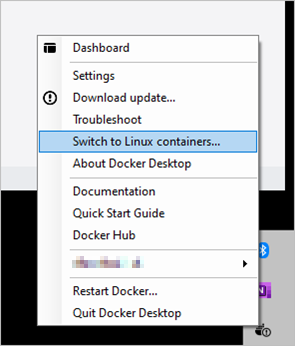
Docker can run both Windows and Linux containers, but not at the same time. Therefore, you'll have to switch to Linux containers.
Before moving on, we recommend that you review this FAQ article about Docker to familiarize yourself with Docker.
Create a dockerfile
After you install the Docker Desktop on Windows, you'll need a dockerfile. A dockerfile is simply a set of instructions to create the container. The "dockerfile" file name is case-sensitive and should be all lowercase without any file name extension.
You can run commands on the target container by using the RUN command. For example, the dockerfile in this section shows that you can use RUN mkdir /dumps to run a mkdir /dumps command on the target container OS.
This sample shows dockerfile content that lets you achieve this section's goal: Creating an Ubuntu container by using the latest Ubuntu image, installing the latest dotnet SDK, updating the OS, installing the dotnet-dump and dotnet-symbol tools, copying and extracting the dump files, and downloading the required files by using the dotnet-symbol tool on one of the core dump files.
Note
Comments begin with a pound sign (#). Comments are provided for each line so that you can understand what each command does.
# Install the latest Ubuntu container image
FROM ubuntu:latest

# Install the latest dotnet SDK
FROM mcr.microsoft.com/dotnet/core/sdk:latest AS tools-install

# Update the OS, the slash (\) means that the command continues on the next line
RUN apt-get update \
&& apt-get upgrade -y \
&& apt-get install -y

# Install the dotnet-dump and dotnet-symbol tools in the /dotnetcore-tools folder
RUN dotnet tool install --tool-path /dotnetcore-tools dotnet-dump
RUN dotnet tool install --tool-path /dotnetcore-tools dotnet-symbol

# Add the /dotnetcore-tools in the PATH environment variable to run the dotnet-dump and dotnet-symbol tools directly
ENV PATH="/dotnetcore-tools:${PATH}"

# Create a /dumps folder in the Linux container
RUN mkdir /dumps

# Copy the coredumps.tar.gz file from a Windows VM to the /dumps folder on a Linux VM
COPY ./coredumps.tar.gz /dumps/

# Extract the tar file to the /dumps folder
RUN tar -xf /dumps/coredumps.tar.gz -C /dumps

# Run dotnet-symbol against one of the core dump files to download the required files (such as symbols and DAC)
RUN dotnet-symbol --host-only --debugging ~/dumps/coredump.manual.1.11724
Create a file that's named dockerfile in the same directory that contains the coredumps.tar.gz archive file. Remember: The file name is case-sensitive and has no extension.
Build and run the Docker container
Again, you have to switch to Linux containers in Docker if it's running Windows containers.
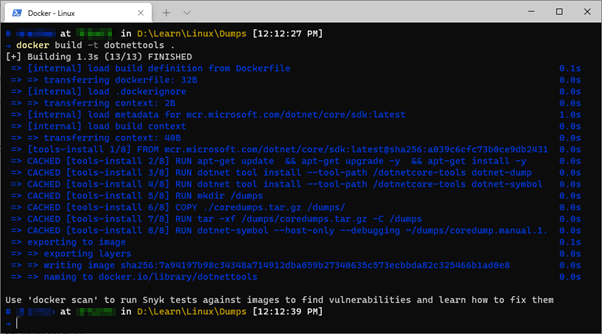
Then, open a Command Prompt window, and change to the folder that contains the coredumps.tar.gz and dockerfile file. To build the docker container, run docker build -t dotnettools ..
Note
The -t parameter means "tag." You'll use this tag name when you run your docker container.
The period (.) at the end of the command means that the Docker build command will use the dockerfile from the current directory.
Here's the output of the build command. Because the same command had been run several times, it uses its internal cache for the target image. The first time that you run this command, it will download the necessary files, and then cache them for later use when necessary. It may take some time to build the image when you first run the command.
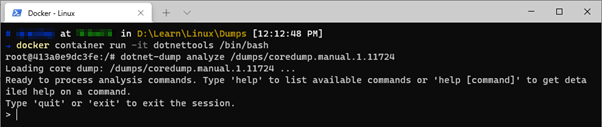
Then, run the container by using the docker container run -it dotnettools /bin/bash command.

That's it. You're now inside the newly built Linux container. The rest is the same as before: You'll open your core dump by using with the same dotnet-dump command: dotnet-dump analyze /dumps/coredump.manual.1.11724. Here's the result from the sample environment that's used to build the training series.
You can run SOS commands, such as clrthreads, to display the managed threads.
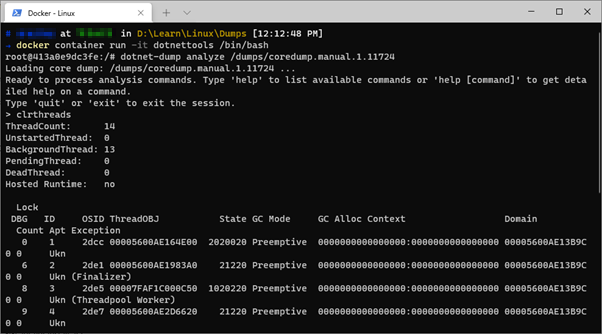
Now, you're ready to analyze core dump files in a Linux container by using Docker.