Note
Access to this page requires authorization. You can try signing in or changing directories.
Access to this page requires authorization. You can try changing directories.
This article provides guidance on troubleshooting consent issues in Microsoft Entra ID. It applies to OpenID Connect and OAuth2-based authentications.
Note
SAML-based applications might present similar errors but require different solutions, typically due to configuration mismatches within the SAML request on either the third-party SAML Service Provider or Microsoft Entra ID.
Symptoms
When an application tries to sign in or get an access token for a resource that hasn't been consented to by a user or admin, you receive an error message similar to one of the following examples:
-
Need admin approval
-
AADSTS65001: The user or administrator has not consented to use the application with ID '<App-ID>' named '<Name-of-App>'. Send an interactive authorization request for this user and resource.
-
AADSTS650056: Misconfigured application. This could be due to one of the following: The client has not listed any permissions for 'AAD Graph' in the requested permissions in the client's application registration. Or, The admin has not consented in the tenant. Or, Check the application identifier in the request to ensure it matches the configured client application identifier. Please contact your admin to fix the configuration or consent on behalf of the tenant.
-
AADSTS90094: An administrator of <TenantDisplayName> has set a policy that prevents you from granting <Name-of-App> the permissions it is requesting. Contact an administrator of <TenantDisplayName>, who can grant permissions to this app on your behalf.
-
AADSTS90008: The user or administrator has not consented to use the application with ID '<App-ID>'. This happened because application is misconfigured: it must require access to Windows Azure Active Directory by specifying at least 'Sign in and read user profile' permission
-
AADSTS900941: Administrator consent is required. App is considered risky. (AdminConsentRequiredDueToRiskyApp) This app may be risky. If you trust this app, ask your admin to grant you access.
-
AADSTS900981: An admin consent request was received for a risky app. (AdminConsentRequestRiskyAppWarning) This app may be risky. Only continue if you trust this app.
There are many reasons why you might receive a message indicating that admin approval or admin consent is required. Consider the following high-level scenarios:
- The User.Read permission is missing.
- User consent is disabled at the tenant level.
- User assignment is enabled for the application.
- A service principal doesn't exist in the tenant for the client application.
- A service principal doesn't exist in the tenant for the resource.
- A consent URL that specifies
prompt=admin_consentorprompt=consentis requested. - Scopes that haven't been consented to are requested in a sign-in request.
- The scope or permission requires admin consent.
- User consent is blocked for risky applications.
The following sections provide a troubleshooting guide for finding the root causes of consent issues. If you want to resolve issues directly, go to the Perform admin consent section.
Before troubleshooting
Make sure the application has permission for user sign-in, such as the User.Read permission. Furthermore, ensure that this permission has been consented to.
For example, if you own the application registration or any application requiring user sign-in, you should at least have the Microsoft Graph User.Read or Openid delegated permission added to the application registration API Permissions.

Troubleshoot steps
Step 1: Get the sign-in request sent to Microsoft Entra ID
To determine why the consent prompt appears, get the sign-in request and examine the parameters sent to Microsoft Entra ID. When the consent prompt appears, you can get the sign-in request by using one of the following methods:
- If you're using a browser, view the address bar.
- If you're not using a browser or still can't see the address bar in the browser, use an HTTP capture tool like Fiddler to get the request.
A sign-in request should look like the following one:
V1 OAuth2 endpoint:
https://<Aad-Instance>/<Tenant-ID>/oauth2/authorize?client_id=<App-ID>&response_type=code&redirect_uri=<Redirect-URI>&resource=<App-URI-ID>&scope=<Scope>&prompt=<Prompt>V2 OAuth2 endpoint:
https://<Aad-Instance>/<Tenant-ID>/oauth2/v2.0/authorize?client_id=<App-ID>&response_type=code&redirect_uri=<Redirect-URI>& scope=<Scope>&prompt=<Prompt>
The following table provides an example of the parameters used in a sign-in request, which are referenced throughout the following troubleshooting steps:
| Property | Sign-in request portion | Value |
|---|---|---|
| Aad-Instance | <Aad-Instance> |
login.microsoftonline.com |
| Tenant-ID | <Tenant-ID> portion of the sign-in request |
common |
| App-ID | <App-ID> portion of the sign-in request |
1f92960d-1442-4cd2-8c76-d13c5dcb30bf |
| Scope | <Scope> portion of the sign-in request |
Openid+User.Read+Directory.Read.All |
| App-URI-ID | V1 endpoint: <App-URI-ID> portion of the sign-in requestV2 endpoint: For resources other than Microsoft Graph, this will be the portion before the scope name. For example, for https://analysis.windows.net/powerbi/api/App.Read.All, App.Read.All is the scope name, so the App-URI-ID is https://analysis.windows.net/powerbi/api. |
https://graph.microsoft.com |
| Prompt | <Prompt> portion of the sign-in request |
Step 2: Verify if you allow users to consent
To check if user consent is allowed in your organization, follow these steps:
Sign in to the Azure portal.
Navigate to Microsoft Entra ID, and select Enterprise applications > Consent and permissions.
Review the User consent for applications setting:
If Allow user consent for apps is selected, all users can consent to permissions that don't require admin consent. In this case, go to the next step.
If Do not allow user consent is selected, users will always receive the "Need admin approval" message. In this case, an admin must perform admin consent.
Note
If an admin believes they have already consented to those permissions, most likely, not all of the required permissions listed in the sign-in request were consented to, or the wrong application was used based on the
<App-ID>.
Step 3: Verify if the application exists
To verify if the application exists in the tenant, follow these steps:
- Sign in to the Azure portal.
- Switch to the correct tenant based on the
<Tenant-ID>. - Go to Enterprise applications.
- Set Application Type to All Applications and search for the
<App-ID>. - If the application isn't found, this is why you experience consent issues. In this case, perform admin consent. If the application is found, go to the next step.
Step 4:Verify if user assignment is required
In the Enterprise applications pane, search for and select the application. Under the Manage section, select Properties to open the Properties pane, and then review the Assignment required setting.
If user assignment is required, an admin must consent to this application. To do so, go to the perform admin consent section.
Note
Consenting to an application for all users in an organization doesn't allow all users to access the application. You must follow the user assignment rules. Only those users assigned to the application can access it. If you don't want to perform admin consent, the only workaround is to turn off Assignment required, ask users for consent when they access the application, and then turn Assignment required back on.
If user assignment isn't required, go to the next step.
Step 5: Compare permissions requested and granted for the application
To verify if the scopes (also called permissions) in the sign-in request are listed in the Permissions section of the application, follow these steps:
If the application is found in Step 3: Verify if the application exists, select it.
Go to Permissions.
Compare what is listed in the Permissions pane and what is listed as
<Scope>in the sign-in request. The permissions listed in the Permissions pane are those that have been consented to.Note
Pay attention to the permission type. Delegated permissions are for when users sign in, and application permissions are for when the service principal is used to authenticate via the client credential flow.
OpenID Connect scopes are generally not listed in enterprise applications. Don't worry if the following scopes aren't listed:
openid: Sign users inemail: View users' email addressprofile: View users' basic profileoffline_access: Maintain access to data you have given it access to
If
<Scope>in the sign-in request is blank or contains less than what is listed in the Permissions pane, go to the next step. If other scopes in<Scope>aren't in the Permissions pane, go to the Perform admin consent section. The missing permissions must be consented to.
Step 6: Verify if the resource exists in your tenant
To check if a resource exists, try a request that looks like https://<Aad-Instance>/<Tenant-ID>/oauth2/authorize?response_type=code&client_id=<App-ID>&resource=<App-URI-ID>.
You might encounter one of the following behaviors or errors:
You're allowed to sign in (this is the behavior you expect). In this case, go to the next step. In most cases, if you see the
codeparameter in the address bar, it means the authentication process was successful.Error AADSTS650052: The app needs access to a service that your organization has not subscribed to or enabled. Contact your IT Admin to review the configuration of your service subscriptions.
This error means the resource doesn't exist in your organization. To resolve this issue, use this consent URL:
https://login.microsoftonline.com/<Tenant-ID>/oauth2/authorize?response_type=code&client_id=<App-URI-ID>&prompt=admin_consentError AADSTS650057: Invalid resource. The client has requested access to a resource which is not listed in the requested permissions in the client's application registration. Client app ID: <App-ID>(<App-Display-Name>). Resource value from request: '<App-URI-ID>'. Resource app ID:<Resource-App-ID>. List of valid resources from app registration: 00000002-0000-0000-c000-000000000000
In order for a client application to sign in and get an access token for a resource, the resource must be assigned the required API permissions that the client application requires, such as access to Azure Key Vault.
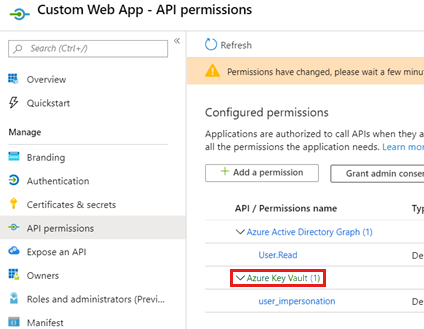
Note
Only the application owner can do this operation.
Error AADSTS500011: The resource principal named '<App-URI-ID>' was not found in the tenant named '<Tenant-ID>'. This can happen if the application has not been installed by the administrator of the tenant or consented to by any user in the tenant. You might have sent your authentication request to the wrong tenant.
This error means that the specified
<App-URI-ID>is invalid or only available as a single-tenant application. Otherwise, it means this resource can't be accessed by external organizations or doesn't exist.To resolve this issue, you must work with the application owner to verify that the
<App-URI-ID>and<Tenant-ID>are correct. If the<App-URI-ID>is owned by a different<Tenant-ID>, then the app registration for<App-URI-ID>must be set up as a multi-tenant application. Otherwise, the<Tenant-ID>must be the same tenant as where the app registration for<App-URI-ID>is located.
Step 7: Verify if the prompt parameter is passed
Sometimes, signing in to the application requires passing the prompt parameter of consent or admin_consent. Once the application obtains consent, make sure the prompt parameter isn't specified. Otherwise, users might always receive a consent error.
Your sign-in request might look like this:
https://login.microsoftonline.com/contoso.onmicrosoft.com/oauth2/authorize?client_id=1f92960d-1442-4cd2-8c76-d13c5dcb30bf&response_type=code&redirect_uri=https://www.contoso.com&scope=openid+profile+User.Read+Directory.Read.All&prompt=consent
So, to resolve consent issues, remove the prompt parameter as follows:
https://login.microsoftonline.com/contoso.onmicrosoft.com/oauth2/authorize?client_id=1f92960d-1442-4cd2-8c76-d13c5dcb30bf&response_type=code&redirect_uri=https://www.contoso.com&scope=openid+profile+User.Read+Directory.Read.All
Perform admin consent
To resolve consent issues, perform admin consent by following these steps:
Have an administrator (a user with the Global Administrator, Company Administrator, or Application Administrator role) access the application.
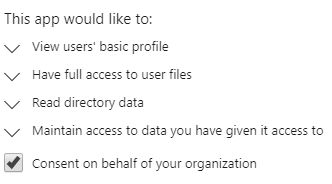
If the consent screen appears, review the requested permissions. To approve the requested permissions, select the Consent on behalf of your organization checkbox.
Note
If an administrator isn't sure what the permissions allow, the administrator must work with the application vendor to understand the permissions and their use. Microsoft support might not know what these permissions do or why they're needed.
If the administrator doesn't get the consent screen, grab the sign-in address, add
&prompt=consentto the end, and then use this request to perform admin consent.Here's an example:
https://login.microsoftonline.com/contoso.onmicrosoft.com/oauth2/authorize?client_id=1f92960d-1442-4cd2-8c76-d13c5dcb30bf&response_type=code&redirect_uri=https://www.contoso.com&scope=openid+profile&tresource=https://graph.microsoft.com&prompt=consentIf the requested permissions aren't listed in the application registration, use the Microsoft identity platform (V2) endpoint to force admin consent. V2 endpoint requires each permission scope to be passed in the
scopeparameter as follows:https://login.microsoftonline.com/contoso.onmicrosoft.com/oauth2/v2.0/authorize?client_id=1f92960d-1442-4cd2-8c76-d13c5dcb30bf&response_type=code&redirect_uri=https://www.contoso.com&scope=openid+profile+User.Read+Directory.Read.All&prompt=consent
Note
- Permission scopes used by the application must be provided by the application owner.
- Consent for application permissions will always require admin consent from a global or company administrator. Application permissions must be added within the application registration in the application's owning tenant.
- Application admins can also consent to delegate permissions that require admin consent.
- When using the admin consent URL, the permissions must already be configured with the application registration. Otherwise, the application owner must have their application correctly configured with Microsoft Entra ID. An admin consent URL looks like
https://login.microsoftonline.com/<Tenant-ID>/adminconsent?client_id=<App-ID>.
More information
Consent
In most cases, certain permissions that require consent haven't been consented. Therefore, consent is requested. To understand the consent, see the following pages:
- Overview of permissions and consent in the Microsoft identity platform
- Microsoft identity platform admin consent protocols
- Microsoft Entra app consent experiences
Application registrations and enterprise applications
In Microsoft Entra, there's an application model that consists of application objects (also called "application registrations") and service principal objects (also called "enterprise applications"). How their relationship works together based on the required permissions is set on the application object. For more information, see Application and service principal objects in Microsoft Entra ID.
Simply adding permissions to an application registration doesn't consent to the permissions. To consent to permissions, you must assign permissions to the service principal.
Delegated permissions and application permissions
There are two types of permissions in Microsoft Entra ID: delegated permissions and application permissions. Make sure you apply the correct permission configuration in the application registration and consent to that permission.
For more information about permissions in Microsoft Entra ID, see the following pages:
- Overview of permissions and consent in the Microsoft identity platform
- Understanding the difference between application and delegated permissions from OAuth2 Authentication Flows
Collect Microsoft Entra activity logs
You can use the Microsoft Entra activity logs to get more details. To do so, follow these steps:
- Sign in to the Azure portal by using an account that has permission to read audit logs, such as a Global Administrator or Security Reader.
- Go to Microsoft Entra ID.
- Select Audit logs under the Monitoring section.
- Set your filter as follows:
- Category: ApplicationManagement
- Status: Failure
- Activity: Consent to application
- Find and select the app that fails to consent.
- Review the STATUS REASON to get more details.
In certain scenarios, you're required to perform admin consent even though you might allow users to consent and the permission normally doesn't require an admin to consent. For example, when the status reason shows "Microsoft.Online.Security.UserConsentBlockedForRiskyAppsException." For more information, see Unexpected error when performing consent to an application and Unexpected consent prompt when signing in to an application.
Contact us for help
If you have questions or need help, create a support request, or ask Azure community support. You can also submit product feedback to Azure feedback community.