Note
Access to this page requires authorization. You can try signing in or changing directories.
Access to this page requires authorization. You can try changing directories.
This article provides more information about how to resolve the direct connectivity issues in Microsoft Power Automate for desktop.
Applies to: Power Automate
Original KB number: 5016345
Symptoms
When attempting to run your desktop flows from a cloud flow or manage your desktop flow machines, you might encounter one of the following issues:
Scenario 1
Your previously registered machines appear offline when they're started up and connected to the network.
Runs fail with one of the following error messages:
-
ConnectionNotEstablished - None of the connected listeners accepted the connections within the allowed timeout. Check that your machine is online.
-
NoListenerConnected - The endpoint was not found. There are no listeners connected for the endpoint. Check that your machine is online.
-
Scenario 2
- Desktop flows run on a registered machine as long as a user session is running (attended runs) or even for some minutes after the last user signs out (unattended runs).
- The connection to the machine is lost after some minutes (for example, 15 minutes).
- The connection is re-established once a user signs back in to the machine.
Scenario 3
When you sign out of your Windows computer, the machine status shows as disconnected in the Power Automate portal.
Cause
Direct to machine connectivity uses Azure Windows Communication Foundation (WCF) relays to allow the Microsoft cloud to connect to on-premises machines and schedule desktop flow runs. The Power Automate Windows service that runs on-premises opens a relay listener that connects to the Azure cloud by opening web sockets.
The most common cause of relay connectivity issues is the machine losing connection to the network. This can be caused by your machine not being powered on or losing network when no user is signed in to the machine.
The Power Automate service runs under its own Windows account (NT Service\UIFlowService by default) which must have access to the network and be able to connect to *.servicebus.windows.net. For more information, see network requirements.
Note
If you use an Azure virtual machine (VM) to run Power Automate for desktop, make sure the Microsoft.ServiceBus endpoint is turned off at the subnet level where the Azure VM is located. This is a known limitation. For more information, see Azure Relay doesn't support network service endpoints.
If the machine and Power Automate service have reliable access to the network, the next likeliest source of issues is the on-premises network blocking or interfering with Azure relay connections.
A common culprit in both scenarios is a network proxy or a firewall that restricts outbound traffic.
In particular, authenticated proxies that use the credentials of the connected Windows user, given that the Power Automate service runs under its own dedicated account.
You can refer to Proxy setup if you determine that you need to override the default proxy settings used by the Power Automate service. You might also need to change the on-premises service account.
For Azure Relay to function properly, it's necessary to configure the proxy and firewall settings to permit the relay gateways associated with both the primary and secondary namespaces. It ensures that the communication between these gateways isn't blocked by the network security settings.
How to investigate
Engage your network administrators.
Involve your network administrators to analyze network configurations and logs.
Understand network topology.
- Trace the path of traffic through network devices (for example, NAT, firewalls, and proxies) to the public internet.
- Collect logs from devices during impacted runs and confirm traffic to *.servicebus.windows.net successfully reaches the public internet.
If your network traffic runs though a proxy, consider changing the on-premises account used by the Power Automate service (UIFlowService).
Get WCF logs from the Power Automate service (UIFlowService). For more information, see Enable WCF tracing.
Make sure your network configuration allows web socket traffic and long-running connections. Some network devices, like proxies, might automatically terminate connections after a certain period, which can disrupt the communication.
Make sure firewall allows connections to Azure Relay gateways:
Step 1: identify the Azure relay namespaces
Two Azure relay namespaces can be used for connecting a machine to the Power Automate cloud services. To identify the namespaces used by a machine:
- Launch the Power Automate machine runtime application and sign in.
- Locate the Diagnose connectivity issues for cloud runtime section and select Launch diagnostic tool.
- Wait for the diagnostics to complete.
- Select Generate the report.
- Open the generated XLS file and locate the Data column.
- Extract the namespace part from the URLs of PrimaryRelay and SecondaryRelay. For example, https://<namespace>/guid_guid.
Step 2: Configure the firewall with the DNS names required for both the primary and secondary relays
Configure your firewalls with the Domain Name System (DNS) names of all the Relay gateways.
The DNS names can be found by running the script. This script resolves the fully qualified domain names (FQDNs) of all the gateways to which you need to establish a connection.
Configure firewall rules to allow the DNS names on port 443 instead of IP addresses.
Step 3: Perform manual connectivity tests
WCF tracing can be enabled on the machine if there's a cloud connectivity issue. For more information, see Enable WCF tracing.
The WCF log should contain exceptions related to connectivity for a specific DNS or IP address, or point to missing proxy configuration.
To test the connection between the machine and the endpoint, run a TCP ping from PowerShell using the following command:
Test-netconnection \<ipaddress or dnsname> -port 443If the
TcpTestSucceededshowsFalse, it's likely that the firewall doesn't allow the connection. Engage your network team to understand if any proxy or firewall could prevent access. There could be several firewalls and proxies between the machine and the Azure Relay services, so make sure to check each subnet configuration.
What information to include when opening a support ticket
If the issue still persists, you can open a support ticket with Microsoft by providing the following details:
- Your network topology: what are the devices that traffic goes through. For more information, see the step 2 in the How to investigate.
- Whether the Power Automate service (UIFlowService) on your machine is running as the default account (NT Service\UIFlowService) or if it has been changed to run as a different account.
- Logs from your network devices showing that the traffic is indeed handed off to the public internet. Include times of the issues and the time zones used by the logs.
- WCF traces from the impacted machines. For more information, see Enable WCF tracing.
- Desktop flow run IDs of impacted runs.
- Local logs from the impacted machine: they can be extracted using the Power Automate machine runtime app's troubleshooting pane.
Enable WCF tracing
In the installation folder (typically C:\Program Files (x86)\Power Automate Desktop), edit the UIFlowService.exe.config file. It requires running your text editor as administrator.
Add the following configuration section between </system.net> and <appSettings>:
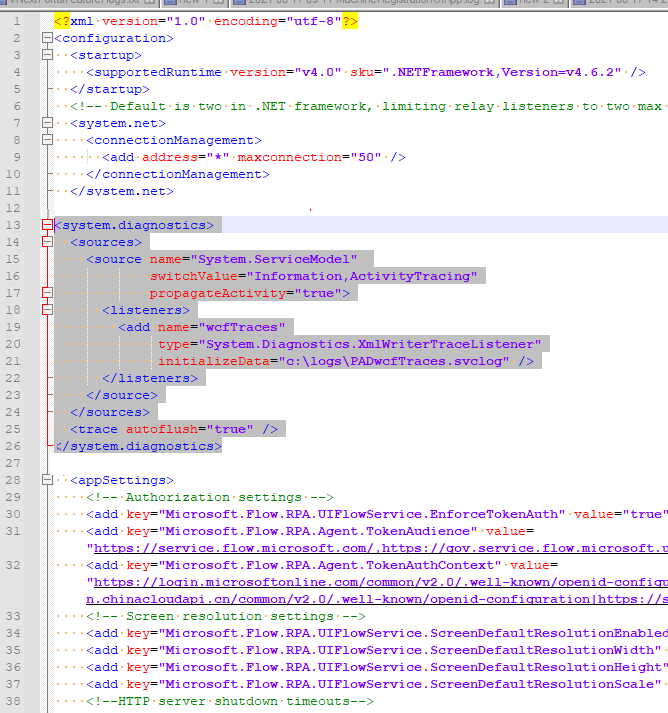
<system.diagnostics> <sources> <source name="System.ServiceModel" switchValue="Information,ActivityTracing" propagateActivity="true"> <listeners> <add name="wcfTraces" type="System.Diagnostics.XmlWriterTraceListener" initializeData="c:\logs\PADwcfTraces.svclog" /> </listeners> </source> </sources> <trace autoflush="true" /> </system.diagnostics>- You can substitute the
c:\logs\PADwcfTraces.svclogvalue with any valid path you want, but the folder (c:\logsin this example) must exist. Otherwise, it isn't be created and logs aren't written. - The Power Automate service needs permissions to write logs into the specified folder. You can grant full control to the
Everyoneuser, allowing any user or service to write to the folder. Alternatively, to restrict permissions to only the Power Automate service, find the service user's Security Identifier (Sid) by runningsc showsid UIFlowService, and then grant permissions to that user.
- You can substitute the
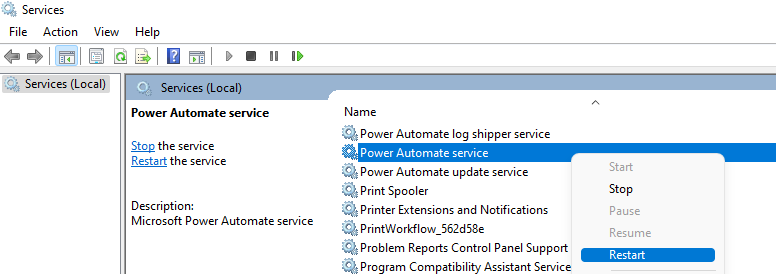
After saving the config file, restart the Power Automate service.
- Search for "services" in the Start menu to open the Windows Services tool.
- Find Power Automate service, right-click it, and select Restart.
Traces are saved to the specified file, providing detailed logs to diagnose connectivity issues.