Note
Access to this page requires authorization. You can try signing in or changing directories.
Access to this page requires authorization. You can try changing directories.
This article provides a detailed guide on how to identify the Logical Unit Number (LUN) of a physical disk presented from Azure for Storage Spaces on Windows Server. This is essential when you remove or replace a physical disk from the storage pool. By following these instructions, you can effectively manage the configurations of your storage spaces without compromising data integrity or service availability.
Important
To complete the following procedures, ensure you have administrator privileges in Windows PowerShell and the necessary permissions to manage disks in Microsoft Azure portal.
Identify the LUN from a storage pool and match it in the Azure portal
To identify the LUN of a physical disk, follow these steps:
To retrieve information about the physical disks in a specified storage pool, run the following PowerShell cmdlet as an administrator:
Get-StoragePool -FriendlyName "<StoragePoolName>" | Get-PhysicalDisk | Select-Object FriendlyName, UniqueId, HealthStatus, Size, PhysicalLocation, DeviceID, CannotPoolReason, Usage | Format-ListHere's an example output:
Friendlyname     : Msft Virtual Disk
UniqueId         : <UniqueID>
HealthStatus     : Healthy
Size             : 37580963840
PhysicalLocation : Integrated : Adapter 1 : Port 0 : Target 0 : LUN 2
DeviceID         : 4
CannotPoolReason : In a Pool
Usage            : Auto-Select
Note
Breakdown of the cmdlet:
FriendlyName: The user-friendly name of the physical disk.UniqueId: A unique identifier for the disk.PhysicalLocation: Specifies the physical location of the disk in the system.Adapter 0is for the operating system disk and temp disks, andAdapter 1is for data disks.Usage: Displays how the disk is currently being used (for example, for storage pools and virtual disks).
To retrieve the unique ID of the virtual disk in the storage pool, run the following cmdlets:
Get-StorageNodeHere's an example output:
Name                          Manufacturer            Model             OperationalStatus
---                           ------------            -----             ------------
Node1-2019-pool.fabrikam.com  Microsoft Corporation   Virtual Machine   Up
Node1-2019-pool.fabrikam.com  Microsoft Corporation   Virtual Machine   Up
Node2-2019-pool.fabrikam.com  Microsoft Corporation   Virtual Machine   Up
Get-StorageNode -name "<StorageNodeName>" | get-virtualdisk | ft friendlyname, uniqueid, allocatedsize, footprintonpoolHere's an example output:
friendlyname uniqueid    allocatedsize footprintonpool
------------ --------    ------------- ---------------
Virtualdisk  <UniqueID>  1073741824      1073741824
Note
The numbers shown in the
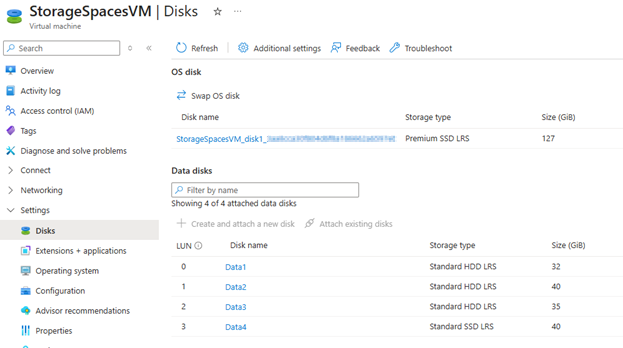
allocatedsizeandfootprintonpoolare in bytes.To locate the LUN of the data disks in the Azure portal, go to Azure portal, select the virtual machine, and select Settings > Disks. Note down the LUN and match it with the retrieved information from step 1.
Remove a physical disk from the storage pool
To retire a physical disk from the storage pool, run the Set-PhysicalDisk cmdlet by using the unique ID from step 1 of the preceding section:
Set-PhysicalDisk -UniqueId <UniqueID> -Usage RetiredHere's an example output when the physical disk is retired:
PS C:\Users\Administrator1> Set-PhysicalDisk -UniqueId <UniqueID> -Usage Retired
PS C:\Users\Administrator1> Get-PhysicalDisk

Number FriendlyName      SerialNumber MediaType   CanPool OperationalStatus HealthStatus Usage         Size
------ ------------      ------------ ---------   ------- ----------------- ------------ -----         ----
5      Msft Virtual Disk              Unspecified False   OK                Healthy      Auto-Select  40 GB
0      Msft Virtual Disk              Unspecified False   OK                Healthy      Auto-Select 127 GB
3      Msft Virtual Disk              Unspecified False   OK                Healthy      Auto-Select  40 GB
2      Msft Virtual Disk              Unspecified False   OK                Healthy      Auto-Select  32 GB
1      Msft Virtual Disk              Unspecified False   OK                Healthy      Auto-Select  16 GB
4      Msft Virtual Disk              Unspecified False   OK                Healthy      Retired      35 GB
To identify the physical disks associated with the virtual disk, run the following cmdlet by using the unique ID from step 2 of the preceding section:
Get-VirtualDisk -UniqueId <UniqueID> | Get-PhysicalDiskHere's an example output:
DeviceId FriendlyName      SerialNumber MediaType   CanPool OperationalStatus HealthStatus Usage        Size
-------- ------------      ------------ ---------   ------- ----------------- ------------ -----        ----
1        Msft Virtual Disk              Unspecified False   OK                Healthy      Auto-Select 40 GB
2        Msft Virtual Disk              Unspecified False   OK                Healthy      Auto-Select 35 GB
To start the storage job by forcing the data to move from the retired physical disk, run the following cmdlet by using the unique ID from the preceding step:
Get-VirtualDisk -UniqueID <UniqueID> | Repair-VirtualDiskCheck the storage job status by using the following cmdlet and wait for the storage job to complete.
Get-StorageJobConfirm that no virtual disk footprint exists on the retired physical disk by running the following cmdlet:
Get-StorageNode -Name "<StorageNodeName>" | Get-PhysicalDisk -PhysicallyConnected | Select FriendlyName, CanPool, UniqueID, @{Name="Size (GB)"; Expression={[math]::Round($_.Size / 1GB, 2)}}, PhysicalLocation, Usage, VirtualDiskFootprintHere's an example of the expected output:
FriendlyName         : Msft Virtual Disk
CanPool              : False
UniqueID             : <UniqueID>
Size (GB)            : 35
PhysicalLocation     : Integrated : Adapter 1 : Port 0 : Target 0 : LUN 2
Usage                : Retired
VirtualDiskFootprint : 0
Note
Breakdown of the cmdlet:
FriendlyName: The user-friendly name of the physical disk.CanPool: Indicates whether the disk can be added to a storage pool.UniqueID: A unique identifier for the disk.Custom property:
Size (GB)- Code:
@{Name="Size (GB)"; Expression={[math]::Round($_.Size / 1GB, 2)}} - Explanation:
@{...}: A hashtable defining a calculated property.Name="Size (GB)": Specifies the name of the new property (in this case, "Size (GB)").Expression={...}: Defines how the property value is calculated:$_.Size: Refers to the size property of the current physical disk (value is in bytes)./ 1GB: Converts the size from bytes to gigabytes (1 GB is a constant in PowerShell equal to 1,024 * 1,024 * 1,024 bytes).[math]::Round(..., 2): Rounds the result to2decimal places for readability.
- Code:
PhysicalLocation: Specifies the physical location of the disk in the system.Usage: Displays how the disk is currently being used (for example, for storage pools and virtual disks).VirtualDiskFootprint: Indicates how much of the physical disk's capacity is being used by virtual disks.
Remove the physical disk from the server by running the following cmdlets using the unique ID from step 1:
$PDToRemove = Get-PhysicalDisk -UniqueID <UniqueID>
Remove-PhysicalDisk -PhysicalDisks $PDToRemove -StoragePoolFriendlyName "<StoragePoolName>"
Reconfirm the
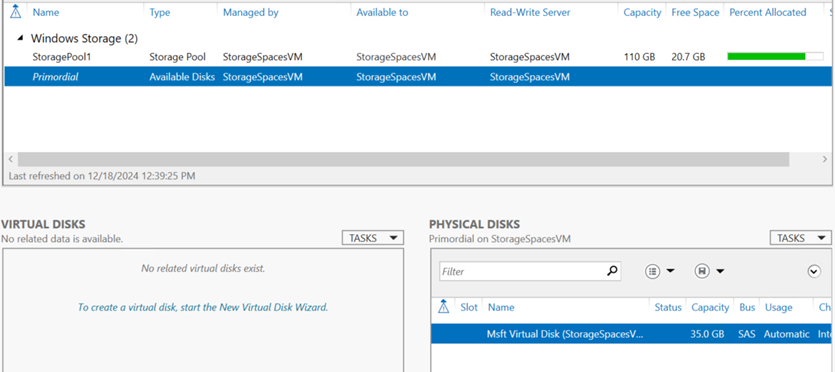
CanPoolproperty of the physical disk which should show asTrueafter the physical disk is removed from the storage pool. Run theGet-PhysicalDiskcmdlet:PS C:\Users\Administrator1> Get-PhysicalDisk Number FriendlyName SerialNumber MediaType CanPool OperationalStatus HealthStatus Usage Size ------ ------------ ------------ --------- ------- ----------------- ------------ ----- ---- 5 Msft Virtual Disk Unspecified False OK Healthy Auto-Select 40 GB 0 Msft Virtual Disk Unspecified False OK Healthy Auto-Select 127 GB 3 Msft Virtual Disk Unspecified False OK Healthy Auto-Select 40 GB 2 Msft Virtual Disk Unspecified False OK Healthy Auto-Select 32 GB 1 Msft Virtual Disk Unspecified False OK Healthy Auto-Select 16 GB 4 Msft Virtual Disk Unspecified True OK Healthy Auto-Select 35 GBOnce the disk is removed from the storage pool, it should be available under the primordial pool.
After confirming the removal with the
Get-PhysicalDiskcmdlet in PowerShell, detach the physical disk in the Azure portal if necessary.Verify the health of the storage pool and the virtual disk by running the
Get-StoragePoolandGet-VirtualDiskcmdlets.
