Note
Access to this page requires authorization. You can try signing in or changing directories.
Access to this page requires authorization. You can try changing directories.
This article provides troubleshooting guidance for issues with accounts used by failover clusters.
When you create a failover cluster and configure clustered services or applications, the failover cluster wizard creates the necessary Active Directory accounts and gives them the correct permissions. Issues can occur if a needed account is deleted, or necessary permissions are changed. The following sections provide steps to troubleshoot these issues.
Troubleshoot password issues with the cluster name account
You receive an event message about computer objects or the cluster identity that includes the following text:
Logon failure: unknown user name or bad password.
The event message indicates that the password for the cluster name account no longer matches the corresponding password stored by the clustering software.
Note
To complete the following steps:
- Your account should be at least a member of the local Administrators group (or equivalent). In addition, your account should be given the Reset password permission for the cluster name account (unless it's a Domain Admins account or the Creator Owner of the cluster name account).
- You can use the account that was used to install the cluster.
For more information about using the appropriate accounts and group memberships, see Local and Domain Default Groups.
For more information about ensuring the cluster administrators have the correct permissions, see Planning ahead for password resets and other account maintenance.
To resolve these issues, follow the steps:
Select Start, go to Administrative Tools, and then select Failover Cluster Manager to open the failover cluster snap-in. If the User Account Control dialog box appears, confirm that the action it displays is what you want, and then select Yes.
In the Failover Cluster Manager snap-in, check whether the cluster you want to configure is displayed. If it isn't displayed, in the console tree, right-click Failover Cluster Manager, select Manage a Cluster, and then select or specify the desired cluster.
In the center pane, expand Cluster Core Resources.
Under Cluster Name, right-click the Name item, and then select Take Offline.
Under Cluster Name, right-click the Name item, point to More Actions, and then select Repair Active Directory Object.
Note
The Repair Active Directory Object option will be greyed out unless the cluster's Name resource is offline. Taking the cluster's Name resource offline shouldn't negatively impact other cluster groups, such as the SQL Server Failover Cluster Instance. This is because those other cluster groups don't depend on the cluster's Name resource.
Troubleshoot issues caused by changes in cluster-related Active Directory accounts
If the cluster name account is deleted or permissions are removed from the account, you'll experience issues when you try to configure a new clustered service or application. In this scenario, use the Active Directory Users and Computers snap-in to view or change the cluster name account and other related accounts.
For more information about the related events (Event IDs 1193, 1194, 1206, and 1207), see Active Directory Permissions for Cluster Accounts.
Note
The following steps require at least membership in the Domain Admins group (or equivalent). For more information about using the appropriate accounts and group memberships, see Local and Domain Default Groups.
To resolve these issues, follow the steps:
On a domain controller, select Start, go to Administrative Tools, and then select Active Directory Users and Computers. If the User Account Control dialog box appears, confirm that the action it displays is what you want, and then select Yes.
Expand the default Computers container or the folder in which the cluster name account (the computer account for the cluster) is located. The Computers container is located in Active Directory Users and Computers\<domain-node>\Computers.
Examine the icon for the cluster name account. The account shouldn't be disabled by having a downward-pointing arrow on it. If it's disabled, right-click it and select Enable Account if possible.
On the View menu, make sure that the Advanced Features option is selected.
When the Advanced Features option is selected, you can see the Security tab in the properties of accounts (objects) in Active Directory Users and Computers.
Right-click the default Computers container or the folder in which the cluster name account is located, and then select Properties.
On the Security tab, select Advanced.
In the list of accounts with permissions, select the cluster name account, and then select Edit.
Note
If the cluster name account isn't listed, select Add and add it to the list.
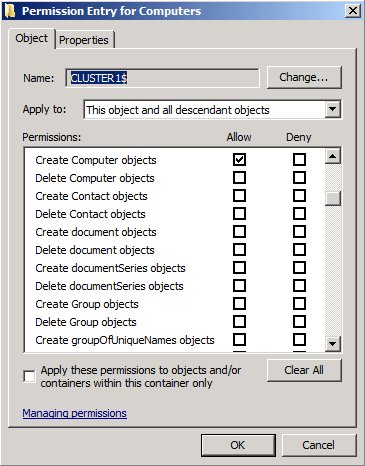
For the cluster name account (also known as the cluster name object or CNO), ensure that the Allow checkbox is selected for the Create Computer objects and Read all properties permissions.
Select OK until you return to the Active Directory Users and Computers snap-in.
Review domain policies (consult a domain administrator if applicable) related to the creation of computer accounts (objects). Ensure that the cluster name account can create a computer account each time you configure a clustered service or application. For example, if your domain administrator has configured settings that cause all new computer accounts to be created in a specialized container rather than the default Computers container, make sure that these settings also allow the cluster name account to create new computer accounts in that container.
Expand the default Computers container or the container in which the computer account for one of the clustered services or applications is located.
Right-click the computer account for one of the clustered services or applications, and then select Properties.
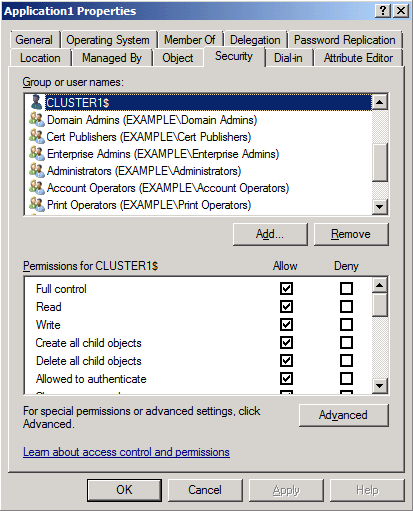
On the Security tab, confirm that the cluster name account is listed among the accounts that have permissions, and select it. Confirm that the cluster name account has the Full control permission (the Allow checkbox is selected). If it doesn't, add the cluster name account to the list and give it the Full control permission.
Repeat steps 12-13 for each clustered service and application configured in the cluster.
Make sure that the domain-wide quota (by default,
10) for creating computer objects hasn't been reached (consult a domain administrator if applicable). If the previous items in this procedure have all been reviewed and corrected, and the quota has been reached, consider increasing the quota. To change the quota, follow these steps:- Open a command prompt as an administrator and run the
ADSIEdit.msccommand. - Right-click ADSI Edit, and then select Connect to > OK. Then, Default naming context is added to the console tree.
- Double-click Default naming context, right-click the domain object under it, and then select Properties.
- Scroll to ms-DS-MachineAccountQuota and select it. Select Edit, change the value, and then select OK.
- Open a command prompt as an administrator and run the