Note
Access to this page requires authorization. You can try signing in or changing directories.
Access to this page requires authorization. You can try changing directories.
This article discusses how to set up Domain Name System (DNS) scavenging and gives an example of setting scavenging up on a pre-existing zone.
Scavenging cleans up (deletes) stale records in DNS. As deletion is involved, many safety valves are built into scavenging, which takes a long time to enable scavenging.
Note
This article focuses on the most common Windows DNS scenario: Windows Server DNS servers hosting Active Directory (AD)-integrated zones.
In Windows Server, scavenging should be set in all the following three places:
- On the individual resource record to be scavenged.
- On a zone to be scavenged.
- On one or more servers performing scavenging.
Scavenging settings on the resource record
In the DNS Microsoft Management Console (MMC), select View > Advanced and check the properties of a resource record to see the scavenging settings. For example:
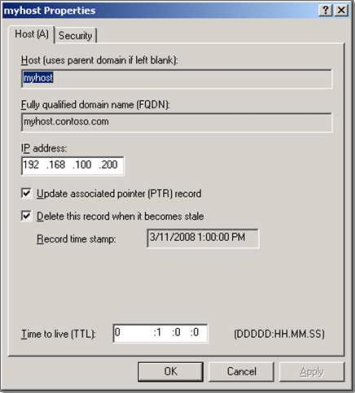
Scavenging on a resource record can be set in three methods:
- The first is checking the Delete this record when it becomes stale checkbox and selecting Apply. When you select Apply, the current time is rounded down to the nearest hour and applied as the timestamp on the record. The timestamp of static records is 0, indicating they aren't scavenged.
- The second way is when a record is created by a client machine registering using dynamic DNS (DDNS). Windows clients dynamically update DNS every 24 hours. All DDNS records are set to scavenge. When a record is first created by a client that has no existing record, it's considered an "Update," and a timestamp is set. If the client has an existing host record and changes the IP of the host record, this is also considered an "Update," and a timestamp is set. If the client has an existing host record with the same IP address, this is considered a "Refresh," and whether the timestamp changes depends on zone settings.
- The third way to set scavenging on records is using the dnscmd /ageallrecords command. If you run this command against a zone, it will set scavenging and a timestamp for all records in the zone, including static records that you don't want to be scavenged.
Once a timestamp is set on a record, it will be replicated to all servers that host the zone.
Note
If the zone that hosts the record doesn't enable scavenging, it won't scavenge, so the timestamp is irrelevant. The timestamp may be updated on the server where the client dynamically registers, but it won't be replicated to other servers in the zone.
Scavenging settings on the zone
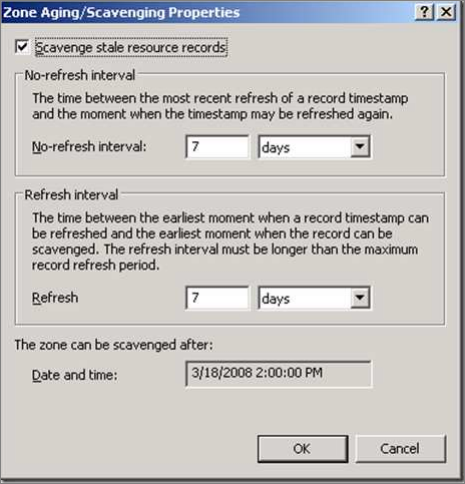
Before a server checks a record to see if it will be scavenged, the zone should have scavenging enabled. To access the scavenging settings of a zone, right-click the zone, select Properties, and then select Aging on the General tab.
Note
The screenshot is the same on any DNS server where this zone is replicated.
When you first set scavenging on a zone, the timestamp (seen at the bottom) is set to the current time of day (rounded down to the nearest hour) plus the Refresh interval. This setting is also reset whenever the zone is loaded or dynamic updates are enabled on the zone.
Note
If you don't see The zone can be scavenged after timestamp, reload the zone.
The zone can be scavenged after timestamp is the first safety valve. It gives clients time to update their record timestamps. Since new record timestamps aren't replicated when zone scavenging is disabled, this also gives replication time to keep things in order.
Refresh and No-refresh intervals
The next safety valves are the Refresh and No-refresh intervals. After both intervals have elapsed, a record can be deleted.
The No-refresh interval is a period of time during which a resource record can't be refreshed. A "Refresh" is a dynamic update where you don't change the host resource record; just touch the timestamp. If a client changes the IP of a host record, this is considered an "Update" and is exempt from the No-refresh interval. The purpose of a No-refresh interval is to reduce replication traffic. A change to a record means the change should be replicated.
After the record timestamp plus No-refresh interval has elapsed, you can enter a Refresh interval. The Refresh interval is the time when refreshes to the timestamp are allowed. The client is allowed to come in and update its timestamp. This timestamp will be replicated, and the No-refresh interval will start again. If the client fails to update its record during the refresh interval, it becomes eligible to be scavenged.
Note
When you set the Refresh and No-refresh intervals, allow enough time for clients to make several registration attempts during the Refresh interval. If you don't do this, a record may become eligible for scavenging due to a failed refresh attempt.
If you right-click your server and select Set Aging/Scavenging for All Zones…, you'll see a screenshot similar to the one above. This option sets the default settings that will be used when this server creates a new zone. Unless you select the Apply these settings to the existing Active Directory-integrated zones checkbox, the setting doesn't affect existing zones.
Scavenging settings on the server
To set scavenging on the server, right-click the server in the MMC and select Properties. Then, select the Enable automatic scavenging of stale records checkbox on the Advanced tab as follows:
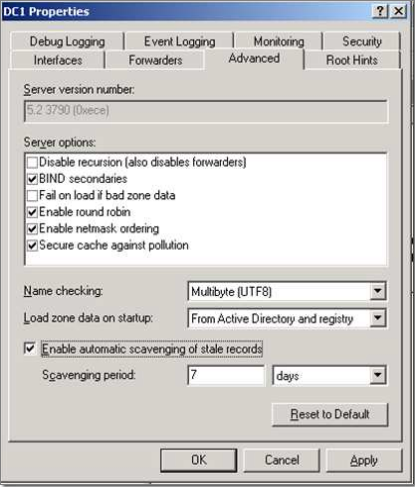
The Scavenging period value is how often this server scavenges. When a server scavenges, it logs a DNS Event ID 2501 to indicate how many records are scavenged. If no records are scavenged, Event ID 2502 is logged. Only one server is required to scavenge since the zone data is replicated to all servers hosting the zone.
Tip
By getting the timestamp on the most recent Event ID 2501 or 2502 and adding the scavenging period to it, you can tell exactly when a server will attempt to scavenge.
Although you can set every server hosting the zone to scavenge, we recommend just having one set. If the server fails to scavenge, it won't have a serious impact. You'll have one place to look for the suspicion and one set of logs to check. If you have many servers set to scavenge, you have many logs to check if the scavenging fails.
To control which server is scavenging for a zone, you can use the dnscmd command to specify exactly which servers may scavenge. For example, the dnscmd /zoneresetscavengeservers contoso.com 192.168.1.1 192.168.1.2 command allows only DNS servers with IP addresses of 192.168.1.1 and 192.168.1.2 to scavenge on the contoso.com zone.
Scavenging process and final checks
You can also manually initiate a scavenging attempt by right-clicking the server and selecting Scavenge Stale Resource Records. Note that manual attempts won't bypass the safety valves.
Check the following before you delete the stale records:
- Is scavenging enabled on the zone?
- Is dynamic update enabled on the zone?
- Is the scavenging server listed as one of the scavenging servers for the zone?
- Is the "zone can be scavenged after" timestamp on the zone exceeded?
This allows the clients and AD replication to be prepared before you start. - Has it been longer than the refresh interval since this zone was last replicated in Active Directory?
If scavenging is enabled on a server that has replication issues, this can help prevent unnecessary tombstoning of records that may still be valid on other servers.
If all the above checks are passed, the zone is ready for scavenging. At this point, the scavenging server checks the timestamp on each resource record. If the current date and time is greater than the timestamp plus No-refresh and Refresh intervals, the record is deleted.
Example: Setting scavenging up on a pre-existing zone
Here's an example of setting scavenging up on a pre-existing zone. This procedure is designed for maximum safety. If using default settings, this process can take four to five weeks (two weeks for the sanity check phase and two to three weeks for the enable phase).
Setup phase
- Turn off scavenging on all servers. You can use the
dnscmd /zoneresetscavengeserverscommand to limit scavenging to a single server, and then ensure this server has scavenging disabled. - Turn on scavenging on the zones you want to scavenge. Set the Refresh and No-refresh intervals as desired. To scavenge more effectively, we recommend lowering the No-refresh interval and leaving the Refresh interval at the default.
- Add today's date plus the Refresh and No-Refresh intervals. Come back in a few weeks when this time has elapsed.
Sanity check phase
Look for any records older than the Refresh plus No-Refresh interval in your DNS records. If you see any, there's a problem with the dynamic registration process, which should be corrected before proceeding. A thorough check at this point is the most important step in the setup.
Things to check if you find old records:
- Does the
ipconfig /registerdnscommand work? - Who is the owner of the record (see the Security tab in the record properties)?
- Is the record statically created by an administrator and then enabled for scavenging? If so, you need to delete the record to clear the ownership and run the
ipconfig /registerdnscommand to update it. - Is the server's Active Directory replication functioning properly?
Don't proceed unless you can explain any outdated records. In the next phase, they'll be deleted.
Enable phase
You can use the dnscmd /zoneresetscavengeservers command to enable scavenging on a single server.
Once scavenging is enabled, create a new test record and enable it for scavenging. Then, map out the point in time when this record disappears. Here are the steps:
- Start with the timestamp on the record.
- Add the Refresh interval.
- Add the No-refresh interval.
- The result will be your "eligible to scavenge" time. The record won't disappear at this time, though.
- Check your DNS event logs for Event IDs 2501 and 2502 to find when the DNS server will run the scavenging.
- Based on your "eligible to scavenge" time, find the most recent Event ID 2501 or Event ID 2502 event, and add the server's scavenging period (from the Advanced tab of server properties) to it.
- This is the point in time when the test record disappears.
For example:
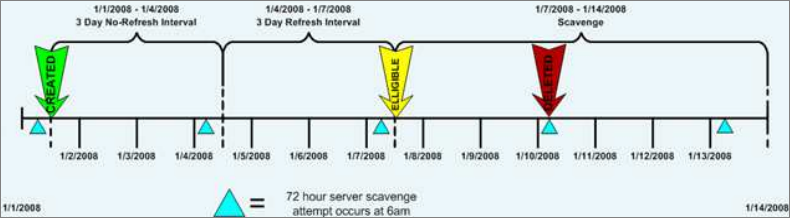
- A zone is set to a 3-day Refresh interval and a 3-day No-refresh interval.
- The server scavenging period is set to three days.
- The last DNS Event ID 2501 or 2502 occurred at 6 am on 1/1/2008.
- You have a record with a timestamp of 1/1/2008 at 12:00 (noon).
Given these assumptions, you can predict that the record will be deleted at approximately 6 am on 1/10/2008. Here's a diagram of the example.
Once scavenging is enabled, you can check periodically to look for the Event ID 2501 and 2502 events to see how things are going. You can also come back at the predicted date and time and see if your test record has disappeared.