Note
Access to this page requires authorization. You can try signing in or changing directories.
Access to this page requires authorization. You can try changing directories.
This article introduces what Windows does when a blue screen occurs and provides some best practices for preventing and troubleshooting blue screen issues.
What happens when a stop error occurs
The operating system (OS) continuously monitors itself to verify that it runs within the expected parameters. If this isn't the case, the OS calls the kernel function KeBugCheckEx to restart to recover from such an unhealthy scenario. For more information, see the KeBugCheckEx function (wdm.h). The KeBugCheckEx function then triggers a stop error (also known as a bug check, blue screen of death, and dump) and restarts the computer.
The following sections use the issue described in Bug Check 0x50: PAGE_FAULT_IN_NONPAGED_AREA to explain what happens when a stop error occurs.
Example of stop error 0x50
This stop error occurs in the following scenario:
The OS is trying to reference a part of memory that should be available in physical random access memory (RAM). However, when the OS accesses that memory, the memory can't be found, and a page fault occurs.
This violates the parameters for a healthy OS. Therefore, the OS calls KeBugCheckEx to shut down the OS in a controlled manner to prevent further damage.
There are three phases to this stop error process.
Phase 1: Monitor the system (ongoing)
During this phase, the kernel continuously monitors the system. In addition, during every startup, the session manager reads the configuration from the registry key HKLM\SYSTEM\CurrentControlSet\Control\CrashControl for the dump configuration.
When the OS detects an unhealthy OS status, the KeBugCheckEx function is called.
Phase 2: Stop error
During the stop error phase, the OS displays this blue status screen. (This is why the stop error is called a blue screen.)
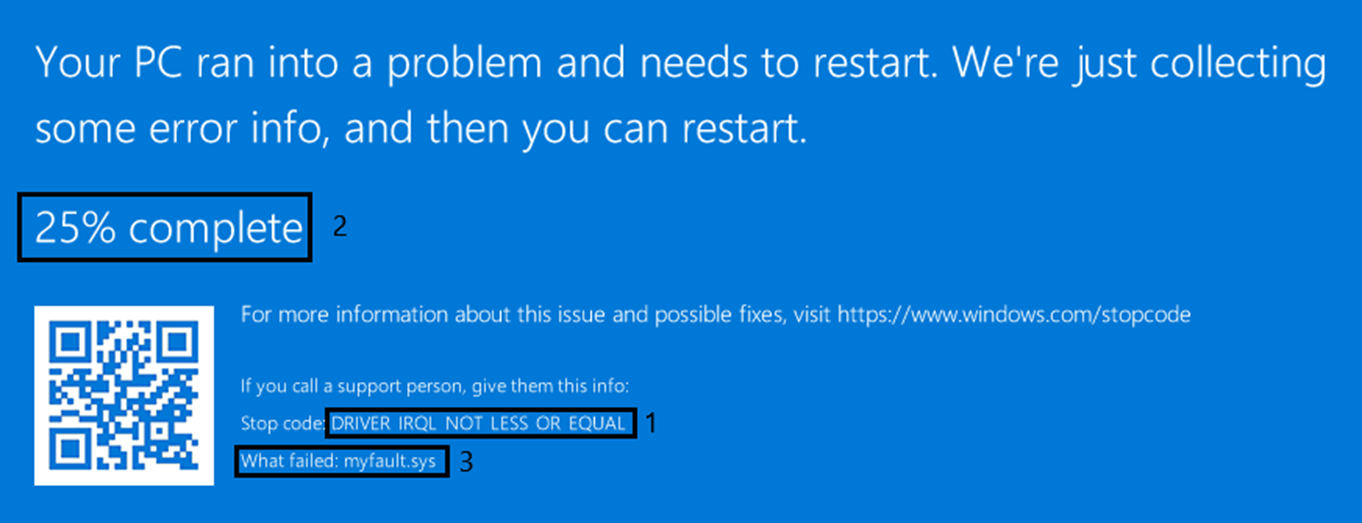
In the screenshot, you can see the specific stop code in the black rectangle 1. This stop code can help you identify the first step by checking the Bug Check Code Reference. In Windows, there are over 300 different stop codes, and each is documented in detail in the reference article.
In the black rectangle 2, you can see the progress of moving RAM to the page file. This operation is based on the configuration in CrashControl that is read during the boot of the system.
On large systems, this process can take some time. A specific scenario can be used to explain this.
Imagine that you have a system that has 1,024 GB of RAM. A typical hard disk drive (HDD) has a disk I/O speed of up to 100 MB per second, while a solid state drive (SSD) can achieve a speed of up to 500 MB. When the OS generates a complete dump, check the following table for the time it takes based on the disk configuration:
| Disk type | Disk speed | Time to write a dump in seconds (minutes) |
|---|---|---|
| HDD | 100 MB/sec | 10,485 sec (~175 min) |
| SSD | 500 MB/sec | 2,097 sec (~35 min) |
Note
In a physical system, the computer Basic Input-Output System (BIOS) might have the Automated System Recovery (ASR) feature. This feature periodically checks if Windows is running. When the check fails, the feature initiates a power reset to recover the system. This behavior interrupts the dump process because Windows and its services no longer run during phase 2.
In the black rectangle 3, you can see a potential hint about what was involved in the crash. If the message is about a driver or software, checking for an update is a valid option.
Once the process of moving RAM to the page file is complete, the page file is marked as a dump. In the final step, the system restarts (based on the configuration) to complete phase 2 and go to phase 3.
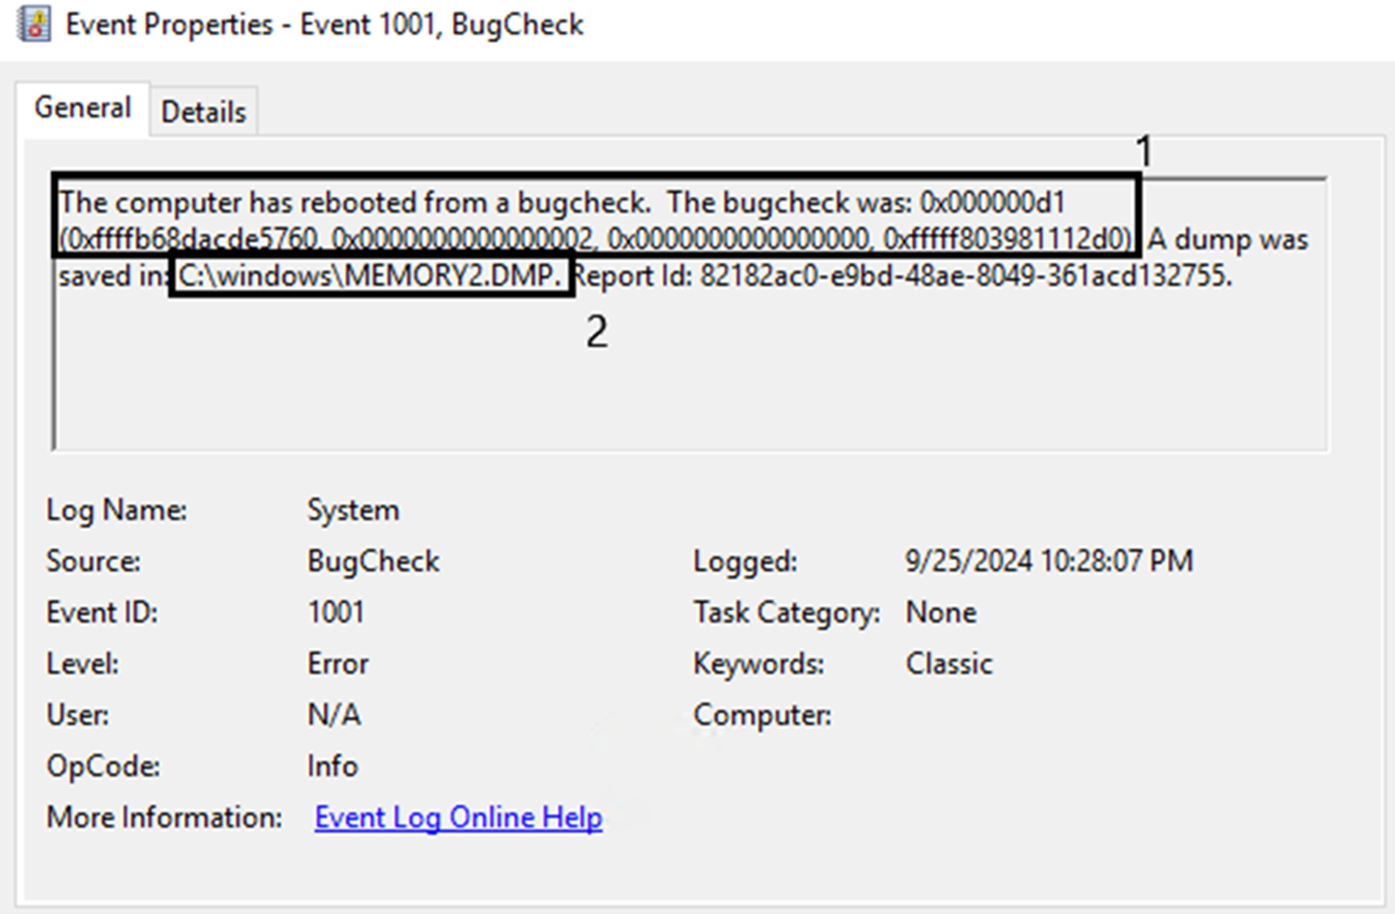
Phase 3: Dump creation
During the boot of the OS, the session manager process (SMSS.exe) loads the page file. Because the page file was marked as a dump, SMSS.exe then extracted the dump from the page file. The boot process might take longer than expected because the page file can be large. The last step of phase 3 is to log an event in the System event log, with event ID 1001, Level: Error, and Source: BugCheck:
Important
This event also contains a specific stop code with the parameters (see black rectangle 1 in the picture). You can use this information in our public documentation to learn more about the bug check and its meaning in the Bug Check Code Reference.
In addition, you can see the dump location (see black rectangle 2 in the picture).
Best practices for troubleshooting and preventing stop errors
In most scenarios, you can use the following actions to resolve a stop error.
Ensure you're running the latest patch for the OS
Microsoft releases patches to any supported OS monthly on every second Tuesday (the patch cycle). Those patches contain improvements for security and reliability. We recommend you install them soon after the release.
Ensure your software and drivers are up to date
Microsoft is working closely with our partners to ensure that their products also work within the parameters of a healthy OS. When a stop error is reported to Microsoft, and our support has identified this error is related to a specific driver or software, Microsoft notifies them. This normally results in an update of their software. Therefore, we recommend you keep the software updated.
Consider updating to the latest version of the OS
Sometimes, improvements to Windows can't be shipped as part of an update, but only as part of a new release of the OS. If you have updated the OS, software, and drivers, an upgrade of the OS might be a valid approach.
Self-help via the stop code reference
Within the Bug Check Code Reference, Microsoft provides guidance and recommendations based on the specific stop code. The reference article is a great place for information and a strong recommendation to check your specific bug check code. Microsoft is aware that this might be a complex solution, and if you need more help, open a support case with Microsoft. Ensure that you have a memory dump available to speed up the resolution.
Ensure the OS can capture a dump
If no dump is generated, follow this recommendation.
Recommended dump configuration
This recommendation depends on the size of the system, as the RAM and the hard disk space directly impact our recommendations.
Systems memory up to 32 GB
- Ensure that the page file is set to RAM + 300 MB.
- Ensure that the system is set to a complete dump. To do so, navigate to
HKEY_LOCAL_MACHINE\System\CurrentControlSet\Control\CrashControl, and set CrashDumpEnabled to 0x1.
Ensure that you have enough disk space for the Pagefile and the memory.dmp file.
Systems memory over 32 GB
- Ensure that the page file is set to System Managed.
- Ensure that the system is set to an automatic memory dump. To do so, navigate to the
HKEY_LOCAL_MACHINE\System\CurrentControlSet\Control\CrashControlregistry key, and set CrashDumpEnabled to 0x7.
Normally, a kernel memory dump is smaller than 40 GB. The automatic dump, combined with a system-managed page file, tries to ensure that the hard disk requirements are kept at a minimum. You still need to ensure that you have enough disk space for the Pagefile and the memory.dmp file.
If necessary, you can configure the OS to save the dump file %SystemRoot%\Memory.dmp to a different location. For example, you can save the file to drive D, which is a second hard disk with enough disk space. To do so, follow these steps:
- Navigate to the
HKEY_LOCAL_MACHINE\System\CurrentControlSet\Control\CrashControlregistry key. - Set DumpFile to d:\Memory.dmp.
Also, on large systems, ensure that ASR is disabled in the BIOS.