Note
Access to this page requires authorization. You can try signing in or changing directories.
Access to this page requires authorization. You can try changing directories.
This article describes the methods to configure listener certificates on a Windows Server that isn't part of a Remote Desktop Services (RDS) deployment.
Original KB number: 3042780
About Remote Desktop server listener availability
The listener component runs on the Remote Desktop server and is responsible for listening to and accepting new Remote Desktop Protocol (RDP) client connections. This lets users establish new remote sessions on the Remote Desktop server. There's a listener for each Remote Desktop Services connection that exists on the Remote Desktop server. Connections can be created and configured by using the Remote Desktop Services Configuration tool.
Configure Remote Desktop server listener certificate
The configuration data for the RDS listener is stored in the Win32_TSGeneralSetting class in Windows Management Instrumentation (WMI) under the Root\CimV2\TerminalServices namespace.
The certificate for the RDS listener is referenced through the Thumbprint value of that certificate on a SSLCertificateSHA1Hash property. The thumbprint value is unique to each certificate.
Note
Before you run the commands, the certificate that you want to use must be imported to the Personal certificate store for the computer account (via certlm.msc). If you don't import the certificate, you'll receive an Invalid Parameter error.
To configure a certificate by using WMI, follow these steps:
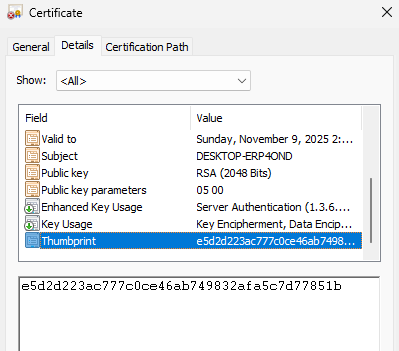
- Open the properties dialog for your certificate and select the Details tab.
Scroll down to the Thumbprint field and copy the space-delimited hexadecimal string into something like Notepad.
The following screenshot shows an example of the certificate thumbprint in the Certificate properties:
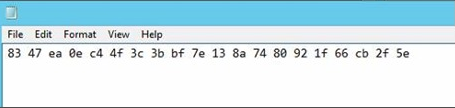
If you copy the string into Notepad, it should resemble the following screenshot:
After you remove the spaces in the string, it still contains the invisible ASCII character that is only visible at the command prompt. The following screenshot is an example:
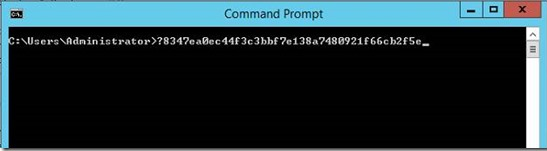
Make sure that this ASCII character is removed before you run the command to import the certificate.
Remove all spaces from the string. There may be an invisible ACSII character that is also copied. This character isn't visible in Notepad. To validate the string, copy the string directly into the Command Prompt window.
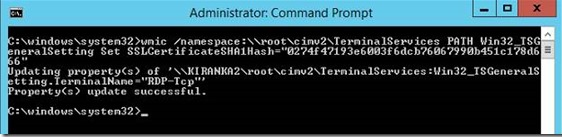
At command prompt, run the following
wmiccommand together with the thumbprint value that you obtain in step 3:wmic /namespace:\\root\cimv2\TerminalServices PATH Win32_TSGeneralSetting Set SSLCertificateSHA1Hash="THUMBPRINT"The following screenshot shows a successful example:
Scroll down to the Thumbprint field and copy the space-delimited hexadecimal string into a text editor like Notepad.
The following screenshot shows an example of the certificate thumbprint in the Certificate properties:
When you copy the string into Notepad, it should look like the following screenshot:
After you remove the spaces in the string, it still contains an invisible ASCII character that is only visible at the command prompt. The following screenshot shows an example:
Ensure that this ASCII character is removed before you run the command to import the certificate.
Remove all spaces from the string. There might be an invisible ACSII character that is also copied. This character isn't visible in Notepad. To validate the string, copy the string directly into the Command Prompt window.
At command prompt, run the following
wmiccommand together with the thumbprint value that you obtain in step 3:wmic /namespace:\\root\cimv2\TerminalServices PATH Win32_TSGeneralSetting Set SSLCertificateSHA1Hash="THUMBPRINT"The following screenshot shows a successful example:
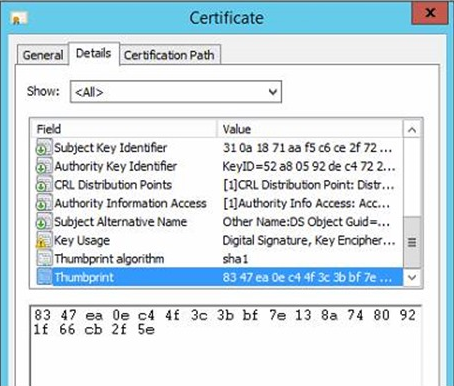
Scroll down to the Thumbprint field and copy it. The following screenshot is an example of the certificate thumbprint in the Certificate properties:
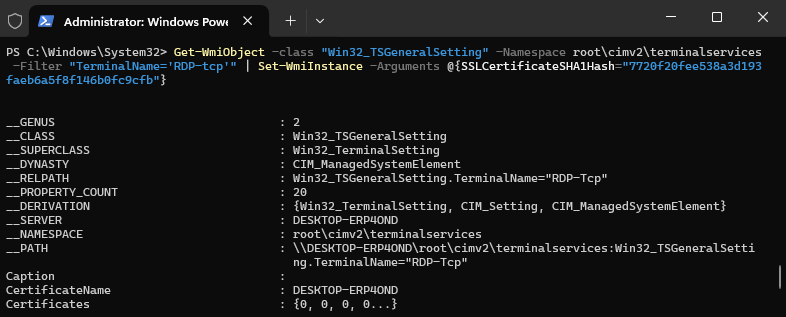
At command prompt, run the following PowerShell command together with the thumbprint value that you obtain in step 2:
Get-WmiObject -class "Win32_TSGeneralSetting" -Namespace root\cimv2\terminalservices | Set-WmiInstance -Arguments @{SSLCertificateSHA1Hash="THUMBPRINT"}The following screenshot shows a successful example: