Note
Access to this page requires authorization. You can try signing in or changing directories.
Access to this page requires authorization. You can try changing directories.
Summary
When you work with Hyper-V checkpoints, you might need to merge the associated differencing disks back into the virtual machine (VM). In most cases, you can delete checkpoints by using Hyper-V Manager, which automatically merges the differencing disks. However, in some situations—such as when third-party backup software creates checkpoints but doesn't clean them up—you might encounter checkpoints that don't appear in Hyper-V Manager or that can't be deleted through the standard interface.
This article describes how to:
- Delete checkpoints and merge differencing disks by using Hyper-V Manager.
- Merge differencing disks when checkpoints aren't visible in Hyper-V Manager.
- Use PowerShell scripts to merge differencing disks without shutting down the VM.
Choose the method that best fits your scenario based on whether the checkpoints are visible in Hyper-V Manager and whether you can shut down the VM.
Merging checkpoints that you can view in Hyper-V Manager
Checkpoints that you can view in Hyper-V Manager are the simplest to handle. Usually, you can use the Delete Checkpoint command on the context menu to delete these checkpoints.
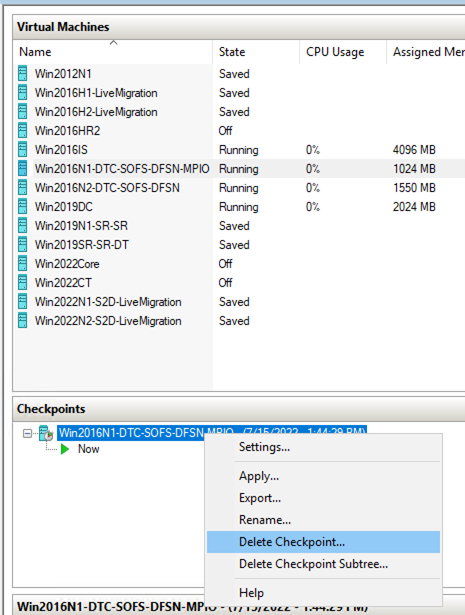
In some cases, Delete Checkpoint and Delete Checkpoint Subtree don't appear on the context menu. This can occur if third-party backup software generates checkpoints but doesn't delete them after a backup operation.
In these cases, you can still use the Delete key to delete the checkpoint.
In summary, to delete checkpoints in Hyper-V Manager (and merge the differencing disk files), follow these steps:
- In Hyper-V Manager, select the virtual machine.
- In the Checkpoints list, right-click the checkpoint that you want to delete, and then take one of the following actions:
- Select Delete Checkpoint.
- If Delete Checkpoint isn't available, select the checkpoint, and then select Del.
Merging checkpoints that you can't view in Hyper-V Manager
You might encounter a situation in which Hyper-V Manager doesn't show checkpoints for a specific VM. At the same time, the corresponding file system folder shows many differencing disk files. This can occur if third-party backup software generates checkpoints but doesn't delete them after a backup operation.
You can merge the differencing disk files in one of two ways, depending on whether you can shut down the VM.
When you can shut down the VM
To merge the differencing disk files, shut down the VM. Typically, the differencing disk files merge as part of the VM shutdown process.
When you can't shut down the VM
You can merge differencing disks into an online VM. However, this is a multi-step process that involves Windows PowerShell scripts. To do this, follow these general steps:
- Back up all the differencing disk files (VHD files).
- Create and run the
Get-VHDChainfunction. This step is described in detail later in this section. - Create and run merge commands. This step is described in detail later in this section.
- Change the VM settings to point to the merged parent VHD.
- Start the VM. A successful startup means that the merge completed successfully.
Create and run the Get-VHDChain function
On the Hyper-V host server, open an administrative PowerShell Command Prompt window.
Copy the following script, and then paste it into the PowerShell window:
function Get-VHDChain {
    [CmdletBinding()]
    param(
        [string]$ComputerName = $env:COMPUTERNAME,
        [string[]]$Name = '*'
    )
    try {
        $VMs = Get-VM -ComputerName $ComputerName -Name $Name -ErrorAction Stop
    }
    catch {
        Write-Warning $_.Exception.Message
    }
    foreach ($vm in $VMs){
        $VHDs = ($vm).harddrives.path
        foreach ($vhd in $VHDs){
            Clear-Variable VHDType -ErrorAction SilentlyContinue
            try {
                $VHDInfo = $vhd | Get-VHD -ComputerName $ComputerName -ErrorAction Stop
            }
            catch {
                $VHDType = 'Error'
                $VHDPath = $vhd
                Write-Verbose $_.Exception.Message
            }
            $i = 1
            $problem = $false
            while (($VHDInfo.parentpath -or $i -eq 1) -and (-not($problem))){
                If ($VHDType -ne 'Error' -and $i -gt 1){
                    try {
                        $VHDInfo = $VHDInfo.ParentPath | Get-VHD -ComputerName $ComputerName -ErrorAction Stop
                    }
                    catch {
                        $VHDType = 'Error'
                        $VHDPath = $VHDInfo.parentpath
                        Write-Verbose $_.Exception.Message
                    }
                }
                if ($VHDType -ne 'Error'){
                    $VHDType = $VHDInfo.VhdType
                    $VHDPath = $VHDInfo.path
                }
                else {
                    $problem = $true
                }
                [pscustomobject]@{
                    Name = $vm.name
                    VHDNumber = $i
                    VHDType = $VHDType
                    VHD = $VHDPath
                }
                $i++
            }
        }
    }
}
This script defines a
Get-VHDChainfunction that identifies the VHD chain (the set of differencing disks for the VM).Run the following command:
Get-vhdchain -name <virtual machine name>Note
In this command, <virtual machine name> represents the name of the virtual machine.
When the script runs, you should see output that resembles the following output.
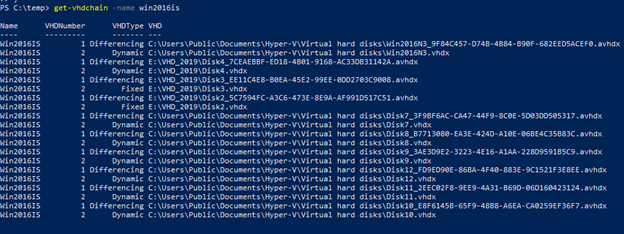
Make sure that
Get-VHDChainruns without errors.Important
If the
Get-VHDChainoutput contains errors, you have to remove the affected differencing disks from the folder. In the following example, Disk 24 generated an error and must be removed from the differencing disk folder.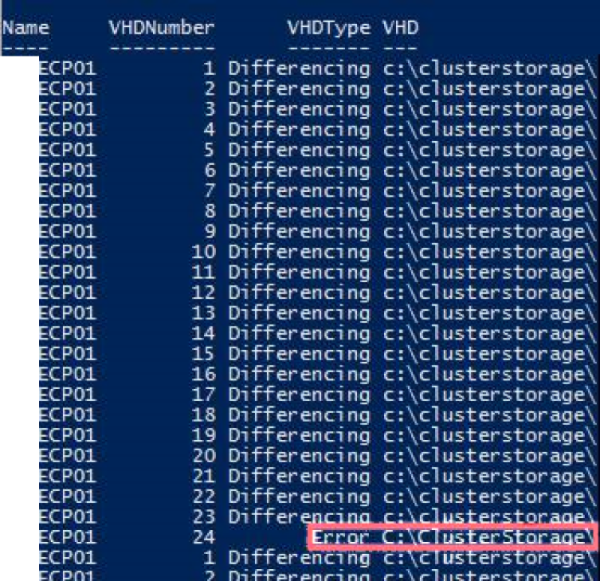
Create and run merge commands
The following instructions create a script in C:\temp\merge.txt to merge the disks. Follow these steps:
On the local C: drive, create a folder that is named temp.
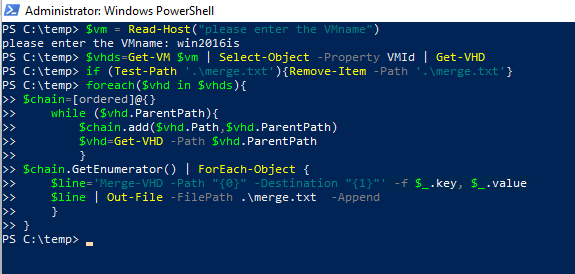
Open an Administrative PowerShell window, and then run the following command:
$vm = Read-Host("please enter the VMname")At the command prompt, enter the virtual machine name.
Copy the following script, and then paste it at the command prompt.
$vhds=Get-VM $vm | Select-Object -Property VMId | Get-VHD
if (Test-Path '.\merge.txt'){Remove-Item -Path '.\merge.txt'}
foreach($vhd in $vhds){
$chain=[ordered]@{}
    while ($vhd.ParentPath){
        $chain.add($vhd.Path,$vhd.ParentPath)
        $vhd=Get-VHD -Path $vhd.ParentPath
        }
$chain.GetEnumerator() | ForEach-Object {
    $line='Merge-VHD -Path "{0}" -Destination "{1}"' -f $_.key, $_.value
    $line | Out-File -FilePath .\merge.txt  -Append
    }
}
The script should resemble the following script:
Open C:\temp\merge.txt. This file contains a list of command line commands that are grouped into pairs. Each pair of commands defines the merge operations for a single differencing disk.
Copy the first command of the first pair, paste it at the command prompt, and then run it. Then, do the same for the second command of the first pair. These operations merge the differencing disk that the commands address.
After the disk merges, repeat the preceding steps for the next differencing disk in the list. Continue for all the differencing disks that the merge.txt file addresses.