Note
Access to this page requires authorization. You can try signing in or changing directories.
Access to this page requires authorization. You can try changing directories.
This guide walks you through enabling the Logs and Alerting feature for your Universal Print tenant. With this feature, Universal Print streams printer health, print job, and billing telemetry directly into your own Azure Monitor Log Analytics workspace, where you can query, visualize, and alert on it.
Tip
New to this feature? Read the Logs and Alerting overview first for what data is captured, how it works, and what you need before you start.
What you'll set up
In about 15 minutes you'll:
- Create an Azure Log Analytics workspace and Data Collection Rule (DCR) in your subscription. Use whichever deployment method you prefer — a PowerShell script, Bicep, an ARM template, or the Azure portal (no local tools required).
- Enable the feature for your tenant from the Universal Print admin portal, pointing it at the workspace and DCR you just created.
- Validate that data is flowing and run sample queries.
Important
Create the Log Analytics workspace and Data Collection Rule in the same Microsoft Entra tenant where Universal Print is used. Universal Print grants ingestion roles to its service principal in that tenant, so a workspace in a different tenant won't receive data.
The deployment (Step 2) creates three custom tables in your workspace; they stay empty until you enable the feature and data starts flowing. For what each table captures and a full column reference, see the Logs and Alerting overview and the Logs and Alerting data reference.
Quick start
If you're already comfortable with Azure Monitor, skip the background and go straight to the steps:
- Step 1 — Get the Universal Print service principal Object ID
- Step 2 — Deploy the infrastructure
- Step 3 — Enable the feature in the Universal Print admin portal
- Step 4 — Validate ingestion
Choose your deployment method
These options all create the same Azure resources and grant Universal Print the same roles. Pick the one that fits how your team works — the Azure portal path simply deploys the ARM template from your browser:
Tip
Not sure which to pick? For most admins the Azure portal (deploy from the browser, no local tools) or the PowerShell script (guided and interactive) are the simplest paths. Use Bicep or ARM only if your team already standardizes on infrastructure-as-code.
| Method | Best for | What you download |
|---|---|---|
| PowerShell script | Guided, interactive setup with retry logic. | Setup-AlertingInfrastructure.ps1 from Scripts/Alerting/ |
| Bicep template | Teams that already deploy infrastructure-as-code with Bicep / az deployment. |
main.bicep, main.bicepparam from Templates/Alerting/ |
| ARM template | Teams standardized on ARM JSON or portal "Deploy a custom template". | azuredeploy.json from Templates/Alerting/ |
| Azure portal | No local tools — deploy the ARM template straight from the browser. | Nothing; load azuredeploy.json from Templates/Alerting/ into the portal |
Download the file(s) for the one method you chose — the signed setup script or a template — from the Scripts/Alerting/ or Templates/Alerting/ folder in the Universal Print resources repository. The .ps1 setup script is Authenticode code-signed; the Bicep and ARM templates are declarative and aren't signed.
Prerequisites
Azure permissions
Two activities need permissions. If one person does everything, the deploy role already includes read access — no extra grant is needed.
| Activity | Role needed | Scope |
|---|---|---|
| Deploy the infrastructure (Step 2) | Owner (simplest), or Contributor + User Access Administrator | The resource group where the workspace will live. Add the same role at subscription scope if you also need to create the resource group. |
| Enable the feature and query data (Step 3 onward) | Reader (or Log Analytics Reader) | The Log Analytics workspace and Data Collection Rule — granted on the resource group that holds them, or directly at the resource level. |
For the deploy role, Contributor creates the workspace and DCR; User Access Administrator grants Universal Print's service principal the ingestion role (Monitoring Metrics Publisher on the DCR). Owner covers both.
The enabling admin needs read access so the workspace and DCR appear in the portal configuration dropdowns. If a different account deployed the infrastructure, grant that Reader role before enabling the feature.
Enabling the feature in Step 3 also requires the Printer Administrator (or Global Administrator) directory role in Microsoft Entra ID. This is separate from the Azure RBAC roles above.
Resource group
The PowerShell script creates the resource group automatically if it doesn't already exist. The Bicep, ARM, and Azure portal paths use a resource group you provide — create one first, or choose Create new during the portal deployment.
Sign in to Azure
Before running any of the commands in the steps below, sign in to Azure with the tooling you'll use:
# Azure PowerShell
Connect-AzAccount -TenantId <your-tenant-id>
# Azure CLI
az login --tenant <your-tenant-id>
For sovereign clouds, add -Environment AzureUSGovernment / -Environment AzureChinaCloud (PowerShell) or az cloud set --name AzureUSGovernment / AzureChinaCloud (CLI) before signing in. See Appendix A.
Step 1 — Get the Universal Print service principal Object ID
Universal Print is a Microsoft first-party application with the well-known Application (client) ID:
da9b70f6-5323-4ce6-ae5c-88dcc5082966
You need the Object ID of its service principal in your own tenant (a different GUID per tenant). For why it's needed, see the FAQ. Obtain it using any one of the methods below.
The Object ID is tenant-specific, so confirm your tooling is signed into the correct tenant (the one where Universal Print is used) before you run any command. Azure CLI and Azure PowerShell track sign-in independently:
az account show --query tenantId -o tsv # Azure CLI(Get-AzContext).Tenant.Id # Azure PowerShellIf it isn't the expected tenant, sign in again — see Sign in to Azure.
Open the All applications blade directly: Azure portal → Microsoft Entra ID → Enterprise applications → All applications. (Equivalent path: Microsoft Entra ID → Enterprise applications → All applications.) Confirm the directory shown in the top bar is the tenant where Universal Print is used.
Change Application type from Enterprise Applications to Microsoft Applications (or All Applications), then set Application ID starts with to
da9b70f6-5323-4ce6-ae5c-88dcc5082966.Validate the match before continuing: exactly one application should be listed, its Name must read Universal Print, and its Application ID must be
da9b70f6-5323-4ce6-ae5c-88dcc5082966.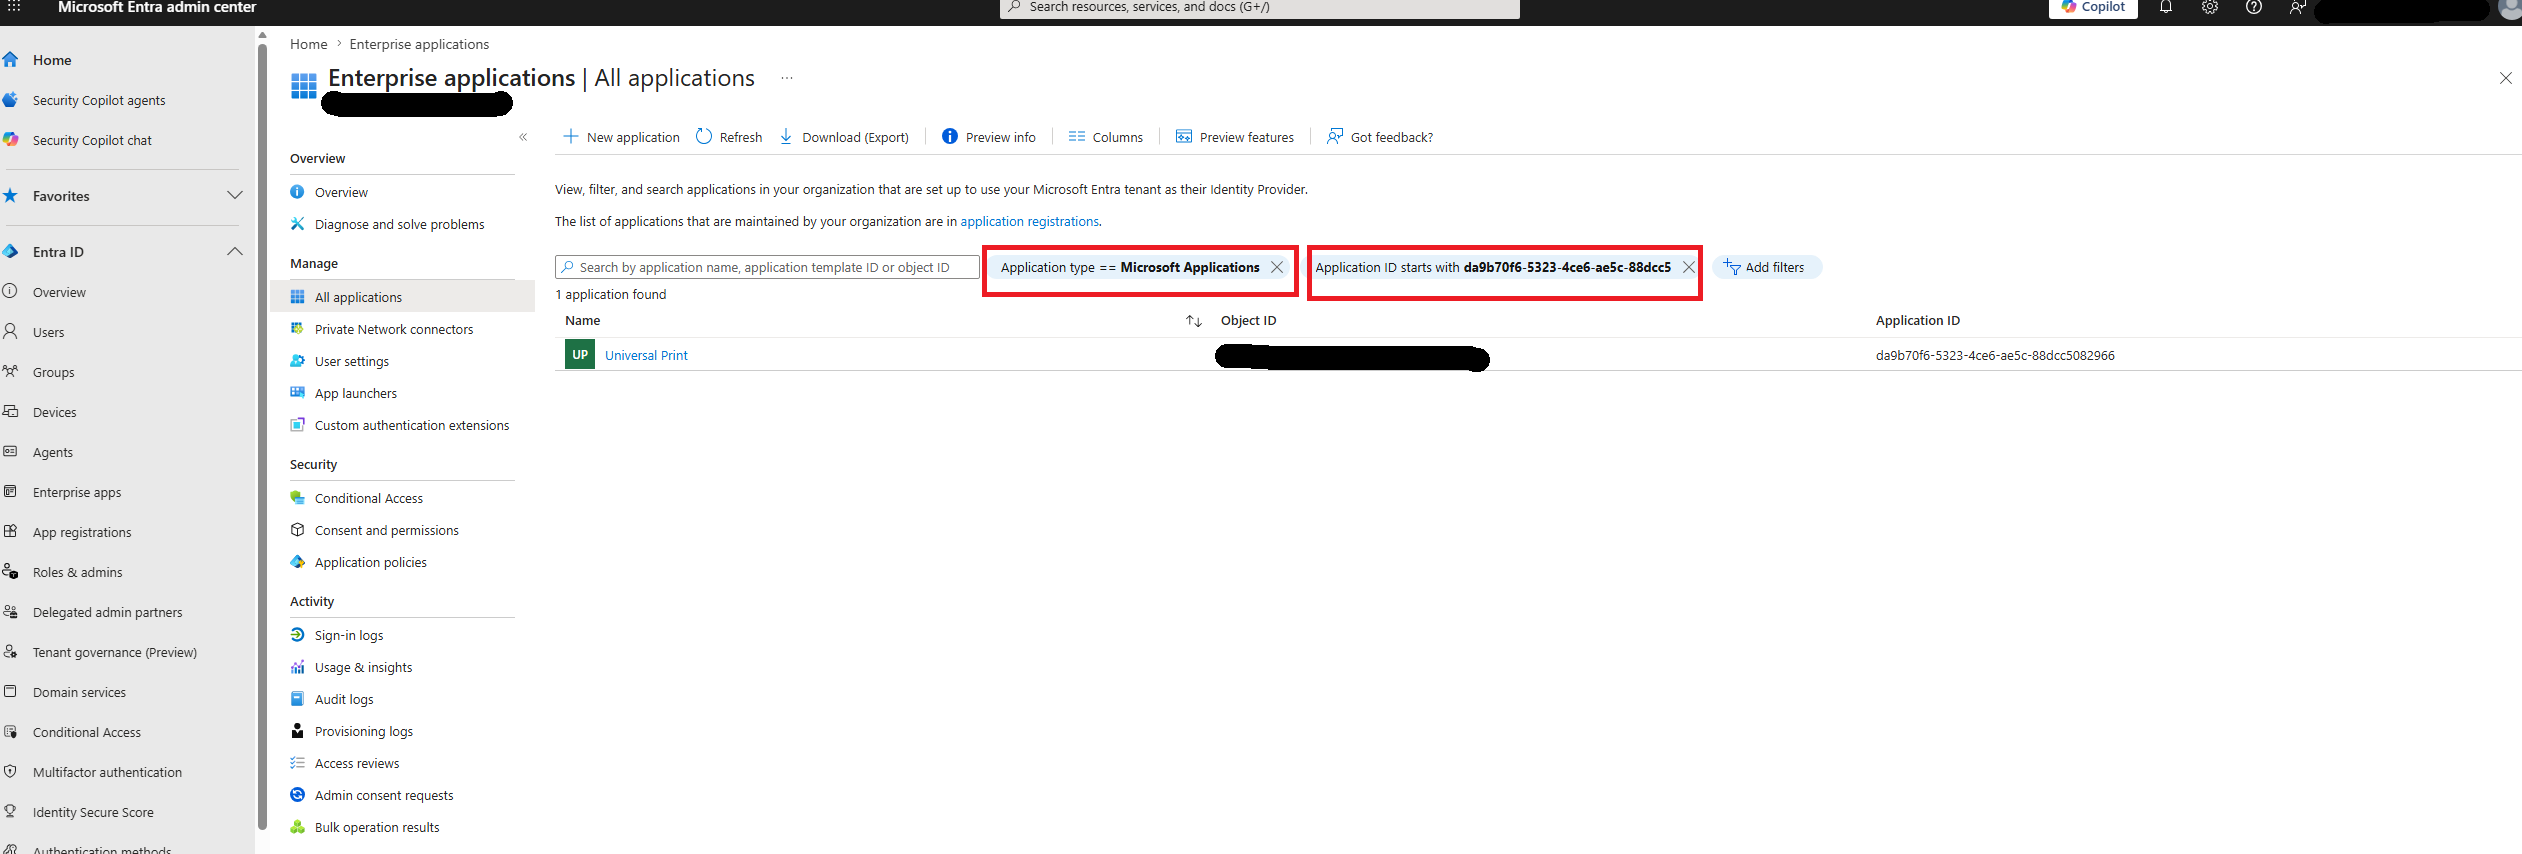
Open the Universal Print application and copy the Object ID from the Overview pane. This is the value you pass to the scripts and templates.
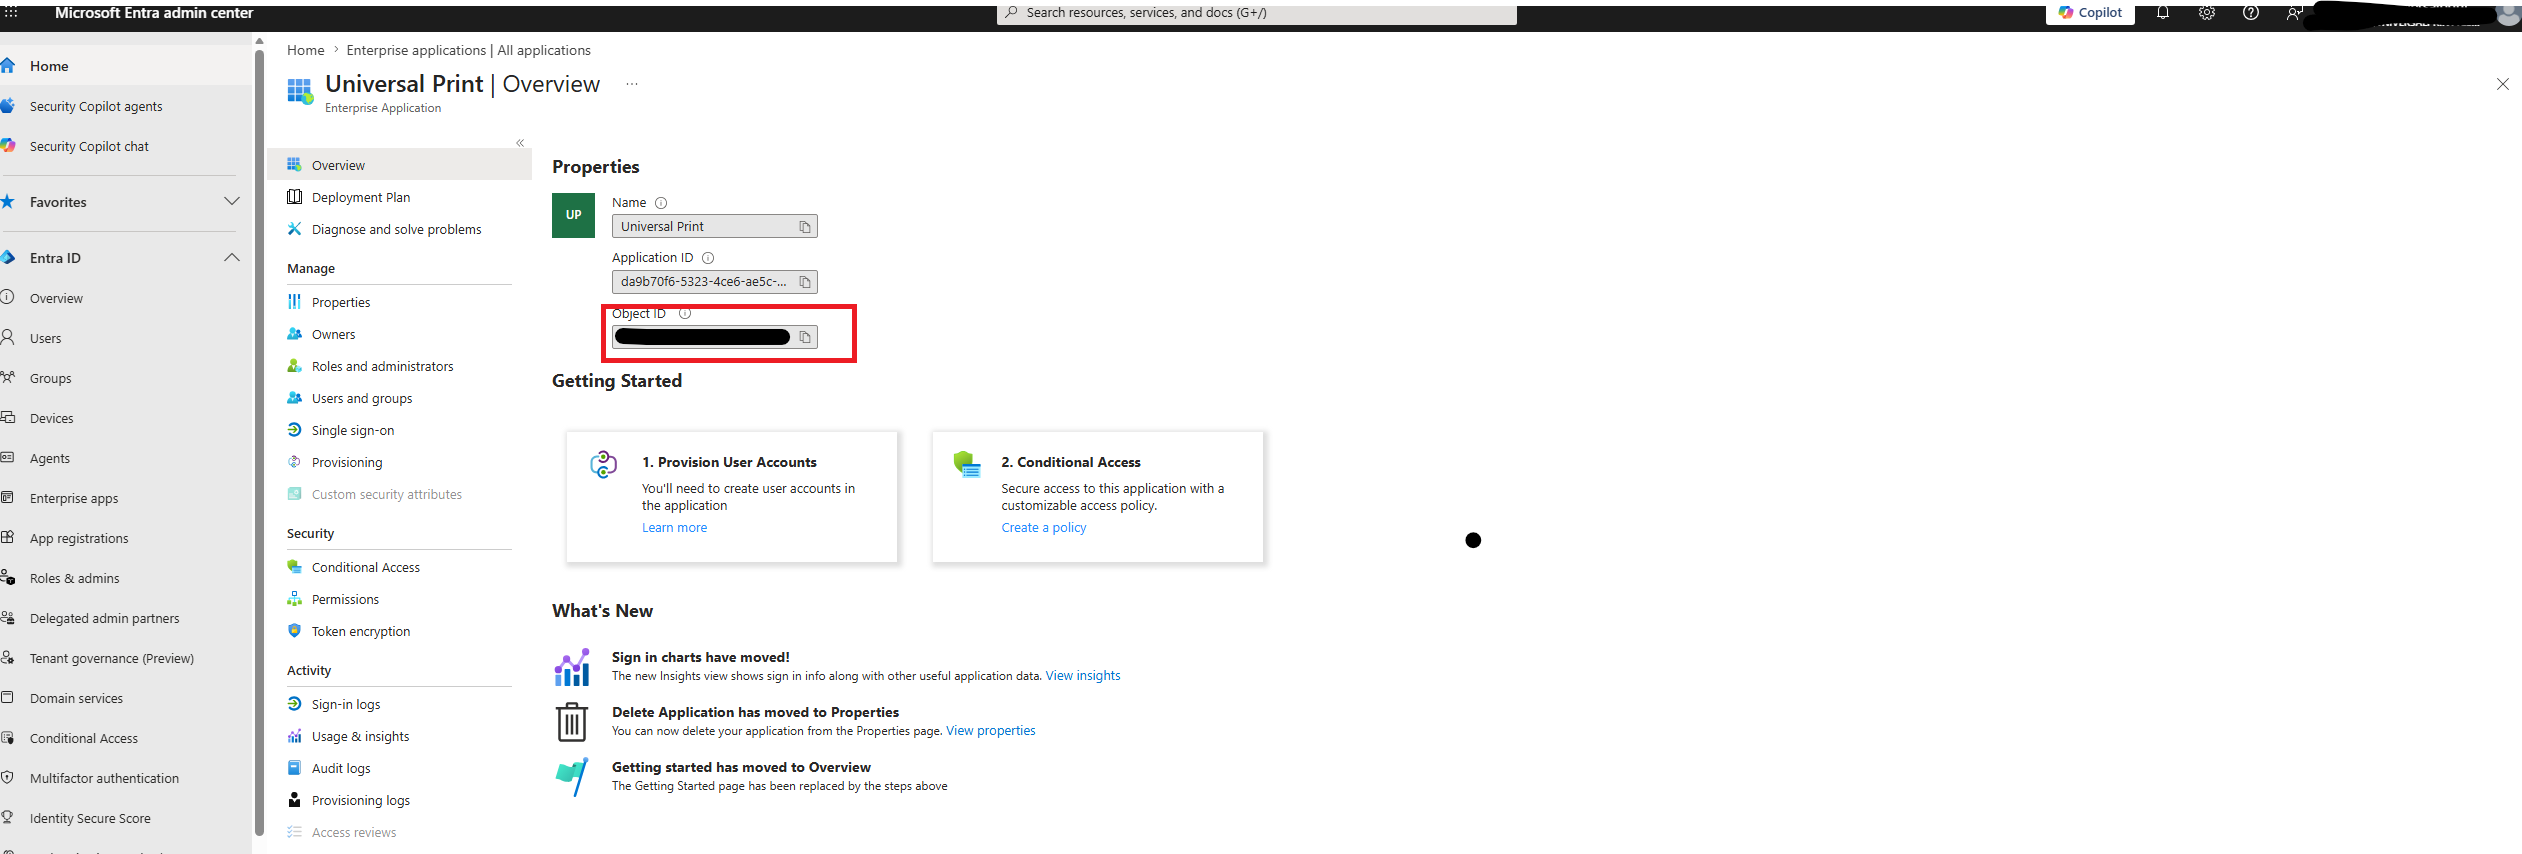
Each method returns a single GUID — the service principal Object ID — for example:
00000000-1111-2222-3333-444444444444
Copy the returned GUID — you'll use it as -UniversalPrintServicePrincipalObjectId (PowerShell) or universalPrintServicePrincipalObjectId (Bicep/ARM).
Step 2 — Deploy the infrastructure
Use one of the following methods — PowerShell, Bicep, or an ARM template (which you can deploy from the command line or directly in the Azure portal). Each provisions the Log Analytics workspace, the three custom tables, and a Direct-ingestion DCR (named dcrup-<workspace-name> by default, truncated to 30 characters), then grants Universal Print's service principal the ingestion role (Monitoring Metrics Publisher on the DCR).
Deploy the ARM template directly from the Azure portal — no local tools required. These steps mirror the Azure Deploy a custom template quickstart.
- Sign in to the Azure portal.
- In the search bar at the top, search for Deploy a custom template and select it from the results.
- On the Custom deployment page, select Build your own template in the editor.
- Select Load file and upload
azuredeploy.jsonfrom theTemplates/Alerting/folder (or open the file, copy its contents, and paste them into the editor). Then select Save. - On the deployment pane, provide the parameter values:
- Subscription — the subscription to deploy into.
- Resource group — select an existing group or choose Create new (for example,
rg-universalprint-logs). - Region — any Azure region (for example,
East US). - Log Analytics Workspace Name — for example,
law-universalprint. - Universal Print Service Principal Object ID — the Object ID from Step 1.
- Adjust any optional parameters (DCR name, retention days) as needed.
- Select Review + create, then select Create to start the deployment.
- When the deployment completes, select Go to resource group (or open the deployment's Outputs) to capture the values you'll need in Step 3.
Note
Removing these resources later is done with the PowerShell clean-up script regardless of how you deployed them. See Clean up Universal Print Logs and Alerting.
Capture the deployment output
When deployment finishes, write down (or copy) these values — you'll need them in Step 3:
- Subscription (ID and name)
- Resource group
- Workspace name
- DCR name (defaults to
dcrup-<workspace-name>)
Step 3 — Enable the feature in the Universal Print admin portal
After the infrastructure is deployed, enable Logs and Alerting for your tenant from the Azure portal and point it at the workspace and DCR you just created.
Sign in to the Azure portal as a Printer Administrator (or Global Administrator) for your tenant.
Search for and open Universal Print.
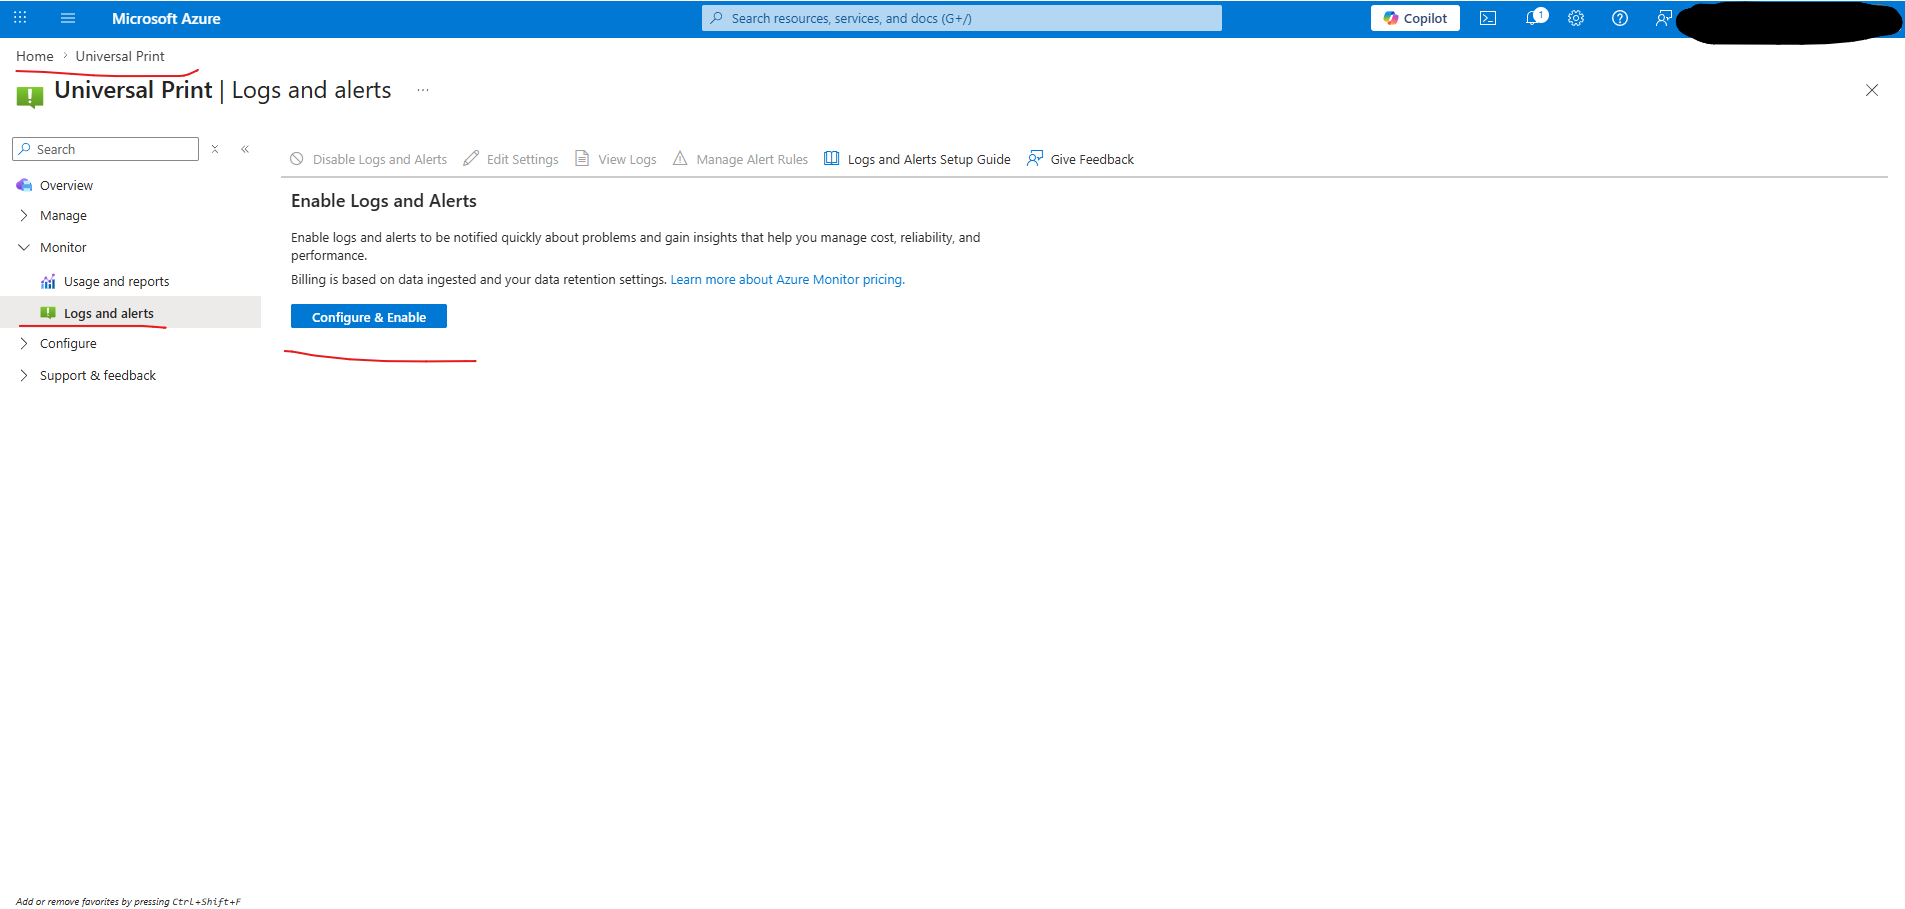
In the left menu, under Monitor, select Logs and alerts.
On the Enable Logs and Alerts card, select Configure & Enable to open the configuration page.
Under Configure log destination, choose the resources the deployment created (highlighted below):
- Subscription — the subscription that holds your Log Analytics workspace.
- Log Analytics workspace — the workspace created in Step 2 (for example,
law-universalprint). - Data Collection Rule — the DCR created in Step 2 (defaults to
dcrup-<workspace-name>).
The dropdowns list resources from the selected subscription; the workspace and DCR must be the ones configured by the deployment.
Note
The administrator enabling the feature needs at least Reader on the workspace and DCR (or the resource group that holds them), or these resources won't appear in the dropdowns. See Azure permissions.
Under Select log categories, choose at least one category for Universal Print to send:
Portal category What it captures Printer activity Changes to printer metadata, health, and availability for all printers Job Activity Changes to print job status for all print jobs Billing Event Your billing and usage data For the destination table each category maps to, see the Logs and Alerting data reference.
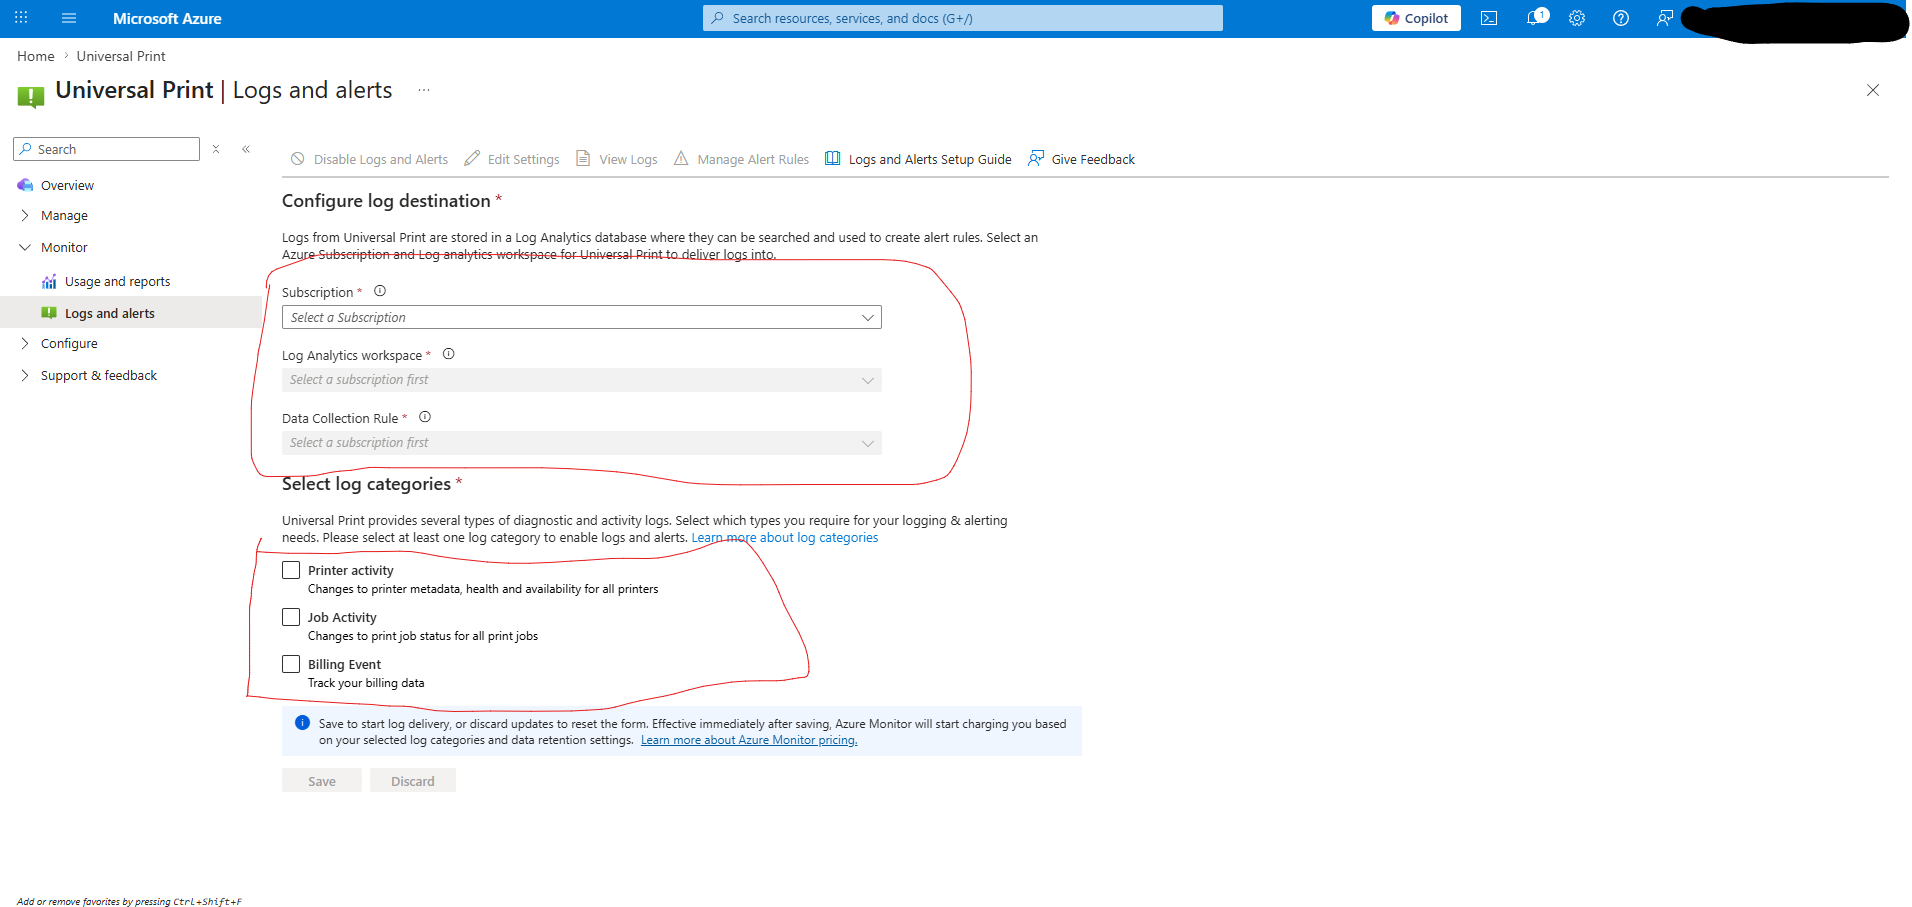
Select Save. Universal Print begins publishing the selected telemetry to your workspace within a few minutes.
Note
Selecting Save starts log delivery immediately, and Azure Monitor begins charging based on the data ingested and your retention settings.
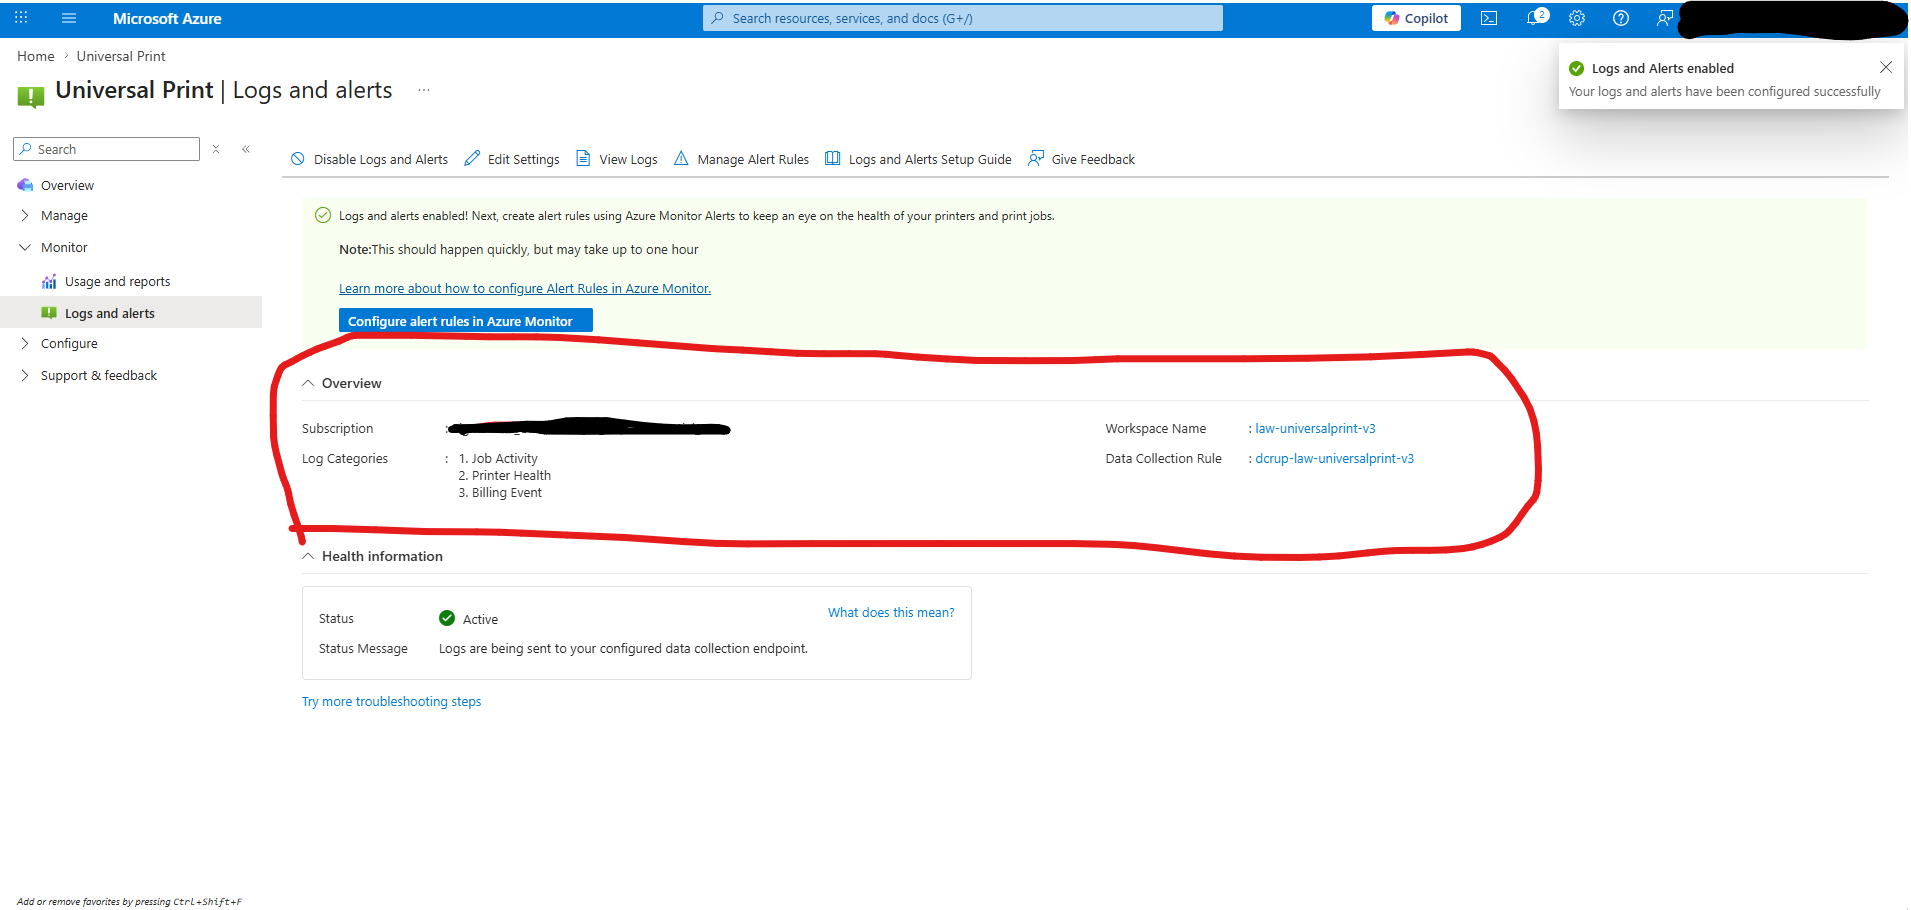
Once enabled, the Overview page shows your active configuration — subscription, log categories, workspace, and Data Collection Rule — along with a Health information section. A status of Active with the message "Logs are being sent to your configured data collection endpoint" confirms telemetry is flowing. From the toolbar you can change the destination with Edit Settings, open your data with View Logs, set up alerting with Manage Alert Rules, or turn the feature off with Disable Logs and Alerts.
Step 4 — Validate ingestion
Once the feature is enabled and you've printed a few jobs (or a printer-health or status change has occurred), confirm the data is landing in your Log Analytics workspace. Open the workspace's Logs blade and run a query against one of the Universal Print tables:
Note
Running these queries requires Reader (or Log Analytics Reader) on the workspace. See Azure permissions.
// Printer health snapshots in the last hour
UniversalPrintPrinterHealth_CL
| where TimeGenerated > ago(1h)
| order by TimeGenerated desc
Note
Telemetry can take a few minutes to first appear after you enable the feature. If the tables are empty, print a job and wait a few minutes before re-checking. For deeper latency and no-data troubleshooting, see No data or delayed data.
For a guided walkthrough that turns queries like these into a printer-attention dashboard, an automated alert, and print-volume reports — plus a ready-to-use set of sample queries — see Monitor and report on print activity.
Disable the feature
To stop Universal Print from sending telemetry without deleting your Azure resources:
- Sign in to the Azure portal as a Printer Administrator (or Global Administrator).
- Open Universal Print > Logs and alerts.
- On the Overview page, select Disable Logs and Alerts.
Universal Print stops publishing new telemetry. Your workspace, tables, DCR, and any data already ingested are left in place, so you can re-enable later or query historical data. To remove the Azure resources entirely (and stop ingestion/retention charges), see Clean up Universal Print Logs and Alerting.
Appendix A — Sovereign clouds
Important
Logs and Alerting is currently enabled in the Azure Public (commercial) cloud only. The -AzureEnvironment parameter and the sovereign-cloud values below are plumbed for future readiness, but Azure US Government and Azure China (21Vianet) aren't supported during the current preview. The guidance here is forward-looking — see availability.
Pass -AzureEnvironment to every script (PowerShell), or set the CLI cloud before deploying:
| Cloud | PowerShell -AzureEnvironment |
CLI az cloud set --name |
|---|---|---|
| Azure Public (Commercial) | AzureCloud (default) |
AzureCloud |
| Azure US Government (GCC High, DoD) | AzureUSGovernment |
AzureUSGovernment |
| Azure China (21Vianet) | AzureChinaCloud |
AzureChinaCloud |
Also use the matching -Environment value on Connect-AzAccount. The admin portal lives at portal.azure.com (Public), portal.azure.us (GCC High / DoD), or portal.azure.cn (China).
Appendix B — Troubleshooting
The table below covers common deployment-time issues. For problems after the feature is enabled — no data, delayed data, configuration errors, or pipeline status errors — see Troubleshoot Logs and Alerting.
| Symptom | Likely cause | Fix |
|---|---|---|
Bicep/ARM deployment fails: missing universalPrintServicePrincipalObjectId |
The templates require the SP Object ID. | Get it from Step 1 and pass it as a parameter. |
Az.* cmdlet not found |
Modules not installed in current PowerShell session. | Install-Module Az.Accounts, Az.Resources, Az.OperationalInsights, Az.Monitor. |
az login succeeds but the Bicep/ARM deployment fails with a Conditional Access / MFA claim error |
On Windows, Azure CLI ≥ 2.84 uses the Web Account Manager (WAM) broker, which can return a cached token missing the acrs:["p1"] step-up claim required by Conditional Access. |
Disable the broker and re-authenticate: az config set core.enable_broker_on_windows=false, then az logout, then az login --tenant <tenant-id> --scope "https://management.core.windows.net//.default". (The PowerShell deployment method is unaffected.) |
Need help?
- Scripts and templates: See the
Scripts/Alerting/andTemplates/Alerting/folders in the Universal Print resources repository for parameter-by-parameter details and IaC parameters. - Support: Contact your Microsoft representative or open a support ticket referencing "Logs and Alerting".
See also
- Logs and Alerting overview
- Continue to Monitor and report on print activity to turn your telemetry into dashboards, alerts, and reports
- Logs and Alerting data reference
- Troubleshoot Logs and Alerting
- Frequently asked questions
- Clean up Universal Print Logs and Alerting