Note
Access to this page requires authorization. You can try signing in or changing directories.
Access to this page requires authorization. You can try changing directories.
Note
This article applies to Azure Azure Cloud Services (extended support). This deployment model is retiring on March 31, 2027. For more information, see Azure updates.
Azure Cloud Services relies on connection strings for authentication in some cases, such as for storage accounts. Connection strings and passwords are inherently insecure due to the risk of unintended exposure or compromise. Microsoft recommends using managed identities for authentication, and services such as Service Fabric managed clusters.
When you publish a cloud service, Visual Studio stores configuration information in two kinds of configuration files: service configurations and profiles. Service configurations (.cscfg files) store settings for the deployment environments for Azure Cloud Services (extended support). Azure uses these configuration files when it manages your cloud services. On the other hand, profiles (.azurePubxml files) store publish settings for cloud services. These settings are a record of what you choose when you use the publish wizard, and are used locally by Visual Studio. This topic explains how to work with both types of configuration files.
Prerequisites
- Visual Studio (see [Visual Studio downloads] (https://visualstudio.microsoft.com/downloads/?cid=learn-onpage-download-cta)) with the Azure development workload installed, and the Individual Component .NET Framework project and item templates installed. See Modify Visual Studio.
- An Azure account. If you don't have an Azure account, activate your Azure benefits for Visual Studio subscribers or sign up for a free trial.
Service Configurations
You can create multiple service configurations to use for each of your deployment environments. For example, you might create a service configuration for the local environment that you use to run and test an Azure application and another service configuration for your production environment.
You can add, delete, rename, and modify these service configurations based on your requirements. You can manage these service configurations from Visual Studio, as shown in the following illustration.
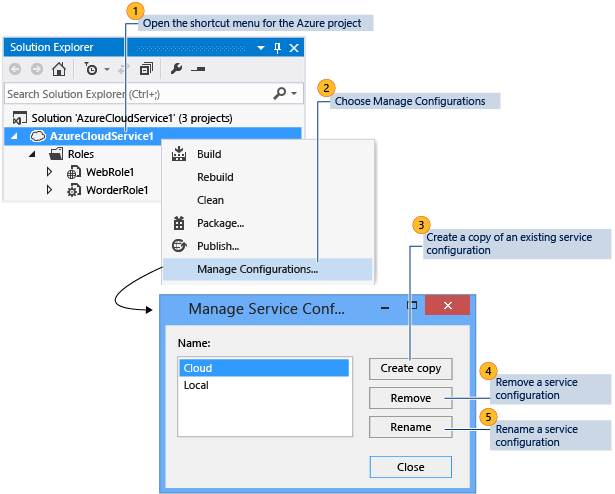
You can also open the Manage Configurations dialog box from the role's property pages. To open the properties for a role in your Azure project, open the shortcut menu for that role, and then choose Properties. On the Settings tab, expand the Service Configuration list, and then select Manage to open the Manage Configurations dialog box.
To add a service configuration
In Solution Explorer, open the shortcut menu for the Azure project and then select Manage Configurations.
The Manage Service Configurations dialog box appears.
To add a service configuration, you must create a copy of an existing configuration. To do this, choose the configuration that you want to copy from the Name list and then select Create copy.
(Optional) To give the service configuration a different name, choose the new service configuration from the Name list and then select Rename. In the Name text box, type the name that you want to use for this service configuration and then select OK.
A new service configuration file that is named ServiceConfiguration.[New Name].cscfg is added to the Azure project in Solution Explorer.
To delete a service configuration
In Solution Explorer, open the shortcut menu for the Azure project and then select Manage Configurations.
The Manage Service Configurations dialog box appears.
To delete a service configuration, choose the configuration that you want to delete from the Name list and then select Remove. A dialog box appears to verify that you want to delete this configuration.
Select Delete.
The service configuration file is removed from the Azure project in Solution Explorer.
To rename a service configuration
In Solution Explorer, open the shortcut menu for the Azure project, and then select Manage Configurations.
The Manage Service Configurations dialog box appears.
To rename a service configuration, choose the new service configuration from the Name list, and then select Rename. In the Name text box, type the name that you want to use for this service configuration, and then select OK.
The name of the service configuration file is changed in the Azure project in Solution Explorer.
To change a service configuration
- If you want to change a service configuration, open the shortcut menu for the specific role you want to change in the Azure project, and then select Properties. See How to: Configure the Roles for an Azure Cloud Services (extended support) project with Visual Studio for more information.
Make different setting combinations by using profiles
By using a profile, you can automatically fill in the Publish Wizard with different combinations of settings for different purposes. For example, you can have one profile for debugging and another for release builds. In that case, your Debug profile would have IntelliTrace enabled and the Debug configuration selected, and your Release profile would have IntelliTrace disabled and the Release configuration selected. You could also use different profiles to deploy a service using a different storage account.
When you run the wizard for the first time, a default profile is created. Visual Studio stores the profile in a file that has an .azurePubXml extension, which is added to your Azure project under the Profiles folder. If you manually specify different choices when you run the wizard later, the file automatically updates. Before you run the following procedure, you should have already published your cloud service at least once.
To add a profile
Open the shortcut menu for your Azure project, and then select Publish.
Next to the Target profile list, select the Save Profile button, as the following illustration shows. This creates a profile for you.
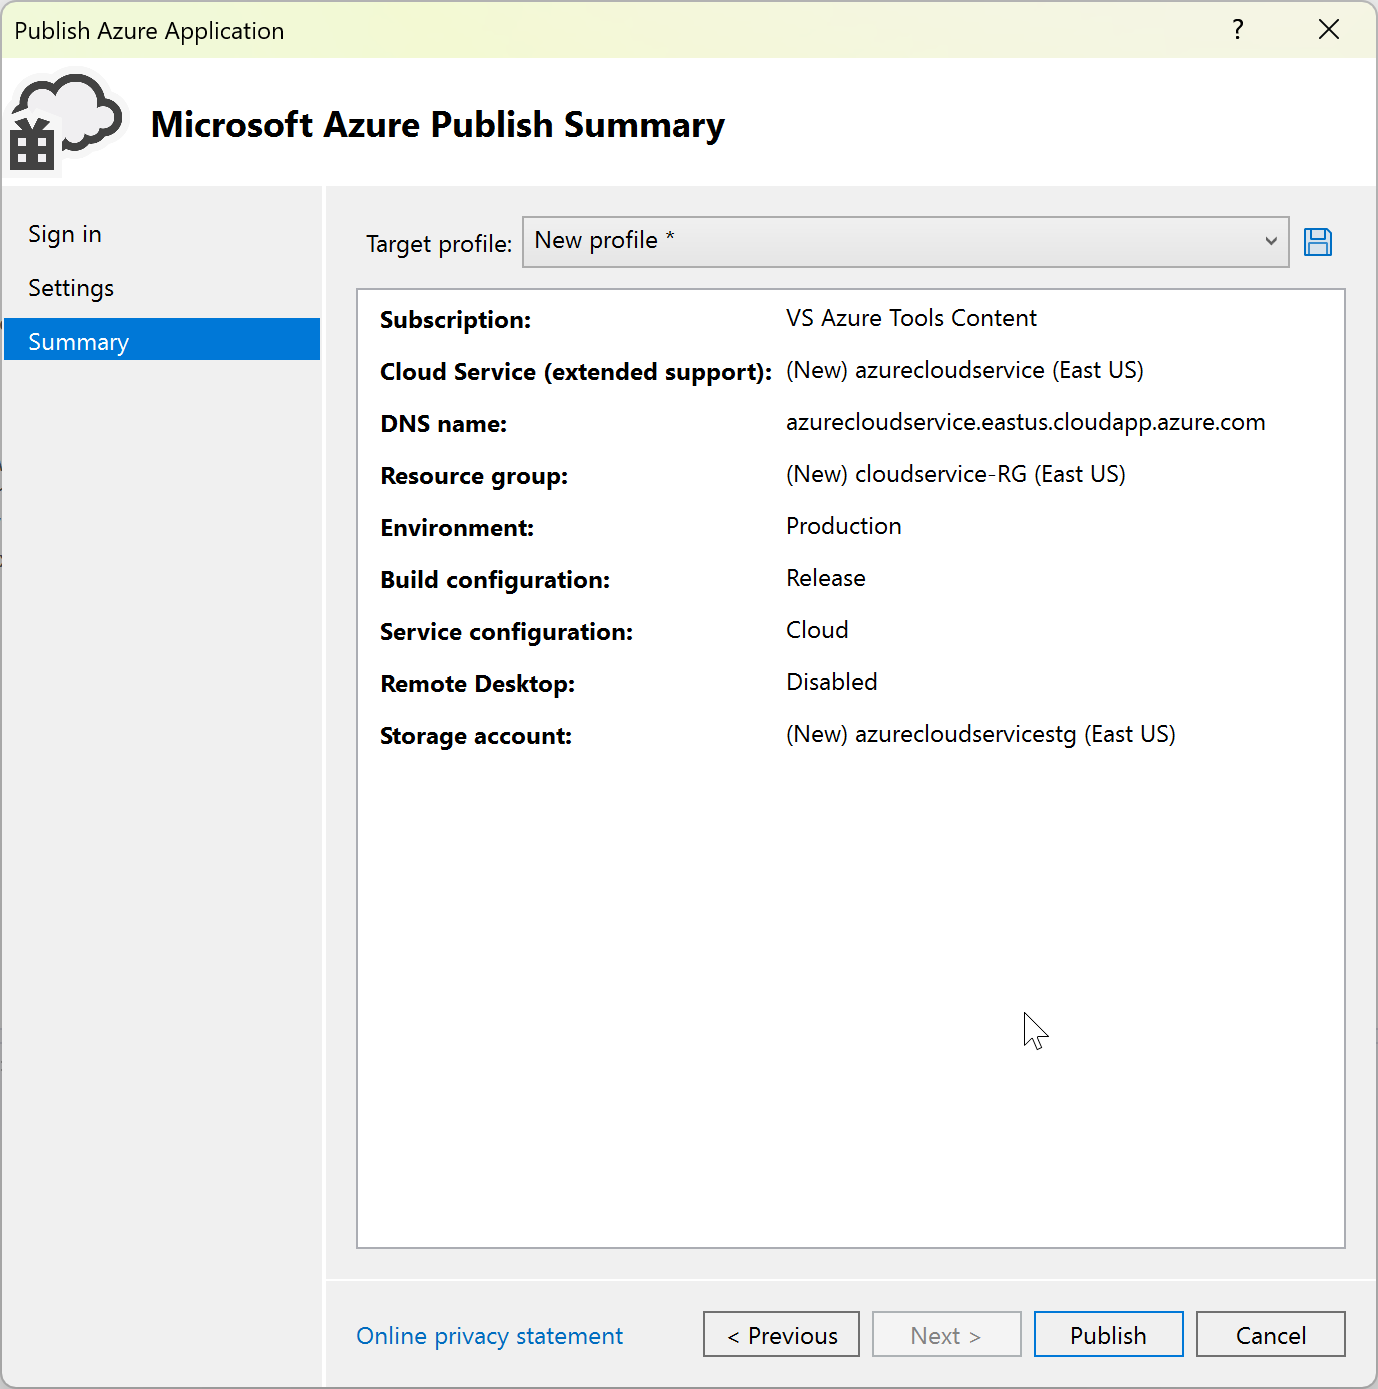
After the profile is created, select <Manage...> in the Target profile list.
The Manage Profiles dialog box appears, as the following illustration shows.
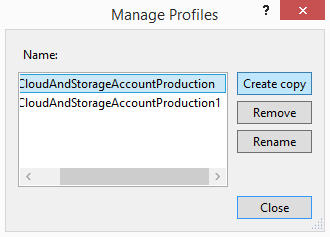
In the Name list, choose a profile, and then select Create Copy.
Choose the Close button.
The new profile appears in the Target profile list.
In the Target profile list, select the profile that you just created. The Publish Wizard settings are filled in with the choices from the profile you selected.
Select the Previous and Next buttons to display each page of the Publish Wizard, and then customize the settings for this profile. See Publish Azure Application Wizard for information.
After you finish customizing the settings, select Next to go back to the Settings page. The profile is saved when you publish the service by using these settings or if you select Save next to the list of profiles.
To rename or delete a profile
- Open the shortcut menu for your Azure project, and then select Publish.
- In the Target profile list, select Manage.
- In the Manage Profiles dialog box, select the profile that you want to delete, and then select Remove.
- In the confirmation dialog box that appears, select OK.
- Select Close.
To change a profile
- Open the shortcut menu for your Azure project, and then select Publish.
- In the Target profile list, select the profile that you want to change.
- Select the Previous and Next buttons to display each page of the Publish Wizard, and then change the settings you want. See Publish Azure Application Wizard for information.
- After you finish changing the settings, select Next to go back to the Settings page.
- (Optional) select Publish to publish the cloud service using the new settings. If you don't want to publish your cloud service at this time, and you close the Publish Wizard, Visual Studio asks you if you want to save the changes to the profile.
Related content
To learn about configuring other parts of your Azure project from Visual Studio, see Configuring an Azure Project.