Browse and manage storage resources by using Server Explorer
Tip
Try Microsoft Azure Storage Explorer
Microsoft Azure Storage Explorer is a free, standalone app from Microsoft. You can use it to work visually with Azure Storage data on Windows, macOS, and Linux.
Note
This article applies to Azure Azure Cloud Services (extended support). Cloud Services (classic) is retired as of August 31, 2024. For more information, see Cloud services (classic) deployment model is retiring on August 31, 2024. For new development, we recommend that you use a newer service type designed for your specific purpose, such as Azure App Service, Azure Functions, or Azure Container Apps. For the latest list of available services, see Directory of Azure products.
If you've installed Azure workload for Microsoft Visual Studio 2019, you can view blob, queue, and table data from your storage accounts for Azure. The Azure Storage node in Server Explorer shows data that's in your local storage emulator account and your other Azure Storage accounts.
To view Server Explorer in Visual Studio, on the menu bar, select View > Server Explorer. The Storage node shows all of the storage accounts that exist under each Azure subscription or certificate that you're connected to. If your storage account doesn't appear, you can add it by following the instructions later in this article.
In Visual Studio 2019 and earlier, you can also use Cloud Explorer to view and manage your Azure resources. For more information, see Managing Azure resources with Cloud Explorer.
Important
Cloud Explorer has been retired in Visual Studio 2022. Instead, you can use the following alternatives:
- To debug Azure App Services or Azure Functions apps, you can use the Connected Services or the Publish features available on all projects.
- If you rely on Visual Studio for publishing, you can access this feature under the "Additional Options" in the Hosting section.
- If you don't use the publishing feature, the Connected Services node inside each Project in your Solution can help you configure access to Azure resources and invoke various operations like remote debugging, remote profiling, starting/stopping the application, view streaming logs, and more.
- Use Microsoft Azure Storage Explorer is a free, standalone app from Microsoft. You can use it to work visually with Azure Storage data on Windows, macOS, and Linux.
- The Kudu console gives you direct, elevated command-line access to the App Service server and its file system. This is both a valuable debugging tool and allows for CLI operations such as installing packages.
If needed, you can use the Azure Portal or continue to use the Azure node of Server Explorer in previous versions of Visual Studio.
For more information about Visual Studio 2022, see our release notes.
Prerequisites
- An Azure account. If you don't have an Azure account, activate your Azure benefits for Visual Studio subscribers or sign up for a free trial.
View and manage storage resources in Visual Studio
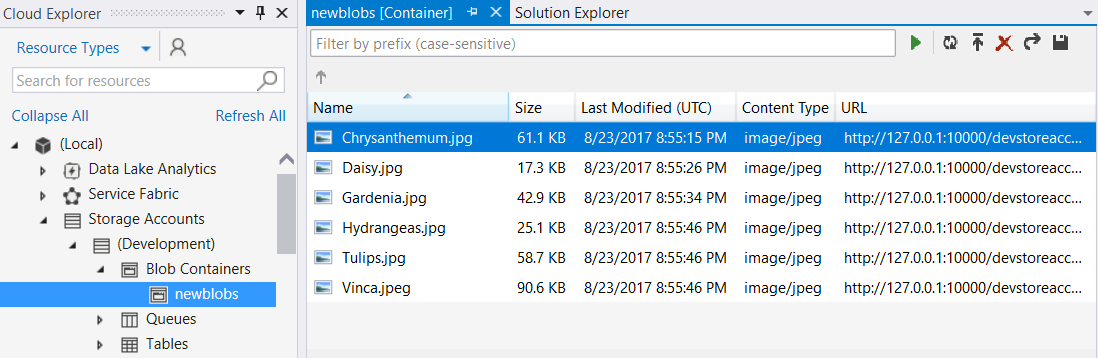
Server Explorer automatically shows a list of blobs, queues, and tables in your storage emulator account. The storage emulator account is listed in Server Explorer under the Storage node as the Development node.
To see the storage emulator account's resources, expand the Development node. If the storage emulator hasn't been started when you expand the Development node, it automatically starts. This process can take several seconds. You can continue to work in other areas of Visual Studio while the storage emulator starts.
To view resources in a storage account, expand the storage account's node in Server Explorer where you see Blobs, Queues, and Tables nodes.
Work with blob resources
The Blobs node displays a list of containers for the selected storage account. Blob containers contain blob files, and you can organize these blobs into folders and subfolders. For more information, see How to use Blob storage from .NET.
To create a blob container
Open the shortcut menu for the Blobs node, and then select Create Blob Container.
In the Create Blob Container dialog box, enter the name of the new container.
Select Enter on your keyboard, or you can click or tap outside the name field to save the blob container.
Note
The blob container name must begin with a number (0-9) or lowercase letter (a-z).
To delete a blob container
Open the shortcut menu for the blob container that you want to remove, and then select Delete.
To display a list of the items in a blob container
Open the shortcut menu for a blob container name in the list, and then select Open.
When you view the contents of a blob container, it appears on a tab known as the blob container view.
You can perform the following operations on blobs by using the buttons in the upper-right corner of the blob container view:
- Enter a filter value and apply it.
- Refresh the list of blobs in the container.
- Upload a file.
- Delete a blob. (Deleting a file from a blob container doesn't delete the underlying file. It only removes it from the blob container.)
- Open a blob.
- Save a blob to the local computer.
To create a folder or subfolder in a blob container
Choose the blob container in Cloud Explorer. In the container window, select the Upload Blob button.
In the Upload New File dialog box, select the Browse button to specify the file that you want to upload, and then enter a folder name in the Folder (optional) box.
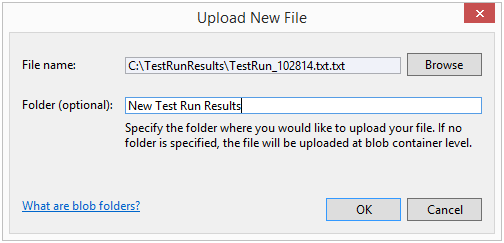
You can add subfolders in container folders by following the same step. If you don't specify a folder name, the file is uploaded to the top level of the blob container. The file appears in the specified folder in the container.
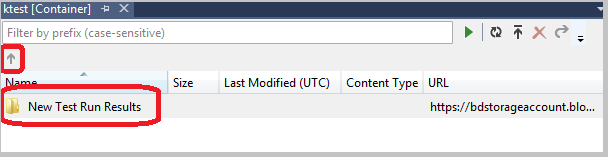
Double-click the folder or select Enter to see the contents of the folder. When you're in the container's folder, you can go back to the root of the container by selecting the Open Parent Directory (arrow) button.
To delete a container folder
Delete all the files in the folder.
Because folders in blob containers are virtual folders, you can't create an empty folder. You also can't delete a folder to delete its file contents, but must instead delete the entire contents of a folder to delete the folder itself.
To filter blobs in a container
You can filter the blobs that are displayed by specifying a common prefix.
For example, if you enter the prefix hello in the filter text box and then select the Execute (!) button, only blobs that begin with "hello" appear.

The filter text box is case-sensitive and doesn't support filtering with wildcard characters. Blobs can be filtered only by prefix. The prefix can include a delimiter if you are using a delimiter to organize blobs in a virtual hierarchy. For example, filtering on the prefix "HelloFabric/" returns all blobs that begin with that string.
To download blob data
In Cloud Explorer, use any of the following methods:
- Open the shortcut menu for one or more blobs, and then select Open.
- Choose the blob name and then select the Open button.
- Double-click the blob name.
The progress of a blob download appears in the Azure Activity Log window.
The blob opens in the default editor for that file type. If the operating system recognizes the file type, the file opens in a locally installed application. Otherwise, you're prompted to choose an application that's appropriate for the file type of the blob. The local file that's created when you download a blob is marked as read-only.
Blob data is cached locally and checked against the blob's last-modified time in Azure Blob storage. If the blob has been updated since it was last downloaded, it's downloaded again. Otherwise, the blob is loaded from the local disk.
By default, a blob is downloaded to a temporary directory. To download blobs to a specific directory, open the shortcut menu for the selected blob names and select Save As. When you save a blob in this manner, the blob file is not opened, and the local file is created with read/write attributes.
To upload blobs
To upload blobs, select the Upload Blob button when the container is open for viewing in the blob container view.
You can choose one or more files to upload, and you can upload files of any type. The Azure Activity Log window shows the progress of the upload. For more information about how to work with blob data, see How to use Azure Blob storage in .NET.
To view logs transferred to blobs
If you are using Azure Diagnostics to log data from your Azure application and you have transferred logs to your storage account, you'll see containers that Azure created for these logs. Viewing these logs in Server Explorer is an easy way to identify problems with your application, especially if it's been deployed to Azure.
For more information about Azure Diagnostics, see Collect Logging Data by Using Azure Diagnostics.
To get the URL for a blob
Open the blob's shortcut menu and then select Copy URL.
To edit a blob
Choose the blob and then select the Open Blob button.
The file is downloaded to a temporary location and opened on the local computer. Upload the blob again after you make changes.
Work with queue resources
Storage services queues are hosted in an Azure Storage account. You can use them to allow your cloud service roles to communicate with each other and with other services by a message-passing mechanism. You can access the queue programmatically through a cloud service and over a web service for external clients. You can also access the queue directly by using Server Explorer in Visual Studio.
When you develop a cloud service that uses queues, you might want to use Visual Studio to create queues and work with them interactively while you develop and test your code.
In Server Explorer, you can view the queues in a storage account, create and delete queues, open a queue to view its messages, and add messages to a queue. When you open a queue for viewing, you can view the individual messages, and you can perform the following actions on the queue by using the buttons in the upper-left corner:
- Refresh the view of the queue.
- Add a message to the queue.
- Dequeue the topmost message.
- Clear the entire queue.
The following image shows a queue that contains two messages:
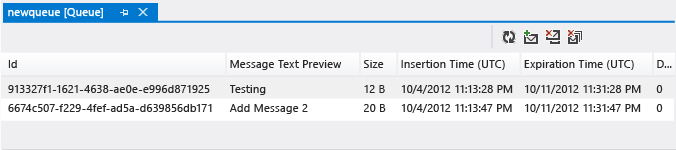
For more information about storage services queues, see Get started with Azure Queue storage using .NET. For information about the web service for storage services queues, see Queue Storage Concepts. For information about how to send messages to a storage services queue by using Visual Studio, see Sending Messages to a Storage Services Queue.
Note
Storage services queues are distinct from Azure Service Bus queues. For more information about Service Bus queues, see Service Bus queues, topics, and subscriptions.
Work with table resources
Azure Table storage stores large amounts of structured data. The service is a NoSQL datastore that accepts authenticated calls from inside and outside the Azure cloud. Azure tables are ideal for storing structured, non-relational data.
To create a table
- In Cloud Explorer, select the Tables node of the storage account, and then select Create Table.
- In the Create Table dialog box, enter a name for the table.
To view table data
In Cloud Explorer, open the Azure node, and then open the Storage node.
Open the storage account node that you are interested in, and then open the Tables node to see a list of tables for the storage account.
Open the shortcut menu for a table, and then select View Table.
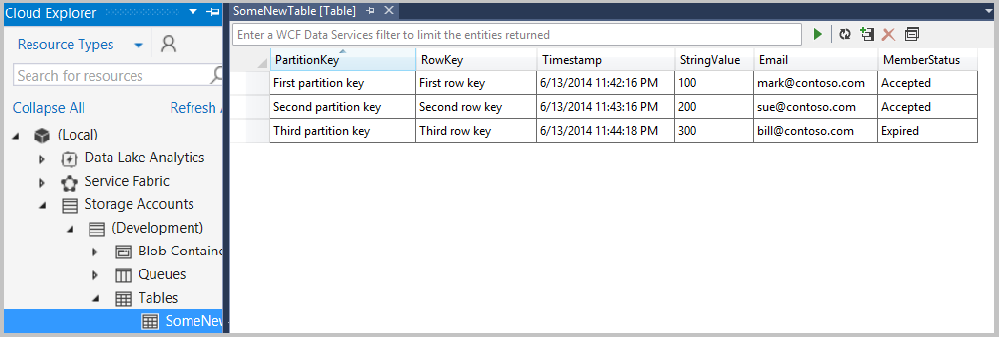
The table is organized by entities (shown in rows) and properties (shown in columns). For example, the next illustration shows entities listed in Table Designer.
To edit table data
In Table Designer, open the shortcut menu for an entity (a single row) or a property (a single cell), and then select Edit.
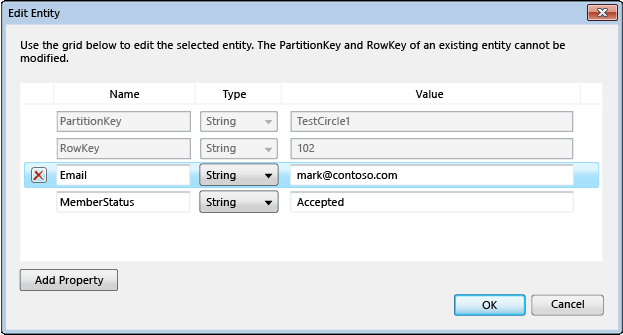
Entities in a single table aren't required to have the same set of properties (columns). Keep in mind the following restrictions on viewing and editing table data:
- You can't view or edit binary data (
type byte[]), but you can store it in a table. - You can't edit the PartitionKey or RowKey values, because Azure Table storage doesn't support that operation.
- You can't create a property called Timestamp. Azure Storage services use a property with that name.
- If you enter a DateTime value, you must follow a format that's appropriate to the region and language settings of your computer (for example, MM/DD/YYYY HH:MM:SS [AM|PM] for US English).
To add entities
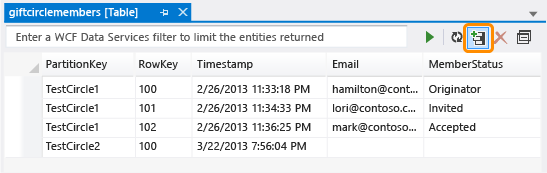
In Table Designer, select the Add Entity button.
In the Add Entity dialog box, enter the values of the PartitionKey and RowKey properties.
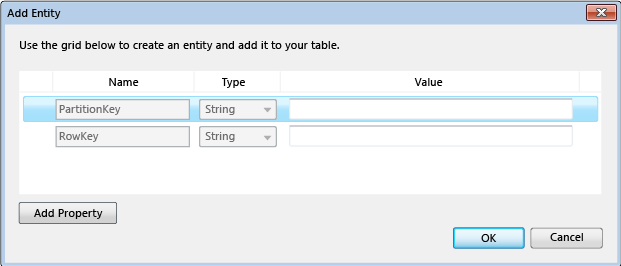
Enter the values carefully. You can't change them after you close the dialog box unless you delete the entity and add it again.
To filter entities
You can customize the set of entities that appear in a table if you use the query builder.
To open the query builder, open a table for viewing.
Select the Query Builder button on the table view's toolbar.
The Query Builder dialog box appears. The following illustration shows a query that's being built in the query builder.
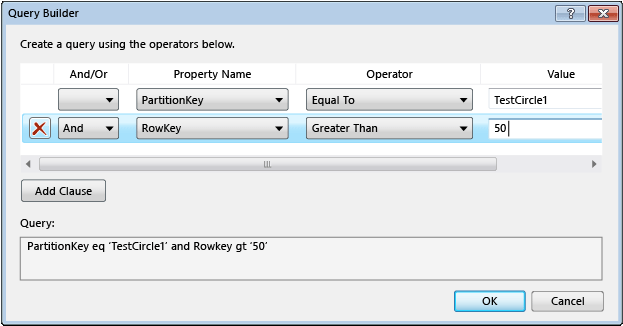
When you're done building the query, close the dialog box. The resulting text form of the query appears in a text box as a WCF Data Services filter.
To run the query, select the green triangle icon.
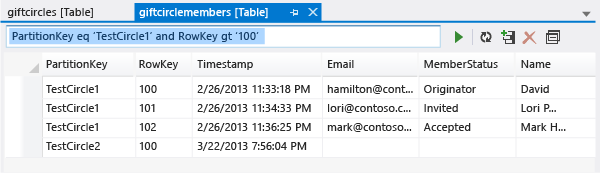
You can also filter entity data that appears in Table Designer if you enter a WCF Data Services filter string directly in the filter text box. This kind of string is similar to a SQL WHERE clause but is sent to the server as an HTTP request. For information about how to construct filter strings, see Constructing filter strings for the table designer.
The following illustration shows an example of a valid filter string:
Refresh storage data
When Server Explorer connects to or gets data from a storage account, the operation might take up to a minute to finish. If Server Explorer can't connect, the operation might time out. While data is retrieved, you can continue to work in other parts of Visual Studio. To cancel the operation if it's taking too long, select the Stop Refresh button on the Server Explorer toolbar.
To refresh blob container data
- Select the Blobs node beneath Storage, and then select the Refresh button on the Server Explorer toolbar.
- To refresh the list of blobs that is displayed, select the Execute button.
To refresh table data
- Select the Tables node beneath Storage, and then select the Refresh button on the Server Explorer toolbar.
- To refresh the list of entities that is displayed in Table Designer, select the Execute button in Table Designer.
To refresh queue data
Select the Queues node beneath Storage, and then select the Refresh button on the Server Explorer toolbar.
To refresh all items in a storage account
Choose the account name, and then select the Refresh button on the Server Explorer toolbar.
Add storage accounts by using Server Explorer
There are two ways to add storage accounts by using Server Explorer. You can create a storage account in your Azure subscription, or you can attach an existing storage account.
To create a storage account by using Server Explorer
In Server Explorer, open the shortcut menu for the Storage node, and then select Create Storage Account.
In the Create Storage Account dialog box, select, or enter the following information:
- The Azure subscription to which you want to add the storage account.
- The name that you want to use for the new storage account.
- The region or affinity group (such as West US or East Asia).
- The type of replication you want to use for the storage account, such as locally redundant.
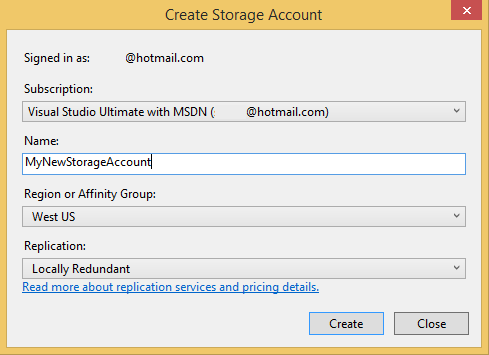
Select Create.
The new storage account appears in the Storage list in Solution Explorer.
To attach an existing storage account by using Server Explorer
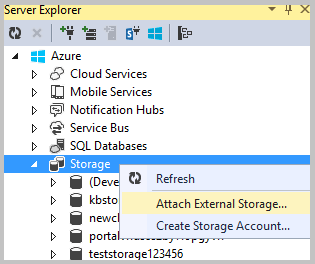
In Server Explorer, open the shortcut menu for the Azure Storage node, and then select Attach External Storage.
In the Create Storage Account dialog box, select, or enter the following information:
- The name of the existing storage account that you want to attach.
- The key for the selected storage account. This value is typically provided for you when you select a storage account. If you want Visual Studio to remember the storage account key, select the Remember account key checkbox.
- The protocol to use to connect to the storage account, such as HTTP, HTTPS, or a custom endpoint. For more information about custom endpoints, see How to Configure Connection Strings.
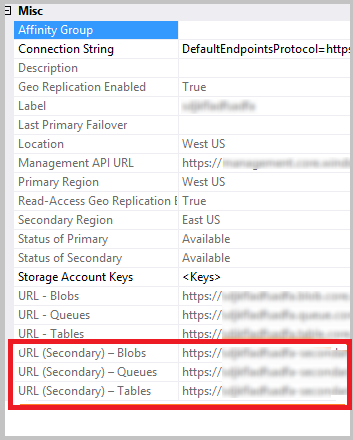
To view the secondary endpoints
If you created a storage account by using the Read-Access Geo Redundant replication option, you can view its secondary endpoints by opening the shortcut menu for the account name, and then select Properties.
To remove a storage account from Server Explorer
In Server Explorer, open the shortcut menu for the account name, and then select Delete.
If you delete a storage account, any saved key information for that account is also removed.
If you delete a storage account from Server Explorer, it doesn't affect your storage account or any data that it contains. It simply removes the reference from Server Explorer. To permanently delete a storage account, use the Azure portal.
Related content
To learn more about how to use Azure Storage services, see Accessing the Azure Storage Services.