Visual Studio provides a consistent way to develop Docker containers and validate your application locally.
You can run and debug your apps in Linux or Windows containers running on your local Windows desktop with Docker installed, and you don't have to restart the container each time you make a code change.
This article illustrates how to use Visual Studio to start an app in a local Docker container, make changes, and then refresh the browser to see the changes. This article also shows you how to set breakpoints for debugging for containerized apps. Supported project types include web app, console app, and Azure function targeting .NET Framework and .NET Core. The examples presented in this article are a project of type ASP.NET Core Web App and a project of type Console App (.NET Framework).
If you already have a project of a supported type, Visual Studio can create a Dockerfile and configure your project to run in a container. See Container Tools in Visual Studio.
Prerequisites
To debug apps in a local Docker container, the following tools must be installed:
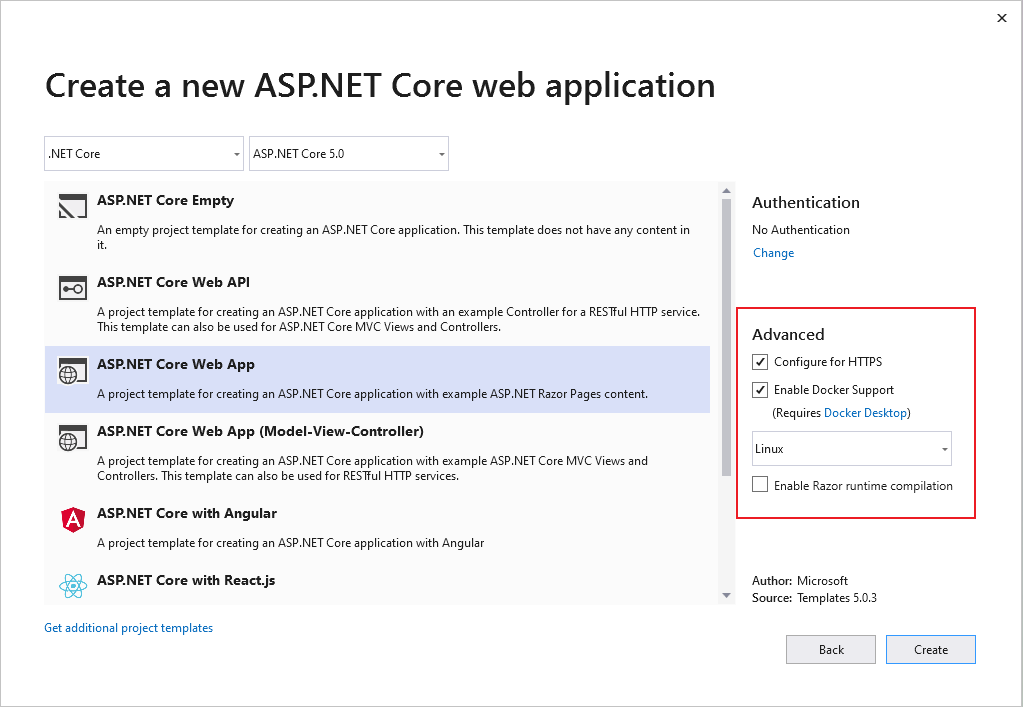
Choose whether you want SSL support by selecting or clearing the Configure for HTTPS checkbox.
Select the Enable Docker checkbox.
Use the Docker OS dropdown list to select the type of container you want: Windows or Linux.
Select Create to complete the process.
Edit your Razor pages and refresh
To quickly iterate changes in your Razor pages, you can start your application in a container. Then, continue to make changes, viewing them as you would with Internet Information Services (IIS) Express.
Make sure that Docker is set up to use the container type (Linux or Windows) that you are using. Right-click on the Docker icon on the Taskbar, and choose Switch to Linux containers or Switch to Windows containers as appropriate.
Editing your code and refreshing the running site as described in this section is not enabled in the default templates in .NET Core and .NET 5 and later. To enable it, add the NuGet package Microsoft.AspNetCore.Mvc.Razor.RuntimeCompilation. Add a call to the extension method AddRazorRuntimeCompilation to the code in the Startup.ConfigureServices method. You only need this enabled in DEBUG mode, so code it as follows in the Main method:
C#
// Add services to the container.var mvcBuilder = builder.Services.AddRazorPages();
#if DEBUGif (Env.IsDevelopment())
{
mvcBuilder.AddRazorRuntimeCompilation();
}
#endif
For more information, see Razor file compilation in ASP.NET Core. The exact code might vary, depending on the target framework and the project template you used.
Set Solution Configuration to Debug. Then, press Ctrl+F5 to build your Docker image and run it locally.
When the container image is built and running in a Docker container, Visual Studio launches the web app in your default browser.
Go to the Index page. We'll make changes on this page.
Return to Visual Studio and open Index.cshtml.
Add the following HTML content to the end of the file, and then save the changes.
HTML
<h1>Hello from a Docker container!</h1>
In the output window, when the .NET build is finished and you see the following lines, switch back to your browser and refresh the page:
Output
Now listening on: http://*:80
Application started. Press Ctrl+C to shut down.
Your changes have been applied!
Debug with breakpoints
Often, changes require further inspection. You can use the debugging features of Visual Studio for this task.
In Visual Studio, open Index.cshtml.cs.
Replace the contents of the OnGet method with the following code:
C#
ViewData["Message"] = "Your application description page from within a container";
To the left of the code line, set a breakpoint.
To start debugging and hit the breakpoint, press F5.
Switch to Visual Studio to view the breakpoint. Inspect values.
Hot reload
Also, in Visual Studio 17.10 and later, Hot Reload is supported in containers, although be aware that in a container, you have to refresh the page to see changes. If the change is to a CSS file, you again have to refresh the page to see those changes. Note also that updates to scoped CSS files (.razor.css files, see ASP.NET Core Blazor CSS isolation) are not supported as part of hot reload.
Create a .NET Framework console app
This section presents how to debug a .NET Framework console app project in a local Docker container by first showing how to add Docker support to the project. It's important to recognize that different project types have different levels of Docker support. There are even different levels of Docker support for .NET Core (including .NET 5 and later) console app projects versus .NET Framework console app projects.
When a .NET Framework console app project is created, there's no option to enable Docker support. After creating such a project, there's no way to explicitly add Docker support to the project. For a .NET Framework console app project, it's possible to add support for container orchestration. A side effect of adding orchestration support to the .NET Framework console app project is that it adds Docker support to the project.
The following procedure demonstrates how to add orchestration support to a .NET Framework console app project, which subsequently adds Docker support to the project and allows the project to be debugged in a local Docker container.
Create a new .NET Framework Console app project.
In Solution Explorer, right-click the project node, and then select Add > Container Orchestration Support. In the dialog box that appears, select Docker Compose. A Dockerfile is added to your project and a Docker Compose project with associated support files is added.
Debug with breakpoints
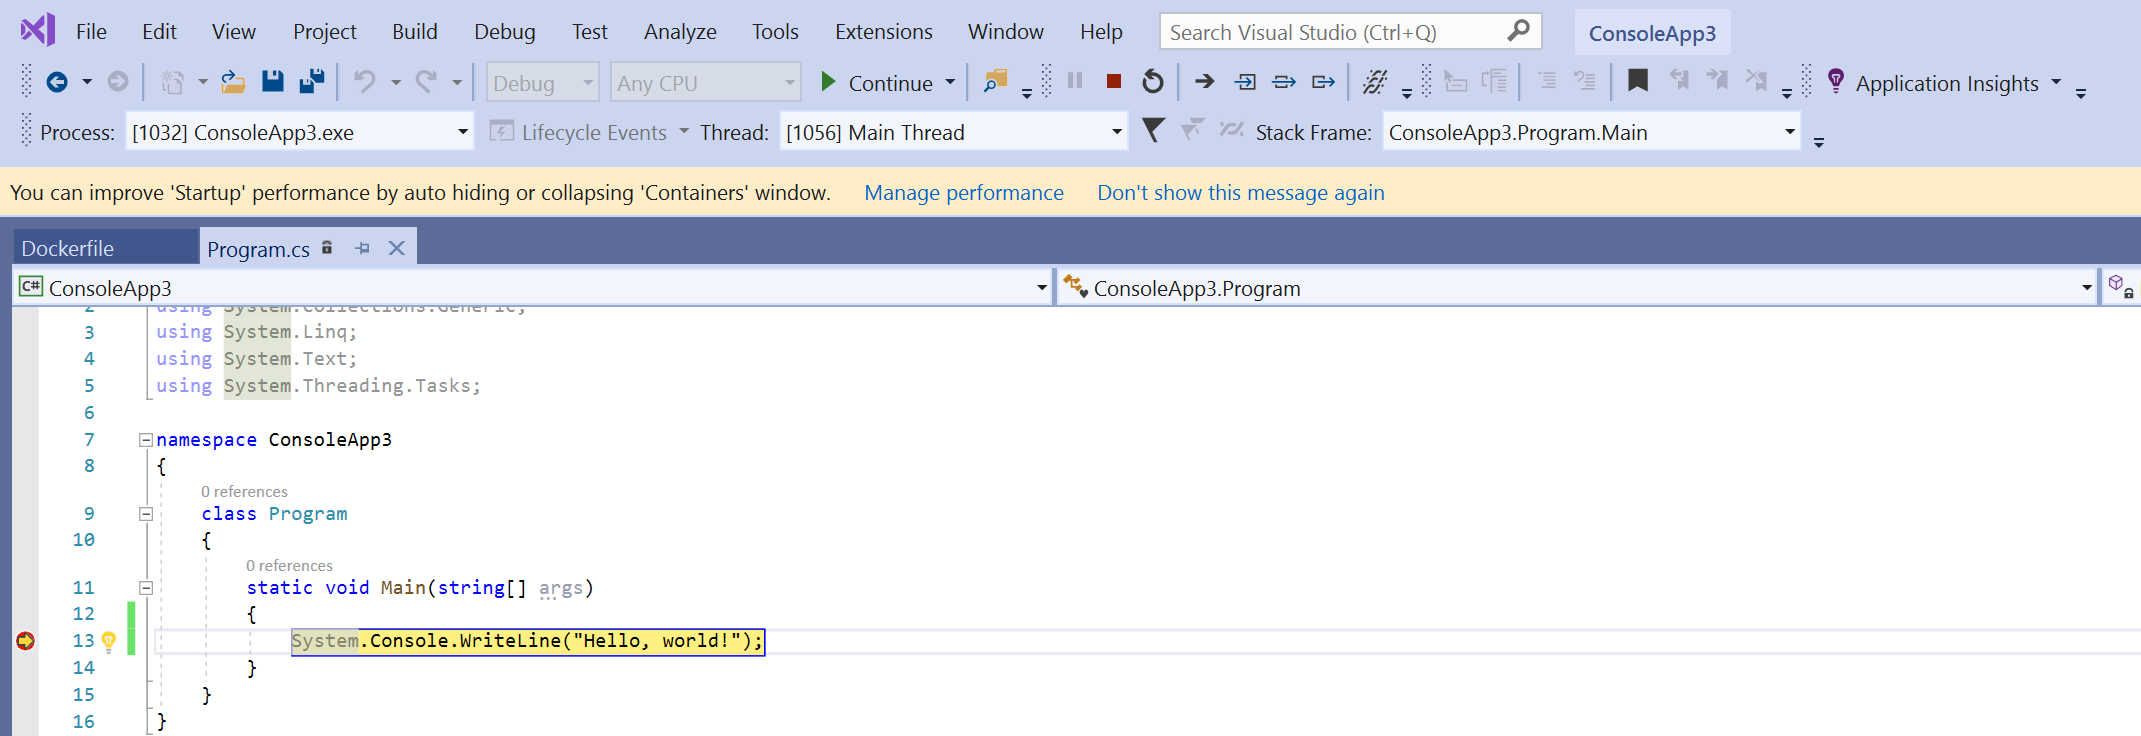
In Solution Explorer, open Program.cs.
Replace the contents of the Main method with the following code:
C#
System.Console.WriteLine("Hello, world!");
Set a breakpoint to the left of the code line.
Press F5 to start debugging and hit the breakpoint.
Switch to Visual Studio to view the breakpoint and inspect values.
Authenticating to Azure services using the token proxy
When you're using Azure services from a container, you can use DefaultAzureCredential (with the VisualStudioCredential enabled) to authenticate with Azure services with your Microsoft Entra account without any additional configuration in the container. To enable this, see How to configure Visual Studio Container Tools. Also, you need to set up Azure authentication in Visual Studio by following the instructions at Authenticate Visual Studio with Azure. The support for VisualStudioCredential in a container is available in Visual Studio version 17.6 and later.
Azure Functions
If you're debugging an integrated Azure Functions project and using the token proxy in the container to handle authentication to Azure services, you need to copy the .NET runtime onto the container for the token proxy to run. If you're debugging an isolated Azure Functions project, it already has the .NET runtime, so there's no need for this extra step.
To ensure the .NET runtime is available to the token proxy, add, or modify the debug layer in the Dockerfile that copies the .NET runtime into the container image. For Linux containers, you can add the following code to the Dockerfile:
Dockerfile
# This layer is to support debugging, VS's Token Proxy requires the runtime to be installed in the containerFROM mcr.microsoft.com/dotnet/runtime:8.0 AS runtime
FROM base as debug
COPY --from=runtime /usr/share/dotnet /usr/share/dotnetRUN ln -s /usr/share/dotnet/dotnet /usr/bin/dotnet
Also, in the Visual Studio project, you need to make some changes to specify this as the layer to use when debugging in Fast Mode. For an explanation of Fast Mode, see Customize Docker containers in Visual Studio. For single container scenarios (not Docker Compose), set the MSBuild property DockerfileFastModeStage to debug in order to use that layer for debugging. For Docker Compose, modify the docker-compose.vs.debug.yml as follows:
yml
# Set the stage to debug to use an image with the .NET runtime in itservices: functionappintegrated: build: target:debug
For a code sample of authentication with Azure Functions, including both integrated and isolated scenarios, see VisualStudioCredentialExample.
Container reuse
When you use Fast Mode, which Visual Studio normally uses for the Debug configuration, Visual Studio rebuilds only your container images and the container itself when you change the Dockerfile. If you don't change the Dockerfile, Visual Studio reuses the container from an earlier run.
If you manually modified your container and want to restart with a clean container image, use the Build > Clean command in Visual Studio, and then build as normal.
When you're not using Fast Mode, which is typical for the Release configuration, Visual Studio rebuilds the container each time the project is built.
Create and configure a full-featured container-based development environment with the Visual Studio Code Dev Containers extension. Open any folder or repository in a container and take advantage of the full feature set of Visual Studio Code, like IntelliSense (completions), code navigation, and debugging.
Build end-to-end solutions in Microsoft Azure to create Azure Functions, implement and manage web apps, develop solutions utilizing Azure storage, and more.