Note
Access to this page requires authorization. You can try signing in or changing directories.
Access to this page requires authorization. You can try changing directories.
Applies to: ![]() Visual Studio
Visual Studio ![]() Visual Studio for Mac
Visual Studio for Mac
Note
This article applies to Visual Studio 2017. If you're looking for the latest Visual Studio documentation, see Visual Studio documentation. We recommend upgrading to the latest version of Visual Studio. Download it here
You can connect to an Access database (either an .mdb file or an .accdb file) by using Visual Studio. After you define the connection, the data appears in the Data Sources window. From there, you can drag tables or views onto your design surface.
Note
If you're using Visual Studio to connect to Access databases, you will need to be aware that versions of Visual Studio prior to Visual Studio 2022 are all 32-bit processes.
This means some of the data tools in Visual Studio will only be able to connect to Access databases using 32-bit data providers.
Prerequisites
To use these procedures, you need a Windows Forms or WPF project and either an Access database (.accdb file) or an Access 2000-2003 database (.mdb file). Follow the procedure that corresponds to your file type.
Create a dataset for an .accdb file
Connect to databases created with Microsoft 365, Access 2013, Access 2010, or Access 2007 by using the following procedure.
Open a Windows Forms or WPF application project in Visual Studio.
To open the Data Sources window, press Ctrl+Q, enter "data" in the search box, and choose Data Sources window. Or on the View menu, select Other Windows > Data Sources. Or on the keyboard, press Shift+Alt+D.
In the Data Sources window, click Add New Data Source.
The Data Source Configuration Wizard opens.
Select Database on the Choose a Data Source Type page, and then select Next.
Select Dataset on the Choose a Database Model page, and then select Next.
On the Choose your Data Connection page, select New Connection to configure a new data connection.
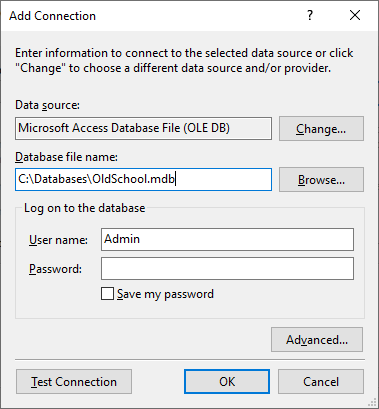
The Add Connection dialog box opens.
If Data source is not set to Microsoft Access Database File, select the Change button.
The Change Data Source dialog box opens. In the list of data sources, choose Microsoft Access Database File. In the Data provider drop-down, select .NET Framework Data Provider for OLE DB, and then choose OK.
Choose Browse next to Database file name, and then navigate to your .accdb file and choose Open.
Enter a user name and password (if necessary), and then choose OK.
Select Next on the Choose your Data Connection page.
You may get a dialog box telling you the data file is not in your current project. Select Yes or No.
Select Next on the Save connection string to the Application Configuration file page.
Expand the Tables node on the Choose your Database Objects page.
Select the tables or views you want to include in your dataset, and then select Finish.
The dataset is added to your project, and the tables and views appear in the Data Sources window.
Create a dataset for an .mdb file
Connect to databases created with Access 2000-2003 by using the following procedure.
Open a Windows Forms or WPF application project in Visual Studio.
On the View menu, select Other Windows > Data Sources.
In the Data Sources window, click Add New Data Source.
The Data Source Configuration Wizard opens.
Select Database on the Choose a Data Source Type page, and then select Next.
Select Dataset on the Choose a Database Model page, and then select Next.
On the Choose your Data Connection page, select New Connection to configure a new data connection.
If the data source is not Microsoft Access Database File (OLE DB), select Change to open the Change Data Source dialog box and select Microsoft Access Database File, and then select OK.
In the Database file name, specify the path and name of the .mdb file you want to connect to, and then select OK.
Select Next on the Choose your Data Connection page.
Select Next on the Save connection string to the Application Configuration file page.
Expand the Tables node on the Choose your Database Objects page.
Select whatever tables or views you want in your dataset, and then select Finish.
The dataset is added to your project, and the tables and views appear in the Data Sources window.
Next steps
The dataset that you just created is available in the Data Sources window. You can now perform any of the following tasks:
Select items in the Data Sources window and drag them onto your form or design surface (see Bind Windows Forms controls to data in Visual Studio or WPF data binding overview).
Open the data source in the Dataset Designer to add or edit the objects that make up the dataset.
Add validation logic to the ColumnChanging or RowChanging event of the data tables in the dataset (see Validate data in datasets).