Menus and Toolbars overview
Menus and toolbars are the way users access commands in your extension. They're convenient graphical ways to present your commands to users. Typically, related commands are clustered together on the same menu or toolbar.
Work with menus and toolbars
This overview covers these top scenarios for working with menus and toolbars:
- Create a menu
- Place items on a menu
- Create a toolbar
- Place items on a toolbar
- Create a group
- Place items on a group
- Place groups on a menu or toolbar
- Placement ordering (Priority)
Create a menu
To create a menu with the new Extensibility Model, add a static MenuConfiguration property, adorning the class with the VisualStudioContribution attribute. This static property can be placed on any class in your Extension project. In the new Extensibility Model samples, they exist on the Extension class for simplicity. Menus without any visible children won't be visible in the UI.
[VisualStudioContribution]
public class ExtensionEntrypoint : Extension
{
  [VisualStudioContribution]
  public static MenuConfiguration MyMenu => new("%MyMenu.DisplayName%");
}
MenuConfiguration class
The MenuConfiguration class has a few parameters that you should become familiar with:
| Parameter | Type | Required | Description |
|---|---|---|---|
| DisplayName | String | Yes | The default display name of your menu. Surround this string with the '%' character to enable localizing this string. See at Localize metadata. |
| TooltipText | String | No | The text to display as the tooltip when the menu is hovered or focused. Surround this string with the '%' character to enable localizing this string. See at Localize metadata. |
| Placements | CommandPlacement[] | No | Specifies the existing Groups within Visual Studio that the menu will be parented to. See at Place a menu in the IDE. |
| Children | MenuChild[] | No | Describes the set of commands, menus and groups that should be parented to this menu. The order that these items are defined in the array represent the order that they'll appear visually in the IDE. See at Place items on a menu |
Place a menu in the IDE
Menus are placed in the IDE the same way commands are. See Place a command in the IDE.
public override MenuConfiguration MyMenu => new("%MyMenu.DisplayName%")
{
    Placements = new CommandPlacement[]
    {
        CommandPlacement.KnownPlacements.ToolsMenu
    },
};
Place items on a menu
Placing on item on a menu is done by adding items to the Children array on the MenuConfiguration. The order that items are added to this array dictate how these items will be displayed visually in the IDE.
Placing commands on a menu
Placing commands on a menu is done using the MenuChild.Command<T> method, replacing the template argument with the class name of the Command.
[VisualStudioContribution]
public static MenuConfiguration MyMenu => new("%MyMenu.DisplayName%")
{
    Children = new[]
    {
        MenuChild.Command<MyCommand>(),
    },
};
Placing menus on a menu
Placing menus on a menu is done using the MenuChild.Menu method, passing in another MenuConfiguration as a parameter.
[VisualStudioContribution]
public static MenuConfiguration MyChildMenu => new("My Child Menu!");

[VisualStudioContribution]
public static MenuConfiguration MyParentMenu => new("My Parent Menu!")
{
    Children = new[]
    {
        MenuChild.Menu(MyChildMenu),
    },
};
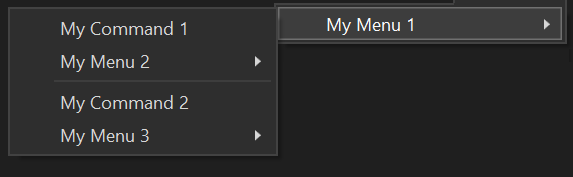
Separating menu items into groups
Items within a menu can be grouped together by having a MenuChild.Separator between items. Visually, this will look like a thin line placed between two items.
[VisualStudioContribution]
public static MenuConfiguration MyMenu1 => new("%MyMenu.DisplayName%")
{
    Children = new[]
    {
        MenuChild.Command<MyCommand1>(), // Assuming there is a `Command` defined in the extension called `MyCommand1`
        MenuChild.Menu(MyMenu2), // Assuming there is a `MenuConfiguration` defined in the extension called `MyMenu2`
        MenuChild.Separator,
        MenuChild.Command<MyCommand2>(), // Assuming there is a `Command` defined in the extension called `MyCommand2`
        MenuChild.Menu(MyMenu3), // Assuming there is a `MenuConfiguration` defined in the extension called `MyMenu3`
    },
};
This can also be accomplished by using the MenuChild.Group method to define a group inline. You would then use the GroupChild class to parent items to the group.
[VisualStudioContribution]
public static MenuConfiguration MyMenu1 => new("%MyMenu.DisplayName%")
{
    Children = new[]
    {
        MenuChild.Group(
            GroupChild.Command<MyCommand1>(), // Assuming there is a `Command` defined in the extension called `MyCommand1`
            GroupChild.Menu(MyMenu2)), // Assuming there is a `MenuConfiguration` defined in the extension called `MyMenu2`
        MenuChild.Group(
            GroupChild.Command<MyCommand2>(), // Assuming there is a `Command` defined in the extension called `MyCommand2`
            GroupChild.Menu(MyMenu3)), // Assuming there is a `MenuConfiguration` defined in the extension called `MyMenu3`
    },
};
In the two previous examples, the resulting menu would be identical in the IDE. The menu MyMenu1 would look like the menu in the following screenshot:
Create a toolbar
To create a toolbar with the new Extensibility Model, add a static ToolbarConfiguration property, adorning the class with the VisualStudioContribution attribute. This static property can be placed on any class in your Extension project. In the new Extensibility Model samples they exist on the Extension class for simplicity.
[VisualStudioContribution]
public class ExtensionEntrypoint : Extension
{
  [VisualStudioContribution]
  public static ToolbarConfiguration MyToolbar => new("%MyToolbar.DisplayName%");
}
Leaving the Placement property of the ToolbarConfiguration as null will place the toolbar on the Standard Toolbar Bar and can be made visible by selecting the toolbar in the View -> Toolbars menu.
ToolbarConfiguration class
The ToolbarConfiguration class has a few properties that you should become familiar with:
| Property | Type | Required | Description |
|---|---|---|---|
| DisplayName | String | Yes | The default display name of your toolbar. Surround this string with the '%' character to enable localizing this string. See at Localize metadata. |
| TooltipText | String | No | The text to display as the tooltip when the toolbar is hovered or focused. Surround this string with the '%' character to enable localizing this string. See at Localize metadata. |
| Placements | CommandPlacement[] | No | Specifies the existing Groups within Visual Studio that the toolbar will be parented to. See at Place a command in the IDE. Leaving this property as null will place the toolbar on the Standard Toolbar Bar and can be made visible by selecting the toolbar in the View -> Toolbars menu |
| Children | ToolbarChild[] | No | Describes the set of commands, menus and groups that should be parented to this toolbar. The order that these items are defined in the array represent the order that they'll appear visually in the IDE. See at Place items on a toolbar |
Place items on a toolbar
Placing commands on a toolbar is done using the ToolbarChild.Command<T> method, replacing the template argument with the class name of the Command.
[VisualStudioContribution]
public static ToolbarConfiguration MyToolbar => new("%MyToolbar.DisplayName%")
{
    Children = new[]
    {
        ToolbarChild.Command<MyCommand>(),
    },
};
Separating toolbar items into groups
Items within a toolbar can be grouped together by having a ToolbarChild.Separator between items. Visually, this will look like a thin line placed between two items.
[VisualStudioContribution]
public static ToolbarConfiguration MyToolbar => new("%MyToolbar.DisplayName%")
{
    Children = new[]
    {
        ToolbarChild.Command<MyCommand1>(), // Assuming there is a `Command` defined in the extension called `MyCommand1`
        ToolbarChild.Separator,
        ToolbarChild.Command<MyCommand2>(), // Assuming there is a `Command` defined in the extension called `MyCommand2`
    },
};
This can also be accomplished by using the ToolbarChild.Group method to define a group inline. You would then use the ToolbarChild class to parent items to the group.
[VisualStudioContribution]
public static ToolbarConfiguration MyToolbar => new("%MyToolbar.DisplayName%")
{
    Children = new[]
    {
        ToolbarChild.Group(
            GroupChild.Command<MyCommand1>(), // Assuming there is a `Command` defined in the extension called `MyCommand1`
        ToolbarChild.Group(
            GroupChild.Command<MyCommand2>(), // Assuming there is a `Command` defined in the extension called `MyCommand2`
    },
};
In the two examples here, the resulting toolbar would be identical in the IDE. The toolbar MyToolbar would look like the toolbar in the screenshot below:

Create a group
A group is a visual grouping of items where a separator will be placed in between the last and first items of adjacent groups. In the sections above, it describes how to create groups inside of the context of the Children property of a MenuConfiguration or ToolbarConfiguration. It is also possible to define groups inside of their own CommandGroupConfiguration. This is useful when you would like to parent a group to an existing menu or toolbar in Visual Studio without defining you're own menu or toolbar. It can also be useful if you would like to format your code in a way that separates your group definitions from your menu and toolbar definitions.
To create a group with the new Extensibility Model, add a static CommandGroupConfiguration property. This static property can be placed on any class in your Extension project. In the new Extensibility Model samples they exist on the Extension class for simplicity. If a CommandGroupConfiguration specifies a Placement, it should also be adorned with the VisualStudioContribution attribute.
public static CommandGroupConfiguration MyGroup => new();

[VisualStudioContribution]
private static CommandGroupConfiguration MyGroupWithPlacement => new(GroupPlacement.KnownPlacements.ToolsMenu);
CommandGroupConfiguration class
The CommandGroupConfiguration class has a few parameters that you should become familiar with:
| Parameter | Type | Required | Description |
|---|---|---|---|
| Placement | GroupPlacement | No | Specifies the existing menu or toolbar within Visual Studio that the group will be parented to. See at Place a group in the IDE. |
| Children | GroupChild[] | No | Describes the set of commands and menus that should be parented to this group. The order that these items are defined in the array represent the order that they'll appear visually in the IDE. See at Place items on a group |
Place a group in the IDE
There is a set of well-defined places in Visual Studio where commands can be placed. These placements are defined by the property CommandPlacement.KnownPlacements on the class Commands.GroupPlacement. The current set of KnownPlacements is:
ToolsMenu- The command will be placed in a group under the top-level "Tools" menu in Visual Studio.ViewOtherWindowsMenu- The command will be placed in a group under the top-level "View" -> "Other Windows" menu in Visual Studio.ExtensionsMenu- The command will be placed in a group under the top-level "Extensions" menu in Visual Studio.
[VisualStudioContribution]
public static CommandGroupConfiguration MyGroup1 => new(GroupPlacement.KnownPlacements.ToolsMenu);

[VisualStudioContribution]
public static CommandGroupConfiguration MyGroup2 => new(GroupPlacement.KnownPlacements.ExtensionsMenu.WithPriority(0x100));
Place items on a group
Commands and menus can be placed onto groups using the Children array property on the CommandGroupConfiguration.
Place commands on a group
Placing commands on a group is done using the GroupChild.Command<T> method, replacing the template argument with the class name of the Command.
[VisualStudioContribution]
public static CommandGroupConfiguration MyGroup => new(GroupPlacement.KnownPlacements.ToolsMenu)
{
    Children = new[]
    {
        GroupChild.Command<MyCommand>(),
    },
};
Place menus on a group
Placing menus on a group is done using the GroupChild.Menu method, passing in a MenuConfiguration as a parameter.
[VisualStudioContribution]
public static MenuConfiguration MyMenu => new("%MyMenu.DisplayName%");

[VisualStudioContribution]
public static CommandGroupConfiguration MyGroup => new(GroupPlacement.KnownPlacements.ToolsMenu)
{
    Children = new[]
    {
        GroupChild.Menu(MyMenu),
    },
};
Place groups on a menu or toolbar
Placing a group on a menu is done using the MenuChild.Group method, passing in a CommandGroupConfiguration as a parameter. Placing a group on a toolbar is done using the ToolbarChild.Group method, passing in a CommandGroupConfiguration as a parameter. Groups parented to menus or toolbars in this way can't have the Placement property of the CommandGroupConfiguration set to any value except null, and it shouldn't be adorned with the VisualStudioContribution attribute.
private static CommandGroupConfiguration MyGroup => new()
{
    Children = new[]
    {
        GroupChild.Command<MyCommand1>(), // Assuming there is a `Command` defined in the extension called `MyCommand1`
        GroupChild.Command<MyCommand2>(), // Assuming there is a `Command` defined in the extension called `MyCommand2`
    },
};

[VisualStudioContribution]
public static MenuConfiguration MyMenu => new("%MyMenu.DisplayName%")
{
    Children = new[]
    {
        MenuChild.Group(MyGroup),
    },
};
private static CommandGroupConfiguration MyGroup => new()
{
    Children = new[]
    {
        GroupChild.Command<MyCommand1>(), // Assuming there is a `Command` defined in the extension called `MyCommand1`
        GroupChild.Command<MyCommand2>(), // Assuming there is a `Command` defined in the extension called `MyCommand2`
    },
}

[VisualStudioContribution]
public static ToolbarConfiguration MyToolbar => new("%MyToolbar.DisplayName%")
{
    Children = new[]
    {
        ToolbarChild.Group(MyGroup),
    },
};
Placement ordering (Priority)
Placements are ordered based on the value of their Priority property when parented to a control defined in VSCT, relative to other items parented to the same group, menu, or toolbar. The Priority property is an unsigned short. The default Priority value for a CommandPlacement and GroupPlacement is 0 and can be modified by calling the CommandPlacement.WithPriority or GroupPlacement.WithPriority methods, passing in the desired Priority value. The Priority can also be set by using the CommandPlacement.VsctParent and GroupPlacement.VsctParent methods and passing in the desired Priority directly.
The Priority property is not involved when parenting items to controls defined via configuration objects using the VisualStudio.Extensibility model (i.e. the group, menu, or toolbar being parented to was defined using CommandGroupConfiguration, MenuConfiguration, or ToolbarConfiguration).
GroupPlacement
GroupPlacement.KnownPlacements.ToolsMenu.WithPriority(0x0500);
// Parenting a group to the "Help" top level menu
GroupPlacement.VsctParent(new Guid("{d309f791-903f-11d0-9efc-00a0c911004f}"), id: 0x0088, priority: 0x0500);
CommandPlacement
CommandPlacement.KnownPlacements.ToolsMenu.WithPriority(0x0500);
// Parenting a command to the "Help -> About" group
CommandPlacement.VsctParent(new Guid("{d309f791-903f-11d0-9efc-00a0c911004f}"), id: 0x016B, priority: 0x0801);