Note
Access to this page requires authorization. You can try signing in or changing directories.
Access to this page requires authorization. You can try changing directories.
You can use the Reference Manager dialog box to add and manage references to components that you, Microsoft, or another company developed. If you're developing a Universal Windows app, your project automatically references all of the correct Windows SDK DLLs. When you create a .NET project, your project automatically references the components it needs, such as the .NET SDK, but you need to add references as you add functionality. Some .NET APIs are exposed in components that you have to add manually. References to COM components or custom components have to be added manually.
If a NuGet package is available for the library you're referencing, use the NuGet Package Manager. See Install and use a NuGet package.
Reference Manager dialog box
The Reference Manager dialog box shows different categories on the left side, depending on the project type:
Assemblies, with Framework and Extensions subgroups (.NET Framework only)
COM lists all COM components that are available for referencing
Windows, with Core and Extensions subgroups. You can explore the references in the Windows SDK or extension SDKs by using the Object Browser.
Browse, with Recent subgroup
Note
You might not see Browse in the Reference Manager dialog box if you're developing C++ projects.
Add a reference
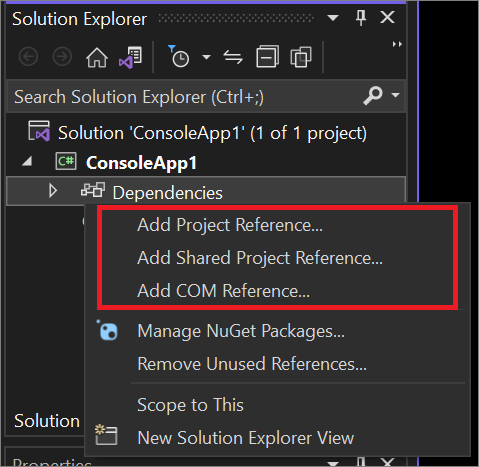
- In Solution Explorer, right-click the References or Dependencies node, and then choose either Add Project Reference, Add Shared Project Reference, or Add COM Reference from the context menu. (You can right-click the project node and select Add from the fly-out menu to choose from these options, too.)

Reference Manager opens and lists the available references by group.
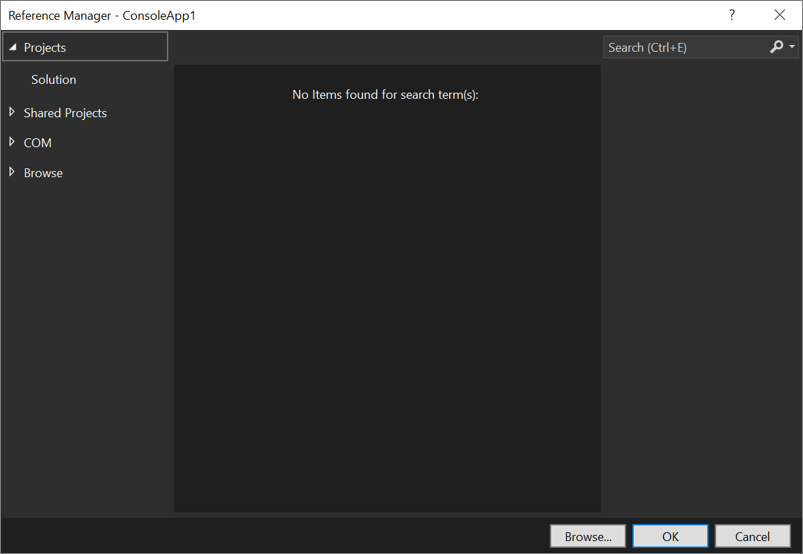
Select a reference to add, and then select OK.
Note
If you don't see the reference you're looking for, select Browse to locate the reference. (If you're developing C++ projects, you might not see a browse option.)
Assemblies tab (.NET Framework only)
Note
The Assemblies tab is not available for projects that target .NET Core, or .NET 5 and later. Select Browse to find an assembly in the filesystem and add it as a reference. To see the referenced assemblies in a project, expand the Dependencies node in the project. From the Dependencies node, you can right-click to add or remove project references, view or remove assemblies in the Assemblies node, or open the NuGet package browser to manage NuGet packages. See Install and manage packages in Visual Studio using the NuGet Package Manager in the NuGet documentation.
For .NET Framework projects, the Assemblies tab lists all .NET assemblies that are available for referencing. The Assemblies tab doesn't list any assemblies from the global assembly cache (GAC) because assemblies in the GAC are part of the run-time environment. If you deploy or copy an application that contains a reference to an assembly that's registered in the GAC, the assembly isn't deployed or copied with the application, regardless of the Copy Local setting. For more information, see Manage references in a project.
When you manually add a reference to any of the EnvDTE namespaces (EnvDTE, EnvDTE80, EnvDTE90, EnvDTE90a, or EnvDTE100), set the Embed Interop Types property of the reference to False in the Properties window. Setting this property to True can cause build issues because of certain EnvDTE properties that can't be embedded.
All desktop projects contain an implicit reference to mscorlib. Visual Basic projects contain an implicit reference to Microsoft.VisualBasic. All projects contain an implicit reference to System.Core, even if it's removed from the list of references.
The Assemblies tab consists of two subtabs:
Framework lists all assemblies that constitute the targeted framework.
For projects that don't target .NET Core or the Universal Windows Platform, the Framework tab enumerates assemblies from the targeted framework. The user must add any references that the application requires.
Universal Windows projects contain references to all of the assemblies in the targeted framework by default. In managed projects, a read-only node under the References folder in Solution Explorer indicates the reference to the entire framework. Accordingly, the Framework tab doesn't enumerate any of the assemblies from the framework and instead displays the following message: "All of the Framework assemblies are already referenced. Please use the Object Browser to explore the references in the Framework."
Extensions lists all assemblies that external vendors of components and controls have developed to extend the targeted framework. Depending on the purpose of the user application, it might need these assemblies.
Extensions is populated by enumerating the assemblies that are registered in the following locations:
32-bit machine:
HKEY_CURRENT_USER\SOFTWARE\Microsoft\[Target Framework Identifier]\v[Target Framework Version]\AssemblyFoldersEx\[UserComponentName]\@default=[Disk location of assemblies]HKEY_LOCAL_MACHINE\SOFTWARE\Microsoft\[Target Framework Identifier]\v[Target Framework Version]\AssemblyFoldersEx\[UserComponentName]\@default=[Disk location of assemblies]
64-bit machine:
HKEY_CURRENT_USER\SOFTWARE\Wow6432Node\Microsoft\[Target Framework Identifier]\v[Target Framework Version]\AssemblyFoldersEx\[UserComponentName]\@default=[Disk location of assemblies]HKEY_LOCAL_MACHINE\SOFTWARE\Wow6432Node\Microsoft\[Target Framework Identifier]\v[Target Framework Version]\AssemblyFoldersEx\[UserComponentName]\@default=[Disk location of assemblies]
And older versions of the [Target Framework Identifier]
For example, if a project targets .NET Framework 4 on a 32-bit machine, Extensions enumerates assemblies that are registered under \Microsoft.NETFramework\v4.0\AssemblyFoldersEx, \Microsoft.NETFramework\v3.5\AssemblyFoldersEx, \Microsoft.NETFramework\v3.0\AssemblyFoldersEx, and \Microsoft.NETFramework\v2.0\AssemblyFoldersEx.
Some components in the list might not be shown, depending on the framework version of your project. This situation can occur under the following conditions:
A component that uses a recent framework version is incompatible with a project that targets an earlier version.
For information about how to change the target framework version for a project, see Framework targeting overview.
A component that uses an older version of the .NET Framework is incompatible with a project that targets a newer .NET Framework.
For more about version compatibility between .NET Framework versions, see Version compatibility.
You should avoid adding file references to outputs of another project in the same solution, because doing so might cause compilation errors. Instead, use the Projects tab of the Add Reference dialog box to create project-to-project references. This practice makes team development easier by enabling better management of the class libraries you create in your projects. For more information, see Troubleshoot broken references.
Note
A file reference instead of a project reference is created if the target framework version of one project is .NET Framework 4.5 or later, and the target version of the other project is .NET Framework 2, 3, 3.5, or 4.0. For more information about .NET, .NET Framework, and .NET Core, see What is .NET (and .NET Core).
To display an assembly in the Add Reference dialog box
Move or copy the assembly to one of the following locations:
The current project directory. (You can find these assemblies by using the Browse tab.)
Other project directories in the same solution. (You can find these assemblies by using the Projects tab.)
- or -
Set a registry key that specifies the location of assemblies to display:
For a 32-bit operating system, add one of the following registry keys.
[HKEY_CURRENT_USER\SOFTWARE\Microsoft\.NETFramework\<VersionMinimum>\AssemblyFoldersEx\MyAssemblies]@="<AssemblyLocation>"[HKEY_LOCAL_MACHINE\SOFTWARE\Microsoft\.NETFramework\<VersionMinimum>\AssemblyFoldersEx\MyAssemblies]@="<AssemblyLocation>"
For a 64-bit operating system, add one of the following registry keys in a 32-bit registry hive.
[HKEY_CURRENT_USER\SOFTWARE\Wow6432Node\Microsoft\.NETFramework\<VersionMinimum>\AssemblyFoldersEx\MyAssemblies]@="<AssemblyLocation>"[HKEY_LOCAL_MACHINE\SOFTWARE\Wow6432Node\Microsoft\.NETFramework\<VersionMinimum>\AssemblyFoldersEx\MyAssemblies]@="<AssemblyLocation>"
<VersionMinimum> is the lowest framework version that applies. If <VersionMinimum> is v3.0, folders specified in AssemblyFoldersEx apply to projects that target .NET Framework 3.0 and later.
<AssemblyLocation> is the directory of the assemblies that you want to appear in the Add Reference dialog box, for example, C:\MyAssemblies.
Creating the registry key under the
HKEY_LOCAL_MACHINEnode allows all users to see the assemblies in the specified location in the Add Reference dialog box. Creating the registry key under theHKEY_CURRENT_USERnode affects only the setting for the current user.Open the Add Reference dialog box again. The assemblies should appear on the .NET tab. If they don't, make sure that the assemblies are located in the specified AssemblyLocation directory, restart Visual Studio, and try again.
Projects tab
The Projects tab lists all compatible projects within the current solution, in the Solution subtab.
A project can reference another project that targets a different framework version. For example, you could create a project that targets the .NET 8.0 but that references an assembly that's been built for the .NET 6.0. However, the .NET 6.0 project can't reference a .NET Framework 8.0 project. For more information, see Framework targeting overview.
Shared Projects tab
Add a reference to a shared project on the Shared Projects tab of the Reference Manager dialog box. Shared Projects let you write common code that's referenced by many different application projects.
Universal Windows tab
The Universal Windows tab lists all SDKs that are specific to platforms on which Windows operating systems run. This tab has two subgroups: Core and Extensions.
Core subgroup
Universal Windows app projects have a reference to the Universal Windows SDK by default. Accordingly, the Core subgroup in the Reference Manager doesn't enumerate any of the assemblies from the Universal Windows SDK.
Extensions subgroup
Extensions lists the user SDKs that extend the targeted Windows platform.
An SDK is a collection of files that Visual Studio treats as a single component. In the Extensions tab, SDKs that apply to the project from which the Reference Manager dialog box was invoked are listed as single entries. When added to a project, all of the SDK content is consumed by Visual Studio such that the user doesn't need to take any further actions to leverage the SDK contents in IntelliSense, toolbox, designers, Object Browser, build, deployment, debugging, and packaging.
For information about how to display your SDK in the Extensions tab, see Create a Software Development Kit.
Note
If a project references an SDK that depends on another SDK, Visual Studio doesn't consume the second SDK unless you manually add a reference to the second SDK. When you choose an SDK on the Extensions tab, the Reference Manager dialog box helps you identify SDK dependencies by listing any dependencies in the details pane.
If a project type doesn't support extensions, this tab doesn't appear in the Reference Manager dialog box.
COM tab
The COM tab lists all COM components that are available for referencing. If you want to add a reference to a registered COM DLL that contains an internal manifest, unregister the DLL first. Otherwise, Visual Studio adds the assembly reference as an ActiveX control instead of as a native DLL.
If a project type doesn't support COM, the tab doesn't appear in the Reference Manager dialog box.
Browse
You can use the Browse button to browse for a component or assembly in the file system.
A project can reference a component that targets a different framework version. For example, you could create an application that targets .NET Framework 4.7.2 but references a component that targets .NET Framework 4. For more information, see Framework targeting overview.
Avoid adding file references to outputs of another project in the same solution, because this tactic might cause compilation errors. Instead, use the Solution tab of the Reference Manager dialog box to create project-to-project references. This makes team development easier by enabling better management of the class libraries that you create in your projects. For more information, see Troubleshoot broken references.
You can't browse to an SDK and add it to your project. You can only browse to a file (for example, an assembly or .winmd) and add it to your project.
When doing a file reference to a WinMD, the expected layout is that the <FileName>.winmd, <FileName>.dll, and <FileName>.pri files are all placed alongside each other. If you reference a WinMD in the following scenarios, an incomplete set of files are copied into the project output directory and, consequently, build and runtime failures occur.
Native component: a native project creates one WinMD for each disjoint set of namespaces and one DLL that consists of the implementation. The WinMDs have disparate names. When referencing this native component file, MSBuild doesn't recognize that the dissimilarly named WinMDs make one component. So, only the identically named <FileName>.dll and <FileName>.winmd are copied, and runtime errors occur. To work around this issue, create an extension SDK. For more information, see Create a Software Development Kit.
Consuming controls: at a minimum, a XAML control consists of a <FileName>.winmd, <FileName>.dll, <FileName>.pri, <XamlName>.xaml, and an <ImageName>.jpg. When the project is built, the resource files that are associated with the file reference don't get copied into the project's output directory, and only <FileName>.winmd, <FileName>.dll and <FileName>.pri are copied. A build error is logged that indicates that the resources <XamlName>.xaml and <ImageName>.jpg are missing. To succeed, manually copy these resource files into the project output directory for build and debugging/runtime. To work around this issue, either create an extension SDK by following the steps in Create a Software Development Kit or edit the project file to add the following property:
<PropertyGroup>
   <GenerateLibraryOutput>True</GenerateLibraryOutput>
</PropertyGroup>
Note
If you add the property, the build might run slower.
Recent
Assemblies, COM, Windows, and Browse each support a Recent tab, which enumerates the list of components that were recently added to projects.
Search
The search bar in the Reference Manager dialog box operates over the tab that's in focus. For example, if you type "System" in the search bar while the Solution tab is in focus, the search doesn't return any results unless the solution consists of a project name that contains "System".
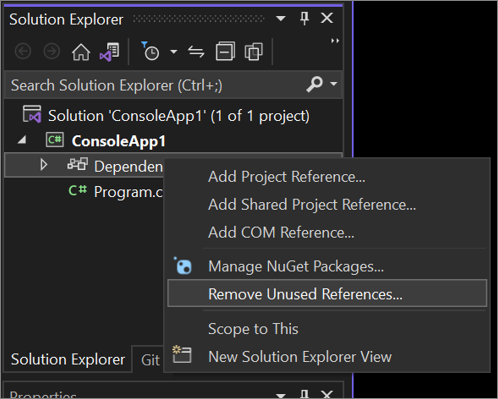
Remove a reference
You can remove unused references for SDK style projects in Visual Studio by using the Remove Unused Reference menu item.

For more information, see Remove unused references.