Note
Access to this page requires authorization. You can try signing in or changing directories.
Access to this page requires authorization. You can try changing directories.
You can reduce the installation footprint of Visual Studio on your system drive by changing the location of some of its files. Specifically, you can use a different location for the download cache and shared components, tools, and SDKs.
You can reduce the installation footprint of Visual Studio on your system drive by changing the location for some of its files. Specifically, you can use a different location for the download cache, shared components, SDKs, and tools files.
Note
There are some tools and SDKs that have different rules on where they can be installed. Such tools and SDKs are installed on your system drive even if you choose a different location.
Get started
When you install Visual Studio, choose the Installation locations tab.
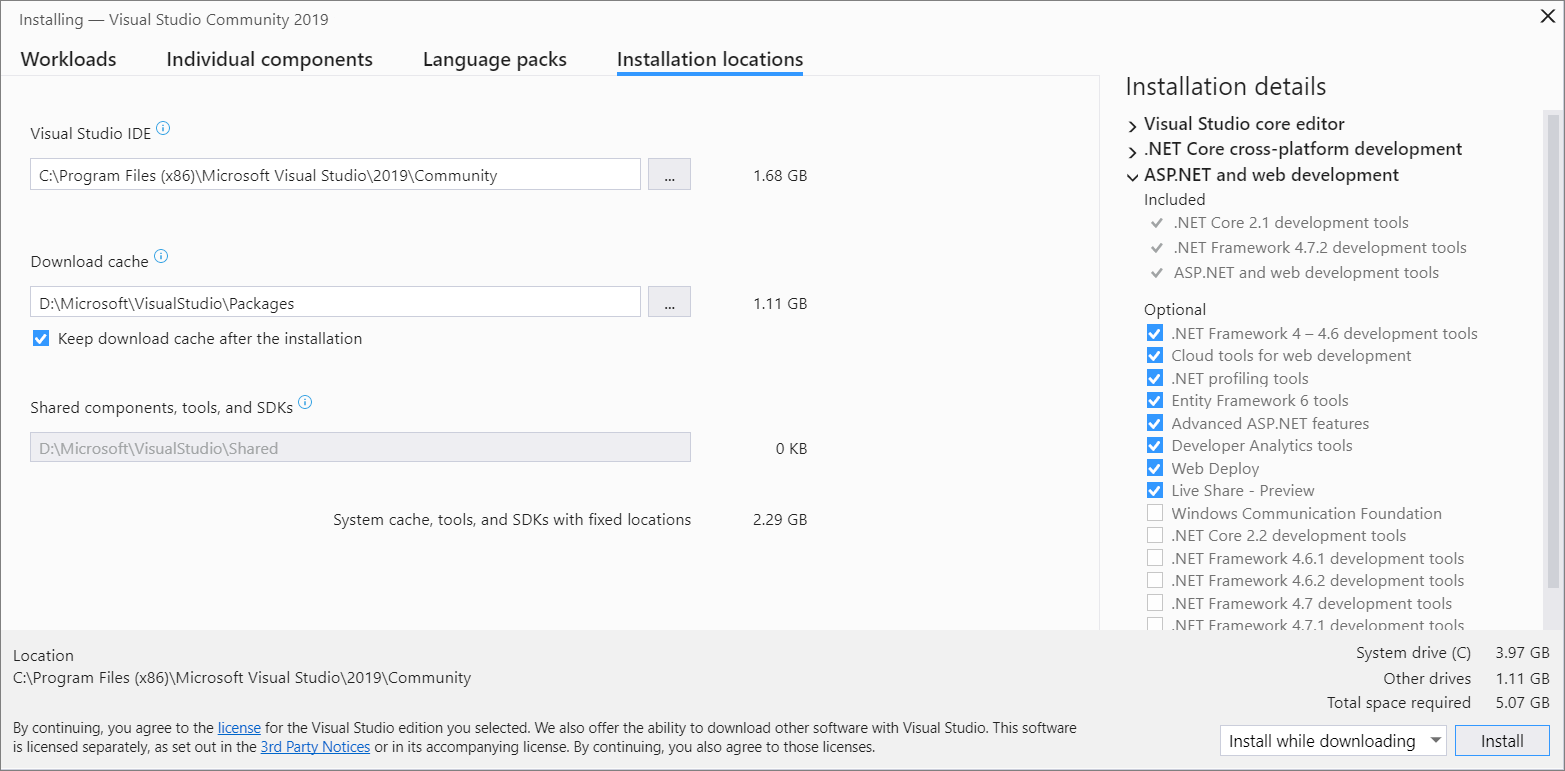
In the Visual Studio IDE section, accept the default. Visual Studio installs the core product and includes files that are specific to this version of Visual Studio.
Tip
If your system drive is a solid-state drive (SSD), we recommend that you accept the default location on your system drive. When you develop with Visual Studio, you read from and write to a lot of files, which increases the disk I/O activity. It's best to choose your fastest drive to handle the load.
In the Download cache section, decide if you want to keep the download cache, and then decide where you want to store its files.
Select or unselect Keep download cache after the installation.
If you decide not to keep the download cache, the location is used only temporarily. This action doesn't affect or delete files from previous installations.
Specify the drive where you want to store installation files and manifests from the download cache.
For example, if you select the "Desktop development with C++" workload, the temporarily required size is 1.58 GB on your system drive, which is then freed as soon as the installation completes.
Important
This location is set with your first installation and cannot be changed later from the installer UI. Instead, you must use command-line parameters to move the download cache.
In the Shared components, tools, and SDKs section, installation uses the same drive that you chose in the Download cache section. The \Microsoft\VisualStudio\Shared directory is where Visual Studio stores the files that side-by-side Visual Studio installations share. SDKs and tools are also stored in this directory.

When you install Visual Studio, choose the Installation locations tab.
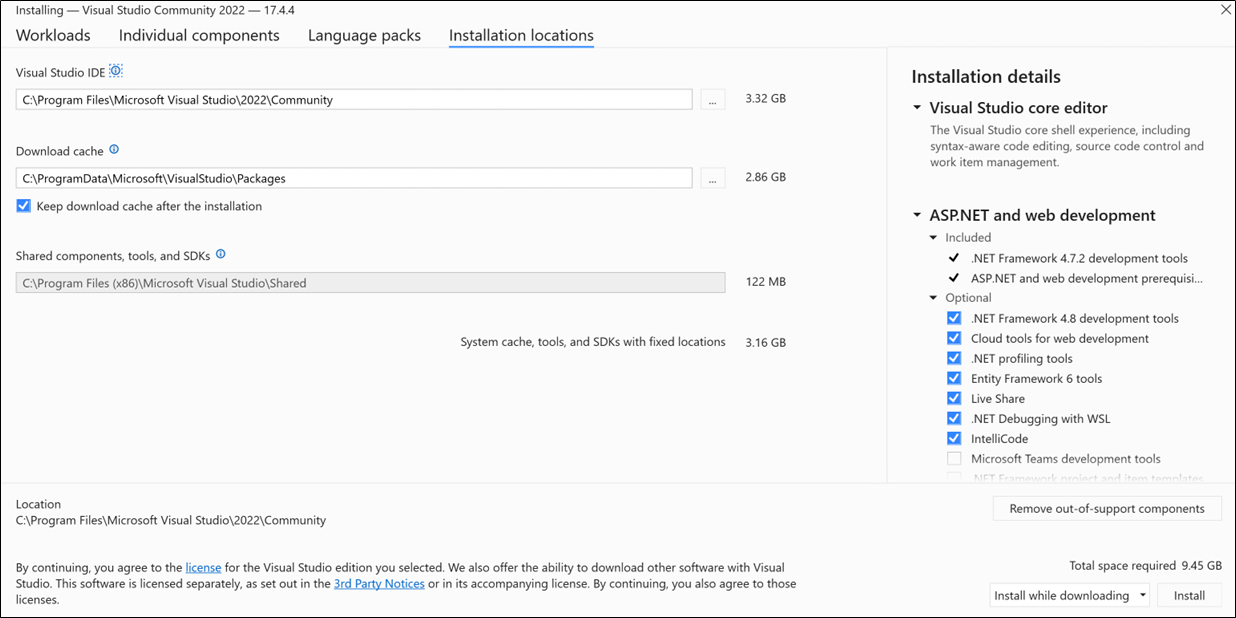
In the Visual Studio IDE section, accept the default path. Visual Studio installs the core product, and includes files that are specific to this version of Visual Studio.
Tip
If your system drive is a solid-state drive (SSD), we recommend that you keep the core product on your system drive. When you develop with Visual Studio, you read from and write to a lot of files, which increases the disk I/O activity. It's best to choose your fastest drive to handle the load.
Important
You can select a different location only when you first install Visual Studio. If you've already installed it and want to change the location, you must uninstall Visual Studio and then reinstall it.
In the Download cache section, decide whether you want to keep the download cache, and if so, where you want to store its files.
Select or unselect Keep download cache after the installation.
If you decide not to keep the download cache, the download cache location is only temporarily used. This action doesn't affect or delete files from previous installations.
For example, if you select the "Desktop development with C++" workload, the temporarily required size for the download cache location is 1.28 GB. As soon as the installation completes, downloaded cache files are removed, leaving only package metadata.
Specify the folder path, including the drive, where you want to store the installation files and manifests from the download cache.
Important
You can select a different location only when you first install Visual Studio. If you've already installed it and want to change the location, you must uninstall Visual Studio and then reinstall it.
In the Shared components, tools, and SDKs section, select the folder where you want to store the files that are shared by side-by-side Visual Studio installations. SDKs and tools are also stored in this directory.
Important
If you've installed Visual Studio on your computer before, you won't be able to change the Shared components, tools, and SDKs path and it appears greyed out.

Support or troubleshooting
Sometimes, things can go wrong. If your Visual Studio installation fails, see Troubleshoot Visual Studio installation and upgrade issues for step-by-step guidance.
Here are a few more support options:
- Use the installation chat (English only) support option for installation-related issues.
- Report product issues to us by using the Report a Problem tool that appears both in the Visual Studio Installer and in the Visual Studio IDE. If you're an IT Administrator and don't have Visual Studio installed, you can submit IT Admin feedback.
- Suggest a feature, track product issues, and find answers in the Visual Studio Developer Community.