Note
Access to this page requires authorization. You can try signing in or changing directories.
Access to this page requires authorization. You can try changing directories.
This article presents Step 4 in the tutorial series Work with the Django web framework in Visual Studio.
The previous Steps in this tutorial series create a Visual Studio solution and Django projects for two applications. BasicProject is a minimal app based on the Blank Django Web Project template and HelloDjangoApp uses the Django 1.9 App template to serve static files with page views from HTML templates.
In Step 4, you add a third Django app to the solution based on the full Django Web Project template. This template helps you create a fuller Django app with three pages that inherit from a base page template. The app employs static JavaScript libraries like jQuery and Bootstrap. The authentication capabilities of the template are described in the final Step in the tutorial series.
In Step 4 of the tutorial, you learn how to:
- Create a fuller Django web app by using the Django Web Project template
- Review the Django project structure provided by the template
- Explore the views and page templates created by the project template
- Examine the URL routing provided by the template
Prerequisites
A Visual Studio solution created in Step 1: Create Visual Studio project and solution, which uses the Blank Django Web Project template.
Review the Prerequisites section in Step 1 of this tutorial series for details about Django template versions, Visual Studio projects versus Django projects, and Python development on Mac.
(Optional) Review the instructions in the previous Steps for an end-to-end Django workflow in Visual Studio:
Create project from template
Follow these steps to create the Django web app from the full Django Web Project template:
In Visual Studio, go to Solution Explorer, right-click the LearningDjango solution, and select Add > New Project.
Note
Step 1 of the tutorial series creates the LearningDjango Visual Studio solution to contain all Django projects described in this series. By keeping all of your Django projects in the same solution, you can easily switch back and forth between different files for comparison.
If you prefer to use a separate Visual Studio solution for the Django project in this tutorial Step, select File > New > Project instead.
In the Add a new project dialog, search for "Django," choose the Django Web Project template, and select Next.
Configure your new project:
Set the Name of the project to DjangoWeb.
Specify the Location for Visual Studio to save the project. (The default is the current location for the solution and existing Django projects.)
Select Create.
Create virtual environment
After Visual Studio initiates project creation, you should see the message prompt Python package specification file "requirements.txt" was detected in project "DjangoWeb".:

The message indicates that the selected template includes a requirements.txt file that you can use to create a virtual environment for the project.
Important
If you don't see the message prompt, you might experience errors when you try to create the Django super user in the next section.
Confirm Visual Studio recognizes the requirements.txt file for the project. In Solution explorer, expand the DjangoWeb project folder, and open the requirements.txt file. Visual Studio should display the message prompt as expected.
Follow these steps to set up the virtual environment:
At the message prompt, select the link to install into or create a virtual environment.
In the Add Virtual Environment dialog, select Create to accept the defaults.
Create Django super user
After Visual Studio creates the DjangoWeb project, the project readme.html file opens. The file includes instructions to create a Django super user (that is, an administrator) for the project.
Follow these steps to create a Django super user:
In Solution Explorer, right-click the DjangoWeb project, select Python, and then select Django Create Superuser:

At the prompt, enter account details for the project, including the username, password, and email address.
You don't have to use security credentials for an existing account. You can create a new username and password to use specifically with the Django web app.
Record the credentials for later use. You need the credentials to exercise the authentication features of the web app.

Run Django web project
Now you're ready to run the Django web application and see the features provided by the template:
In Solution Explorer, right-click the DjangoWeb project, and select Set as Startup Project.
This command sets the selected project as the default startup project for the Visual Studio solution. When you start the Debugger, Visual Studio runs the code for the startup project. In Solution Explorer, the name of the startup project for the solution is shown in bold:
Select Debug > Start Debugging (F5) or use the Web Server button on the toolbar to run the server:


Explore web app pages
The app created by the template has three pages: "Home," "About," and "Contact." There are links for each page on the navigation bar.

Try switching between the pages by using the options on the navigation bar.
Examine the different parts of the running app, including the page content. Notice how the URL address route changes based on the current page.
Authenticate with the app by selecting the Log in option on the navigation bar. Enter the super user credentials you provided in the previous section.
The app created by the Django Web Project template uses Bootstrap for responsive layout that accommodates mobile form factors. To see this responsiveness, resize the browser to a narrow view so the content renders vertically, and the navigation bar turns into a menu icon:


You can leave the app running for the exercises in the next section.
If you want to save your work, stop the app and follow the instructions in previous Steps in this tutorial series:
- Step 1 (exclude virtual environment files from source control)
- Step 2 (commit changes to source control)
Examine web app project structure
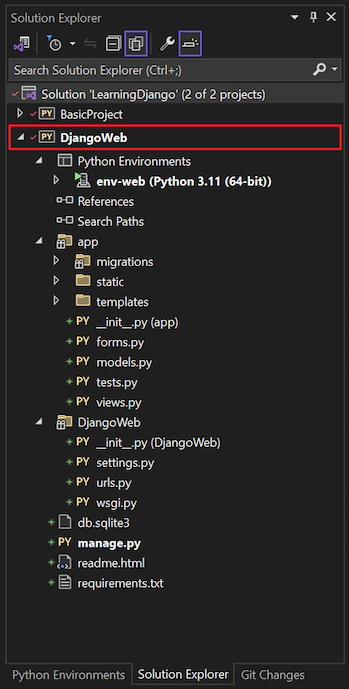
The Django Web Project template creates a web app project in Visual Studio with the following structure:
Files in the DjangoWeb Visual Studio project root:
- manage.py: The Django administrative utility.
- db.sqlite3: A default SQLite database.
- requirements.txt: Identifies packages in the project that have a dependency on Django 1.x.
- readme.html: Contains information about the web app, including requirements and critical usage procedures. Visual Studio displays this file after creation of the project. As described earlier, this file has the instructions to create a super user (administrator) account for the app.
The DjangoWeb/app folder:
This folder contains all the app files, including views, models, tests, forms. This folder also has subfolders with files, including templates, migrations, and static. You usually rename the app folder to use a more distinctive name like the app name itself.
The DjangoWeb/DjangoWeb folder:
This folder is the Django project folder. It contains the typical Django project files: __init__.py, settings.py, urls.py, and wsgi.py. The settings.py file is already configured for the app and the database file by using the project template. The urls.py file is also already set up with the routes to all the app pages, including the Log in form.
Share virtual environment between Visual Studio projects
You can share a virtual environment between Visual Studio projects. However, keep in mind that different projects likely use different packages over time. A shared virtual environment must contain all the packages for all the projects that use it.
To use an existing virtual environment, follow these steps:
When prompted to install dependencies in Visual Studio, select I will install them myself option.
In Solution Explorer, right-click the Python Environments node and select Add Existing Virtual Environment.
Navigate to and select the folder that contains the virtual environment, and then select OK.
Examine views and page templates
The code for the page views created by the Django Web Project is located in the project's app/views.py file. Each view function calls the django.shortcuts.render helper function with the path to a template and a simple dictionary object. The about function creates the view for the "About" page in the web app:
def about(request):
   """Renders the about page."""
   assert isinstance(request, HttpRequest)
   return render(
      request,
      'app/about.html',
      {
         'title':'About',
         'message':'Your application description page.',
         'year':datetime.now().year,
      }
   )
HTML page templates for the views are located in the project's app/templates/app folder (which you commonly rename). The base template, layout.html, is the most extensive. The file refers to all the necessary static files (JavaScript and CSS) for the app views.
This template also defines two block sections: content and scripts. The other web app pages override the {% block content %} section in the layout.html file. You can see the two block sections within the <body> element in this annotated version of the layout.html file:
<!DOCTYPE html>
<html>
<head>
<meta charset="utf-8" />
<!-- Define viewport for Bootstrap's responsive rendering -->
<meta name="viewport" content="width=device-width, initial-scale=1.0">
<title>{{ title }} - My Django Application</title>
{% load staticfiles %}
<link rel="stylesheet" type="text/css" href="{% static 'app/content/bootstrap.min.css' %}" />
<link rel="stylesheet" type="text/css" href="{% static 'app/content/site.css' %}" />
<script src="{% static 'app/scripts/modernizr-2.6.2.js' %}"></script>
</head>
<body>
<!-- Navigation bar section omitted in this excerpt -->
<div class="container body-content">
<!-- Content block - App pages override this block -->
{% block content %}
{% endblock %}
<!-- App header and footer content -->
<hr/>
<footer>
<p>© {{ year }} - My Django Application</p>
</footer>
</div>
<script src="{% static 'app/scripts/jquery-1.10.2.js' %}"></script>
<script src="{% static 'app/scripts/bootstrap.js' %}"></script>
<script src="{% static 'app/scripts/respond.js' %}"></script>
<!-- Scripts block - List page-specific scripts in this block -->
{% block scripts %}
{% endblock %}
</body>
</html>
The individual HTML page templates, about.html, contact.html, and index.html, each extend the base template layout.html. The about.html template file is the simplest and shows the {% extends %} tag and {% block content %} section:
{% extends "app/layout.html" %}

<!-- Content block overrides "content" block in layout template -->
{% block content %}

<h2>{{ title }}.</h2>
<h3>{{ message }}</h3>

<p>Use this area to provide additional information.</p>

{% endblock %}
The index.html and contact.html template files use the same structure and provide more instructions in the content block.
The app/templates/app folder contains two more HTML page templates. The login.html file defines the page content for the Log in app page. The loginpartial.html file is brought into the layout.html file with the {% include %} statement. The last Step (authenticate users) in this tutorial series describes these two template files in more detail.
Indent {% block %} and {% endblock %} tags in templates
The HTML samples show markup provided in the page template in Visual Studio. Notice that the block tags aren't indented in the markup. To clearly show the location of the block tags, Visual Studio page templates don't indent these tags.
However, Django page templates work fine if you indent the block tags. Some developers prefer to align the tags within their appropriate parent HTML elements.
Examine URL route patterns
The Django project's URL file (DjangoWeb/DjangoWeb/urls.py) created by the Django Web Project template contains the following code:
"""
Definition of urls for DjangoWeb
"""

from datetime import datetime
from django.urls import path
from django.contrib import admin
from django.contrib.auth.views import LoginView, LogoutView
from app import forms, views

urlpatterns = [
    path('', views.home, name='home'),
    path('contact/', views.contact, name='contact'),
    path('about/', views.about, name='about'),
    path('login/',
         LoginView.as_view
         (
             template_name='app/login.html',
             authentication_form=forms.BootstrapAuthenticationForm,
             extra_context=
             {
                 'title': 'Log in',
                 'year' : datetime.now().year,
             }
         ),
         name='login'),
    path('logout/', LogoutView.as_view(next_page='/'), name='logout'),
    path('admin/', admin.site.urls),
]
The first three URL patterns map directly to the home, contact, and about view functions defined in the project's app/views.py file. The login/ and logout/ patterns correspond to the authentication features of the app.
Special URL route patterns like ^login/$ and ^logout$ access built-in Django views instead of app-defined views. Calls to the url method also include extra data to customize the view. The last Step (authenticate users) in this tutorial series describes how to work with URL calls.
Explore differences in URL patterns
In Step 3 (HTML template inheritance) of this tutorial series, the path for the "About" page uses the '^about$' pattern. This pattern differs from the URL route presented in this tutorial Step. Depending on your template version, the sample code might show the "About" page URL pattern as about/ or ^about instead of ^about$.
The lack of the trailing dollar sign $ in the regular expression is an oversight in many versions of the project template. The URL pattern works perfectly well for a page named "about" or "About." However, without the trailing $ character, the URL pattern also matches URLs like "about=django," "about09876," "about-face," and so on. The trailing $ character creates a URL pattern that ensures matches only for the term "about."