Note
Access to this page requires authorization. You can try signing in or changing directories.
Access to this page requires authorization. You can try changing directories.
This article presents Step 2 in the tutorial series Work with the Flask web framework in Visual Studio.
Visual Studio allows you to create Flask applications from project templates that provide a more extensive starting point for your projects. Step 1 in the tutorial describes how to create a Flask app with one page, where all the code is in a single file. In Step 2, you refactor the code and create a structure for page templates to enable further development. In particular, you want to separate code for the application views from other aspects like startup code.
In Step 2 of the tutorial, you learn how to:
- Refactor application code to separate views from startup code
- Render a view by using a page template
Prerequisites
- A Visual Studio solution and Flask application project created in Step 1: Create Visual Studio solution and Flask project.
Refactor Flask project for further development
The Blank Flask Web Project template lets you create a project with a single app.py file that contains startup code alongside a single view. To allow further development of an app with multiple views and templates, you need to separate these functions.
Follow these steps to adjust your Flask project to allow for further development:
In Solution Explorer, right-click your Flask project folder (BasicProject), and select Add > New Folder.
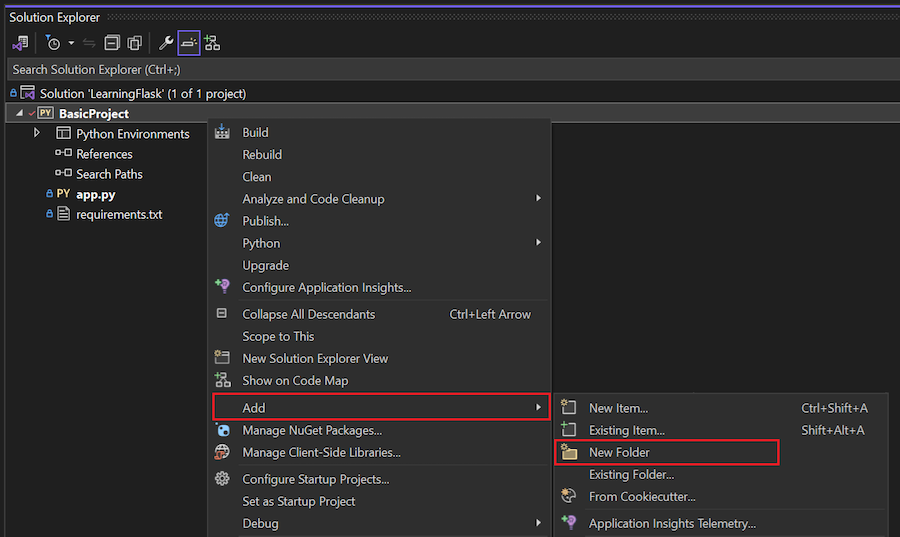
Name the new application folder HelloFlask.
Right-click the HelloFlask folder, and select Add > New Item to create a new file.
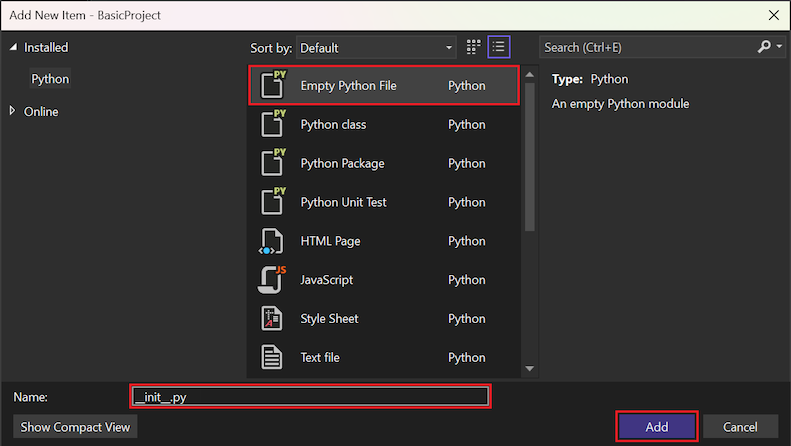
In the Add New Item dialog, select the Empty Python File file template:
Name the file __init__.py. The file name should include two leading and two ending underscore characters (
_) around the word init.Select Add.
Add the following code to the new file, which creates the
Flaskinstance and loads the application views:from flask import Flask app = Flask(__name__) import HelloFlask.viewsIn the HelloFlask folder, create another new Python file named views.py.
Important
Be sure to specify the file name as views.py. The name views is important because of the
import HelloFlask.viewsstatement in the __init__.py file. If the name views isn't the same in both instances, Visual Studio shows an error at runtime.Add the following code to the views.py file. This code renames the function and defines the return route to the
/homeendpoint:from flask import Flask from HelloFlask import app @app.route('/') @app.route('/home') def home(): return "Hello Flask!"This code also contains the page rendering code from the app.py file and imports the
appobject declared in the __init__.py file.In the HelloFlask folder, create a subfolder named templates. The folder is empty for now.
In the Flask project folder (BasicProject), replace the contents of the app.py file with the following code:
import os
from HelloFlask import app    # Imports the code from HelloFlask/__init__.py

if __name__ == '__main__':
    HOST = os.environ.get('SERVER_HOST', 'localhost')

    try:
        PORT = int(os.environ.get('SERVER_PORT', '5555'))
    except ValueError:
        PORT = 5555

    app.run(HOST, PORT)
After you update the code, rename the app.py file to runserver.py.
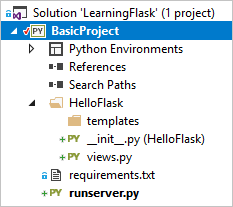
Confirm your refactored Flask project structure looks like the following example:


Run refactored program and check routes
Now you're ready to run your project in Visual Studio:
In Visual Studio, select Debug > Start Debugging (F5) or select Web Server on the main toolbar (the browser you see might vary):
When the application opens in the browser, try both the
/(root) and/homeURL route endpoints in the browser:

Run updated program in Debugger
You can also set breakpoints at various parts of the code and follow the app startup sequence in the Debugger:
Set several breakpoints, such as the following points:
- The first line of the runserver.py file
- The first line of the __init__.py file
- The
return "Hello Flask!"line in the views.py file
Start the app in the Debugger by selecting Debug > Start Debugging or F5.
While the Debugger is running, step through the code with F10, or run the code from each breakpoint with F5. You can also use debugging controls on the main toolbar in Visual Studio, such as Continue, Stop, Restart, and Step options:

When you're done, select Ctrl+C followed by any key to stop the application. You can also close any open browser windows for the routes.

Commit changes to source control
After you refactor the code and test the updates, you can review and commit your changes to source control:
Save the changes to your project files, such as with the Ctrl+S keyboard shortcut.
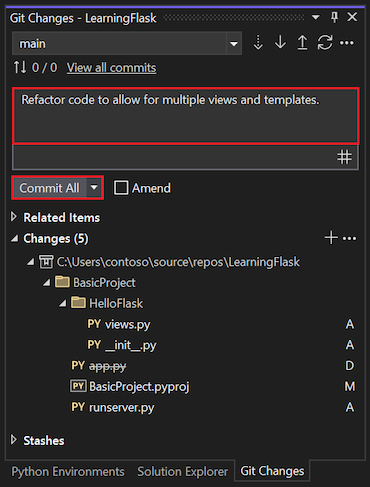
On the Git controls bar, select the uncommitted changes (pencil 5) to open the Git Changes window:

In the Git Changes window, enter a commit message, and select Commit All:
When the commit completes, Visual Studio displays the message Commit <hash> created locally.
(Optional) Push the committed changes to your remote repository:
On the Git controls bar, select the outgoing/incoming commits (arrows 1/0).
Select Sync (Pull then Push) or Push.

You can also accumulate multiple local commits before you push them to the remote repository.


Save the changes to your project files, such as with the Ctrl+S keyboard shortcut.
Select the uncommitted changes (pencil 5) at the bottom right in Visual Studio, which opens Team Explorer:

In Team Explorer, enter a commit message like "Refactor code" and select Commit All.
When the commit completes, Visual Studio displays the message Commit <hash> created locally. Sync to share your changes with the server.
(Optional) Push the committed changes to your remote repository:
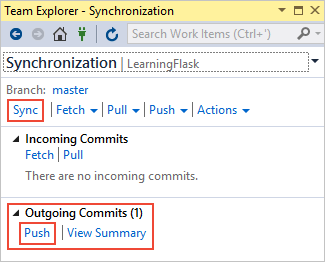
In Team Explorer, select Sync.
Expand the Outgoing Commits and select Push.
You can also accumulate multiple local commits before you push them to the remote repository.


For subsequent procedures in this tutorial series, you can refer to this section for the steps to commit changes to source control.
Determine frequency of commits and pushes
Committing changes to source control creates a record in the change log and a point to which you can revert the repository, as needed. You can also examine each commit to review the specific changes.
Commits in Git are inexpensive. It can be preferable to submit your changes in small amounts with frequent commits, rather than accumulate a large number of changes and submit them as a single commit.
You don't need to commit every small change to individual files. It's common to make a commit when you add a feature, change a structure as shown in this Step of the tutorial series, or refactor some code. It's also a good practice to check with your collaborators to agree on the granularity of commits that work best for everyone.
How often you commit and how often you push commits to a remote repository are two different concerns. You might accumulate multiple commits in your local repository before you push them to the remote repository. The frequency of your commits depends on how your team wants to manage the repository.
Use templates to render pages and views
The home function in the views.py file generates a plain-text HTTP response for the page. Most real-world web pages respond with rich HTML pages that often incorporate live data. The primary reason developers define views by using a function is to generate content dynamically.
The return value for the view is just a string. You can build up any HTML within a string by using dynamic content. Because it's best to separate markup from data, it's better to place the markup in a template and keep the data in code.
Adjust views to use inline HTML
The first step is to convert the view processing to use inline HTML for the page with some dynamic content:
Replace the contents of the views.py file with the following code:
from datetime import datetime
from flask import render_template
from HelloFlask import app

@app.route('/')
@app.route('/home')
def home():
    now = datetime.now()
    formatted_now = now.strftime("%A, %d %B, %Y at %X")

    html_content = "<html><head><title>Hello Flask</title></head><body>"
    html_content += "<strong>Hello Flask!</strong> on " + formatted_now
    html_content += "</body></html>"

    return html_content
Save your changes and run your app again.
Refresh the page a few times to confirm that the date and time updates. When you're done, stop the app.
Create HTML template
Next, convert the page rendering process to use an HTML template:
Right-click the templates folder, and select Add > New Item to create a new file.
In the Add New Item dialog, select the HTML Page file template. Name the file index.html and select Add.
Replace the supplied contents of the HTML file with the following markup:
<html>
<head>
   <title>Hello Flask</title>
</head>

<body>
   {{ content }}
</body>
</html>
In this code, the
{{ content }}statement is a placeholder or replacement token (also called a template variable) for which you supply a value in the code.
Adjust home function to load template
You need to modify the home function to use the render_template method. This method loads the HTML template and supplies a value for {{ content }} by using a named argument that matches the name of the placeholder.
In the views.py file, replace the
homefunction definition with the following code:def home(): now = datetime.now() formatted_now = now.strftime("%A, %d %B, %Y at %X") return render_template( "index.html", content = "<strong>Hello, Flask!</strong> on " + formatted_now)Flask automatically looks for templates in the templates folder, so the path to the template is relative to that folder.
Save your project changes and run the app again.
Notice that the inline HTML syntax (
\<strong>...) within thecontentvalue doesn't render as HTML because the templating engine (Jinja) automatically escapes HTML content. Automatic escaping prevents accidental vulnerabilities to injection attacks.Developers often gather input from one page and use it as a value in another by using a template placeholder. Escaping also serves as a reminder that it's best to keep HTML out of the code.
When you're done, stop the app.
Use distinct placeholders
You can use distinct placeholders for each piece of data within the HTML markup. Then, adjust your home function again to supply the specific placeholder values:
Replace the contents of the index.html file with the following markup:
<html>
  <head>
    <title>{{ title }}</title>
  </head>
  <body>
    <strong>{{ message }}</strong>{{ content }}
  </body>
</html>
In the views.py file, replace the
homefunction definition with the following code to provide values for all the placeholders:def home(): now = datetime.now() formatted_now = now.strftime("%A, %d %B, %Y at %X") return render_template( "index.html", title = "Hello Flask", message = "Hello, Flask!", content = " on " + formatted_now)Save your changes and run your app again. This time you should see the properly rendered output:

You can commit your changes to source control and update your remote repository. For more information, see Commit changes to source control.

Separate page templates
Templates are usually maintained in separate HTML files, but you can also use an inline template. Separate files are recommended to maintain a clean separation between markup and code.
Use .html extension for templates
The .html extension for page template files is entirely optional. You can always identify the exact relative path to the file in the first argument to the render_template function. However, Visual Studio (and other editors) typically provide features like code completion and syntax coloration with .html files, which outweighs the fact that page templates aren't HTML.
When you work with a Flask project, Visual Studio automatically detects if the HTML file you're editing is actually a Flask template, and provides certain auto-complete features. If you start to enter a Flask page template comment ({#), Visual Studio automatically supplies the closing #} characters. The Comment Selection and Uncomment Selection commands (on the Edit > Advanced menu) also use template comments instead of HTML comments.
Organize templates into subfolders
You can use subfolders and then refer to the relative path under the templates folder in calls to the render_template function. This approach is a great way to effectively create namespaces for your templates.