Note
Access to this page requires authorization. You can try signing in or changing directories.
Access to this page requires authorization. You can try changing directories.
This article presents Step 5 in the tutorial series Work with Python in Visual Studio.
All code in a Python project runs within the context of a specific environment. Examples of environments include a global environment, a virtual environment, a conda environment, and so on. The environment is used for any tasks that require language services that are specific to the Python version and a set of installed packages. Each environment requires certain installed packages based on the project code.
The Python developer community produces thousands of useful packages that you can incorporate into your own projects. In Step 5 of this tutorial series, you use the Python Environments window in Visual Studio to manage packages in your Python environments.
In Step 5 of the tutorial, you learn how to:
- View Python environments and packages in Visual Studio
- Install and manage packages for Python environments
- Test Python code with installed packages
Prerequisites
- A Python application project that has a Python file (.py) with code created in Step 2: Write and run Python code.
View Python environments in Visual Studio
Visual Studio provides two places to view information about Python environments:
The Python Environments node in Solution Explorer lists environments currently in use by your project. If you have more than one environment for a project, Visual Studio shows the active environment in bold. You can expand a specific environment to see the set of installed packages. When an environment is active, you can import its installed packages and use them in your code.


The Python Environments window displays all available environments and their installed packages. You can view environments installed by using the Visual Studio Installer and environments installed separately. The available environments include global, virtual, and conda environments. Visual Studio shows the default Python environment for new projects in bold.


Use one of the following methods to open the Python Environments window:
To access the window from the main toolbar in Visual Studio, select View > Other Windows > Python Environments.
If you have a Python project open in Solution Explorer, right-click the Python Environments node under the project, and select View All Python Environments:


You can also use the Ctrl+K, Ctrl+` keyboard shortcut to open the Python Environments window from Solution Explorer.


Prepare the Python file
To prepare for the exercise, follow these steps to update your Python project file to include the necessary code:
Open your Python project file (.py) in the editor. (Tutorial Step 2 explains how to create this file, where the default file name is PythonApplication1.py.)
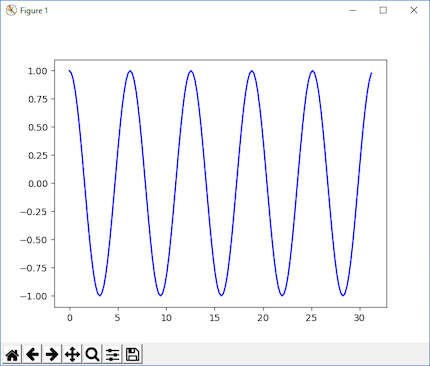
Replace the code in the file with the following code. This version of the code creates a cosine wave similar to the output from tutorial Step 4, but it plots the output graphically.
from math import radians
import numpy as np                # installed with matplotlib
import matplotlib.pyplot as plt

def main():
   x = np.arange(0, radians(1800), radians(12))
   plt.plot(x, np.cos(x), 'b')
   plt.show()

main()
In the editor, hover over the
matplotlibimport statement. Visual Studio uses special formatting to indicate the statement is unresolved.

The
matplotlibimport statement is unresolved because the necessary packages aren't installed in the default global environment. You learn how to install the required packages in the next section.


Install packages for the Python environment
To resolve the matplotlib import statement, you need to install the necessary packages in the default global environment:
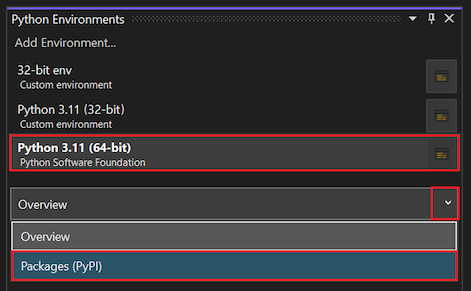
In the Python Environments window, select the default environment for new Python projects, then select Packages (PyPI) in the dropdown menu. (PyPI is the acronym for the Python Package Index.)

Visual Studio shows the list of packages currently installed in the default environment.
In the Search field, enter matplotlib. In the results list, select the Run command: pip install matplotlib option.
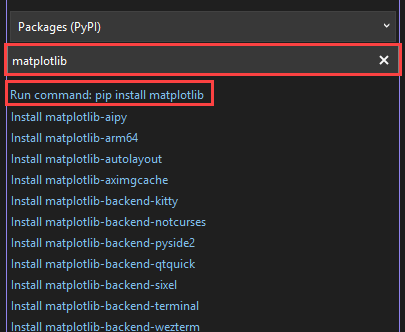

The command installs the
matplotliblibrary, and also any packages it depends on. In this case, the dependent packages include thenumpylibrary.You can open the View > Output window to monitor the progress of the installation.
After the packages install, the Python Environments window refreshes to show the packages for the selected environment:


The X to the right of the package uninstalls it.


Run the program
Now that the matplotlib library is installed, you're ready to test your program.
Run your program with debugging (F5) or without the Debugger (Ctrl+F5).
Check the program output. You should see a plot graph of the cosine data: