Note
Access to this page requires authorization. You can try signing in or changing directories.
Access to this page requires authorization. You can try changing directories.
Styles and templates for elements in the XAML Designer are stored in reusable entities called resources. Styles enable you to set element properties and reuse those settings for a consistent appearance across multiple elements. A ControlTemplate defines the appearance of a control and can also be applied as a resource. For more information, see XAML styles and Control templates.
Whenever you create a new resource from an existing property, Style, or ControlTemplate, the Create Resource dialog box enables you to define the resource at the application level, the document level, or the element level. These levels determine where you can use the resource. For example, if you define the resource at the element level, the resource can be applied only to the element on which you created it. You can also choose to store the resource in a resource dictionary, which is a separate file that you can use again in another project.
Create a new resource
With a XAML file open in XAML Designer, create an element, or choose an element in the Document Outline window.
In the Properties window, choose the property marker, which appears as a box symbol to the right of a property value, and then choose Convert to New Resource. A white box symbol indicates a default value, and a black box symbol typically indicates that a local resource has been applied.
The appropriate dialog box for creating a resource appears. This dialog box appears when you create a resource from a brush:
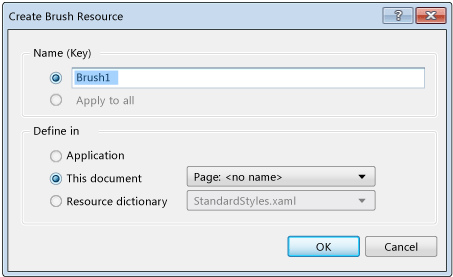
In the Name (Key) box, enter a key name. This is the name that you can use when you want other elements to reference the resource.
Under Define in, choose the option that specifies where you want the resource to be defined:
To make the resource available to any document in your application, choose Application.
To make the resource available to only the current document, choose This document.
To make the resource available to only the element from which you created the resource or to its child elements, choose This document, and in the drop-down list, select element: name.
To define the resource in a resource dictionary file that can be reused in other projects, click Resource dictionary. Then, select an existing resource dictionary file, such as StandardStyles.xaml, in the drop-down list.
Choose the OK button to create the resource and apply it to the element from which you created it.
Apply a resource to an element or property
In the Document Outline window, choose the element to which you want to apply a resource.
Do one of the following:
Apply a resource to a property. In the Properties window, choose the property marker next to the property value, choose Local Resource or System Resource, and then choose an available resource from the list that appears.
If you don't see a resource that you expect to see, it might be because the type of the resource doesn't match the type of the property.
Apply a style or control template resource to a control. Open the right-click menu (context menu) for a control in the Document Outline window, choose Edit Template or Edit Additional Templates, choose Apply Resource, and then choose the name of the control template from the list that appears.
Note
Edit Template applies control templates. Edit Additional Templates applies other template types.
You can apply resources wherever they're compatible. For example, you can apply a brush resource to the Foreground property of a TextBox control.
Edit a resource
Choose an element on the artboard or in the Document Outline window.
Choose the Default or Local property marker to the right of the property in the Properties window, and then choose Edit Resource to open the Edit Resource dialog box.
Modify options for the resource.