Viva Glint 360 feedback program - Subject experience
A Microsoft Viva Glint 360 feedback program provides insights into your strengths and opportunities. A 360 program shares different viewpoints about the way you work from the people you work with. It’s a foundational step toward professional growth and meaningful change. A 360 isn't a performance evaluation but is truly focused on your development.
Direct managers assign 360 program subjects. As a 360 subject, a self-assessment is completed. Also, feedback is requested from various others, such as managers, direct reports, and other collaborators.
Subject Guide
Share this PDF version of the Viva Glint 360 Subject Guide with Subjects of 360 programs.
3-step 360 Subject journey
Note
This journey is written for a 360 Subject so it is shareable. Best practice is to use the PDF guide linked above.
After accessing your 360 program, begin your three-step journey.

There are two ways to begin your 360 process:
Select feedback providers from your welcome email.
On the cycle start date, you receive a welcome email letting you know that your 360 program began.
The email provides instructions about next steps and prompts to Select feedback providers.
Upon selecting this prompt, you’re prompted to log into Viva Glint and brought to a page to select your feedback providers.
Your email looks like this:

Select Feedback providers from your Glint dashboard
- From your Glint manager dashboard, in the Feedback tab, you see that you have a 360 program in progress.

Step 1 - Select feedback providers
You may see prepopulated feedback providers (manager, direct reports, peers). There’s no limit to the number of feedback providers you can select, but you must invite at least three.

- Follow on-screen instructions to add or remove feedback providers.
- When finished, select Invite Feedback Providers.
- A banner confirms that your feedback providers are updated.
- Feedback provider email invitations are sent within 15 minutes of confirming your providers.
What if enough feedback providers haven't been included?
You receive on-screen notification if your minimum number of providers isn't met. Select Update Feedback Providers after correcting this issue.

Feedback provider reminder
If time was tight or for any other reason, you forgot to select feedback providers, you receive this email:

Step 2 - Take your self-assessment
From the Feedback tab on your Glint dashboard, select View for your program. Now Step 2 is activated. Select the Take Assessment button and follow the on-screen instructions. Your due date for your self-assessment displays.

You're taken to the first page of the self-assessment:

When finished, you see this message:

Step 3 - Review your report and reflect
Until your cycle is complete, Step 3 shows as Awaiting Results.

During this time, stay engaged:
- Reaccess your initial welcome email and select Select feedback providers.
- From the Feedback tab on your Glint dashboard, select My Feedback and then View.
Access your 360 report
You receive an email letting you know to review your report. Use the button in the email or access your report from the Feedback tab on the Glint platform.
Scroll to the Feedback History section to access your completed 360.
Select the card to open the report. Data shows the number of completed participants (you included) and their initials.
On the toolbar, select the horizontal ellipses to review the confidentiality settings. You can also download a PDF of your report.
Choose a tab to open:
- Insights – A top-level view of your 360 results
- Comments – A view of all comments. Comments are intended to give context for why someone provided a specific rating.
- All Responses – A detailed view of your survey questions. View in bar chart or table format.

Use the light bulb symbol for guidance on how to view the report.
View Insights
In this section, you see these reports:
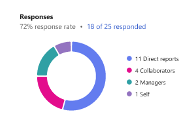
Responses
This report is a breakdown of who responded from those people invited to give feedback.
Comments
View the total number of comments and the actual comments left by feedback providers.
Top relative strengths and Top relative opportunities
In this section, take action to better understand where others see you as effective or where there's an opportunity for improvement. Select Take action to view these insights further.
Overall Scores
Review your scores by rater category. To view rating scores, hover over and select a row to see a visual representation of your feedback.

Visibility into your report access
You have visibility about who has access to your 360 report via the Welcome email and from the 360 overview page. A message appears and you see:
- Which users are scheduled to receive a copy of the 360 report (subject, coach and/or manager)
- Notification that you receive an email when admins release your 360 report.
From your 360 report, you have access to a Report Recipients section that lists all report recipients and release dates.
Note
Subjects that don’t have access to their 360 reports still have visibility to view Report Recipients.
Opt out of becoming a subject
Your manager may begin a 360 feedback program on your behalf. You can opt out by selecting the Opt out button in the welcome email or overview page.
After selecting Opt out, confirm or cancel that action in the confirmation message that displays. The Glint 360 admin from your organization receives an email notification should you opt out.
If an admin reopens a cycle for you after you opted out, no responses are saved and the entire cycle must start over.

Opting out during live or closed survey status
You can’t opt out of a closed 360 feedback cycle. You receive an error message stating the cycle is no longer available.
Should you opt out during a cycle, any feedback already collected is deleted, and this action can’t be undone. An opt out record is retained in the subject’s My Feedback tab and the admin’s cycle overview. This function can be overridden if an admin manually deletes the subject from a cycle.