Note
Access to this page requires authorization. You can try signing in or changing directories.
Access to this page requires authorization. You can try changing directories.
For highly trained users, Microsoft Viva Glint the Advanced Configuration Uploads option allows you to view file upload details, perform custom data access uploads for users in bulk, and complete complex data updates.
Review upload types
- MANAGERS_UPLOAD: To upload custom results data access for dashboard users in bulk.
- Retroactive User Updates: To perform an upload to user data in closed surveys.
- ROLE_UPLOAD: To upload users to a Viva Glint User Role, follow the guidance in this article: Import and export Viva Glint User Roles.
Note
To upload employee data, follow the guidance in this article: Upload your employee attributes to Viva Glint.
Caution
Uploads performed in Advanced Configuration don't calculate derived fields or transform date formats to yyyy/mm/dd. If data should be derived, like Tenure from Hire Date, load data through the Viva Glint People page or SFTP.
Perform a MANAGERS_UPLOAD
When several users need customized data access to their Viva Glint Dashboards, use the MANAGERS_UPLOAD to update their access in bulk. To grant one or a few users access to custom segments of data, grant custom access from their user profile.
To upload custom access for multiple users:
Prepare a file using the custom data access export in User Roles.
Save your file in .csv format with a comma separator and UTF-8 or UTF-8 with BOM encoding.
In the Advanced Configuration menu, select Uploads.
- Upload Type: Select MANAGERS_UPLOAD from the dropdown list.
- Apply To: For the survey and cycle dropdown menus, make no selection. These selections apply to retroactive uploads only and not to custom access uploads.
- Incremental:
- Switch on this toggle to append access to users in your file.
- Switch off this toggle to overwrite all access for users in your file. Users not included in the file aren't impacted.
- Use exact case from the file for the First/Last name: Ignore, this setting doesn't apply to custom access uploads.
Drag and drop your .csv file or browse to choose it in the Drag and drop to upload section.
In the Upload Job Details page that appears, confirm that the Uploaded Lines Summary matches the changes in your uploaded file.
Select Apply Upload to Database to upload new values to and kick off a process to refresh reporting data.
In the Load import file into database? dialog, select Yes.
Go to some users' profiles to confirm that customized access appears as expected.
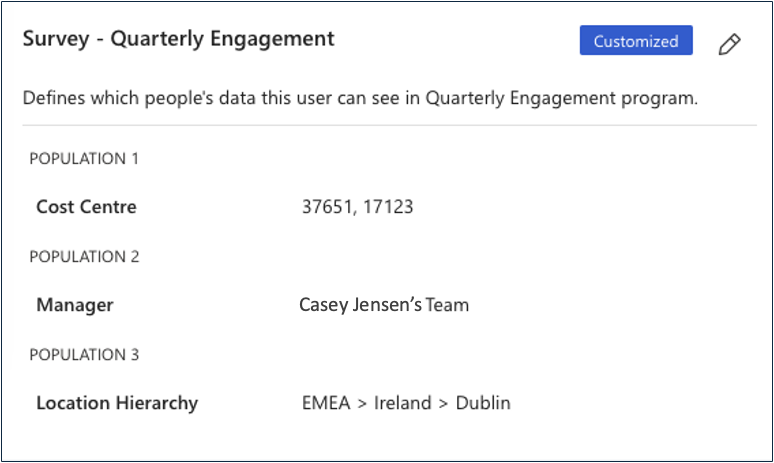
For example, the custom data access for this user:
manager reference population add or remove survey uuid Cost Center Manager Level 1 Region Country City ana.bowman@contoso.com 0 ADD aa1aa1aa-a1a1-1a1a-1a1a-111111111a11 37651 ana.bowman@contoso.com 0 ADD aa1aa1aa-a1a1-1a1a-1a1a-111111111a11 17123 ana.bowman@contoso.com 1 ADD aa1aa1aa-a1a1-1a1a-1a1a-111111111a11 7890 ana.bowman@contoso.com 2 ADD aa1aa1aa-a1a1-1a1a-1a1a-111111111a11 EMEA Ireland Dublin Displays on Ana's profile like this:
Perform Retroactive User Updates
When a survey closes, employee attributes that display in reporting don't update with regular employee data uploads. To update data in reporting in a closed survey, use the Retroactive User Updates option to apply new values. This option applies new data to past versions of user data and doesn't touch current employee information.
Employee Lifecycle and Always-On surveys
Ongoing survey types like Lifecycle and Always-On can have the same user respond multiple times in a survey cycle that may need a retroactive update. Viva Glint retroactive updates don't currently support attribute value updates to multiple records for the same user during a retroactive update. An admin can remove users who have multiple records when preparing a file of corrected user data.
If duplicated users aren't removed, admins see a "FAILED" State for the Retroactive User Updates upload, with the following File error in the Upload Job Details:
- System error: Failed to find user_staging_record with externalUserId=[user@contoso.com], which is not supposed to happen at all because User object with the same ID was previously loaded."
Note
To retroactively update a Manager Hierarchy, always use the RETROACTIVE_PULSE_UPDATE Data App and not the Retroactive User Updates option.
Important
If your organization can't save files in .csv format, Retroactive User Updates isn't an option. Instead:
- Import an .xlsx file to the People page.
- Create a User Role and add these users to the role.
- Use the RETROACTIVE_PULSE_UPDATE Data App and select your User Role in roleOrDistributionList.
To perform a Retroactive User Updates upload
Go to Configuration and in Service Configuration, select Advanced Configuration. For this task, admins access Data Apps and Uploads from the Advanced Configuration menu.
Caution
- Don't perform a retroactive update while a Viva Glint survey is live.
- Deleted user data can't be retroactively updated.
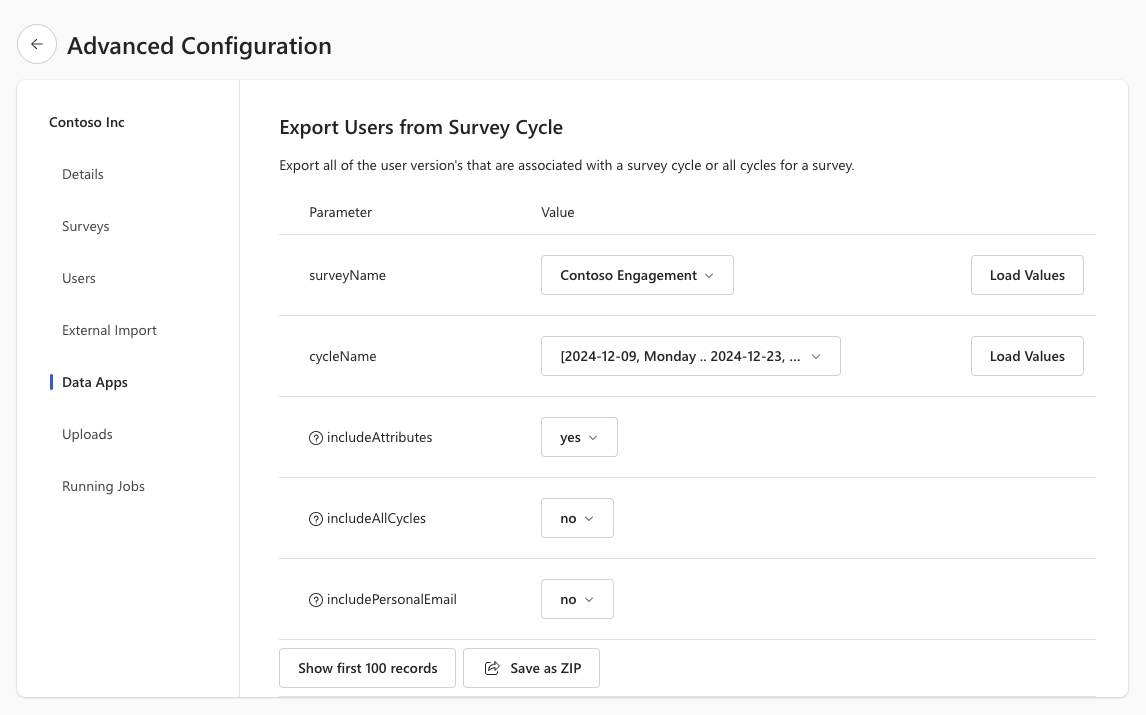
Export survey cycle data with the EXPORT_USERS_FROM_SURVEY_CYCLE Data App for the surveys that need to be updated.
Note
Keep this export of original survey cycle data in case any retroactive updates need to be reverted.
Prepare an update file with the EXPORT_USERS_FROM_SURVEY_CYCLE file from Step 1.
- To preserve special characters and formatting, always open files by importing data from .csv in Microsoft Excel.
- Delete all columns except for First Name, Last Name, Email, Employee ID, Status, and the attributes that need to be retroactively updated (for example, Department).
- Delete all user rows for employees whose data remains the same.
- Correct values for users and attributes that need to be updated.
- For example: To correct Department = ‘Sales’, ‘SALES’, ‘sales’, which create three values where there should be one in reporting, update all users to Department = ‘Sales’.
- Save your edited file with corrected values in .csv format with UTF-8 or UTF-8 with BOM encoding.
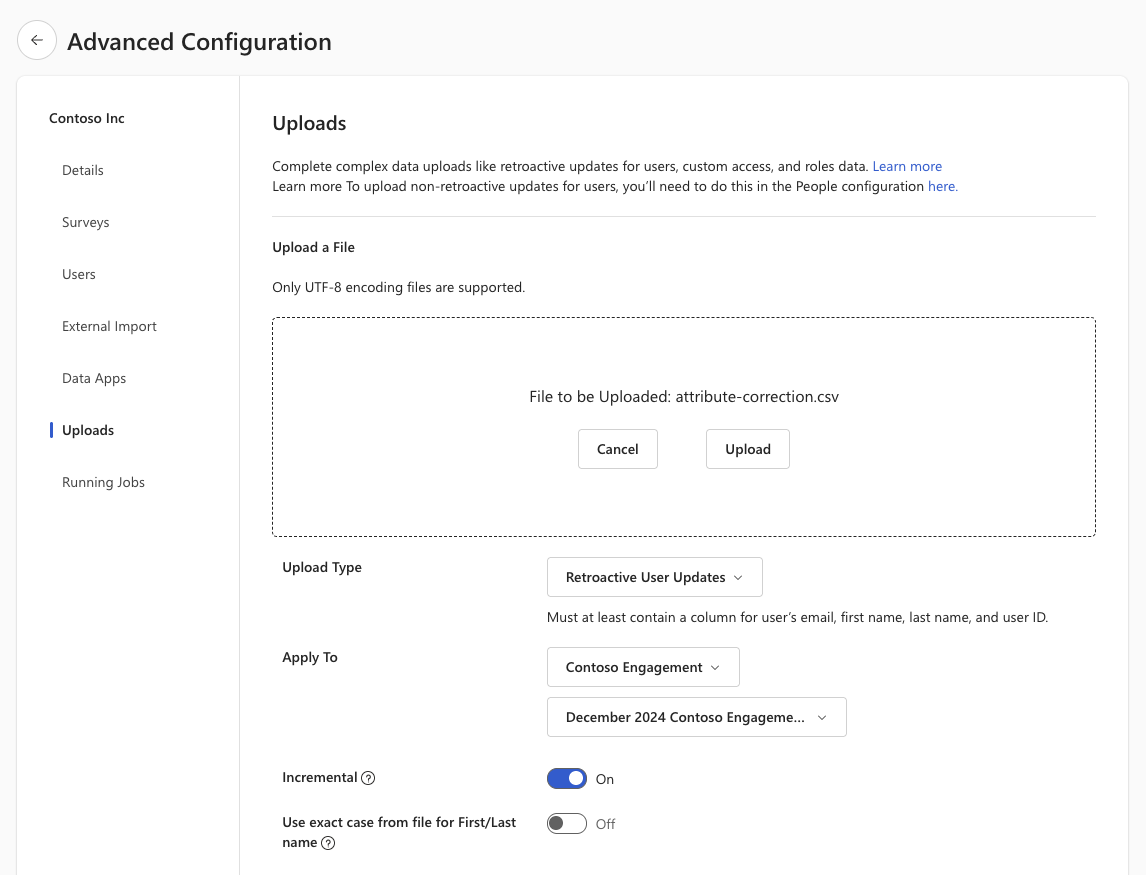
In the Advanced Configuration menu, select Uploads.
In the Choose job type dropdown list, select Retroactive User Updates.
In the Survey dropdown list, select your survey.
In the Survey Cycle dropdown list, select your survey cycle.
Switch on the Incremental toggle.
Drag and drop your .csv file or browse to choose it in the Drag and drop to upload section.
Caution
To prevent errors, don't upload your file until all previous steps are complete.
Confirm the File to be Uploaded and select Upload.
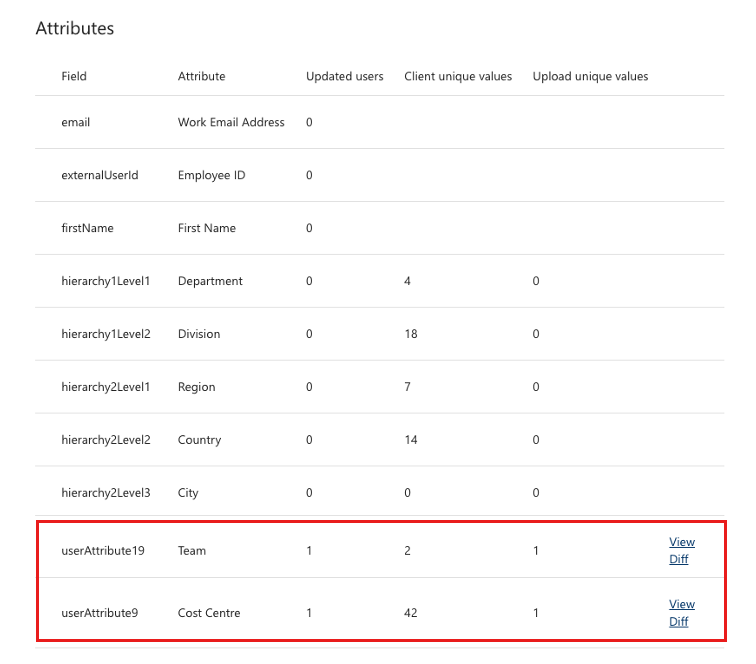
In the Upload Job Details page that appears, confirm that the Attribute(s) and Updated users count match the attributes and count of users in your uploaded file.
Select Apply Upload to Database to upload new values and kick off a process to refresh reporting data.
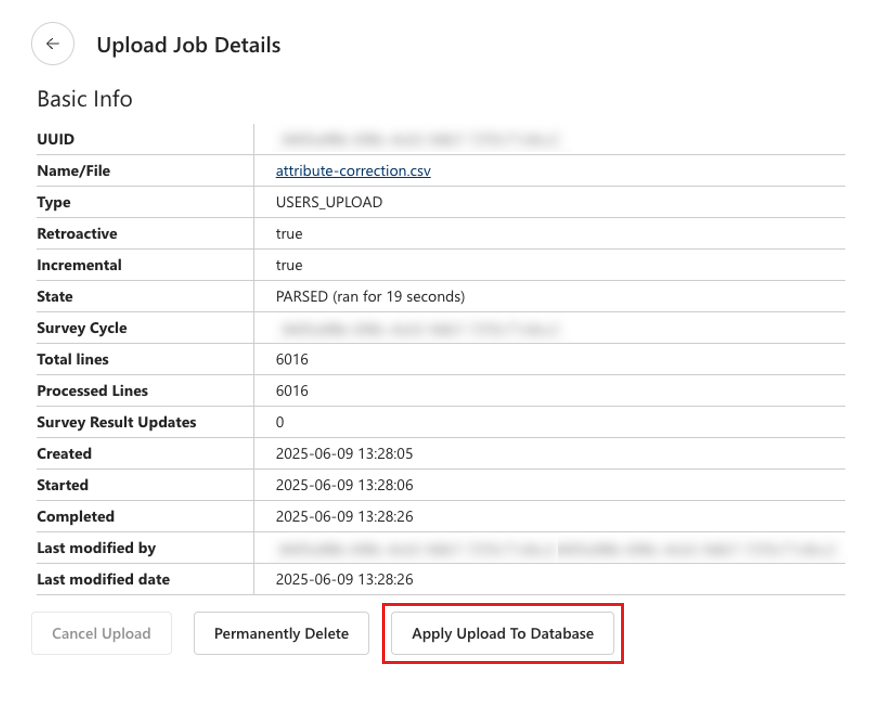
In the Load import file into database? dialog, select Yes.
Confirm changes to attributes in your Dashboard and Reports.


Note
Depending on the number of attributes and users involved, it may take up to an hour to see changes reflected in reporting.