Note
Access to this page requires authorization. You can try signing in or changing directories.
Access to this page requires authorization. You can try changing directories.
After initial attribute setup in Microsoft Viva Glint, use this guidance to add new attributes, rename attributes, manage derived and optional system attributes, and to update attribute visibility in the platform. New attributes and their values apply to future survey results only.
Caution
The Viva Glint Admin that sets up or changes attributes needs to save changes in the default language for your organization. Confirm that the default language (often English) is selected in the Language dropdown menu in Viva Glint. Setting up or editing attributes in a different language resets the expected language for Viva Glint data ingestion and causes upload errors.
Important
Coordinate the timing of new or updated attributes with your HR information system team. Edits to your attribute setup need to be in place before files with changes can successfully import to Viva Glint.
Add new attributes to Viva Glint
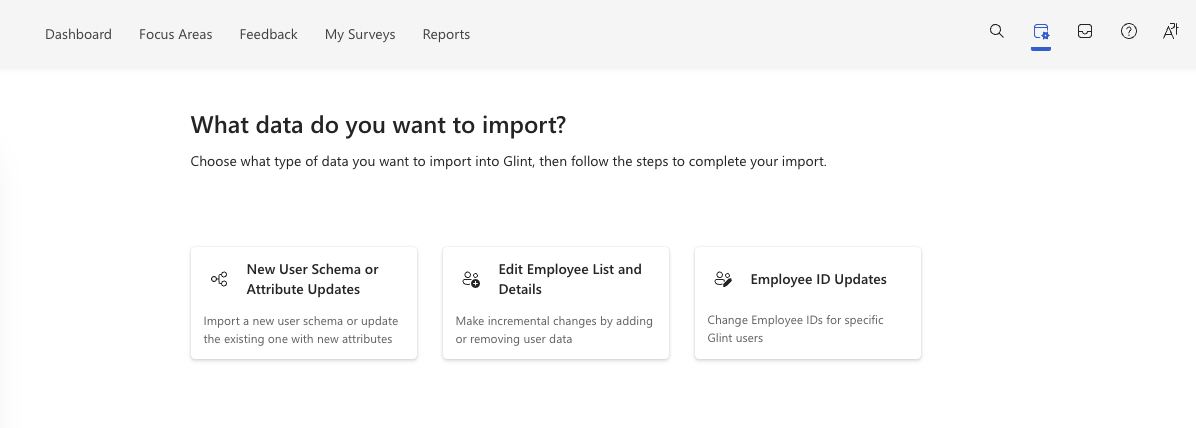
To add new attributes to your Viva Glint setup from the admin dashboard:
Select the Configuration symbol and then under the Employees section, choose People.
Select Import and then New User Schema or Attribute Updates.
Upload your dataset with the new attribute and all existing attributes, including attributes which are derived (such as tenure, age range and various manager hierarchy levels). The easiest way to identify all existing attributes is to export an employee data file from the People option within the Configuration section and maintain each of those column headers in your import, along with the new attribute.
Note
Your uploaded file must contain the Attribute Header Row and at least one row of employee data that aligns with the current format.
Select Continue.
If dates are included in your file, select There are date fields and then the appropriate date format from the dropdown menu.
Note
This selection should be your existing date format in your employee data.
Preview your data and confirm that you see the new attributes.
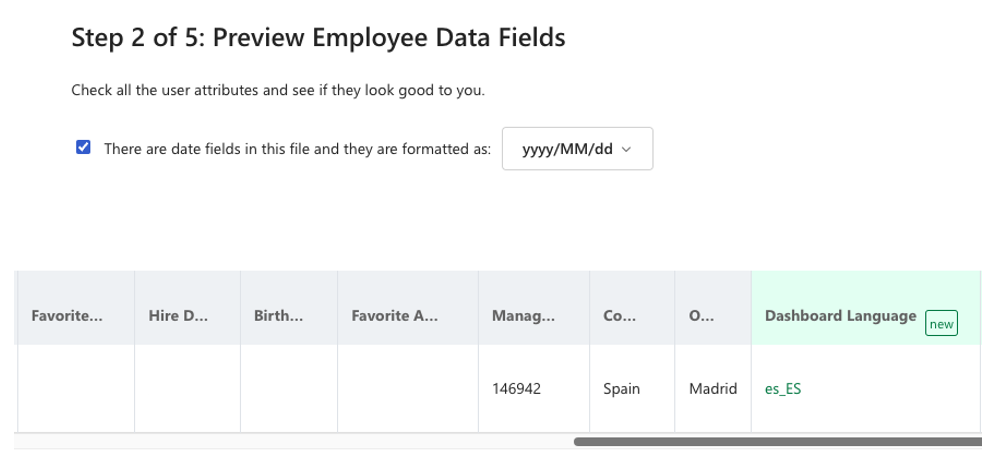
Select Continue.
The Attributes Setup page shows current required, derived, optional system, and hierarchy attributes. If the newly added field is required, derived, or an optional system attribute, make your selection in the appropriate section. Select Continue.
Note
Hierarchy Group levels and mapping can't be changed after initial setup. Viva Glint admins can change hierarchy and hierarchy level names after initial setup.
Review newly added attributes and select Continue.
Choose to Save attributes and import employee data or to Save attributes and discard employee data.
Tip
When adding new attributes, choose the Save attributes and discard employee data option to save your setup in preparation for future imports.
Select Save or Go Back to make more edits.
Edit attribute names
Use the following guidance to rename attributes before updating your employee data files so that they continue to import seamlessly.
From the admin dashboard:
Select the Configuration symbol and then in the Employees section, choose People.
Select Actions and then select Manage User Attributes.
Select the corresponding ellipses to the far right of the attribute in the Active Attributes row.
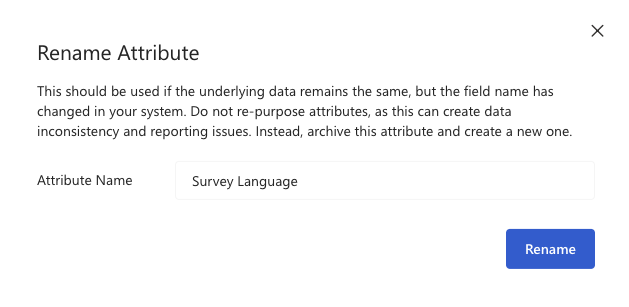
Select Rename Attribute.
Enter the new name in the Attribute Name field and select Rename.
Important
Renaming an attribute updates how that attribute is stored in the system.
After an attribute is renamed:
- All future employee data uploads must use the new attribute (column) name.
- Upload files, templates, and any integrations that reference the old name must be updated.
- Uploads that continue to use the previous attribute name will fail. To avoid import issues, ensure your data files are updated to match the new attribute name before your next upload.
Caution
Use this method if the underlying data remains the same, but the field name changed in your system. Repurposing attribute name labels can create issues in reporting. Instead, create a new attribute.
For example, if Department changes to Team and the values in that column change too, add a new Team attribute and don't rename Department to Team.
Delete an attribute
Deleting an attribute permanently removes it from Viva Glint. Before deletion, Viva Glint checks whether the attribute is used in areas that could affect surveys, permissions, or user access.
If the attribute is used in high-impact scenarios, deletion is blocked until those dependencies are removed. If the attribute isn’t actively used or is used only in low-impact scenarios, deletion is allowed.
Important
Attribute deletion is permanent and irreversible. Unlike user deletion, attribute deletion does not include a soft‑deleted recovery period.
- Select the Configuration icon, and then under Employees, choose People.
- Select Actions, and then select Manage user attributes.
- In Active attributes, select the ellipses (…) to the right of the attribute.
- Select Delete attribute.
Viva Glint checks whether the attribute is used in the platform.
- If the attribute isn’t used or is used only in low-impact scenarios, deletion continues.
- If the attribute is used in high-impact scenarios, deletion is blocked and you must remove the dependencies before you can delete the attribute.
The blocked and warning scenarios are described in the sections below.
Scenarios that block deletion
You can’t delete an attribute if it’s currently used in any of the scenarios below. Complete the required action, then try deleting the attribute again.
Used in a derived attribute: The attribute is used to calculate tenure groups, age groups, or a custom derived attribute.
What to do:
- Go to People > Manage user attributes > Derived attributes.
- Remove the derived attribute mapping, or select a different source attribute to calculate the derived attribute from.
- To remove or adjust custom derived attributes, please contact support.
Used in optional system attributes: The attribute is used to calculate survey language, dashboard language, user time zone, or personal email.
What to do:
- Go to People > Manage user attributes > Optional system attributes.
- Remove the mapping or select a different attribute to sync from.
Used in user role attribute rules: The attribute is used to define which users belong to a role.
What to do:
- Go to User roles.
- Open the role, then select Add/Edit employees.
- Select Attribute rules and remove or replace the attribute.
Used in user role permissions: The attribute is used to define team access for a role.
What to do:
- Go to User roles.
- Open the role and select Permissions.
- In Access, select a different attribute for attribute-based access or choose another access option.
Used for attribute-based survey access: The attribute is used for attribute-based survey access.
What to do:
- Go to Settings > General settings > Engage survey details.
- Remove the attribute from Attribute-based survey access.
Used in distribution lists: The attribute is used to define distribution list membership.
What to do:
- Go to Settings > Distribution lists.
- Update all distribution lists that use attribute rules and remove the attribute.
Used in live survey questions: The attribute is used as a macro in a question in a live survey.
What to do:
- Remove the macro from the question text, or wait until the survey closes, then delete the attribute.
Used in the question library: The attribute is used as a macro in a question that isn’t part of a live survey.
What to do:
- Go to Question library.
- Edit the question and remove the macro from the question text.
Used in Employee Lifecycle (ELC) programs: The attribute is used to trigger an employee lifecycle survey.
What to do:
- Go to Survey programs.
- Open the ELC program and select Distribution.
- Choose a different employee attribute.
Used in custom access: The attribute is used to define admin access, focus area access, or survey data access.
What to do:
- Go to User roles or People.
- For complex custom access (per‑user access rules), export the CSV to identify and update users individually.
- Admin and Focus Area access isn’t currently exportable. If the attribute is used for Admin or Focus Area access, you must review each affected user and remove access individually.
Scenarios that allow deletion (with warnings)
You’re notified if the attribute is used in the scenarios below, but deletion isn’t blocked.
Used in report attributes
The attribute is removed from all historical reports. It’s no longer available for report filters, sections, or comment filters.
Used in historical survey questions or reports
Macro text becomes static and isn’t impacted by deletion.
Used in email notifications
The macro text is removed from email templates.
Used for alerts
The attribute is hidden from alerts reports. Alerts are regenerated in a later phase.
Used in internal benchmark comparisons
The attribute is removed from benchmark comparisons and is no longer selectable.
After the attribute is deleted
When deletion is complete:
- The attribute is removed from the schema and no longer appears in Viva Glint.
- All data associated with the attribute is deleted from historical reports.
- Users can’t filter reports or comments by the attribute or use it as a report section.
Manage Derived Attributes
Viva Glint calculates attribute values based on data sent in your employee attribute file.
To edit custom derived attribute ranges after your initial setup:
- Select the Configuration symbol and then under the Employees section, choose People.
- Select Actions and then Manage User Attributes.
- In the Derived Attributes section, select Manage Derived Attributes.
- Select the checkbox next to the Derived Attribute that you want to edit or add.
- To disable a Derived Attribute: Deselect the checkbox next to the desired field.
- To enable a Derived Attribute: Select the checkbox next to the desired field and choose a field from your data in the Calculate From dropdown menu.
- To update the field used to create a Derived Attribute: Select the checkbox next to the desired field and choose a new field in the Calculate From dropdown menu.
- To update the attribute value ranges: Select the Customize ranges option next to the desired field and customize ranges.
Important
- Any attribute used in the field under Calculate from (for example, Hire Date) becomes a required attribute for all future full and incremental file uploads. If a required attribute is missing from a file upload, the data import will fail.
- Do not include attributes that have the same name as derived attributes (for example, Tenure or Age Grouping). Glint generates these automatically. If you include them manually, the conflicting sources may cause import errors.
- Any changes you make in the Derived attributes section will apply to both full and incremental configurations as we move toward a unified configuration.
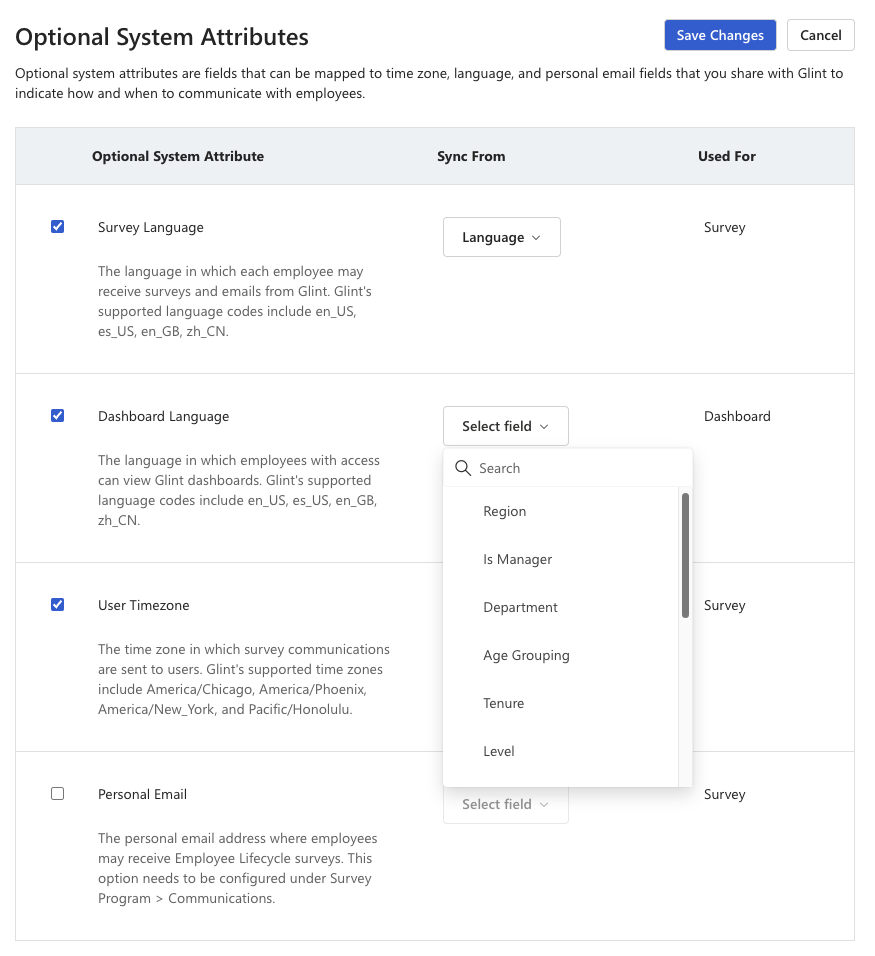
Manage Optional System Attributes
Choose how and when Viva Glint communicates with employees by mapping language, time zone, and personal emails to Viva Glint fields.
Important
Send language and time zone values exactly as they appear in related tabs in the following articles:
Users with blank or invalid values receive and access surveys/emails/dashboards in your organization's default selection in General Settings.
See Recent language changes for changes to supported languages and codes effective April 10, 2025.
To edit optional system attributes after your initial setup:
- Select the Configuration symbol and then under the Employees section, choose People.
- Select Actions and then Manage User Attributes.
- In the Optional System Attributes section, select Manage Optional System Attributes.
To disable an Optional System Attribute: Deselect the checkbox next to the desired field.
To enable an Optional System Attribute: Select the checkbox next to the desired field and choose a field from your data in the Sync From dropdown menu.
To update the field mapped to an Optional System Attribute: Select the checkbox next to the desired field and choose a new field in the Sync From dropdown menu.
Manage hierarchy groups
Use the following guidance to manage hierarchy attributes before updating your employee data files so that they continue to import seamlessly. Use these steps to update Hierarchy group or level names, add new hierarchies, or edit existing hierarchy levels.
Rename hierarchy attributes
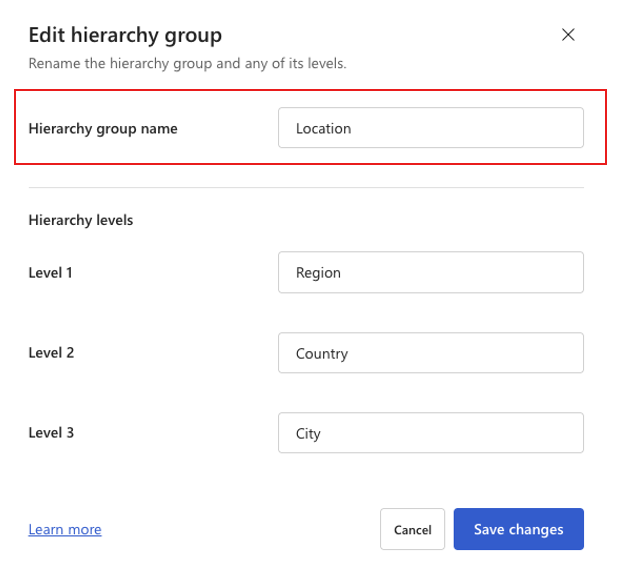
To rename a hierarchy group:
Select the Configuration symbol and then under the Employees section, choose People.
Select Actions and then Manage User Attributes.
In the Hierarchy Groups section, go to the hierarchy that you want to rename.
Select the ellipsis next to the hierarchy group and choose Edit hierarchy group.
In the dialog that appears, edit the Hierarchy group name field.
Select Save changes.
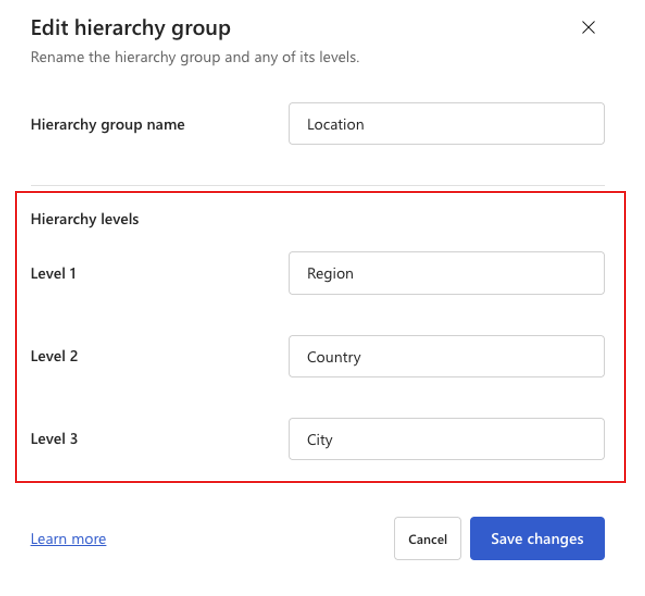
To rename hierarchy levels:
Select the Configuration symbol and then under the Employees section, choose People.
Select Actions and then Manage User Attributes.
In the Hierarchy Groups section, go to the hierarchy that has levels that you want to rename.
Select the ellipsis next to the hierarchy group and choose Edit hierarchy group.
In the dialog that appears, edit the Level fields in the Hierarchy levels section.
Select Save changes.
Caution
Use this method if the underlying data remains the same, but the hierarchy level name changes in your system. Repurposing attribute name labels can create issues in reporting. For example, rename a "Department" level to "Team" only if the values in the column remain the same.
Add a hierarchy
To add a new hierarchy group:
Select the Configuration symbol and then under the Employees section, choose People.
Select Actions and then Manage User Attributes.
In the Hierarchy Groups section, select + Add Hierarchy Group.
In the dialog that appears, enter a Hierarchy group name.

Select the + Add level to add as many levels as needed, up to 10.
Next to each level, enter a name.
Select Create.
Edit hierarchy levels
Select the Configuration symbol and then under the Employees section, choose People.
Select Actions and then Manage User Attributes.
In the Hierarchy Groups section, select the ellipsis next to the hierarchy group to edit and choose Edit hierarchy group.
In the dialog that appears, select a level name to edit or use the + Add level option to add a new lowest level.

Enter a name for any new levels.
Select Save changes.
Caution
Rename levels only if the underlying data remains the same, but the hierarchy level name changes in your system. Repurposing attribute name labels can create issues in reporting. For example, rename a "Department" level to "Team" only if the values in the column remain the same.
Delete hierarchies
Hierarchy structures and hierarchy attributes cannot be deleted at this time.
Update custom attribute visibility
Use the Visibility setting to edit whether a custom attribute appears:
- On a user's profile selected from the People page.
- In exports of users in a survey cycle.
- In survey recipient exports downloaded from the Distribution section of survey programs.
Note
This setting doesn't affect an attribute's visibility in raw survey response exports.
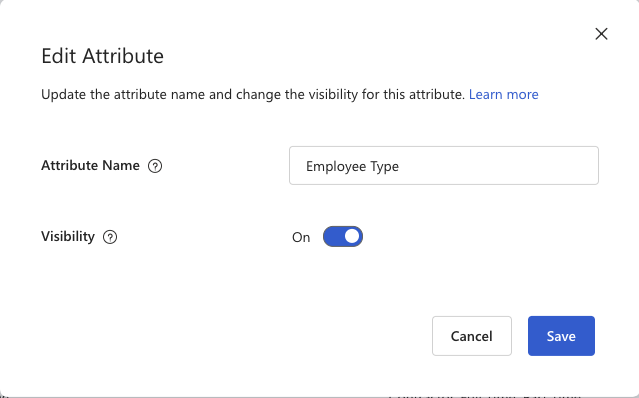
To edit a custom attribute's visibility:
Select the Configuration symbol and then in the Employees section, choose People.
Select Actions and then Manage User Attributes.
In the Active Attributes section, select the ellipses on the desired custom attribute and choose Edit Attribute.
Note
The visibility setting isn't editable for Required or Hierarchy attributes.
Switch the Visibility toggle to On or Off to show or hide the attribute.
Select Save.
To give a User Role access to newly visible custom attributes, select the Configuration symbol and then in the Employees section, choose User Roles. Select a role's Report Attributes and make selections for the newly visible attribute. Learn more about User Role setup.