Note
Access to this page requires authorization. You can try signing in or changing directories.
Access to this page requires authorization. You can try changing directories.
Important
This feature is for public preview customers only. Features in preview might not be complete and could undergo changes before becoming available in the broader release. This preview feature allows personal data processing. See the "Previews" section of the Microsoft Products and Services Data Protection Addendum for more information.
Your organizational data can appear in the Viva Insights web app in one of three ways: through Microsoft Entra ID, which is the default source; through individual .csv files that you as an Insights Administrator upload directly to Viva Insights; or through an API-based data import that you, your source system admin, and your Microsoft 365 IT admin setup.
This article talks about the third option, importing data.
With an import, you bring data from your source system to the Viva Insights HR data ingress API through a zip file. You can either:
- Create a custom app to export data from the source system to a zip file. Then, using the same app, import that data using the API information below.
- Create a custom app to export data from the source system to a zip file. Then, run a C# console app we created to import data to Viva Insights.
- Create a custom app to export data from the source system to a zip file. Then, run a PowerShell script we created to import data to Viva Insights.
- Use our Azure Data Factory (ADF) template to send data to our API-based import.
However, before you can run your app and start transferring data to Viva Insights, you need to coordinate a few tasks between your Microsoft 365 admin and Insights Administrator (Insights admin). See Workflow for an overview of required steps.
Important
Only use the following steps if this is the first time you’re importing organizational data. If this isn’t your first import, see Import organizational data (subsequent imports) to refresh previously imported data.
Workflow
Setup:
- The data source admin generates a security certificate and provides it to the Microsoft 365 admin.
- Using the security certificate, the Microsoft 365 admin registers a new app in Azure.
- Using IDs from the app registration, the Insights admin sets up the import.
- The data source admin prepares their data and either:
- Exports it from their source system using a custom app based on our API, then using the same app, imports the data to Viva Insights.
- Exports it from their source system using a custom app based on our API, then using our C# solution or PowerShell script, imports the data to Viva Insights.
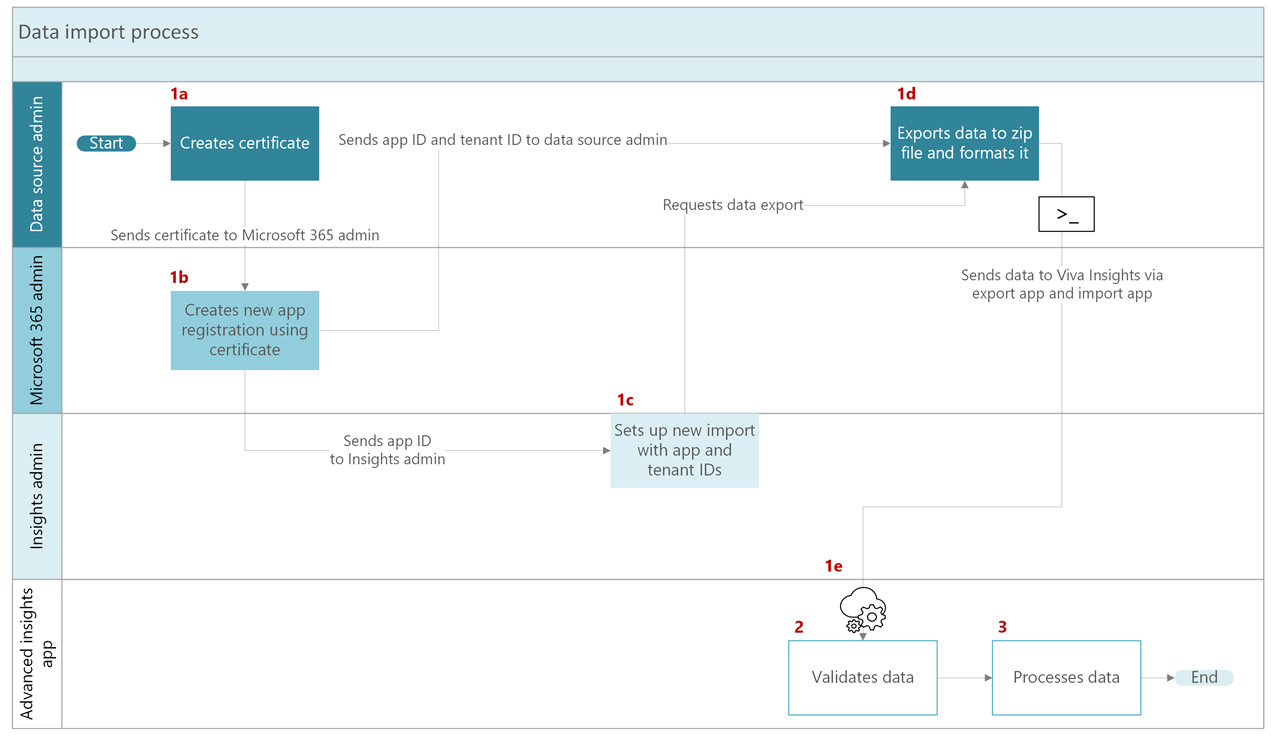
Validation: Viva Insights validates your data. (If validation isn’t successful, you can choose from a few options described in Validation fails.)
Processing: Viva Insights processes your data. (If processing isn’t successful, you can choose from a few options described in Processing fails.)

After the data successfully validates and processes, the overall data-import task is complete.
Setup
Generate the security certificate
Applies to: data source admin
To start getting data from your source file into Viva Insights, the Microsoft 365 admin needs to create and register an app in Azure. As the data source admin, you need to help the Microsoft 365 admin register their app by giving them a security certificate.
Here’s what to do:
- Create a certificate by following the instructions in this article: Create a self-signed public certificate to authenticate your application
- Send the generated certificate to the Microsoft 365 admin.
That’s it for now. If you want to get a head start on your next steps, follow the steps in Export your data on a set frequency.
Register a new app in Azure
Applies to: Microsoft 365 admin
Note
For more information about registering an app in Azure, see Quickstart: Register an application with the Microsoft identity platform.
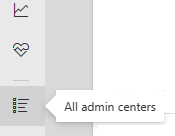
From the Microsoft admin center's left rail, select All admin centers. This option appears as the last one on the list.
Select Microsoft Entra ID.
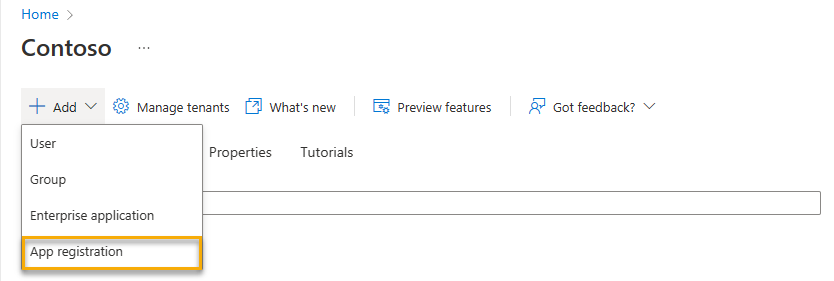
Create a new app registration:
In the top toolbar, select Add > App registration.
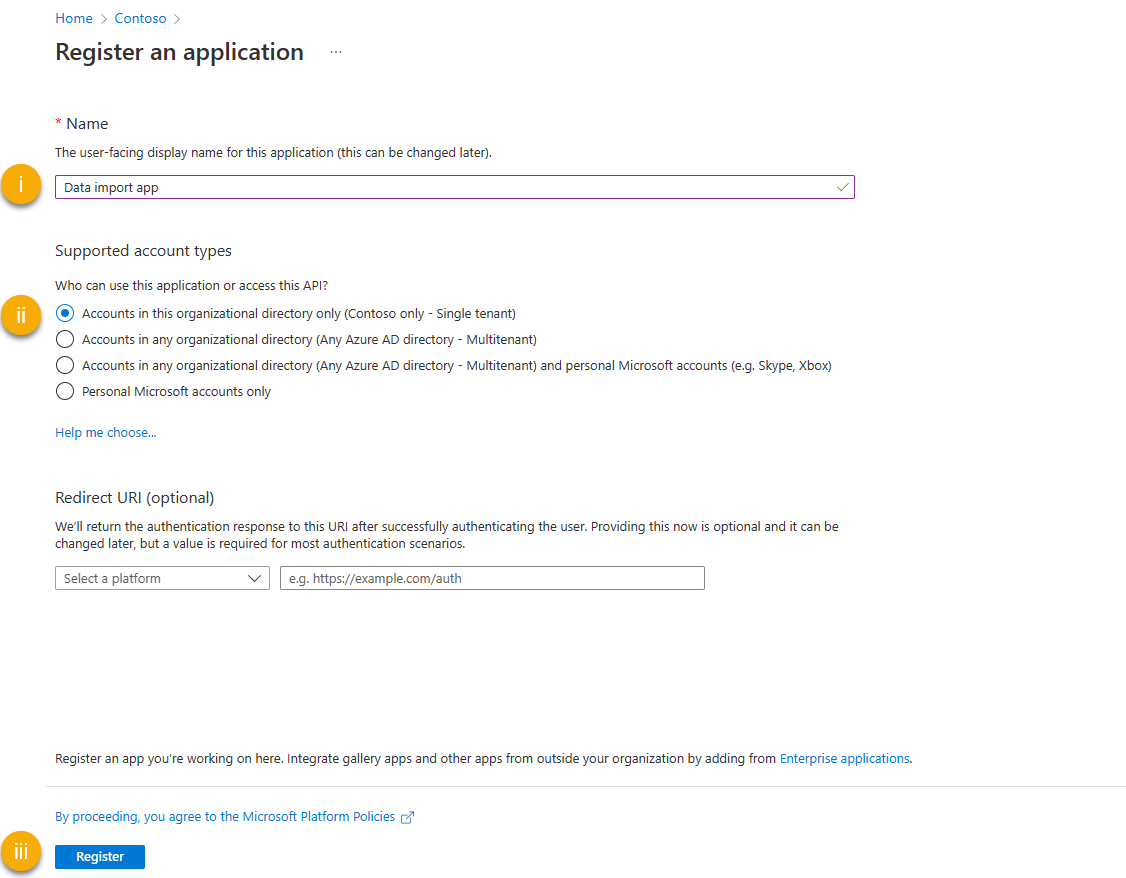
On the resulting screen:
- Give your app a name.
- Under Supported account types, leave the first option, Accounts in this organizational directory only ([Your organization] only - Single tenant), selected.
- Select the Register button at the bottom of the screen.
When you arrive back at the Overview screen, copy down the Application (client) ID and Directory (tenant) ID.

Important
Keep these IDs handy. You'll need to provide them later.
Add a certificate:
Select Add a certificate or secret.

Select Upload certificate.
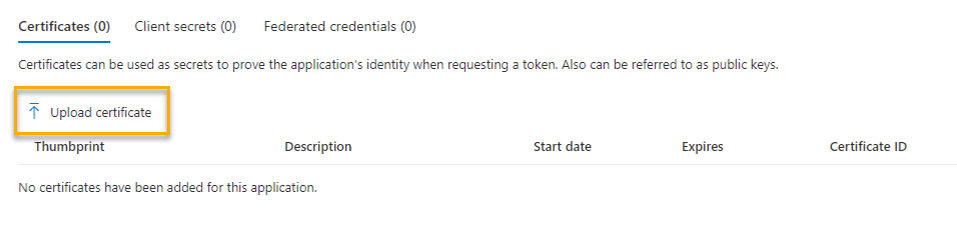
Upload the certificate that the data source admin gave you and add a Description. Select the Add button.

Remove API permissions:
Select API permissions from the left rail.
For each listed API / Permissions name, select the ellipsis (...) to the right of the API—for example, Microsoft Graph.
Select Remove permission.
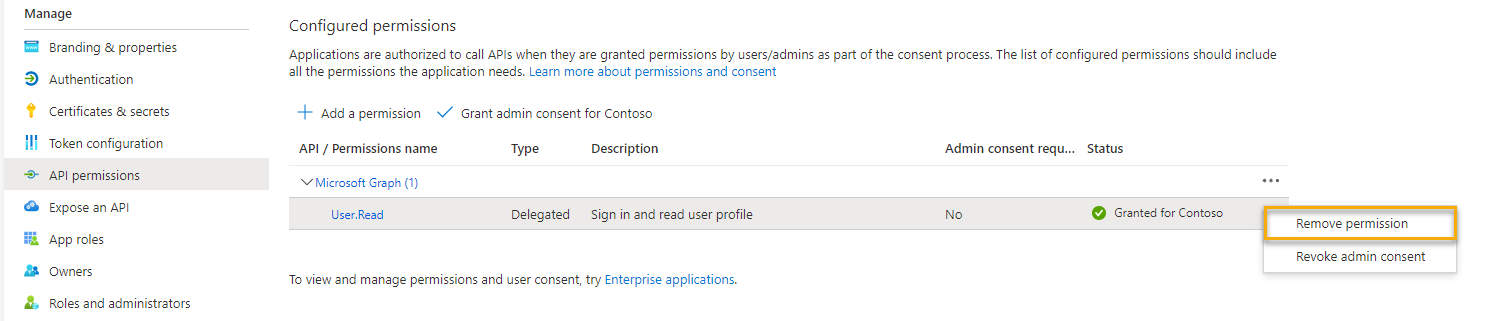
Confirm removal.
When you remove permissions for these items, you’re making sure app only has permissions for what it needs.
Share the IDs you noted down in step 3c:
- Give the Insights admin the app ID.
- Give the data source admin the app ID and the tenant ID.


Set up the import in Viva Insights
Applies to: Insights admin
Start the import from one of two places: the Data hub page or the Organizational data page, under Data connections.
From Data hub:
- In the Data source section, find the API-based import option. Select the Start button.
From Data connections:
Next to Current source, select the data sources button.
A Switch to: API-based import window appears. Select Start.
On the API-based organizational data import page:
Give your connection a name.
Enter the app ID that your Microsoft 365 admin gave you.
Save.
Select the connection you named in step 3a as the new data source.
Contact the data source admin and request that they send org data to Viva Insights.
Prepare, export, and import organizational data
Tips for preparing your data
- For new data, include full historical data for all employees.
- Import organizational data for all employees in the company, including licensed and nonlicensed employees.
- See the sample .csv template for data structure and guidelines to avoid common issues like too many or too few unique values, redundant fields, invalid data formats, and more.
Export your data on a set frequency
At the frequency you decide (once a month, once a week, etc.) have your custom app export organizational data from your source system as a zip folder and store it in your files. Base this zip folder on the one here. Your zip folder needs to contain a data.csv file and a metadata.json file.
Here are a few more details about these files and what they need to contain:
data.csv
Add all fields you want to import in this file. Make sure you format it according to our guidelines in Prepare organizational data.
metadata.json
Indicate the type of refresh you’re performing and how Viva Insights should map your fields:
"DatasetType": "HR"(line 2). Leave this as-is."IsBootstrap":(line 3). Use"true"to indicate a full refresh and"false"to indicate an incremental refresh."ColumnMap":. If you use names other than what Viva Insights uses, change each column header name to match what you use in your source system.
Important
Remove any fields that aren’t present in your .csv file.
Mapping example
The following example represents one field in the metadata.json file:
"PersonId": {
    "name": "PersonId",
    "type": "EmailType"
"PersonId": {corresponds to the source column name.“name” : “PersonId”,corresponds to the Viva Insights field name."type": "EmailType"corresponds to the field’s data type.
Let’s say that instead of PersonId, your source system uses Employee for this field header. To make sure your fields are mapped correctly, edit the first line below, so it looks like this:
      "Employee": {
        "name": "PersonId",
        "type": "EmailType"
When you upload your data, your Employee field becomes PersonId in Viva Insights.
Import your data
To import your data to Viva Insights, you can pick from four options:
- Use our API to build a custom app that exports and imports your data at the frequency you choose. Learn more.
- Run our C# solution on your console, which is based on our API. Learn more.
- Run our PowerShell script, which is also based on our API. Learn more.
- Use our Azure Data Factory (ADF) template to send data to our API-based import. Learn more.
Note
Our C# and PowerShell solutions only import data to Viva Insights. They don’t export data from your source system.
Before working with any of the options below, make sure you have this information:
- App (client) ID. Find this ID in the registered app information on the Azure portal under Application (client) ID.
- Client secret: This is a secret string that the application uses to prove its identity when requesting a token. It’s also referred to as application password. This secret is only shown for the first time when the client secret is created. To create a new client secret, see Create a Microsoft Entra app and service principal in the portal.
- Certificate name. This name is configured in your registered application. After you upload the certificate, the certificate name shows up under Description in the Azure Portal. You can use the certificate name as an alternative to the client secret.
- The zip file and the path to the zip file. Don’t change the file names data.csv and metadata.json.
- Microsoft Entra tenant ID. Also find this ID on the app's overview page under Directory (tenant) ID.
- Scale unit: The scale unit provided to you for your tenant, for example,
novaprdwus2-01.
About the Viva Insights HR data ingress API
View the following commands:
[Request headers]
These two request headers are required for all the APIs mentioned below
x-nova-scaleunit: <ScaleUnit obtained from Insights setup connection page>
Authentication: Bearer <Oauth token from AAD>
Note
Generate Active Directory OAuth token for registered app (daemon app auth flow) using:
Authority: https://login.microsoftonline.com
Tenant: <target AAD tenant ID>
Audience: https://api.orginsights.viva.office.com
For more information about generating tokens, see: Acquire and cache tokens with Microsoft Authentication Library (MSAL)
Get connector/ping to check if connector is set for a tenant
[GET] https://api.orginsights.viva.office.com/v1.0/scopes/<tenantId>/ingress/connectors/HR
[ResponseBody]
If connector is set and caller application (id) is granted authorization:
200:

{
       “ConnectorId”: “Connector-id-guid”

}
If the Insights Administrator has removed the connector or, the connector hasn't been set yet by the Insights Administrator:
403: Forbidden.
Push data
Survey app to call Viva Insights API to push content
[POST] https://api.orginsights.viva.office.com/v1.0/scopes/<tenantId>/ingress/connectors/HR/ingestions/fileIngestion
[Body] file content as multipart/form-data
Type: Zip archive
Content to be archived:
Metadata.json
Data.csv
[Request Body]
Body:

{

   "$content-type": "multipart/form-data",

   "$multipart":

    [

        {

            "headers":

                {

                    "Content-Disposition": "form-data; name=\"file\"; filename=info"

                   },

            "body": @{body('Get_blob_content_(V2)')}

         }

    ]

}
[Response Body]
200:
{

  "FriendlyName": "Data ingress",

  "Id": "<ingestion Id>",

  "ConnectorId": "<connector Id>",

  "Submitter": "System",

  "StartDate": "2023-05-08T19:07:07.4994043Z",

  "Status": "NotStarted",

  "ErrorDetail": null,

  "EndDate": null,

  "Type": "FileIngestion"

}
In case connector is not set:
403: Forbidden
If connector is set but previous ingestion is not complete yet:
400: Bad request: Previous ingestion is not complete.
Poll status
API to poll status for the ingestion, as the ingestion of data is long-running operation.
[GET] https://api.orginsights.viva.office.com/v1.0/scopes/<tenantId>/ingress/connectors/Hr/ingestions/fileIngestion/{ingestionId:guid}
[Response]
200:
{

            "FriendlyName": "Data ingress",

            "Id": "<ingestion Id>",

            "ConnectorId": "<connector Id>",

            "Submitter": "System",

            "StartDate": "2023-05-08T19:05:44.2171692Z",

            		  "Status": "NotStarted/ExtractionComplete/ValidationFailed

/Completed/",

            "ErrorDetail": null,

            "EndDate": "2023-05-08T20:09:18.7301504Z",

            "Type": "FileIngestion"

},
Download error stream if validation fails (issue in data)
[GET] https://api.orginsights.viva.office.com/v1.0/scopes/<tenantId>//Hr/ingestions/{ingestionId}/errors
[Response]
200: File stream with errors, if any.
Option 1: Use the Viva Insights HR data ingress API to build a custom import/export app
You can use the Viva Insights HR data ingress API to build a custom app that automatically exports data from your source system, and then imports it to Viva Insights.
Your app can take any form—for example, a PowerShell script—but it needs to export your source data as a zip folder at the frequency you pick, store the folder in your files, and import that folder into Viva Insights.
Option 2: Import data through our C# solution after exporting data through your custom app
After you’ve exported your source data as a zip folder at the frequency you pick, and stored that folder in your files, you can run the DescriptiveDataUploadApp C# solution on the console. The DescriptiveDataUploadApp C# solution then brings your locally stored data into Viva Insights. Learn more on GitHub.
To run the solution:
Clone this app to your machine by running the following command on the command line:
git clone https://github.com/microsoft/vivainsights_ingressupload.git.Include the following console values. See Prepare, export, and import organizational data for descriptions.
- AppID/ClientID
- Absolute path to the zipped file. Format the path like this:
C:\\Users\\JaneDoe\\OneDrive - Microsoft\\Desktop\\info.zip - Microsoft Entra tenant ID
- Certificate name
Option 3: Run the DescriptiveDataUpload PowerShell solution after exporting data through your custom app
Similar to option 2, after you’ve exported your source data as a zip folder at the frequency you pick, and stored that folder in your files, you can run the DescriptiveDataUpload PowerShell solution on the console. The DescriptiveDataUpload PowerShell solution then brings your locally stored data into Viva Insights. Learn more on GitHub.
Clone the source code to your machine by running this command on the command line:
git clone https://github.com/microsoft/vivainsights_ingressupload.gitOpen a new PowerShell window as an administrator.
In your PowerShell window, run the following command:
Install-Module -Name MSAL.PSOr, go to this PowerShell gallery link for instructions on installation.
Set parameters. See Prepare, export, and import organizational data for descriptions.
ClientIDpathToZippedFileTenantIdnovaScaleUnitingressDataType: HRClientSecretorcertificateName
Option 4: Use our Azure Data Factory (ADF) template to send data to our API-based import
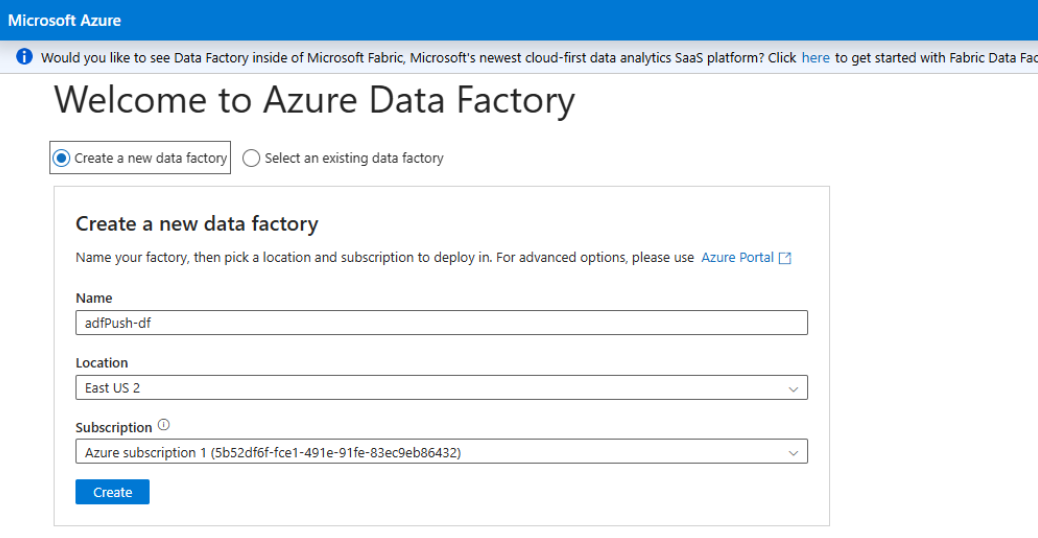
1. Create new Azure Data Factory
Log in to https://adf.azure.com/en/datafactories.
Create a new data factory or use an existing data factory. Complete the fields, then select Create.
2. Create a new pipeline and activity
Create a new pipeline and enter a name for the pipeline.
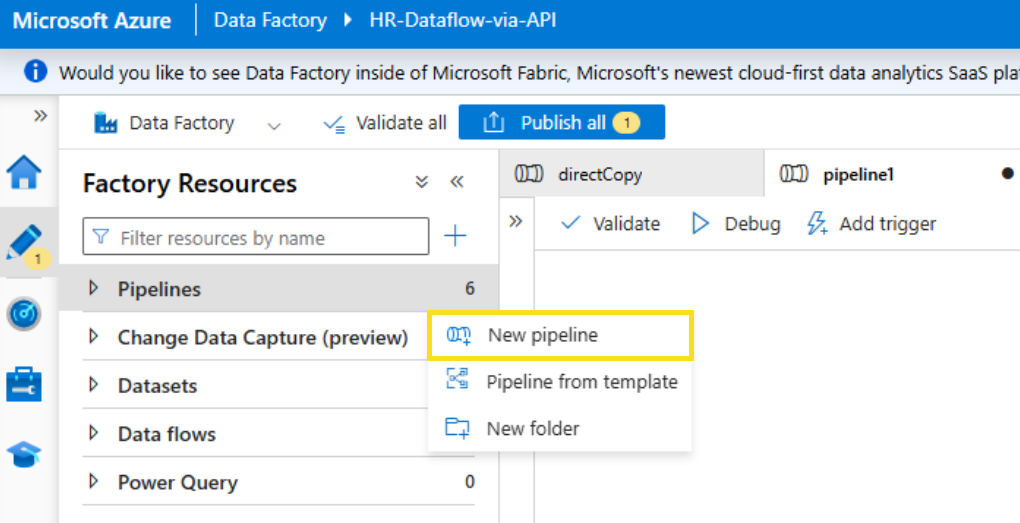
Under Activities, add Copy data.
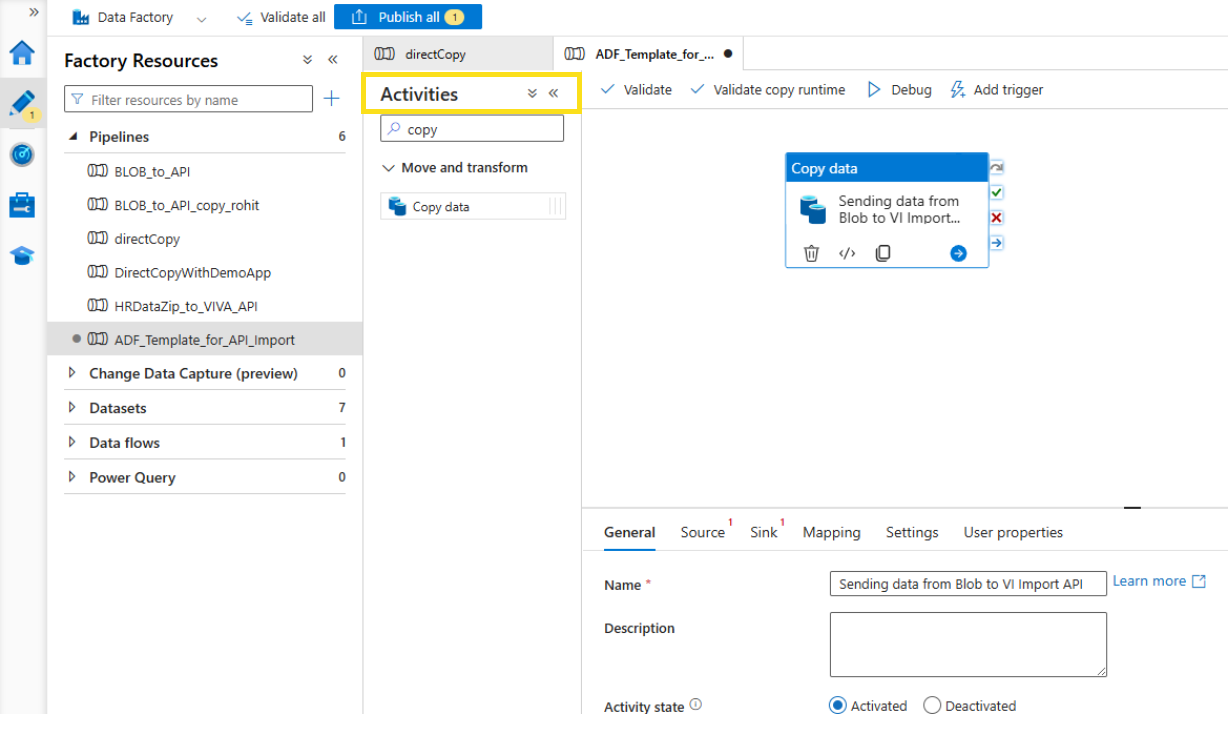
3. Copy data activity settings: General
Select your Copy data activity, then select General to complete each field using the guidance below.
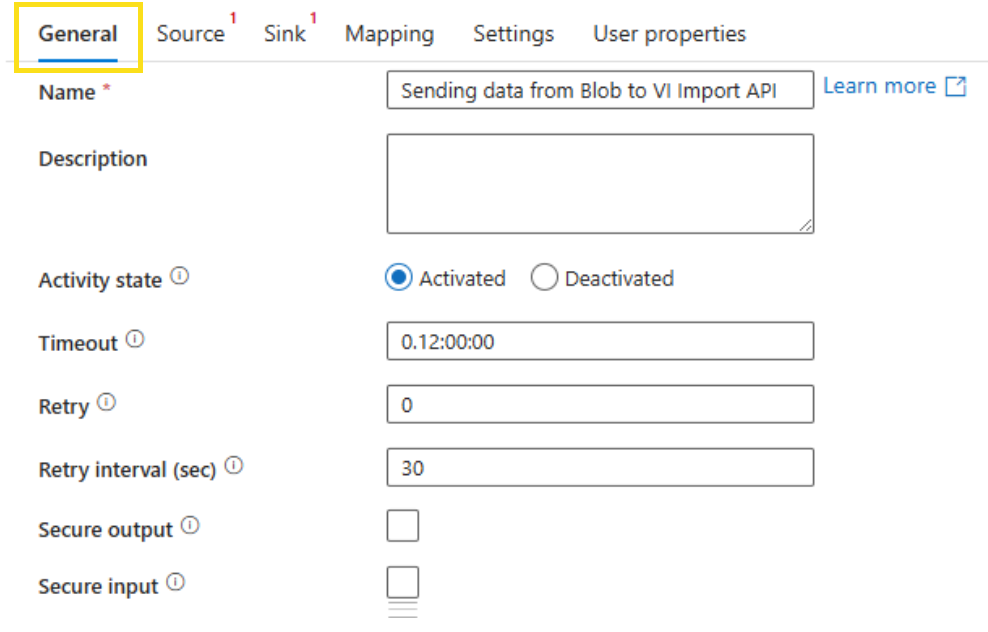
- Name: Enter a name for your activity.
- Description: Enter a description for your activity.
- Activity state: Select Activated. Or select Deactivated to exclude the activity from the pipeline run and validation.
- Timeout: This is the maximum amount of time an activity can run. The default is 12 hours, the minimum is 10 minutes, and the maximum amount of time allowed is seven days. The format is in D.HH:MM:SS.
- Retry: The maximum number of retry attempts. This can be left as 0.
- Retry interval (sec): The maximum number of retry attempts. This can be left as 30 if the retry attempts is set as 0.
- Secure output: When selected, the output from the activity isn't captured in logging. You can leave this cleared.
- Secure input: When selected, the input from the activity isn't captured in logging. You can leave this cleared.
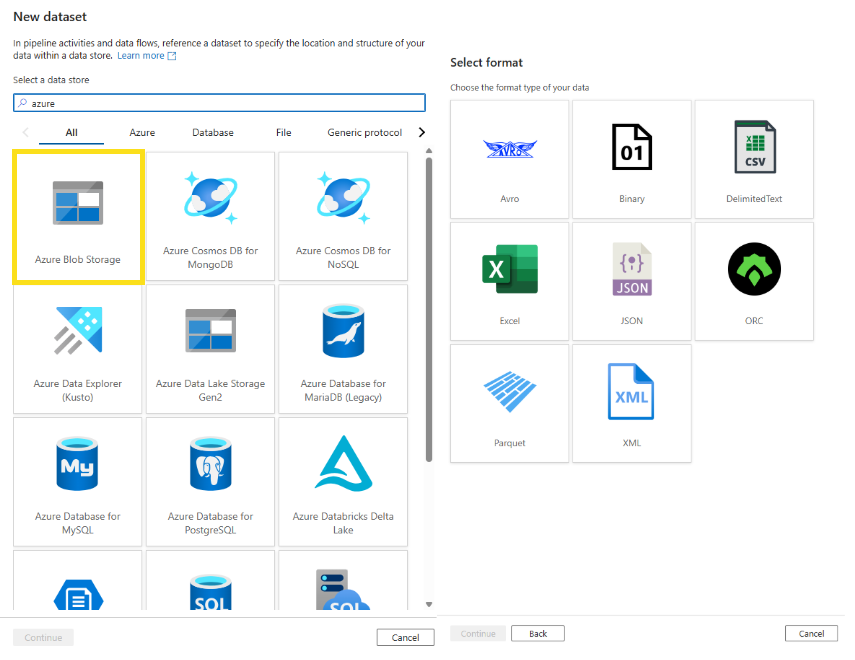
4. Copy data activity settings: Source
Select Source.
Select an existing source dataset or select +New to create a new source dataset. For example, under New dataset select Azure Blob Storage, then select the format type of your data.
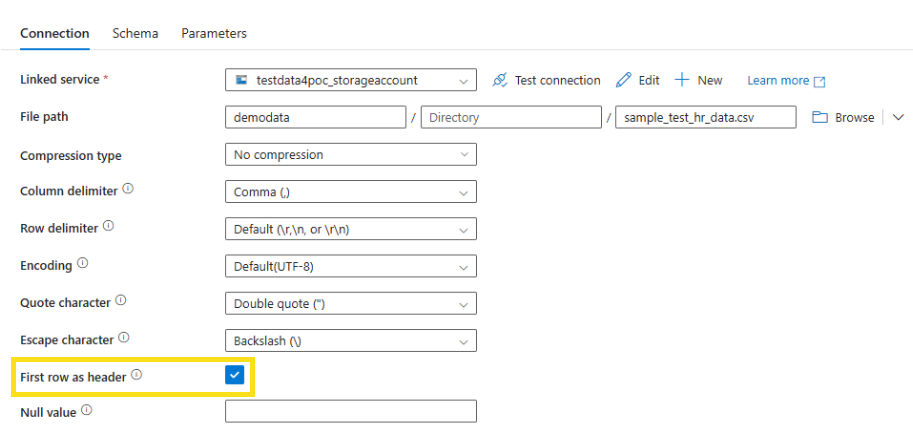
Set the properties for the .csv file. Enter a Name and under Linked service, select an existing location or select +New.
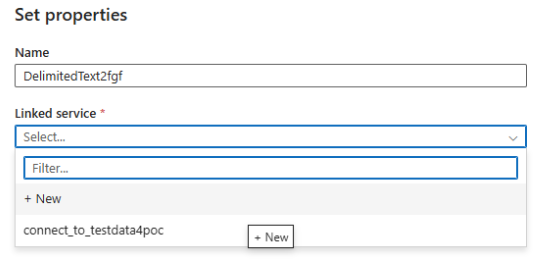
If you selected +New, enter the details for the new linked service using the guidance below.

Next to Source dataset, select Open.
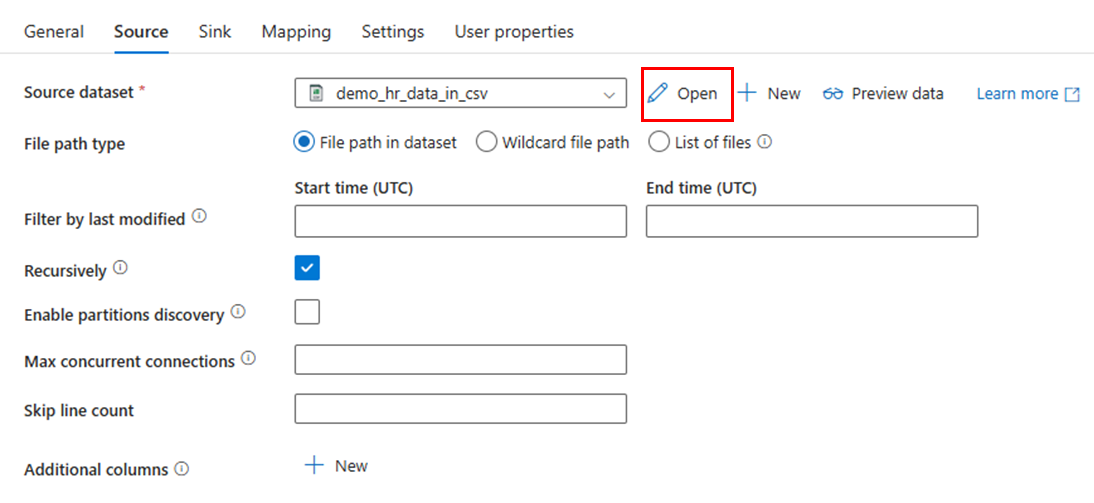
Select First row as header.
5. Copy data activity settings: Sink
Select Sink.
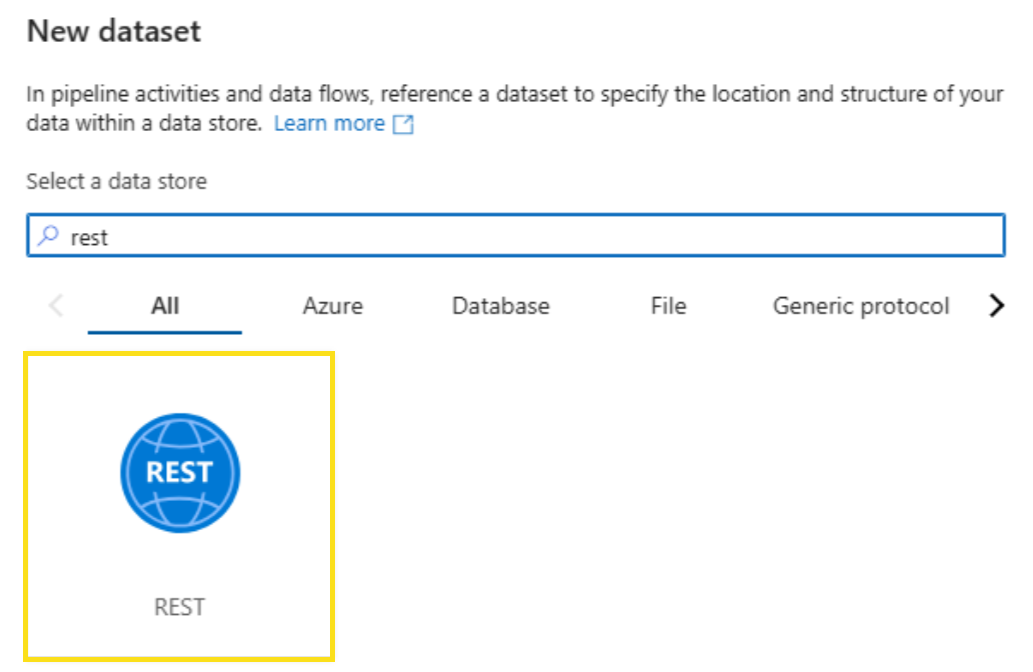
Select +New to configure a new rest resource to connect to the Viva Insights Import API. Search for “Rest” and select Continue.

Name the service. Under Linked service select +New.
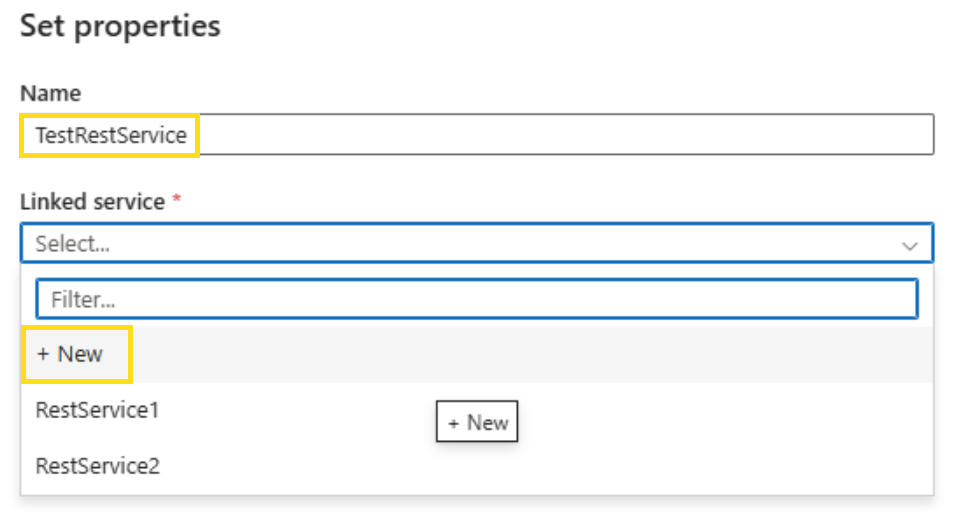
Search for "Rest" and select it.
Enter the fields using the guidance below.

- Name: Enter a name for your new linked service.
- Description: Enter a description to your new linked service.
- Connect via integration runtime: Enter preferred method.
- Base URL: Use the URL below and replace <TENANT_ID> with your tenant ID: https://api.orginsights.viva.office.com/v1.0/tenants/{tenantid}/modis/connectors/HR/ingestions/fileIngestion<TENANT_ID>/ingress/connectors/HR/ingestions/fileIngestion
- Authentication type: Select your authentication type as Service principal, then select Secret or Certificate. Service principal example:
Inline: Select it.
Service principal ID: Enter the App ID authorized for the API connector.
Service principal key: Enter the key.
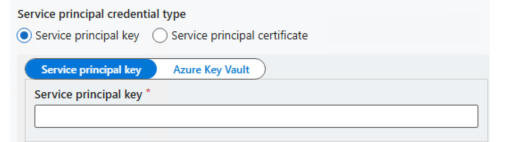
Tenant: Enter the tenant ID.
Microsoft Entra ID resource: https://api.orginsights.viva.office.com
Azure cloud type: Select your Azure cloud type.
Server certificate validation: Select Enabled.
Enter the Sink settings using the guidance below.
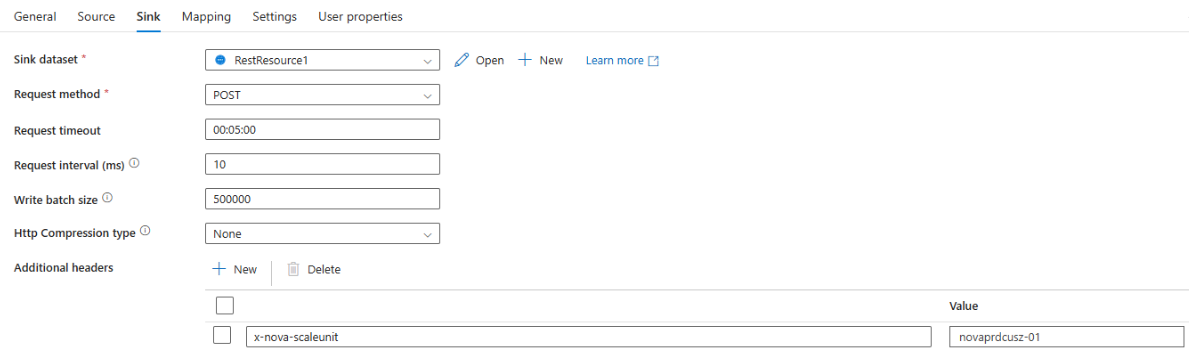
- Sink dataset: Select the existing or newly created dataset.
- Request method: Select POST.
- Request timeout: Five minutes is the default.
- Request interval (ms): 10 is the default.
- Write batch size: The batch size should be higher than the maximum number of lines in your file.
- Http compression type: None is the default. Or you can use GZip.
- Additional headers: Select +New.
- Box 1: x-nova-scaleunit
- Value: The value can be retrieved from Workplace Analytics by navigating to -> Organization data tab -> Select Manage data sources -> Select API-based import.
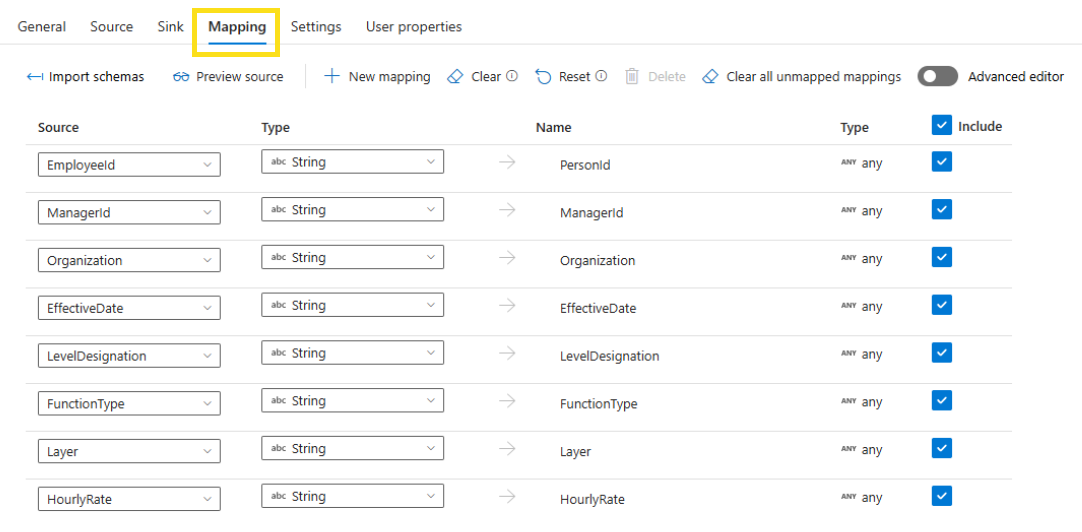
6. Copy data activity settings: Mapping
Select Mapping.
For the bootstrap upload, make sure to include PersonId, ManagerId, and Organization in the mapping (destination name). For the incremental upload, verify that the destination names are consistent with those in the previous upload, along with PersonId. You can't perform incremental uploads with new columns, and PersonId is required in all uploads.
7. Copy data activity settings: Settings and User Properties
No other customizations are required for Settings or User Properties. You can edit these settings on a case-by-case basis if you need to.
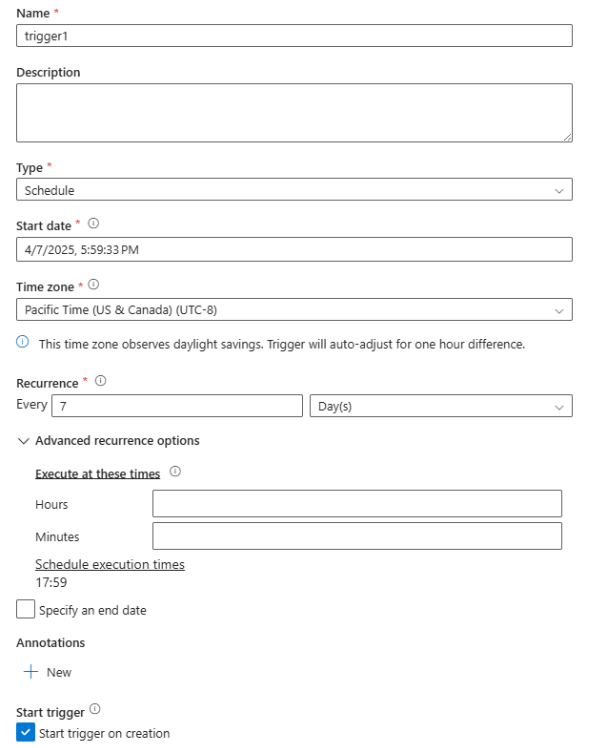
8. Copy data activity: Trigger Setup (Automation)
To add a trigger to the automation setup, select Add trigger. The recommended automation is weekly. You can also customize the frequency.
Validation
After the data source admin sends data, the app starts validating.
After this phase completes, validation has either succeeded or failed. Depending on the outcome, you’ll either receive a success notification or a failure notification in the top-right corner of the Data connections screen.
For information about what happens next, go to the appropriate section:
Validation succeeds
After successful validation, Viva Insights starts processing your new data. Processing can take between a few hours and a day or so. During processing, a "Processing" status appears on the Import history table.
After processing completes, it's either succeeded or failed. Depending on the outcome, you’ll either find a "Success" or "Failed" status in the Import history table.
Processing succeeds
When you find the "Success" status in the Import history table, the upload process is complete.
After you receive the "Success" status, you can:
- Select the view (eye) icon to see a summary of the validation results.
- Select the mapping icon to see the mapping settings for the workflow.
Note
Each tenant can have only one import in progress at a time. You need to complete the workflow of one data file, which means you either guide it to a successful validation and processing or abandon it, before you begin the workflow of the next data file. The status or stage of the upload workflow is shown on the Data connections tab.
Processing fails
If processing fails, a "Processing failed" status appears in the Import history table. For processing to succeed, the data source admin needs to correct errors and push the data to Viva Insights again.
Note
Processing failures are generally due to backend errors. If you’re seeing persistent processing failures and you’ve corrected the data in your imported file, log a support ticket with us.
Validation fails
If data validation fails, a "Validation failed" status appears in the Import history table. For validation to succeed, the data source admin needs to correct errors and push the data to Viva Insights again. Under Actions, select the download icon to download an error log. Send this log to the data source admin so they know what to correct before sending the data again.
The data source admin might find the following section helpful to fix data errors in their export file.
About errors in data
Applies to: data source admin
When any data row or column has an invalid value for any attribute, the entire import fails until the data source admin fixes the source data.
See Prepare organizational data for specific formatting rules that might help resolve errors you encounter.
Learn more about validation errors and warnings.