Create a custom meeting query
Tip
You can download sample results, go through a Show me how explanation and watch a how-to video about meeting queries. Select these options just above Query setup.
Overview
Each of these steps takes place within one section of the advanced insights app's Custom queries > Meeting query page.
Note
If you're an existing Viva Insights customer, refer to the note in the Introduction for more information about using the new platform.
To run a meeting query, you'll follow five basic steps:
- Set up your query.
- Add metrics.
- Add conditions and condition groups.
- Add meeting and organizer attributes.
- Run your query.
In this article, we talk about how to complete each of these steps, and also give some important background information about how metrics, conditions, and attributes work.
Set up your query
Section: Query setup

Under Query setup:
Name your query (optional). Queries are assigned a default name, which follows this format: "Activity," user ID, date, and time. Make sure the name is unique.
Select a Time period (optional). This field defaults to Last 3 months, but you can select another time period you want your query to analyze. Pick from Last 1 year, Last 6 months, Last 1 month, or a Custom date range. If you choose a Custom date range, use the date picker to select the range.
Set the query to automatically update by selecting the Auto-Refresh box (optional). When you select the auto-refresh option, your query automatically runs and computes a new result every day. This option is deselected by default, but you can select it on any query where the Time period isn’t customized.
Optional: Type a Description.
Selecting More Settings beneath the Description box brings you to the More Settings pane. This pane shows the metric rules that apply to your query. To find out more about these rules, select See metric rule details.
Note
Metrics are criteria used to measure the productivity and wellbeing of employees, and metric rules are rules Viva Insights uses to improve the accuracy of your query results.
To learn more about metrics used in Viva Insights, refer to Metric definitions. To learn more about metric rules, refer to Metric rules.
Add metrics
Section: Select metrics for what you want to know about your meetings

Select the Add metrics button to see the Select metrics pane.
Choose the metrics.
When you're done picking metrics, select Add to query. The Add to query button adds these metrics to your query and takes you back to the setup screen. The metrics you selected appear as tags in the box beneath the section description.


About metrics
Metrics are criteria used to measure the productivity and wellbeing of employees. In the case of meeting queries, metrics describe employee wellbeing as related to meetings. For example, if you’re wondering how many chats were sent during meetings, you could use the Number of chats sent during the meeting metric in your query.
You can pick from seven meeting-related metrics, which we've broken into two categories: meeting impact metrics and meeting quality metrics. Here are their names and definitions:
| Category | Name | Definition |
|---|---|---|
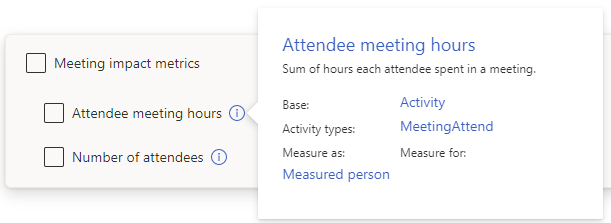
| Meeting impact metrics | Attendee meeting hours | Sum of hours each attendee spent in a meeting |
| Number of attendees | Number of people who attended a meeting | |
| Meeting quality metrics | Number of attendees multitasking | Number of attendees who sent or read emails or Teams chats during a meeting |
| Number of redundant attendees | Number of attendees who are redundant in a meeting, meaning that their manager and their manager's manager also attended | |
| Number of attendees who ended the meeting on time | Number of attendees who left a Teams meeting early or within one minute after the scheduled end time | |
| Number of attendees who didn’t end the meeting on time | Number of attendees who left a Teams meeting after one minute past the scheduled end time | |
| Number of attendees who joined the meeting on time | Number of attendees who joined a Teams meeting early or within five minutes after the scheduled start time | |
| Number of attendees who didn’t join the meeting on time | Number of attendees who joined a Teams meeting after five minutes past the scheduled start time | |
| Number of chats send during the meeting | Number of Teams chats attendees sent during a meeting | |
| Number of emails send during the meeting | Number of emails attendees sent during a meeting |
About the Select metrics pane
In the Select metrics pane, metrics are grouped by the metric categories we just described. Expand the categories to see which metrics they contain. Let’s say you were looking for how many hours attendees spent in meetings. You'd find the Attendee meeting hours metric under the Meeting impact metrics category.
While you're adding meeting query metrics, you can use the search bar at the top of the pane. Enter keywords or related Power BI templates to find the metrics you're looking for.
To learn more about a metric, hover over its information icon.
Add conditions and condition groups
Section: Select which meetings and employees you want to include in the query

Select the Add condition or Add condition group button.
Using conditions and condition groups, add one or multiple filters to narrow your analysis of meetings and employees.
Note
The default conjunction for conditions and condition groups is “and.” To select “or” instead, use the dropdown menu.
To learn more about filters, refer to our Filters article.
Predefined filters
To create conditions and condition groups in meeting queries, you'll pick from 13 predefined filters. 10 of these filters are for meeting attributes, which have to do with the characteristics of the meeting (for example, Duration). Three of these filters are for person attributes, which have to do with people involved in the meeting (for example, Attendees).
If you pick a meeting attribute, an operator (like "=") appears. You fill in either "true" or "false," add a numerical value, or enter a text value.
If you pick a person attribute, you create a filter based on organizational data with the following components:
| Component | Description |
|---|---|
| Aggregation type | All, AtLeastOne, or None |
| Meeting attribute | The attribute you picked from the initial dropdown list |
| Organizational data attribute | An attribute from your company's organizational data |
| Operator | =, !=, >, >=, <, or <=, depending on which organizational data attribute you picked |
| Value | One of a list of predefined choices, based on what your company's organizational data contains |
Note
Organizational data available for you to use in filters depends on what your organization sends to Viva Insights.
Here's a list of all predefined filters, their type, input format, and an example condition statement that uses that filter. All of these filters apply at the meeting level.
| Name | Type | Input | Example statement |
|---|---|---|---|
| Subject | Meeting | Text value | Subject = Design review |
| All Day Meeting | Meeting | True or false | All Day Meeting = true |
| Cancelled | Meeting | True or false | Cancelled = false |
| Recurring | Meeting | True or false | Recurring = true |
| Intended participants | Person | Organizational data attribute and predefined value choices | All Intended participants Profession = Designer |
| Attendees | Person | Organizational data attribute and predefined value choices | AtLeastOne Attendees City = Los Angeles |
| Organizer | Person | Organizational data attribute and predefined value choices | Organization = Marketing |
| Duration | Meeting | Numerical value in the 00:00 format | Duration > 30:00 |
| Accept count | Meeting | Numerical value | Accept count >= 10 |
| No response count | Meeting | Numerical value | No response count < 5 |
| Decline count | Meeting | Numerical value | Decline count != 0 |
| Tentatively accepted count | Meeting | Numerical value | Tentatively accepted count <= 20 |
| Intended participant count | Meeting | Numerical value | Intended participant count > 100 |
Note
Attendees are all the actual participants (anyone who joined on Teams) of a meeting, plus the organizer. Intended participants are all of the meeting's invitees, plus the organizer.
To move and delete conditions and condition groups
To move a condition or condition group, take the following actions:
- Select the six-dot icon to the right.
- Drag the six-dot icon above or below other conditions or groups.
To delete a condition or condition group, select the trashcan icon to the right.

Tip
Learn more about conditions, condition groups, and filters in our filters documentation.
Add meeting and organizer attributes
Section: Select which meeting and employee attributes of the meeting organizer you want to include in the query
Select the Select attributes button, then on the right pane, use the checklist to make selections.
When you're done picking attributes, select the Add to query button.
Attributes appear as tags in the box above the Select attributes button.
About meeting and organizer attributes
Meeting and organizer attributes are the data fields—or columns—that appear in your query output. These attributes are broken up into two categories: the first is about the meeting itself (for example, Sensitivity, Duration, Importance), and the second is about the meeting organizer—that is, attributes from the organizational data you've uploaded to Viva Insights.
In Select which meeting and employee attributes of the meeting organizer you want to include in the query, you narrow down which data fields your query includes—for example, Recurring (a meeting attribute) or TimeZone (an organizer attribute)—to prevent your output (.csv) file from being larger than necessary. Making selections here:
- Improves data analysis with fewer columns in a smaller file.
- Further protects private data by excluding columns from the file.
- Enables you to select Clear all to clear the selected columns.
Attribute errors and warnings
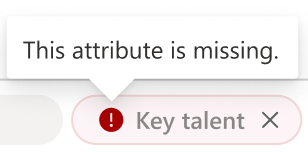
If an attribute appears as a red tag, that attribute might have been removed or renamed. You might see red tags if you’re cloning or editing a query and the attributes have changed since the query was last run. You can remove these marked attributes to get the query to run, or contact your admin to add these attributes back into the organizational data.
If an attribute appears as a yellow tag with a warning icon, the attribute isn't available. If you find a yellow tag on an attribute like "Subject" or "Title," email subject lines and meeting titles might be suppressed in your organization. Your admin can turn on keywords if your organization wants to use them.

Run the query
Select the Run button in the screen’s upper right to run the query.
To access your query results
After your query runs, access its results in the Query results page. On the Query results page, you can also edit and clone your query. For further information, refer to Access query results and modify existing queries.
Here's a sample of how a .csv meeting query output looks:

Example meeting query
Let’s say you wanted to run a meeting query to find out how often attendees are multitasking during large, recurring meetings, here’s how you might do that:
Set up your query.
- Query name: Give your query a custom name by typing in something like “Multitasking in large meetings.”
- Time period: Select "Last 6 months".
- Auto-Refresh: You just want to have this run once, so leave the Auto-Refresh box deselected.
- Description: Other analysts in your organization might want to know more about this query, so give it a brief description.
Add metrics.
- Under Select metrics for what you want to know about your meetings, select the Add metrics button.
- You want to know how many hours attendees spend in these meetings, so select "Attendee meeting hours" from the Meeting impact metrics category.
- You want to know how many attendees are multitasking, so select "Number of attendees multitasking" from the Meeting quality metrics category.
- When you're done picking metrics, select the Add to query button. Your metrics appear as tags back in the query editor.
Specify the meetings and employees you want to analyze.
Under Select which meetings employees you want to include in the query, select Add condition.
Because you want this query to analyze large meetings (which your company defines as having 20 or more participants), you select Intended participant count from the Meeting attribute dropdown menu, set the Operator to ">=", and enter "20" for the Value.
Because you want to analyze recurring meetings, add a new condition, then set Meeting attribute to "Recurring", leave the Operator at "=", and leave the Value at "true".

Choose the meeting and employee attributes you want to include in your output file.
- Under Select which meeting and employee attributes you want to include in the query, select the Select attributes button.
- Because you want to know how big each meeting is, select Participant count from the right pane, under the Meetings category.
- You also want to know how many multitaskers are supervisors. In the organizational data you upload to Viva Insights, you include an indicator of whether someone is a supervisor. Select that attribute under the Organizational data button.
- Select the Add to query button.
Select the Run button on the upper right of the screen to run the query.
After the query successfully runs, find the results on the Query results page. You can take these actions from the Query results page:
- Download the .csv output file: Select the CSV icon from the Downloads column. If you want to connect the query to another file, like a Power BI visualization, you can select the copy link icon.
- Edit, Edit query name, Clone, Favorite, or Delete the query: Select the ellipses to the right of the Downloads column, then select the appropriate choice.
Caution
Editing queries overwrites existing results. If you want to keep your query’s results, use the Clone feature—which creates an identical copy of the query—instead.
Note
Only the analyst who originally ran the query can Edit query name, Edit, or Delete the query. Other analysts in the organization can View, Clone, and Favorite the query.

Related topics
Feedback
Coming soon: Throughout 2024 we will be phasing out GitHub Issues as the feedback mechanism for content and replacing it with a new feedback system. For more information see: https://aka.ms/ContentUserFeedback.
Submit and view feedback for