Upgrade to Synapse Analytics
Your current Azure Templates have been using Workplace Analytics data that's been exported and running on Azure Databricks for computations. To improve usability and reduce costs, you can upgrade from Databricks to Azure Synapse Analytics.
Prerequisites
- Azure admin - Must be an admin of the Azure subscription or you cannot complete the upgrade.
- SAS token for file download - You should've received an email from Microsoft with the SAS token for this upgrade. If you did not receive an email with it, ask your Microsoft representative for it.
- App Registrations access - Confirm you can access the Microsoft Entra ID “App Registrations” in the Azure portal for your current Azure Templates installation for both the “UI” and the “API," including the IDs for the services being upgraded.
- Microsoft Entra service access - Confirm you have access in the Azure portal, including the Tenant ID.
- Resource Groups access - Confirm you access in the Azure portal, including the names and Subscription IDs.
- Azure Template service names - Confirm you have the names of the current Azure Template services in the Azure portal, including the storage account, UI or UX app service, API app service, and the key vault names.
- Key vault secrets access – Confirm you can view and modify the Key vault secrets because the scripts must be able to modify some of the key vault secrets. If you don’t have access, the scripts will fail with permission errors.
Open Azure Cloud Shell
Log in to the Azure Portal, and open Azure Cloud Shell as described in Overview of Azure Cloud Shell.
Note
If this is your first time running Azure Cloud Shell, you will need to select the subscription storage before you are allowed to use Cloud Shell.
Download the scripts
Download the SasToken.zip file that was emailed to you by your Microsoft Representative.
Unzip the SasToken.zip file to access its contents: SasToken.txt.
Open the SasToken.txt file using Notepad or preferred text editor.
Copy the full first line beginning with $sasUri. Below is an example value, but please use the value that was provided to you by your Microsoft representative:
$sasUri = “https://wpaappsprodtest1.blob.core.windows.net/tmpexternal/AztScripts_20211011.zip?sv=2020-08-04&ss=bfqt&srt=o&sp=rwdlacupitfx&se=2022-02-22T04:16:23Z&st=2022-02-14T20:16:23Z&spr=https&sig=K6fCajAhRpHPm%2FlTdrTdFc0fXfYHLNDKF4zvbBXYAOE%3D%22”Paste the full value, beginning with $sasUri and ending after the second quotation marks, into the Cloud Shell command line, and then press Enter.
Return to the SasToken.txt file in Notepad, and copy the second value beginning with $sasUriParams. Below is an example value, but please use the value that was provided to you by your Microsoft representative:
$sasUriParams = “https://wpaappsprodtest1.blob.core.windows.net/tmpexternal/UpdateParams.ps1?sv=2020-08-04&ss=bfqt&srt=o&sp=rwdlacupitfx&se=2022-02-22T04:16:23Z&st=2022-02-14T20:16:23Z&spr=https&sig=K6fCajAhRpHPm%2FlTdrTdFc0fXfYHLNDKF4zvbBXYAOE%3D%22”Paste the full value, beginning with $sasUriParams and ending after the second quotation marks, into the Cloud Shell command line, and then press Enter.
In the Cloud Shell command line, run the following to download the Scripts .zip file:
Invoke-WebRequest -Uri $sasUri -outfile ./aztScriptsCloudShell.zipRun the following to unzip the Scripts Archive:
Expand-Archive -LiteralPath ./aztScriptsCloudShell.zip -DestinationPath ./ -ForceRun
dirto list the directories in the current folder, and confirm that the AztScripts_20211011 directory is listed: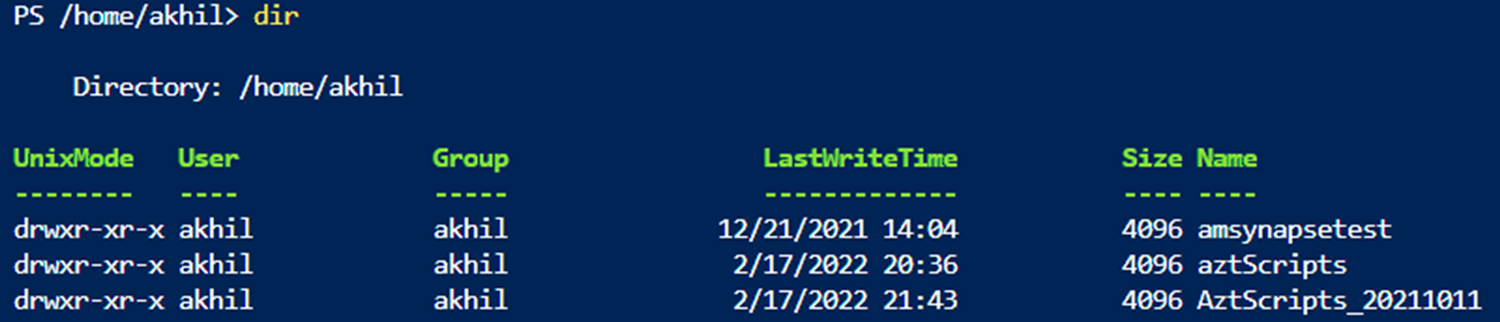
To set up the Params file, run the following to copy the template-all-param.txt file that you just downloaded and rename it to azt-param.txt, which will later be used by UpdateParams.ps1:
Copy-Item ./AztScripts_20211011/template-all-param.txt ./AztScripts_20211011/azt-param.txtRun the following command to access the UpdateParams.ps1 script:
Invoke-WebRequest -Uri $sasUriParams -outfile ./UpdateParams.ps1Run the following command to create a copy of this file within the AztScripts_20211011 directory, where modifications will be made:
copy ./UpdateParams.ps1 ./AztScripts_20211011Select the editor ({}) icon to open the Cloud Shell editor.
In the left pane, expand the AztScripts_20211011 file folder, and then locate and open the UpdateParams.ps1 file:
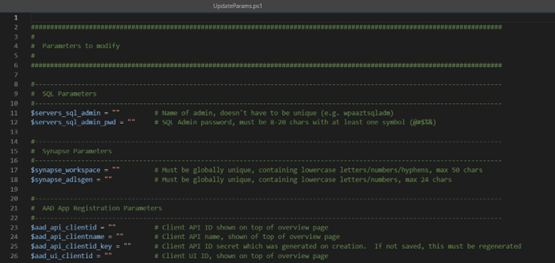
You'll need to enter the parameters that are specific to your environment, as described in the following section before you can complete the upgrade.
Script parameters
The following describes what you must enter within each section of the UpdateParams.ps1 file for this upgrade process.
SQL Server
- servers_sql_admin: Does not have to be unique. You can use “wpaaztsqladm” or whatever you prefer.
- servers_sql_admin_pwd: Must be 8 to 20 characters in length and include at least one symbol (@#$%&).
Synapse
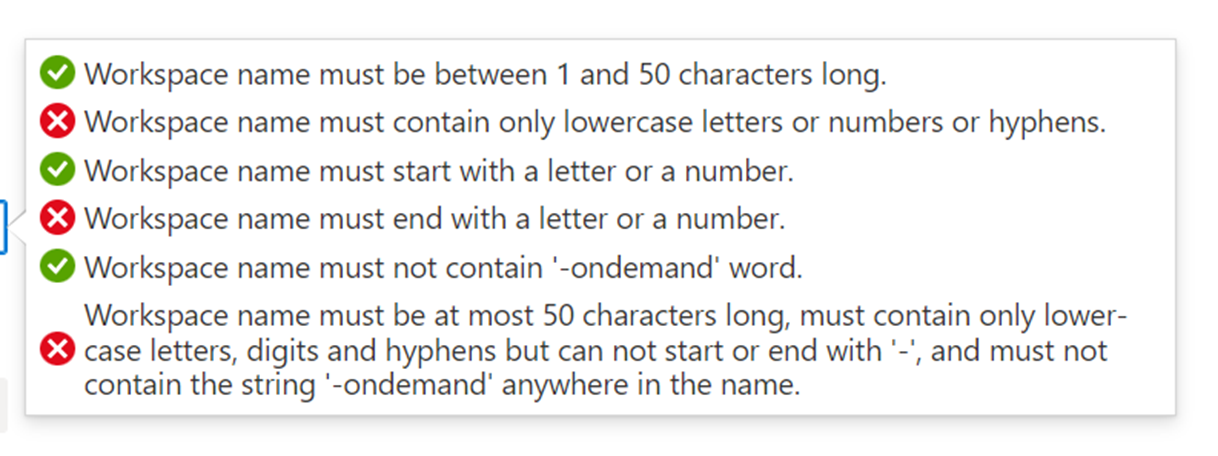
synapse_workspace: Must be globally unique. Something on-brand works best because no one else can use this name for their service. The following shows the rules for the name:
synapse_adlsgen: Must also be globally unique (no one else can use this name for their service), between 3 and 24 characters with only lowercase letters and numbers (no capital letters, special characters, or spaces).
Microsoft Entra application registrations
The following are shown in the API’s App Registration in Azure for your current Azure Template setup:
- aad_api_clientid: On the Overview page as Application (client) ID.
- aad_api_clientname: Also, at the top left of the Overview page, it's shown as the name of the App Registration.
- aad_api_clientid_key: Within the left navigation, under Certificates & Secrets, you'll see a listing of valid (and invalid) keys. However, you can only see the first three characters of the key in this list. The full key is only shown when it is created. You'll need to ask your Azure admin for the full key or ask for a new one.
The following is shown in the App Registration UI in Azure for your current Azure Templates setup"
- aad_ui_clientid: Shown on the Overview page as Application (client) ID.
Dest storage
- storageAccounts_name: Name of your current storage account for your current installation of Azure Templates (current Resource Group, which you should only have one of).
UX app service
- sites_web_name: Name of your current app service deployed for the UI (or UX) of your current installation of Azure Templates.
API app service
- sites_api_name: Name of your current App service deployed for the API of your current installation of Azure Templates.
General
- azure_tenantid: “Tenant ID” from the overview page of your Microsoft Entra service for your current Azure Templates installation.
- azure_subsscriptionid: “Subscription ID” from the overview page of your Resource Group for the current Azure Templates installation.
- resource_group_name: Name of your Resource Group for the current Azure Templates installation.
- azure_region: “Location” from the overview page of your Resource Group for the current Azure Templates installation and remove the spaces and make all lowercase (e.g., “East US” will be entered as “eastus”).
Keyvault
- vaults_kv_name: Name of your current key vault used by your current installation of Azure Templates.
Source storage
- src_storageAccount: The container that you downloaded in the zip file with a value of wpaappsprodtest1.
- src_sasToken: Return to the SasToken.txt file open in Notepad, and copy the last line of the file beginning with “?sv= and ending with the closing quotation marks. When you place this value into the UpdateParams.ps1 file, be sure to only include one set of starting and ending quotation marks.
Linkage account details
- synapse_linkedServiceName: Whatever you prefer, something on-brand that you can remember is best.
- synapse_linkedServiceAccntName: Should be the same as what you named the synapse_linkedServiceName.
- synapse_node_size: This parameter depends on the size of the data to process. This must be set to a larger size than the following synapse_executor_size parameter or an exception error will occur. The default value is Medium.
- synapse_executor_size: This must not exceed the synapse_node_size parameter or an exception error will occur. The default value is Small.
Important
Be sure to save the UpdateParams.ps1 file after entering the required parameters described in this section. If the synapse_executor_size is set larger than the synapse_node_size, it'll cause an exception error.
Run the scripts
After you've entered the correct parameters in the UpdateParams.ps1 file, you can run the scripts.
In Cloud Shell, run the following to open the folder:
cd ./AztScripts_20211011Run the following to use the parameters completed in the previous section:
./UpdateParams.ps1Run the following to create the Synapse workspace with permissions and a Spark pool cluster, which then links a Gen2 storage account to them:
./2m-azuresynapseworkspaceandlinkage.ps1Run the following to add the packages (Requirements7.txt) to the Spark pool cluster and link to the Blob storage:
./2m-azuresynapsepackage.ps1Run the following to update the existing SQL environment:
./2m-azuresynapsesql-code.ps1Run the following to import the Integration dataset:
./2m-azuresynapseintegrationdataset.ps1After the ONA job successfully completes, it zips it into ONA_Results_zip, and then the ONA_Results_pipeline is created. Now run the following to import the Notebooks from the storage account into the Synapse workspace:
./2m-azuresynapsenotebookcreation-code.ps1Run the following to create the Pipelines based on JSON script, and then import them into Synapse workspace:
./2m-azuresynapsepipelinecreation.ps1The Pipelines are based off the kind of job being completed, such as Organizational Network Analysis or Relationship Intelligence. Now run the following to add the Key Vault Secrets for the Synapse workspace:
./2m-azuresynapsekeyvault.ps1Run the following to add permissions to the Storage account:
Connect-AzureADThen run the following to add permissions to access the storage account from the Synapse workspace:
./2m-azuresynapsepermissions.ps1Note
During this step, you can ignore the warnings about “InvalidOperation: Expression after ‘&’” and “InvalidOperation: Cannot index into null array."
Deploying the UI and API
Run the following in Cloud Shell, which uses Zip Deploy to install the build for the web app on the server:
./2e-appservice-code.ps1
After completing this upgrade process, the API will now facilitate calls only to Azure Synapse pipelines, which is consistent with the current Synapse solution.