Note
Access to this page requires authorization. You can try signing in or changing directories.
Access to this page requires authorization. You can try changing directories.
An integration system user (ISU) account is required for Microsoft Viva Learning to access your Workday tenant. You can create an ISU from the Workday portal. ISU also requires relevant security group access with permission to access Workday Learning Web Services and learning catalog.
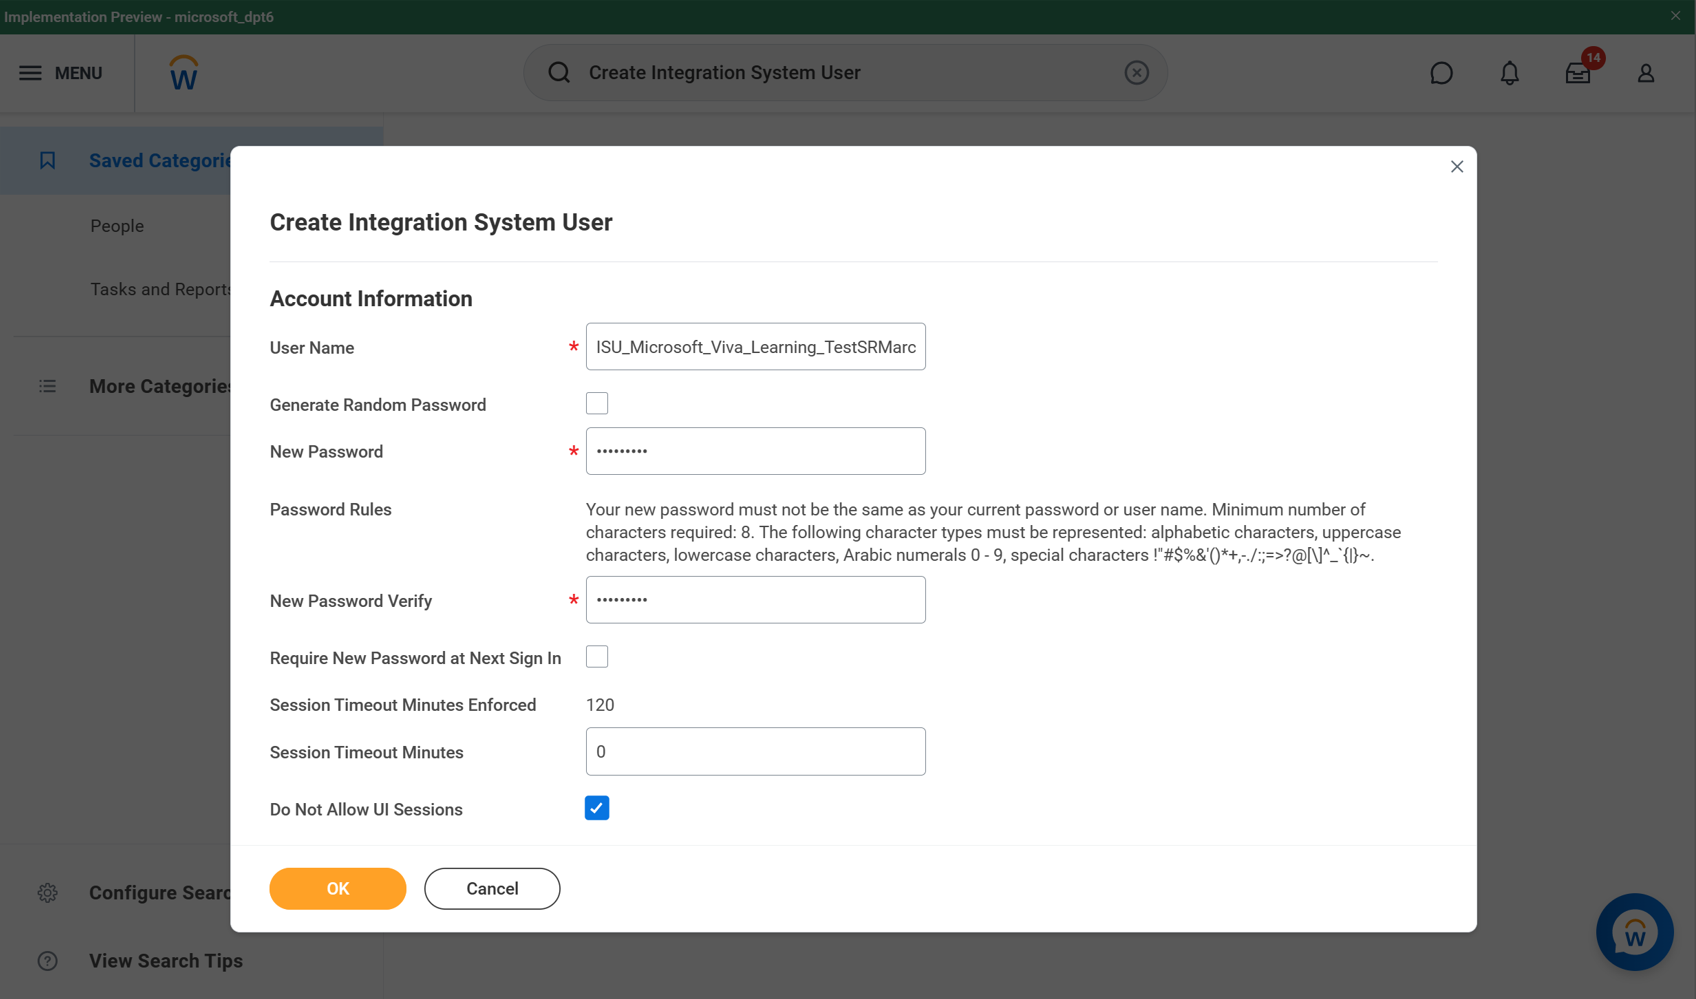
Access the Create Integration System User task. Workday automatically sets the value of Session Timeout Minutes to zero to prevent the integration system user session from expiring. Expired sessions can cause the integration to stop before it successfully completes.
Create a username and password. Workday recommends using ISU_Microsoft_Viva_Learning for the username. Note: The username can be customized.
Access the Create Security Group task and select Integration System Security Group (Unconstrained).
Provide a group name. Workday recommends using ISU_Microsoft_Viva_Learning. It doesn’t need to be the same as the ISU name.

Link your group to the integration system user. This lets Workday assign the integration system user as part of the Microsoft Viva Learning security group.

You need these domains in the Integration and System functional areas: Integration Security, security Configuration. Access the Maintain Permissions for Security Group task to update domain security policies.

In Domain Security Policy Permission, add Get Only access to the following domain security policies.
Domain security policy Description Reports: Learning Record This domain provides access to reports that display data related to the learning record. This permission is required for accessing RaaS report for Assignment and completion sync. Manage: Learning Content This domain provides access to certain administrative tasks to manage learning content. This permission is required for accessing RaaS report for catalog sync. Worker Data: Active and Terminated Workers This domain provides access to reporting fields and data sources that include terminated workers. This domain policy is required for certain fields (Firstname, lastname, email address, ID) in User RaaS report. Worker Data: Current staffing information Provides information on workers' current information such as status, length of service, seniority. Includes web services. This domain policy is required for certain fields (Worker is Terminated) in User RaaS report. Workday Accounts This domain provides access to the management of Workday Accounts. This domain policy is required for certain fields (username) in User RaaS report. 
Run the Activate Pending Security Policy Changes task.
Advance security: These are optional steps for advance security access on ISU.
Optional: Set up course-segmented security on Workday portal: You can configure which learning content displays in Viva Learning by restricting the integration system user's access by using segmented security. You can segment security based on security categories or topics.
Access the Create Learning Security Category task or the Create Learning Topic task. Create security segments or topics to restrict access and add these to your learning content. You need the Learning Segment Setup domain in the System functional area.
Select the Inactive checkbox if you want to disable permissions for members of the security group. You can't inactivate the security group when you:
- Grant the security group permission to the Security Configuration domain.
- Include the security group as a member of another security group.
- Specify the security group as an administrator for another security group.
From the Security Groups prompt, select security groups to identify who has permission to access the securable content.
From the Access to Segments prompt, select security segments that you want members of the specified security groups to be able to access. Workday-owned security groups include:
- Job Application - Contingent Worker
- Job Application – Employee
- Job Application – External
You can't combine different types of security segments in a segment-based security group.
Example scenario: You want a Benefits Administrator to be able to manage only benefits-related documents. You don't want them to be able to manage payroll-related documents. Workday secures access to manage all worker documents to the Worker Data: Add Worker Documents and Worker Data: Edit and Delete Worker Documents domains.
You can create Document Categories - Benefits segment to identify benefits-related documents. You can then use the security segment to create a segment-based security group so Benefits Administrators can access only the benefits-related documents.
Next steps: Users with access to a domain through both a segment-based and a non-segment-based security group have permission to access all segments. Make sure you associate non-segment-based security groups with users who have permission to access all segments by:
- Reviewing all security groups on the policy before adding segment-based security groups.
- Reviewing the included security groups in an aggregation security group.
To provide security permissions:
- Add the security group to security policies.
- Activate pending security policy changes.
- Activate the security group when you want to enable the permissions on an inactive security group.
Optional: Edit domain security policies on Workday portal. You can configure which security groups have permission to access the secured items in a domain. You need the Security Configuration domain in the System functional area.
- Access the Domain Security Policies for Functional Area report.
- Select a security policy.
- Select Edit Permissions.
- Select the View or Modify checkbox to grant the security groups access to the report or task securable items.
- Select the Get or Put checkbox to grant the security groups access to integration and report or task securable actions.
Activate pending security policy changes on Workday portal.
Create an active timestamp using the Activate Pending Security Policy Changes task. Security policy changes made since the previous active timestamp take effect immediately. The active timestamp now reflects the current time, regardless of pending changes. You can run these reports to view a detailed list of the security policy changes you’re activating: Domain security policies with pending changes, Business process security policies with pending changes.
- Access the Activate Pending Security Policy Changes task.
- Describe your changes in the Comment field.
- Check the Confirm checkbox to activate your changes.
- You can use the View All Security Timestamps report to roll back to a previous timestamp.


