Note
Access to this page requires authorization. You can try signing in or changing directories.
Access to this page requires authorization. You can try changing directories.
This article consists of steps required for enabling catalog, user, assignment, and completion data sync in Workday and Viva Learning integration. Admins are required to create a custom RaaS report on the Workday portal. After you create the integration system user for Workday portal and provide all security access, follow these steps to create the required RaaS reports.
Note
All RaaS reports (catalog, user data, LRS) should be created from same user account or a single user should be given report ownership at Workday portal. This username should be inserted under Reporting URL attribute in Viva Learning Manage Provider. Review this example: https://wd2-impl-services1.workday.com/ccx/service/customreport2/microsoft_dpt6/username/Viva_Learning_Catalog_Report.
Note
Admins need to create a custom report manually. This is a one time process. We're only supporting the report structure mentioned in this support article. We don't recommend any other changes in the reports.
- Ensure that the Workday to AAD user sync is in place for your tenant.
- Enable inbound user provisioning with Workday to ensure that all users in Workday are synced to Microsoft Entra ID.
- If you're already a Microsoft 365 customer, Workday to Microsoft Entra user sync should be in place for your tenant.
Check with your organization admins for details around same. Otherwise, you can refer to the steps mentioned here to enable the provisioning. Tutorial: Configure Workday for automatic user provisioning with on-premises Active Directory
Important
Verify that XML alias for the report field names, filter names, and prompt names match precisely with the support documentation after creating the report.
Create RaaS report on the Workday portal for catalog sync
This report should be created from the primary Admin account of Workday to avoid any privacy and security related concerns. Currently we're syncing historic and present assignments.
Sign in to the Workday Portal.
- Sign in to Workday Portal.
- Search for the task "Create Custom Report."
Configure the report parameters.
- Title the Report Name as
Viva Learning Catalog Report. The report name must exactly match this string. - Set the Report Type as "Advanced."
- Mark checkbox "Enable as Web service."
- Mark checkbox “Optimized for performance.”
- In the "Data Source" field, go to "All" and select "Learning content." Select OK.
- Title the Report Name as
Add report fields.
- Once you select OK, Data Source has "Learning Content" as a value. Remove any existing value in the Data Source Filter field and add "Manageable Learning Content".
- Add the fields in "Columns" as outlined in the following schema. You see three objects for field "rating"; select the one with a hash (#) icon next to it.
Important
These column values are case sensitive.
Business object Field Column heading override Column heading override XML alias Learning Content Workday ID LearningObjectId LearningObjectId Learning Content Title Title Title Learning Content Description Description Description Learning Content Link to Learning Content DeepLinkUrl DeepLinkUrl Learning Content Duration in Minutes Duration Duration Learning Content Inactive Status Inactive Inactive Learning Content Learning Content Type ContentType ContentType Learning Content Content Provider ContentProvider ContentProvider Learning Content Exclude from Search and Browse IsNonSearchable IsNonSearchable Learning Content Rating Rating Rating Learning Content Skill Level DifficultyLevel DifficultyLevel Learning Content Topic Topics Topics Learning Content Skills Skills Skills Learning Content Third Party Content Thumbnail Image URL ExternalImageURL ExternalImageURL Language User Language Code Locale Locale Learning Content Last Updated LastUpdated LastUpdated 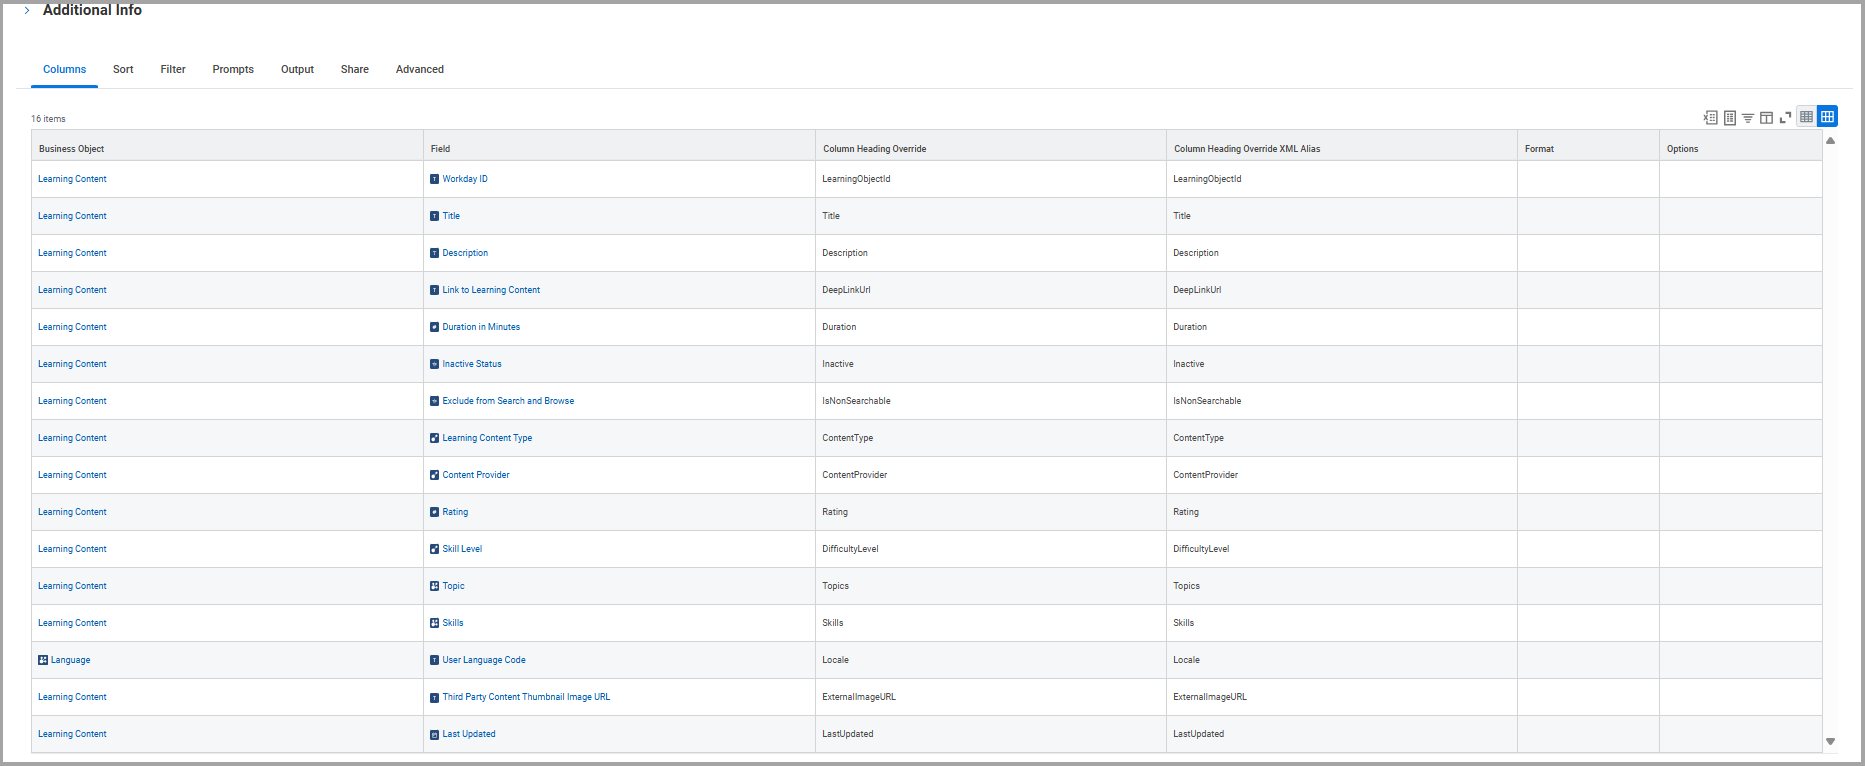
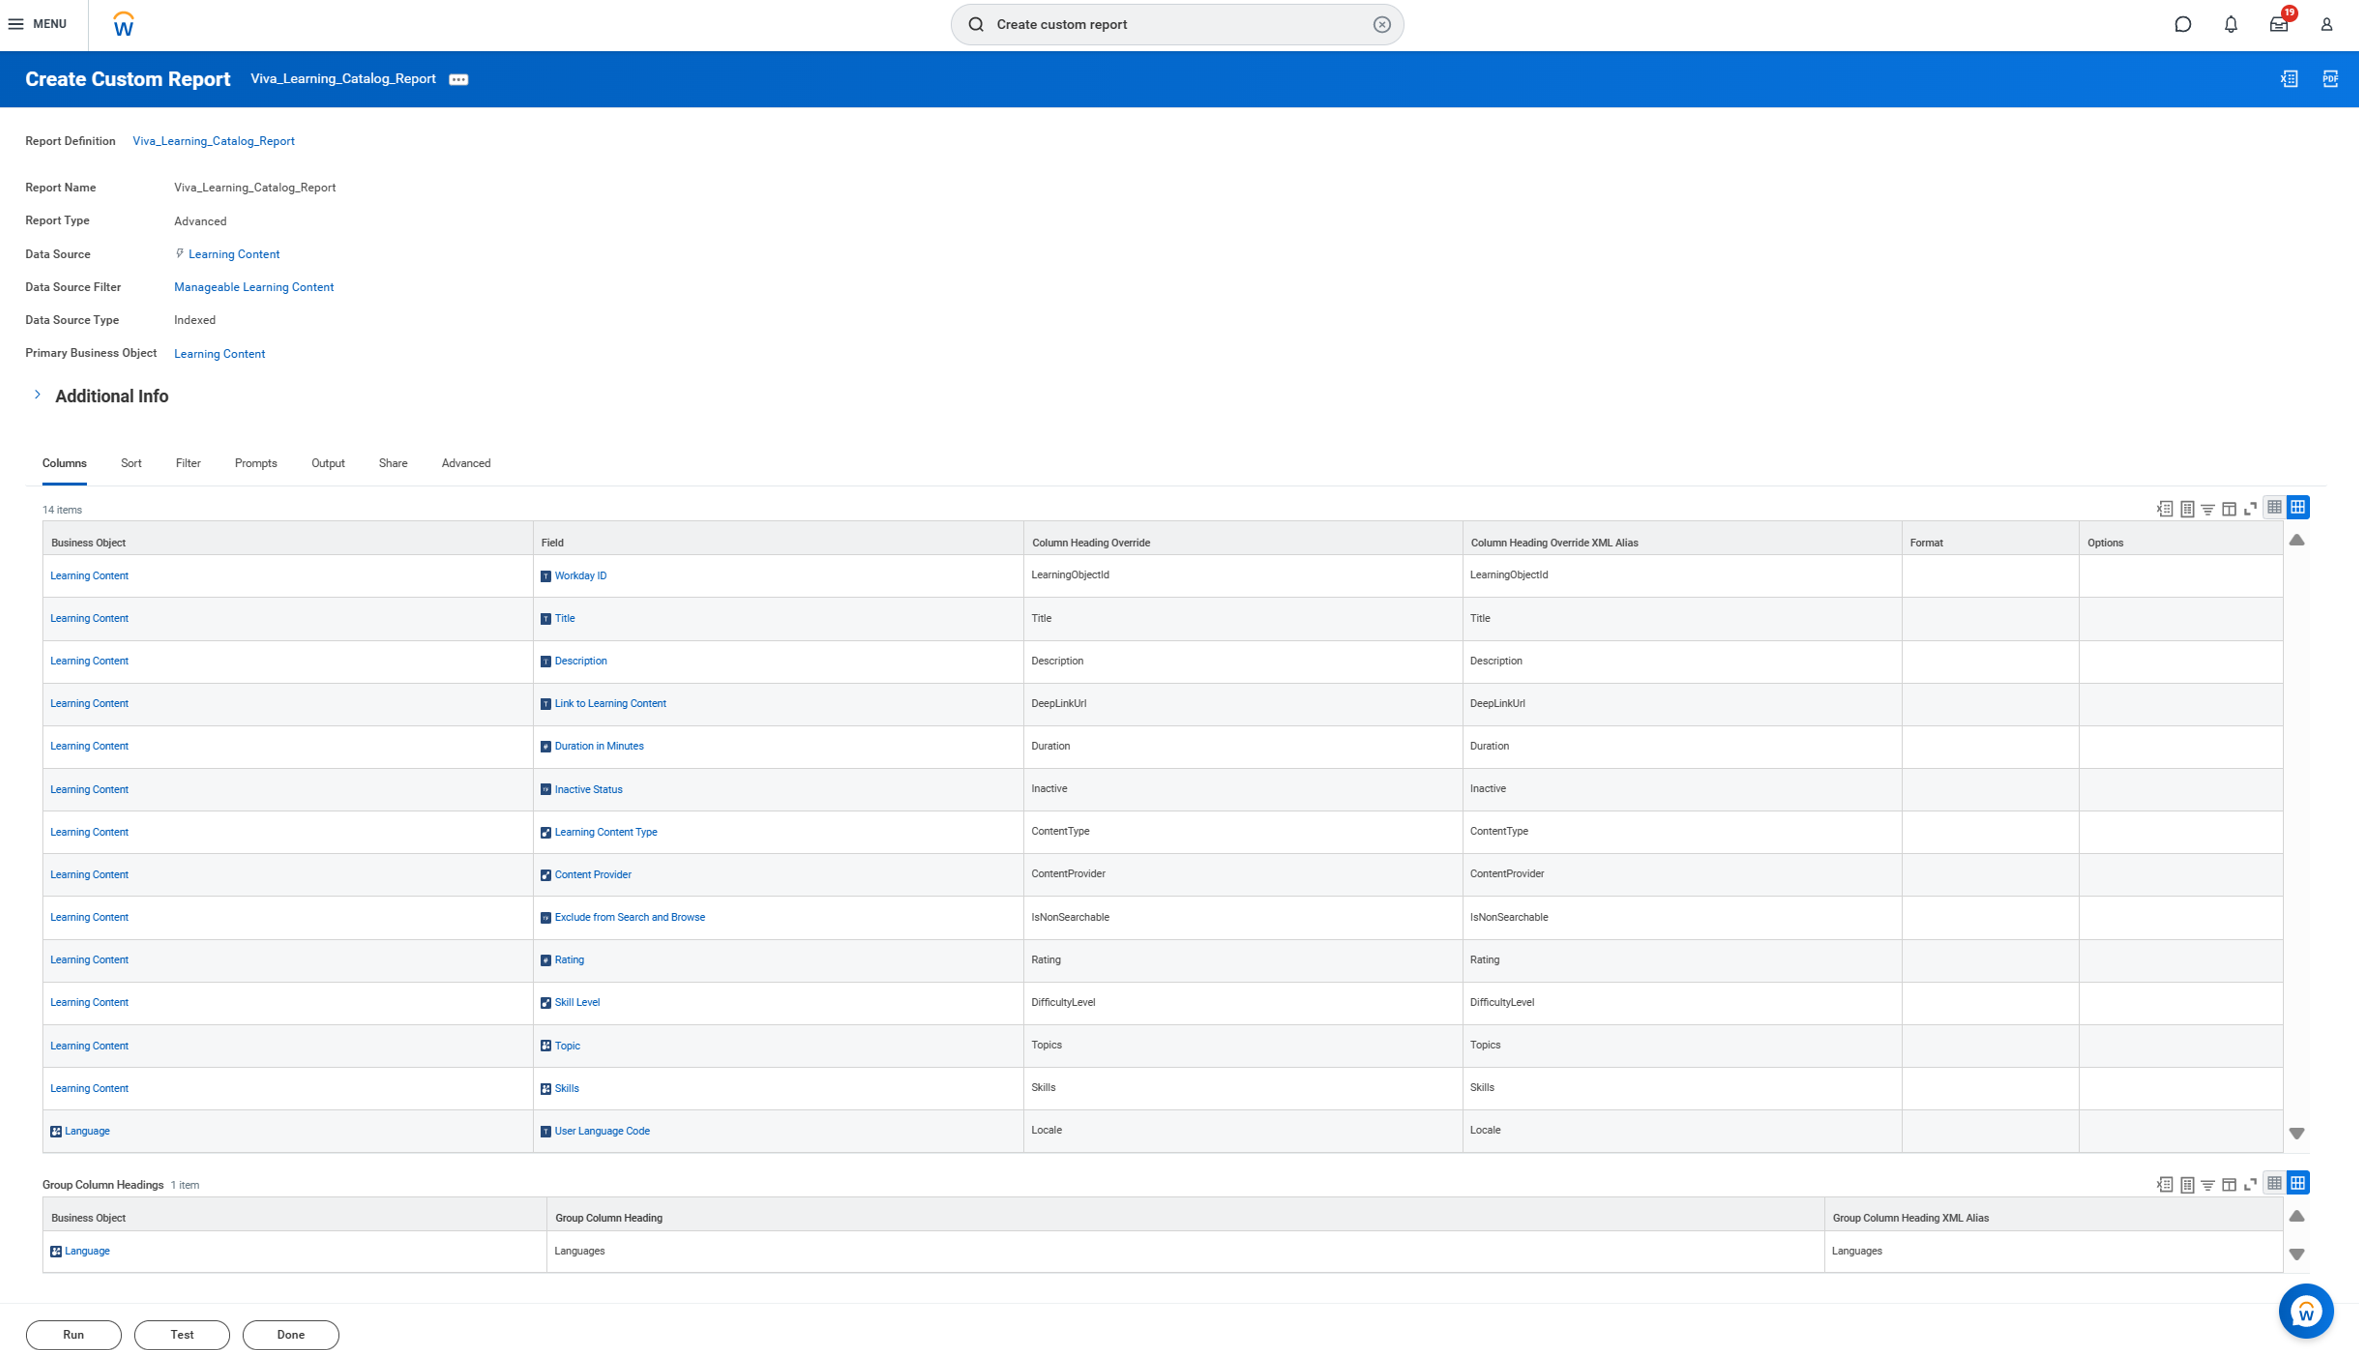
Under "Group Column Headings", add the following fields:
Business Object Group column heading Group column heading XML Alias Language Languages Languages Learning content learningContent_group learningContent_group Add filters to the report under "Filter section".
And/Or (Field Operator Comparison type Comparison value )Indexed And Learning Content Type exact match with the selection list Prompt the user for the value Prompt #1 Yes And Last Updated greater than or equal to Prompt the user for the value Prompt #2 Yes And Last Updated less than or equal to Prompt the user for the value Prompt #3 Yes 
Add the Prompts: Go to Prompts. Mark "Prompt Values in Subtitles" and add the following prompt values. You can directly copy and paste these values.
Important
These column values are case sensitive.
Field Prompt qualifier Label for prompt Label for prompt XML alias Default type Default value Required Learning Content Type Prompt #1 contentType contentType No default value Yes Last Updated Prompt #2 Start_Date Start_Date No default value Yes Last Updated Prompt #3 End_Date End_Date No default value Yes 
Go to Advanced and select the field Optimized for Performance.
Note
After isEffective date changes, it isn't possible to turn on optimized for performance. Considering the data volumes in hand, we can advise customers to uncheck this field.
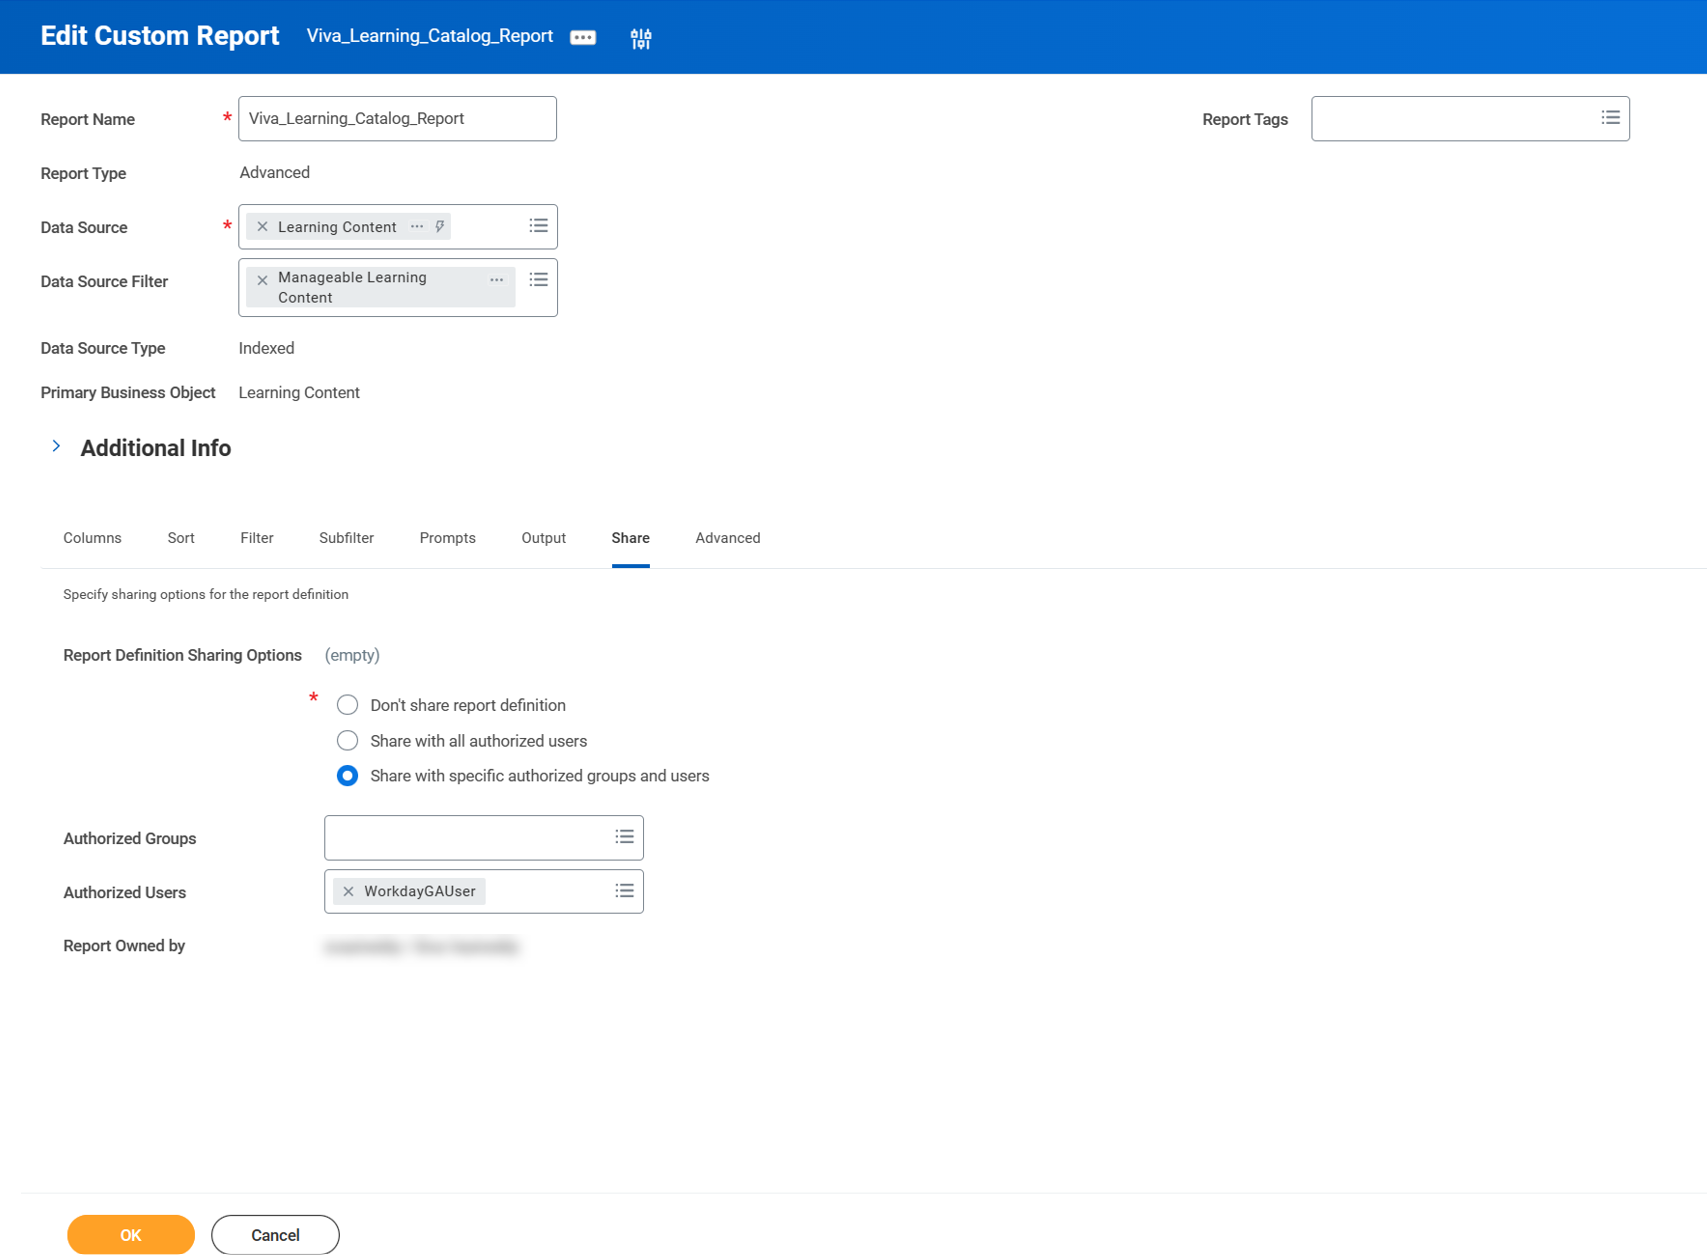
Share the report with Integrated System User (ISU), which you created while enabling catalog sync. Go to the Share section in report, select the option "share with specific authorized groups and users" and add ISU name in the Authorized users field.
Save the report. Select OK.
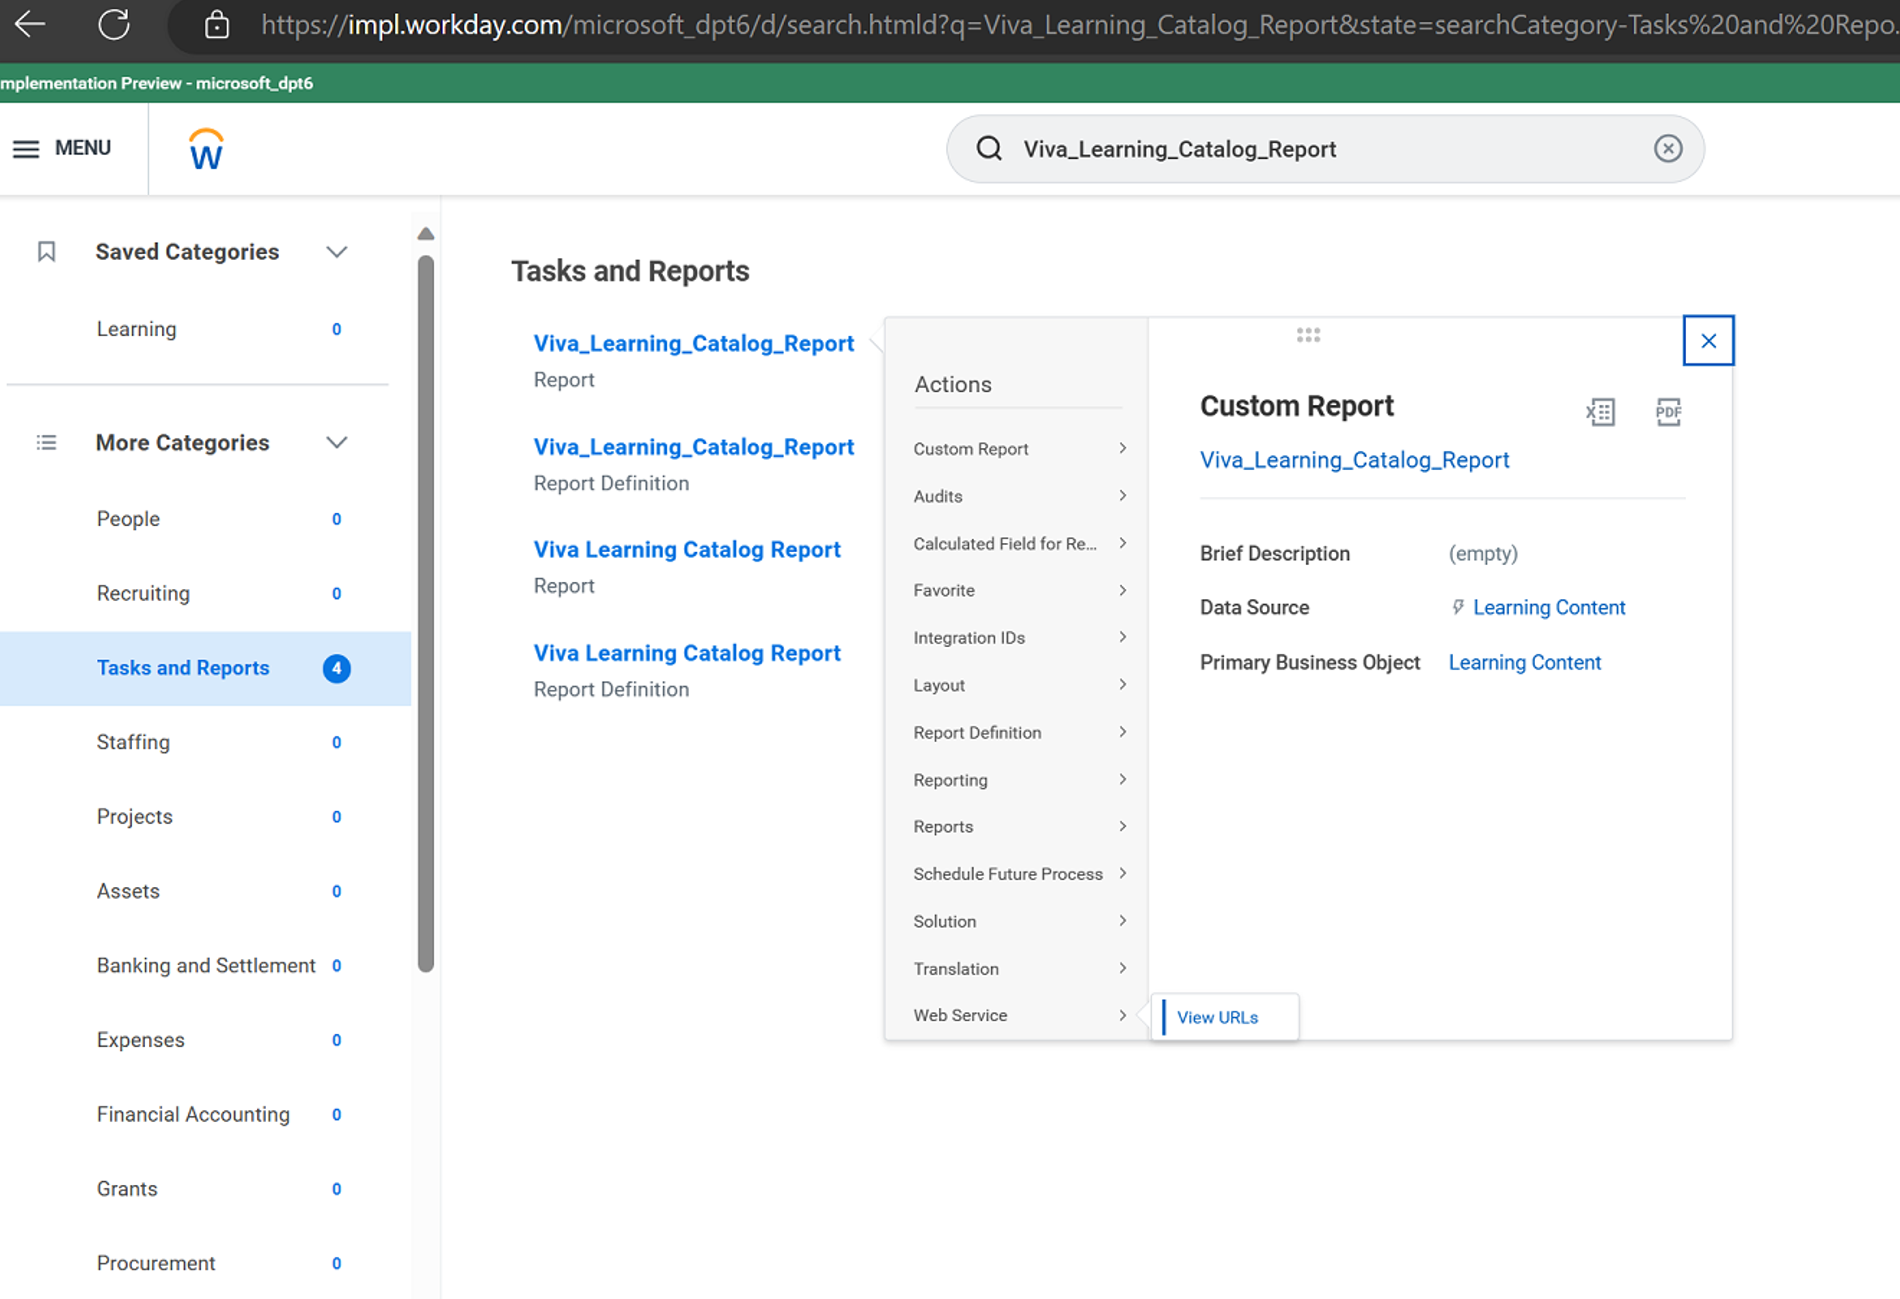
Generate report URL. This URL is required as an input parameter on Viva Learning Admin tab. The same user who created the report should generate the URL.
Select the report > Web Service > View URLs.
In next window, select any contentType and any date range and select OK.
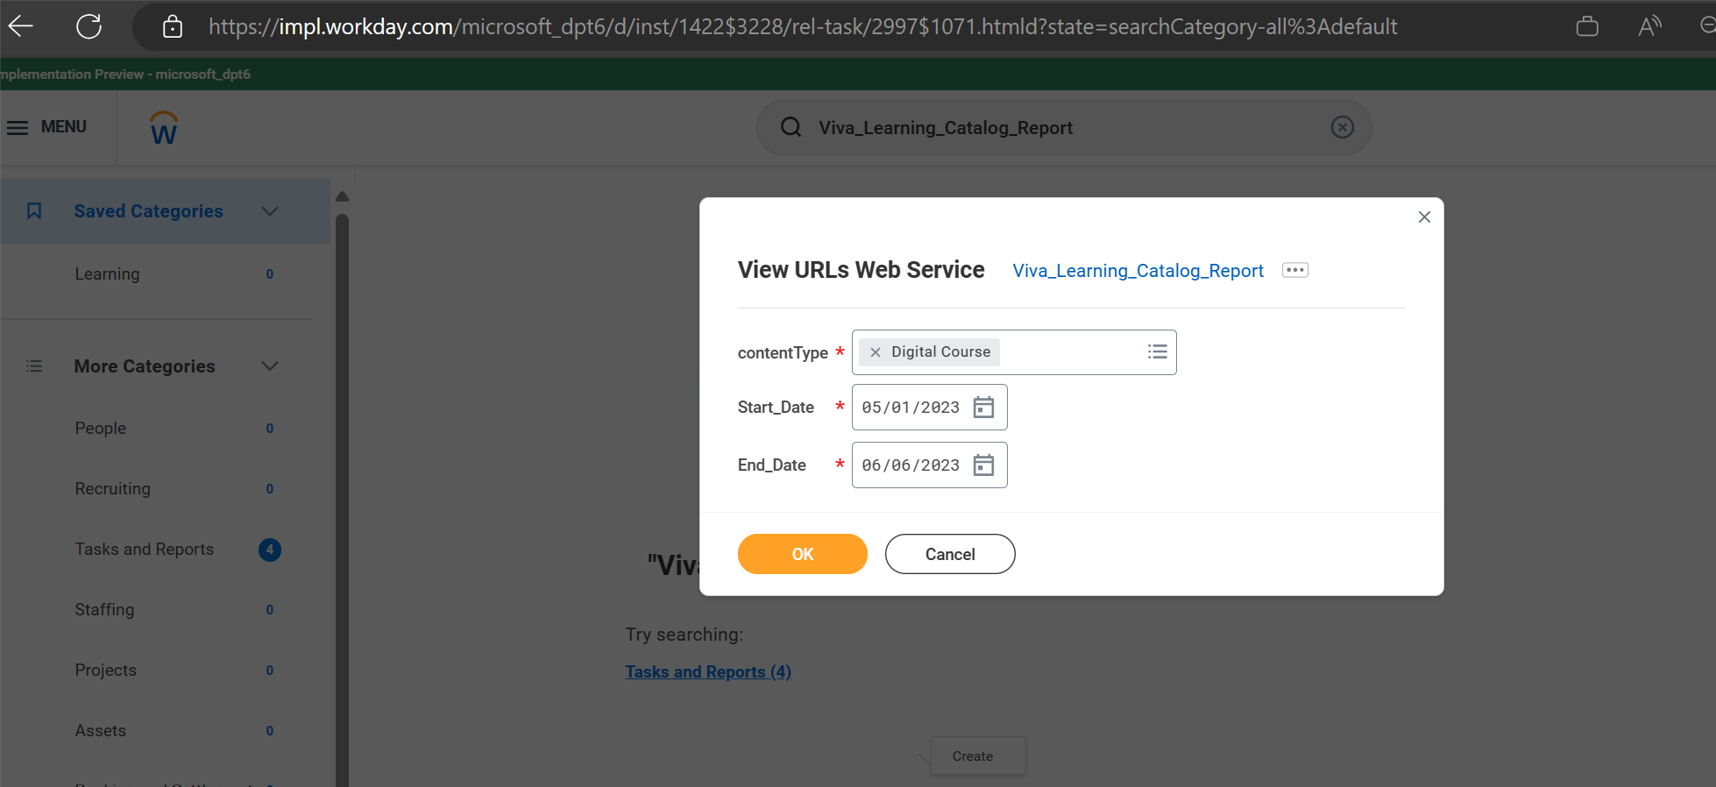
Select JSON. This action opens a new window.
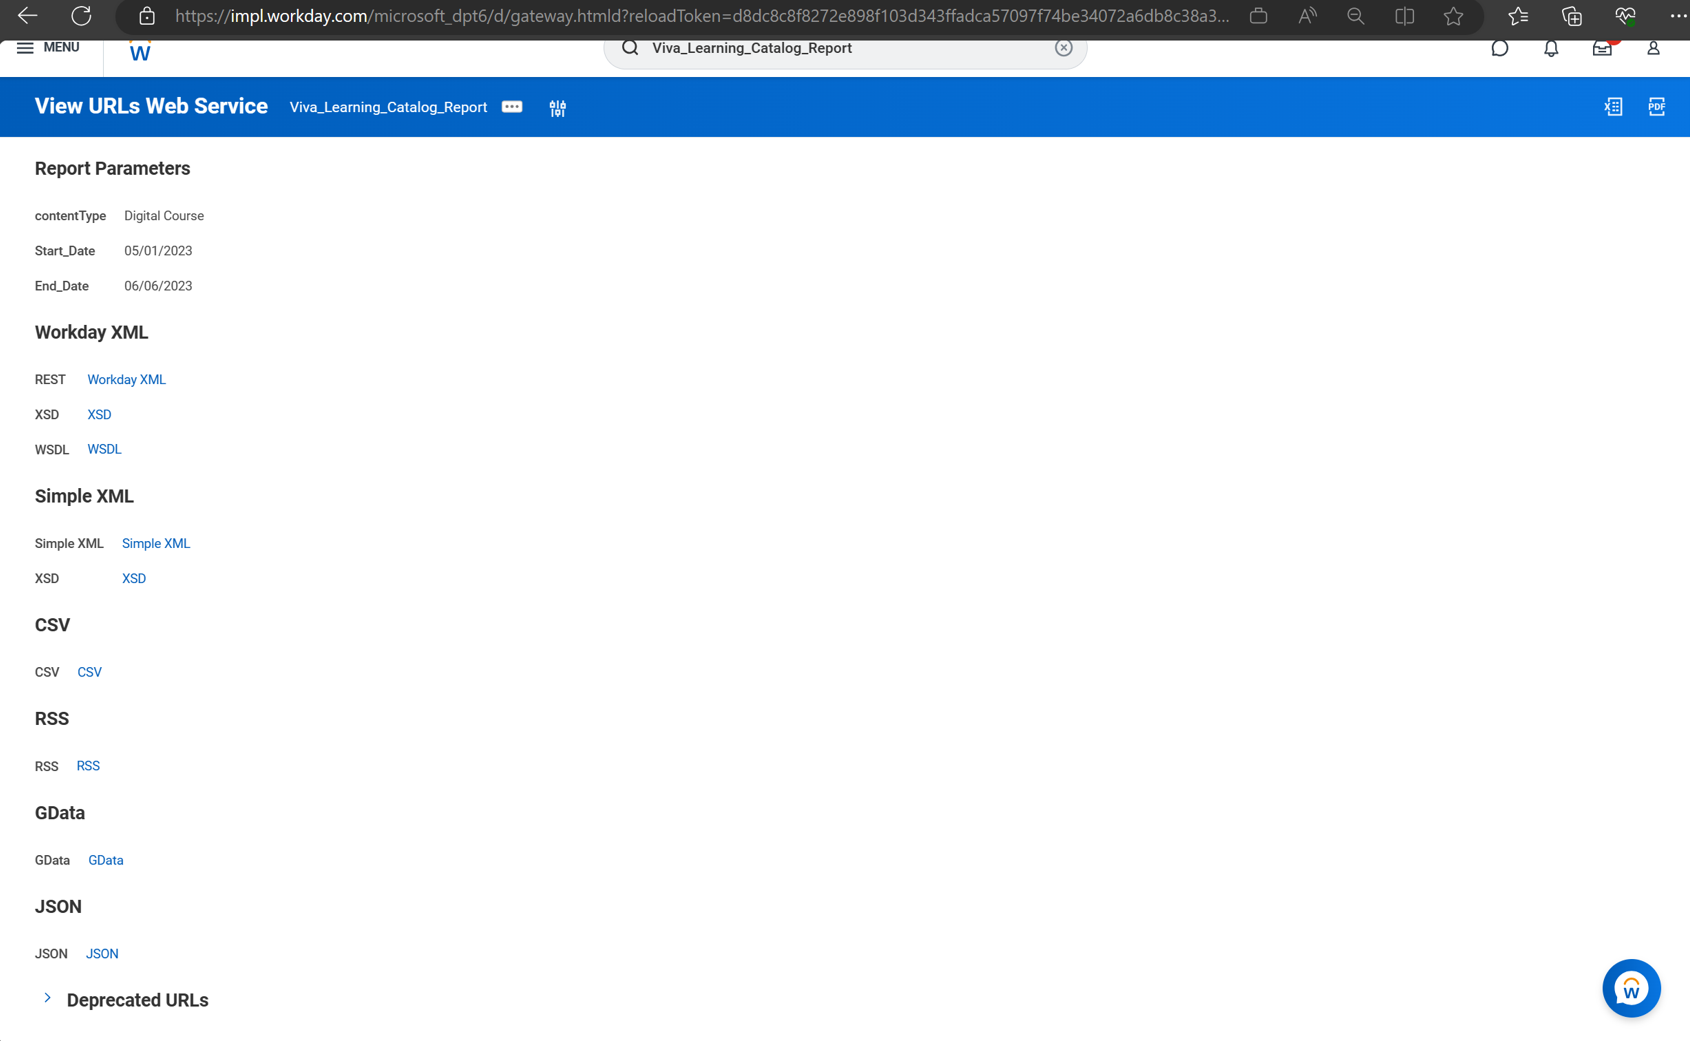
In the next window, provide the Workday credentials and sign in. It downloads the JSON.
Copy the URL from browser and append it post Viva_Learning_Catalog_Report. That is, the report name
- for example, for Microsoft test tenant the URL is:
https://wd2-impl-services1.workday.com/ccx/service/customreport2/microsoft_dpt6/svasireddy/Viva_Learning_Catalog_Report?Start_Date=2023-03-01-08:00&End_Date=2023-05-14-07:00&contentType!WID=9882927d138b100019b928e75843018d&format=json - After appending, the final URL for test tenant:
https://wd2-impl-services1.workday.com/ccx/service/customreport2/microsoft_dpt6/svasireddy/Viva_Learning_Catalog_Report - Save the final URL, this is used as an input config parameter on Admin portal while enabling the configuration.
- for example, for Microsoft test tenant the URL is:
Once configuration is complete on the Admin portal, within the next 24 hours delta sync calls the report API, and accordingly data reflect in Viva Learning. Refer to this document for details on enabling integration on Admin portal.


Create RaaS report on Workday portal for user data sync
Create this report from the primary Workday admin account to avoid any privacy and security related concerns. Currently we're syncing historic and present assignments.
Sign in to the Workday Portal.
- Sign in.
- Search for the task "Create Custom Report".
Configure the report parameters:
- Name the report "Viva Learning Users Report". The report name must match this string.
- Indicate report type as "Advanced."
- Check "Enable as Web service".
- Check "Optimized for performance".
- In the "Data source," go to "All" and select "Workers for HCM Reporting." Select OK.
Add report Fields.
Add the fields in "Columns."
Important
These column values are case sensitive.
Business object Field Column heading override Column heading override XML alias Worker Workday ID UserId UserId Worker Preferred Name – First Name FirstName FirstName Worker Preferred Name – Last Name LastName LastName Worker User Name UserName UserName Worker "Worker is Terminated" or "Terminated" Terminated Terminated Worker Public Primary Work Email Address Email_Address Email_Address Worker Employee ID Employee_ID Employee_ID 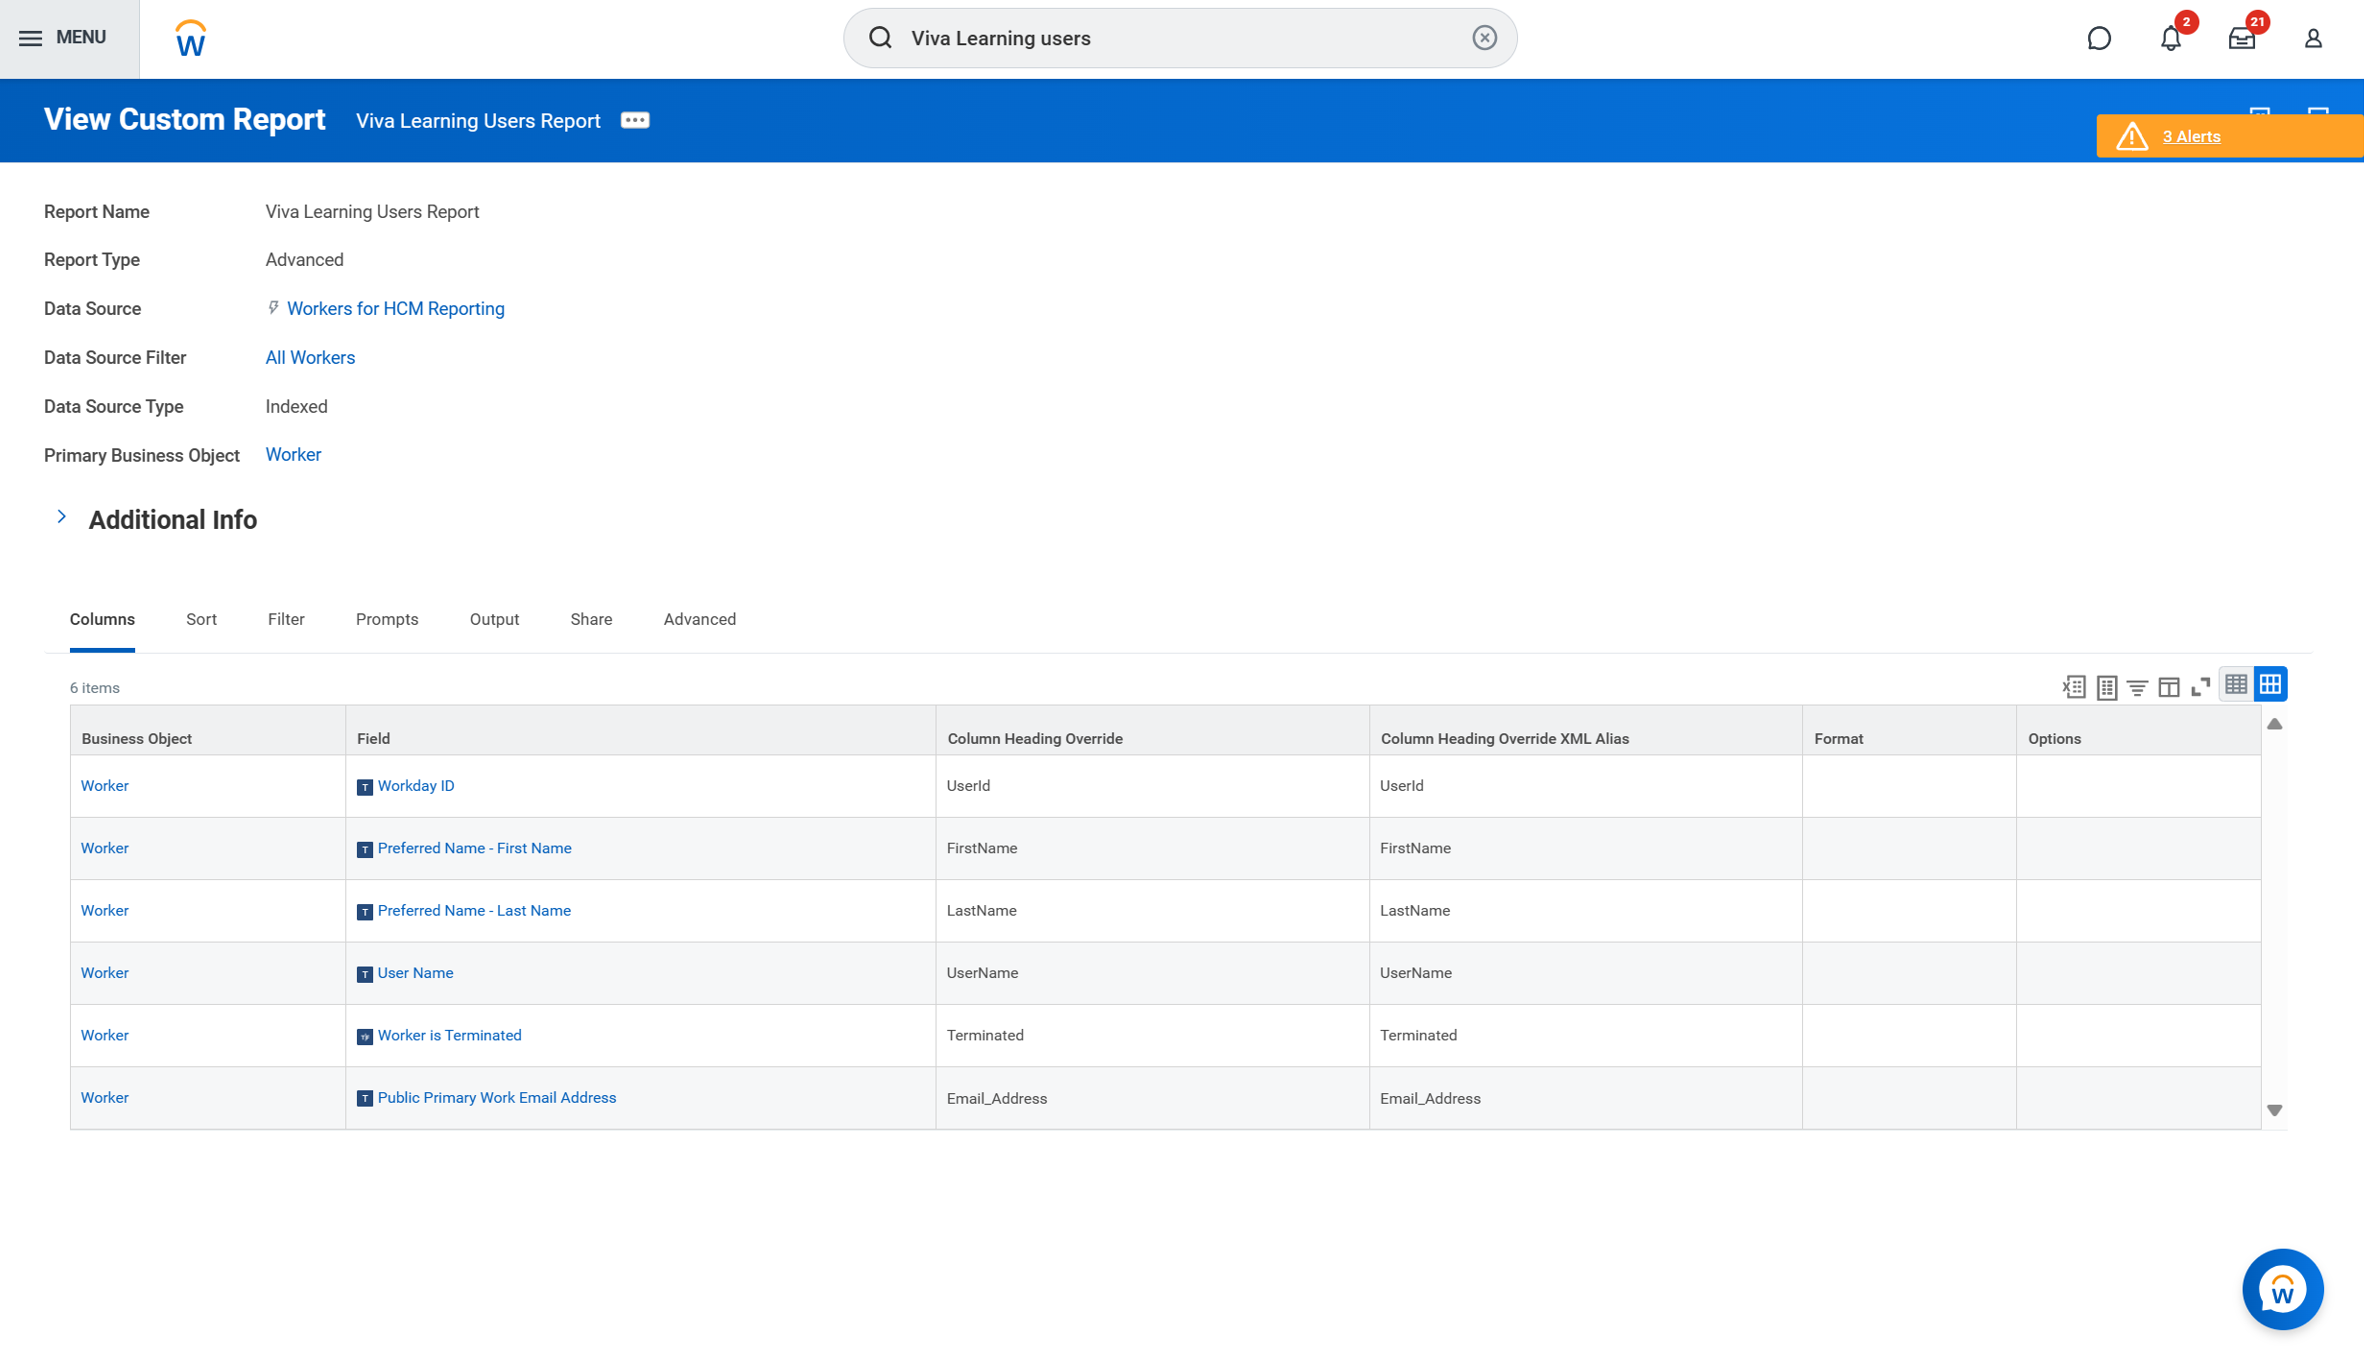
Add filters to the report
Add the following values in the "Filter on Instances". Follow the steps mentioned below for adding the calculated field.
And/Or ( Field Operator Comparison type Comparison value ) Indexed And Hire Date greater than or equal to Prompt the user for the value Starting Prompt Yes And Hire Date less than or equal to Prompt the user for the value Ending Prompt Yes
Add the Prompts: Go to Prompts. Mark "Display Prompt Values in Subtitles", and add the following prompt values. You can directly copy and paste these values.
Important
These column values are case sensitive.
Field Prompt qualifier Label for prompt Label for prompt XML alias Default type Default value Required Don't prompt at run time Do Not include in Subtitle Contingent Worker type Contingent_Worker_Type No default value Yes Employee Type Employee_Type No default value Yes Worker Types Worker_Types No default value Yes Include Terminated workers Include_Terminated_Workers Specify default value Yes Yes Hire Date Starting Prompt Start_Date Start_Date No default value Yes Hire Date Ending Prompt End_Date End_Date No default value Yes Go to Advanced and select the field
Optimized for Performance.Share the report with Integrated System User (ISU) and respective security group that you created while enabling content sync. Go to the Share section in report, select the option "share with specific authorized groups and users" and add group name and user name in Authorized Groups and Authorized users field.
Save the report. Select OK.
Once configuration is complete on Admin portal, within the next 24 hours delta sync calls the report API, and accordingly data reflect in Viva Learning. Refer to this document for details on enabling integration on Admin portal.

Create RaaS report on Workday portal for assignment by organization and their completion status
This report should be created from the primary Workday admin account to avoid any privacy and security related concerns. Currently we're syncing historic and present assignments. Here, learner record sync is abbreviated as LRS.
Sign in to the Workday Portal:
- Sign in.
- Search for the tasks "Create Custom Report."
Configure the report parameters:
- Name the report "Viva Learning LRS Assignments Report". The report name must match this string.
- Set Report Type as "Advanced."
- Mark checkbox "Enable as Web service."
- In the "Data Source" field, go to "All" and select "Learning Assignments Records”. Select OK.
Add report fields.
- Once you select OK, the "Data Source" automatically sets the value as "Learning Assignment Records." For the "Data Source Filter" field, remove any existing value and add "Assignment Records for ~Person~from Learning Organization". You can copy this value and paste in the field directly.
- Add the fields in "Columns" as outlined below. You see two objects for “Learning Assignment," select the one with a blue icon next to it.
Important
These column values are case sensitive.
Business object Field Column heading override Column heading override XML alias Learning Assignment Workday ID AssignmentId AssignmentId Worker Workday ID LearnerId LearnerId Learning Content Workday ID LearningObjectId LearningObjectId Learning Assignment Due Date DueDate DueDate Learning Assignment Assignment Status CompletionStatus CompletionStatus Learning Assignment Assigned Date AssignmentDate AssignmentDate Assigned By Workday ID AssignerId AssignerId Learning Assignment Assignment Record Completion Moment CompletionDate CompletionDate Learning Assignment Required AssignmentType AssignmentType 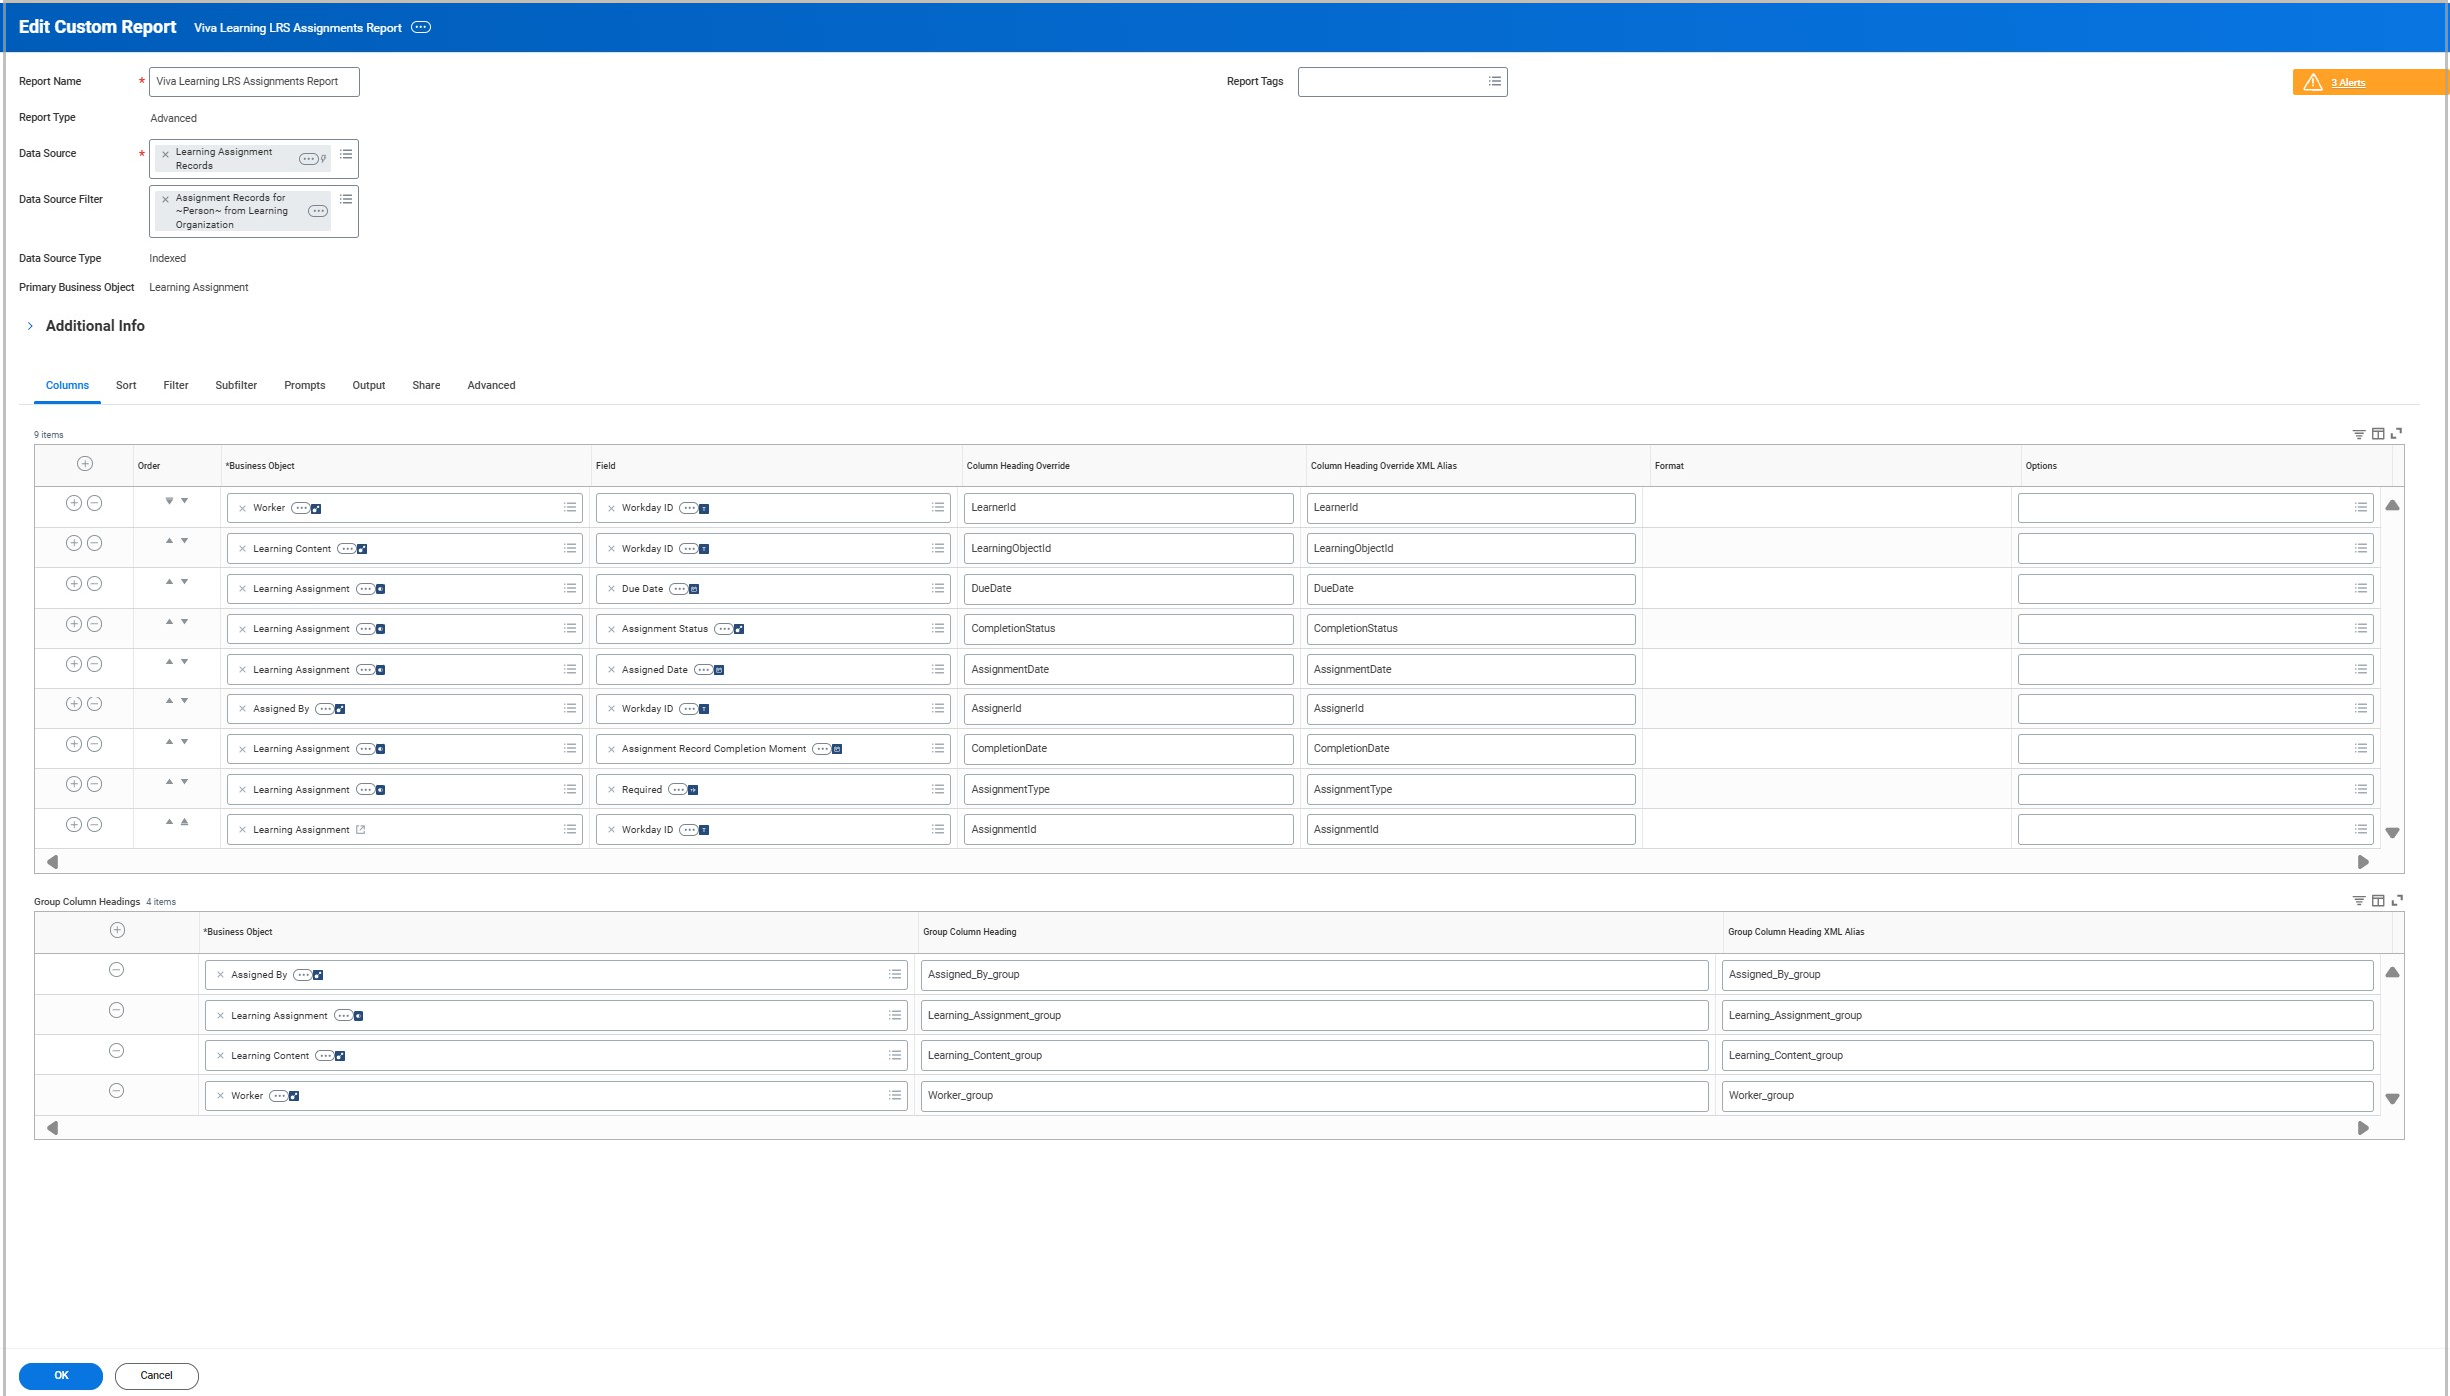
Note
The
In progressstatus from Workday doesn't sync to Viva Learning.Under "Group Column Headings", add the following fields.
Business object Group Column Heading Group column heading XML alias Assigned By Assigned_By_group Assigned_By_group Learning Assignment Learning_Assignment_group Learning_Assignment_group Learning Content Learning_Content_group Learning_Content_group Worker Worker_group Worker_group Under Prompt mark "Display Prompt Values in Subtitles" and add the following prompt values. You can directly copy and paste these values. In the 'Default Value' field for "learning Organization for Learning Assignment," provide the default value of the top organization (root organization) for which you need the report that is being pivoted.
Important
These label values are case sensitive.
Field Label for Prompt Label for Prompt XML Alias Default Type Default value Required Don't Prompt at Runtime Learning Organizations for Learning Assignment Learning_Organizations_for_Learning_Assignment Learning_Organizations_for_Learning_Assignment No default Value Yes Include Subordinate Organizations Include_Subordinate_Organizations Specify default value Yes Yes Yes Add date filters to the report for delta sync.
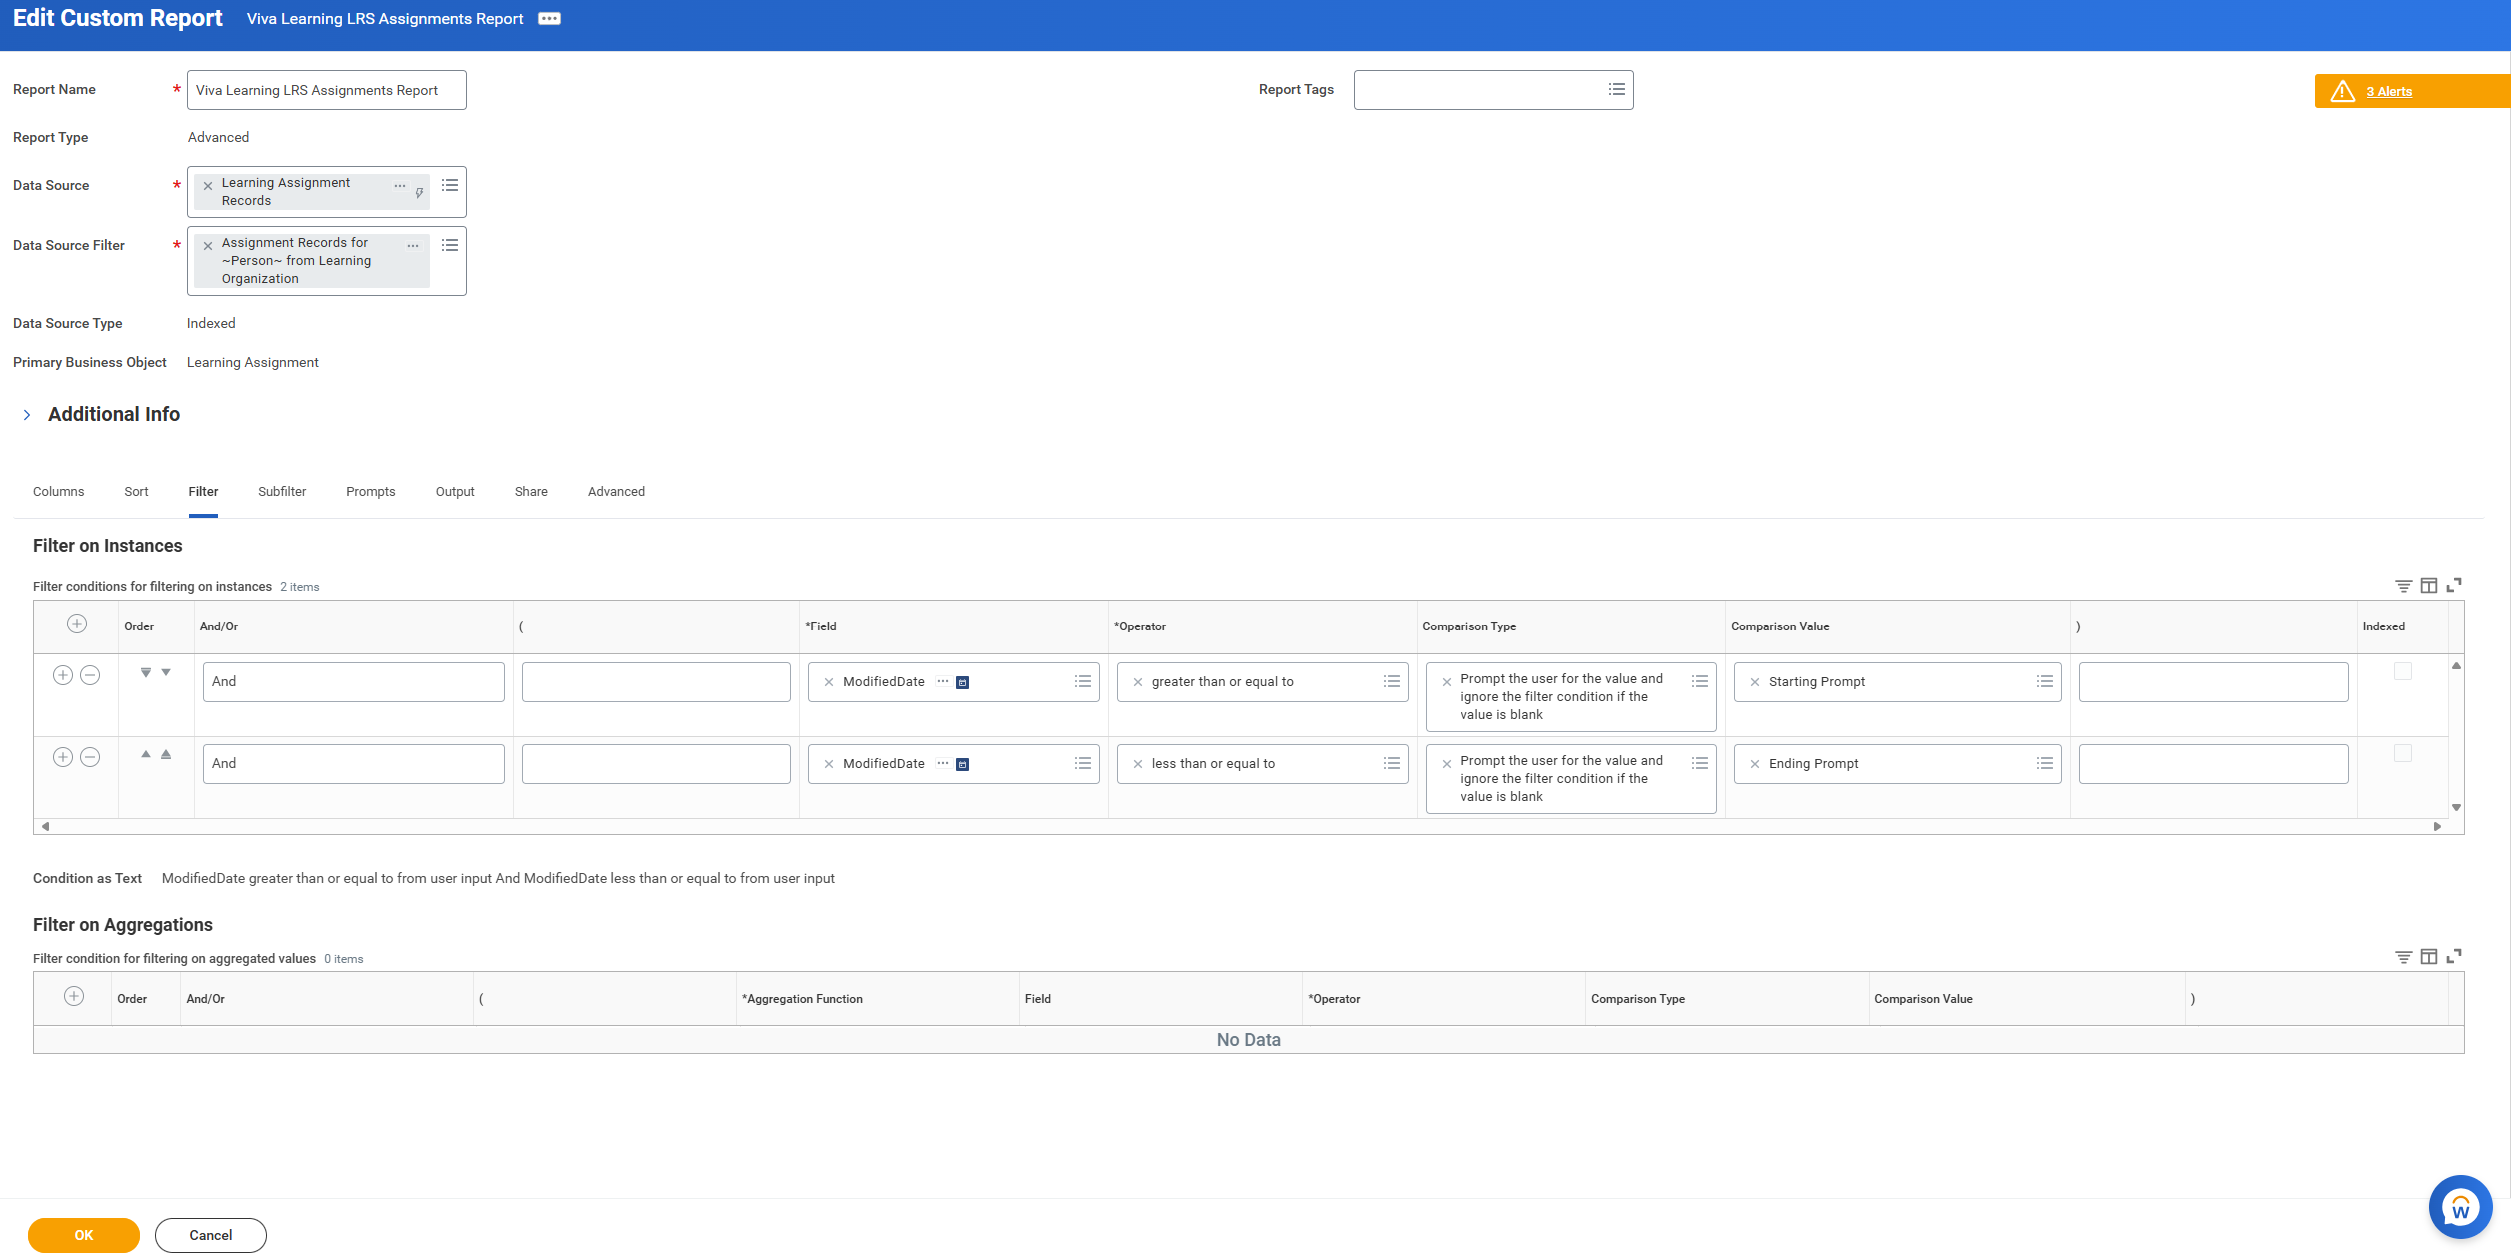
Go to "Filters". Select “+”, In “And/Or” select And. in "Field" select "create calculated field for report".
In next screen, write "Field name" as ModifiedDate and select "Function" as Build Date. Select OK.
In next screen, add following values under Date Fields and select OK.
Field Value Extract Year from Date Field Last Functionally Updated Extract Month from Date Field Last Functionally Updated Extract Day from Date Field Last Functionally Updated Add following values in remaining fields of the start filter:
Field Value Field Modified Date Operator greater than or equal to Comparison Type Prompt the user for the value and ignore the filter condition if the value is blank Comparison Value Starting Prompt Add another filter and with following values and select “OK”.
Field Value Field ModifiedDate Operator less than or equal to Comparison Type Prompt the user for the value and ignore the filter condition if the value is blank Comparison Value Ending Prompt
Modify the prompts
Go to Prompts.
Select Populate Undefined Prompt Defaults. This selection adds the start and ending prompt for Modified date, which is defined in the previous step.
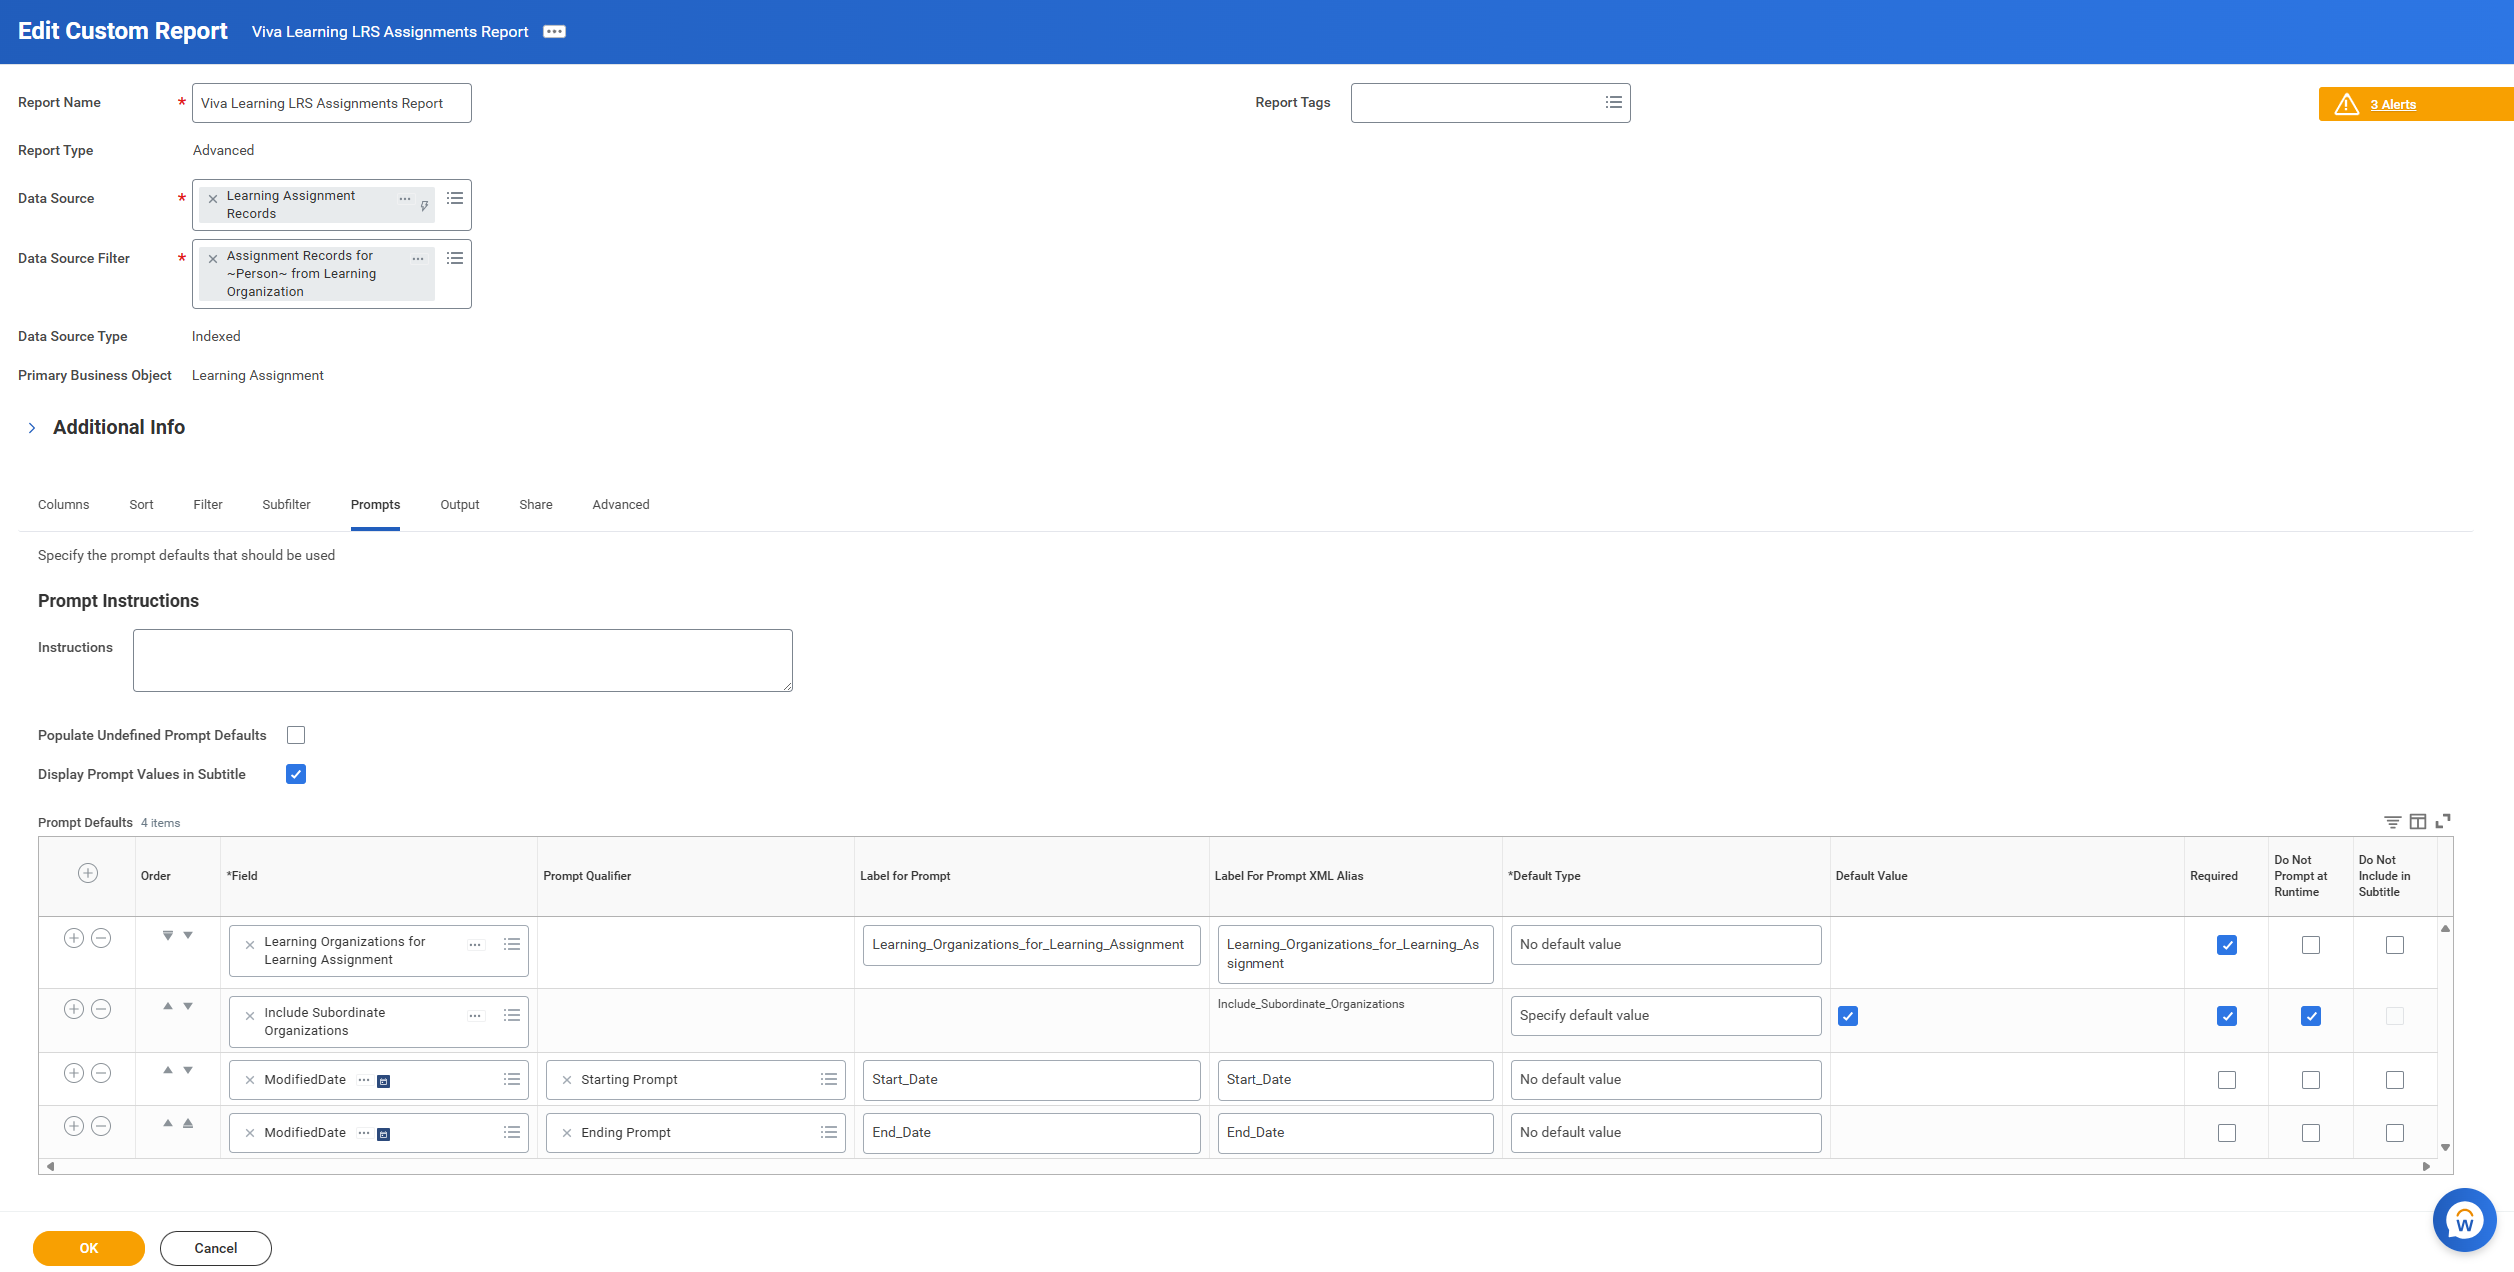
Add following values in the new prompts and select OK.
- For Starting Prompt, add value
Start_Datein fields Label for Prompt and Label for Prompt XML Alias. - For Ending Prompt, add value
End_Datein fields Label for Prompt and Label for Prompt XML Alias.
- For Starting Prompt, add value
Important
These label values are case sensitive.
Go to Advanced. Uncheck the field Optimized for Performance.
Save the report. Select OK.
Share the report with Integrated System User (ISU) and the respective security group, which you created while enabling content sync.
Within the next 24 hours LRS sync calls the report API and accordingly data reflect in Viva Learning, provided Admin has enabled LRS on Admin portal. Refer to this document for configuration steps on Admin portal.


Note
The assignments with the completion status of "manually waived" aren't displayed in the Viva Learning user experience.
Create RaaS report on the Workday portal for completion status of self-enrollment
This report should be created from the primary Workday admin account to avoid any privacy and security related concerns. Currently we're syncing historic and present assignments.
Sign in to the Workday Portal.
- Sign in.
- Search for "Create Custom Report."
Configure the report parameters:
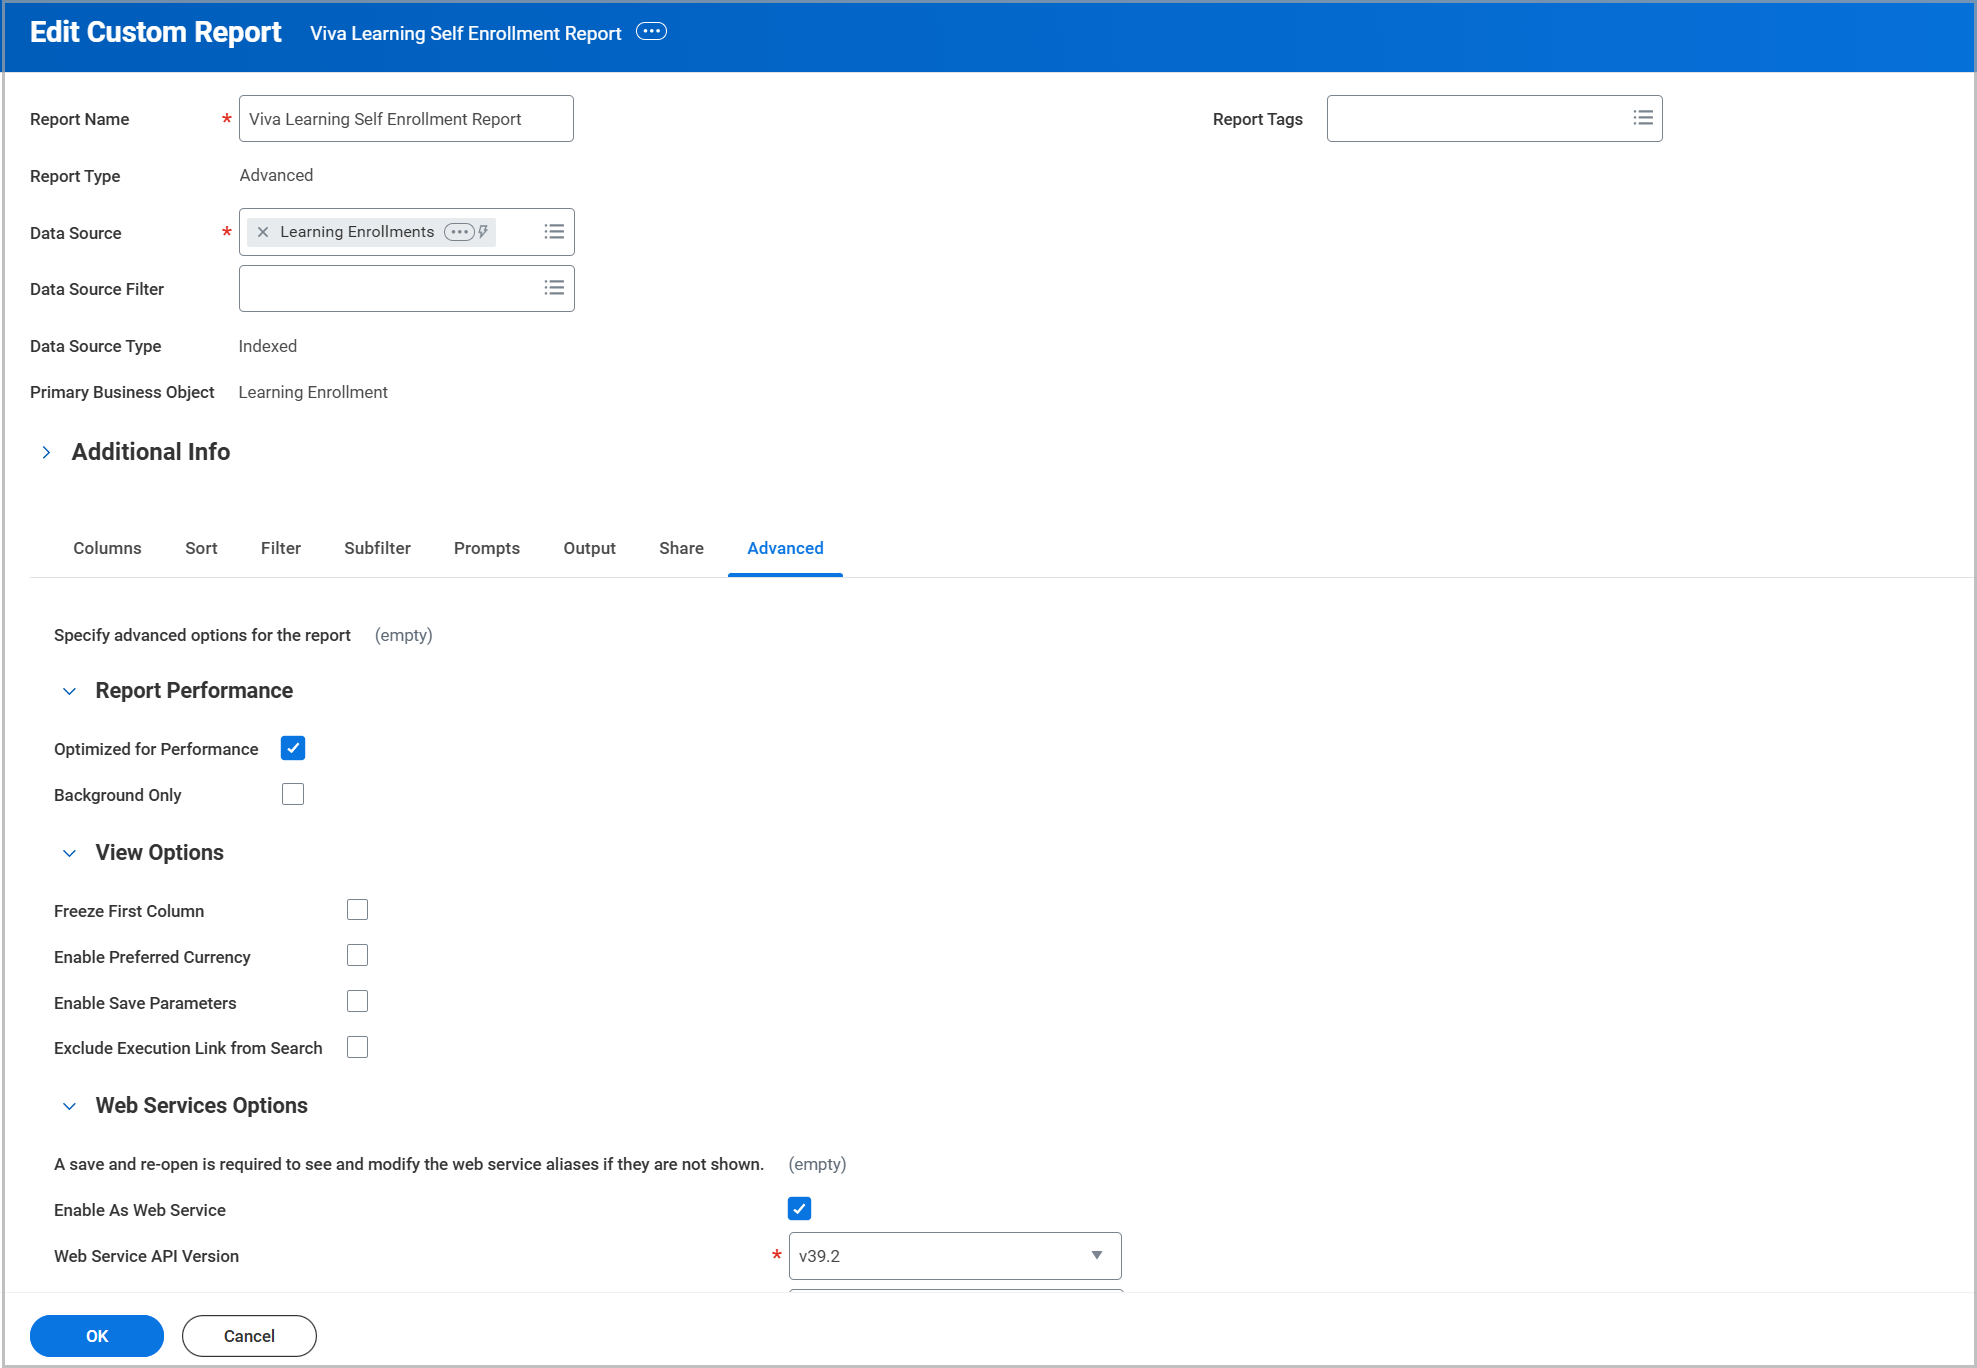
- Name the report "Viva Learning Self Enrollment Report". The report name must match this string.
- Set Report Type as "Advanced."
- Mark checkbox "Enable as Web service."
- In the "Data Source" field, go to "All" and select "Learning Enrollments”. Select OK.
Add report fields.
Once you select OK, the "Data Source" automatically sets the value as "Learning Enrollments." Leave the "Data Source filter" field blank.
Add the fields in "Columns" as per below schema. You see two objects for "Learning Enrollment", select the one with a blue icon next to it.
Important
These column values are case sensitive.
Business object Field Column heading override Column heading override XML alias Learning Enrollment Workday ID EnrollmentId EnrollmentId Learning Enrollment Participant Workday ID LearnerId LearnerId Learning Content Detail Workday ID LearningObjectId LearningObjectId Learning Enrollment Completion Status CompletionStatus CompletionStatus Learning Enrollment Completion Date CompletionDate CompletionDate 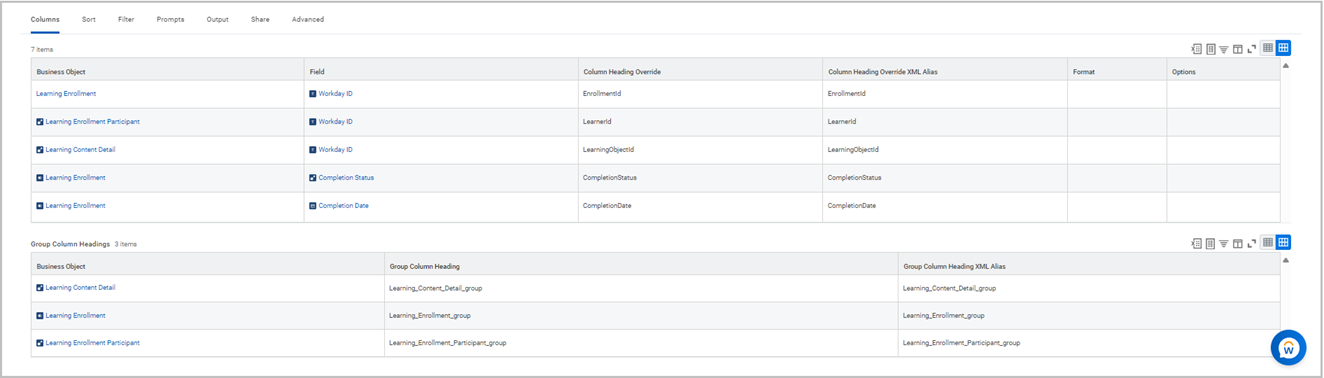
Under "Group Column Headings", add these fields:
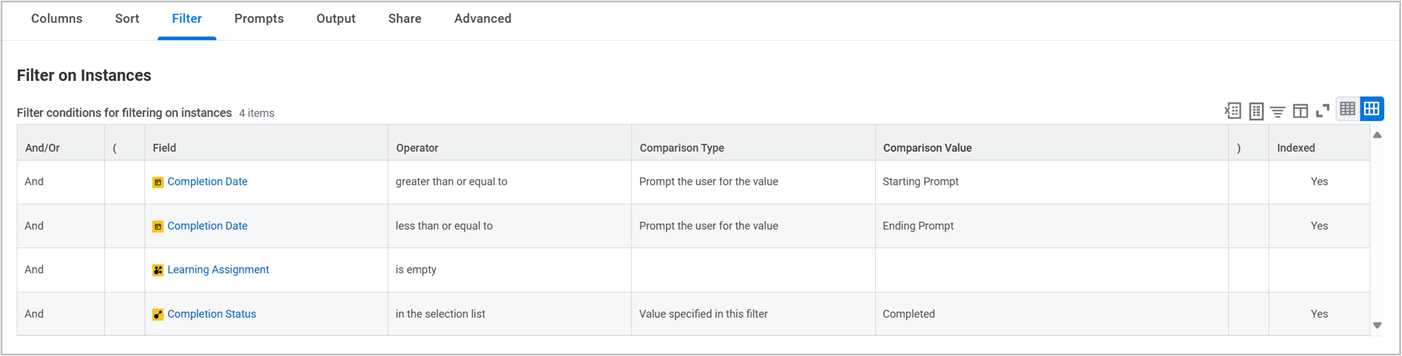
Business object Group Column Heading Group column heading XML alias Learning Content Detail Learning_Content_Detail_group Learning_Content_Detail_group Learning Enrollment Learning_Enrollment_group Learning_Enrollment_group Learning Enrollment Participant Learning_Enrollment_Participant_group Learning_Enrollment_Participant_group Add filters to the report for delta sync.
- Go to the filter and add the following values:
And/Or ( Field Operator Comparison type Comparison value ) Indexed And Completion Date greater than or equal to Prompt the user for the value Starting Prompt Yes And Completion Date less than or equal to Prompt the user for the value Ending Prompt Yes And Learning Assignment is empty And Completion Status in the selection list Value specified in this filter Completed Yes


Modify the prompts
Go to Prompts.
Select Populate Undefined Prompt Defaults. This selection quickly adds the start and ending prompt for the completion date, which is defined in previous step. You can also enter the prompts as shown in the image below. Once the prompts are populated, this check box selection is gone.
Select Display Prompt Value in Subtitle.
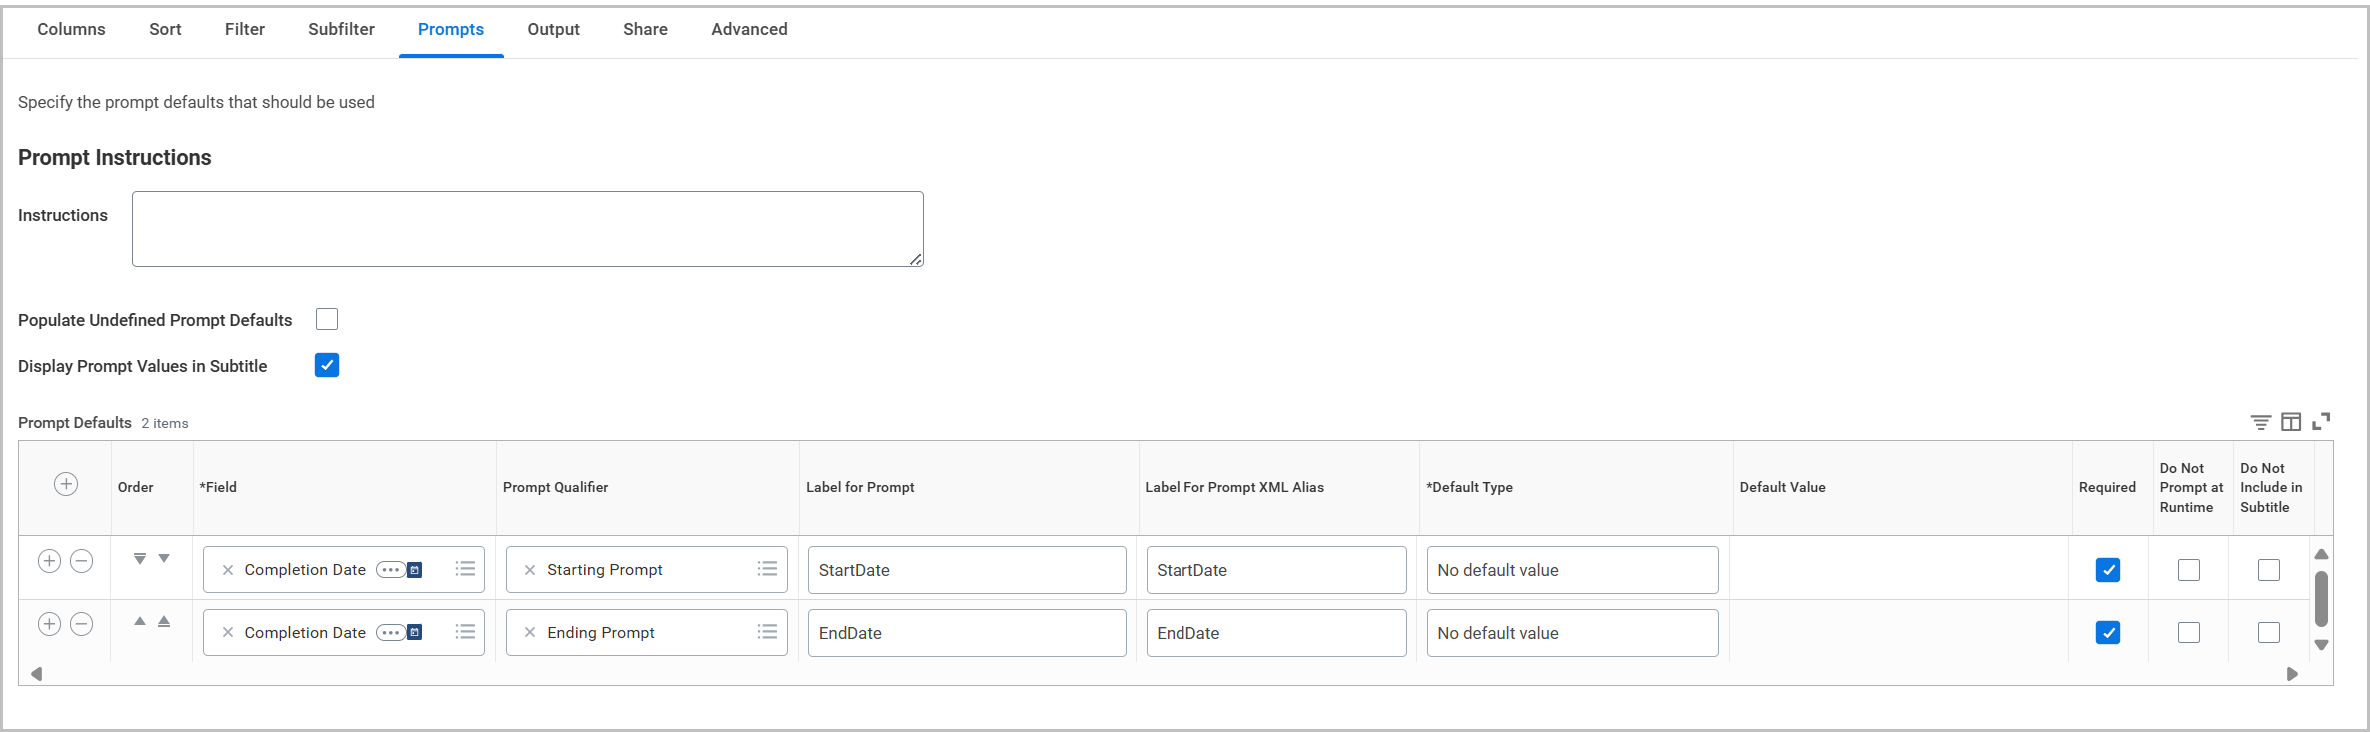
Add following values in the new prompts and select "OK".
- For Starting Prompt, add value StartDate in fields Label for Prompt and Label for Prompt XML Alias.
- For Ending Prompt, add value EndDate in fields Label for Prompt and Label for Prompt XML Alias.
Important
These label values are case sensitive.
Go to Advanced. Check the field Optimized for Performance.
Save the field. Select OK.
Share the report with Integrated System User (ISU) and respective security group, which you created while enabling content sync. Go to the Share section in the report, select "Share with specific authorized groups and users" and add group name and user name in Authorized Groups and Authorized users field.
Within the next 24 hours, the LRS sync calls the report API and accordingly reflects the data in Viva Learning. This depends on whether the admin enabled LRS on Admin portal. Refer to this document for configuration steps on the Admin portal.


Note
Lessons aren't supported in self-enrollment completion status.
Important
If the tenant refreshes, the report owner parameter in the RaaS report can automatically change to the default system user. This change in owner status also changes the API url for Viva Learning. For the connection to work, you can either reconfigure the Workday connector or transfer the report to the original owner.