Note
Access to this page requires authorization. You can try signing in or changing directories.
Access to this page requires authorization. You can try changing directories.
This article helps you to familiarize yourself with the use of batch upload for bulk submission of orders. With batch upload, you can enter bulk orders into an Excel template by:
- Downloading the Excel template
- Completing the template with all orders needed
Loading the orders
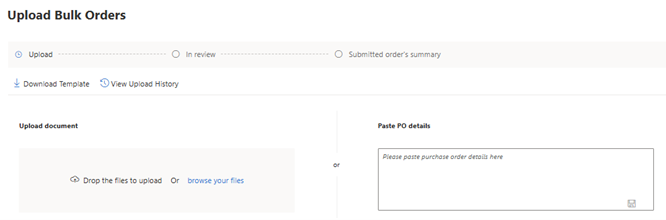
On the Batch Upload page in VLC, you’re given two options for loading the orders:
- Load one or more POs into VLC using the Excel template.
- Use batch template and copy as text into VLC.
1. Uploading using the Excel template
The most common way to do batch uploads is by using the Excel template that you can download directly from the Batch Upload screen. The batch upload form did not change with the transition from the Microsoft Order Entry Tool (MOET) to VLC.
Go to Upload, then select the Next button to advance to the Review stage.
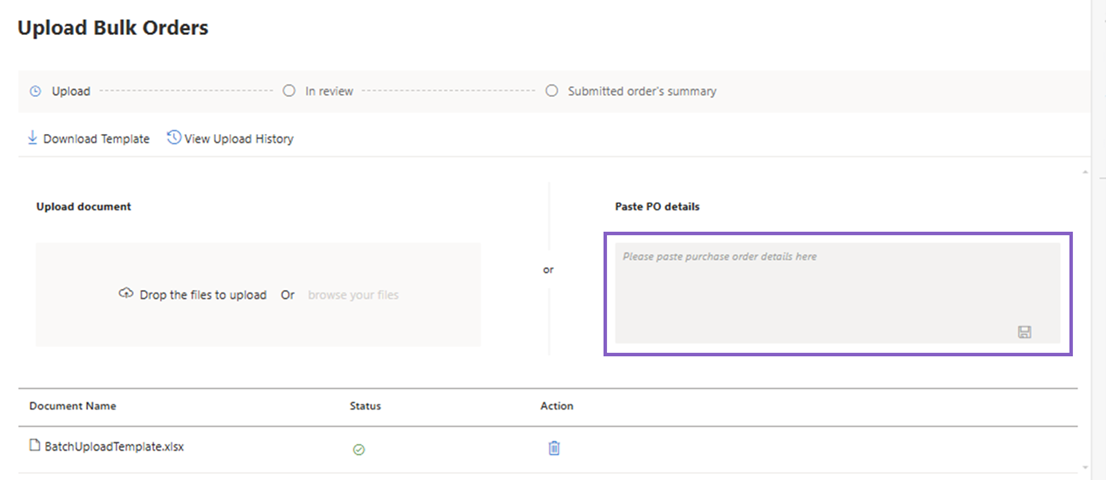
2. Uploading as text
You can copy the order from the batch template and upload as text directly into the VLC Batch Upload page. You need to include the complete text that makes up the batch PO.


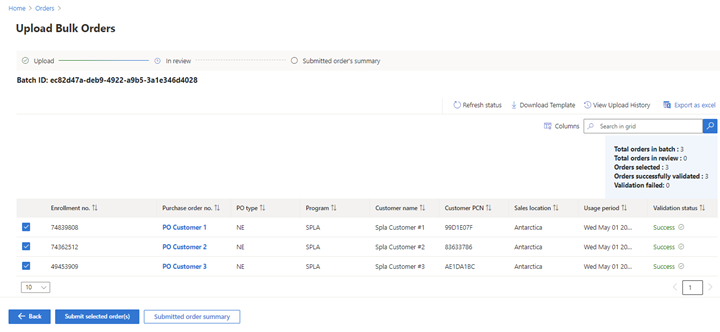
Review
- After uploading and submitting the batch file, you’ll advance to the Review stage where you can view the validation status for every PO submitted. Refresh the report until all validations end in success or error.
- You should fix all POs with errors and upload again. Alternatively, you can submit the successfully validated orders first and then submit orders with errors corrected later.
- To correct the errors, you can download a copy of the batch upload and error descriptions as an Excel file. You can make PO corrections through the VLC user interface (UI).
Submission
You can only submit orders that have been validated successfully. After submitting the selected POs, your status will change to In Progress. You can refresh the status to check if it has been Accepted.

Working with invalid orders
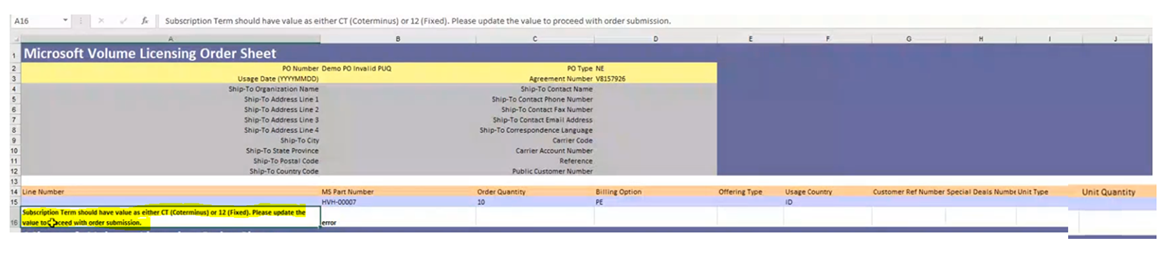
In the Review stage, you can download the original uploaded file with the error associated with every PO. In the following example, the OVS OLS SKU is missing the mandatory Unit Quantity field. It should have a value of 12.
After making the correction, you should submit again as a new batch upload.
To resubmit, you need to first delete the erroneous lines included in the Excel file downloaded.
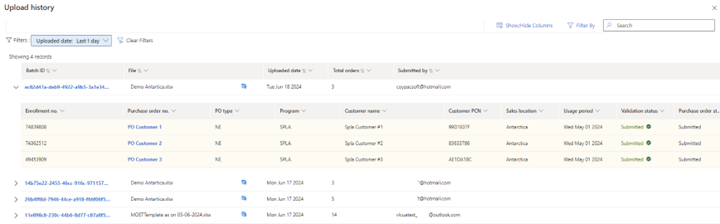
Batch history
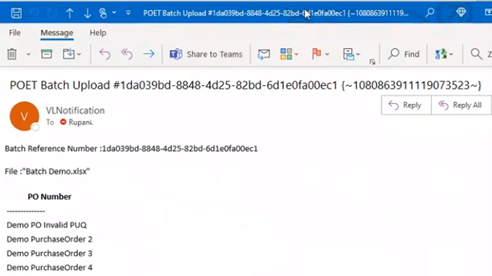
Every batch upload is assigned a unique batch ID. The unique ID is referenced in all email communications for easy location of the original upload process. You can use the search function (last day, last week, last month, or customized range of dates) to find the batch ID. You can also open the submission file name and review the status of every batch order.
Communication
Every stage of batch upload has a corresponding email confirmation.
Completing the batch template
Overview
The template includes sections for both the PO header and Detail lines. Each field in the template contains a cell comment (indicated by a small red triangle in the upper right corner of the cell) that provides instructions for filling in the field. To view the cell comment for a particular field, hover over the cell containing the field name.
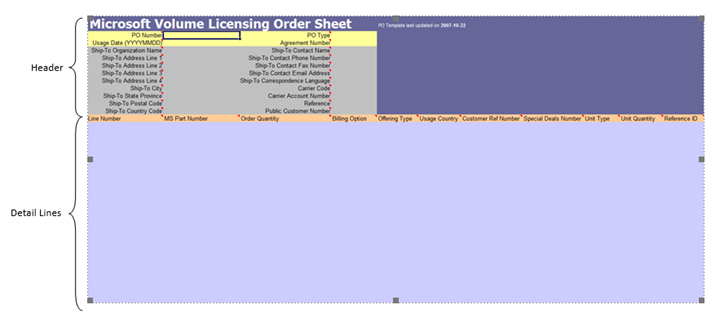
Completing the PO header template
Complete each required field for the PO header. Note the following:
- PO Number must be unique for the enrollment.
- PO Type should be NE (new enrollments) for all orders.
- Usage Date is required for a PO containing any license part number but isn’t required for a PO containing only fulfillment part numbers. Note: The Usage Date must be entered in YYYYMMDD format with no slashes.
- Enrollment Number is required.
- Public Customer Number is not required; however, it’s necessary to successfully process POs for certain participating volume licensing programs.
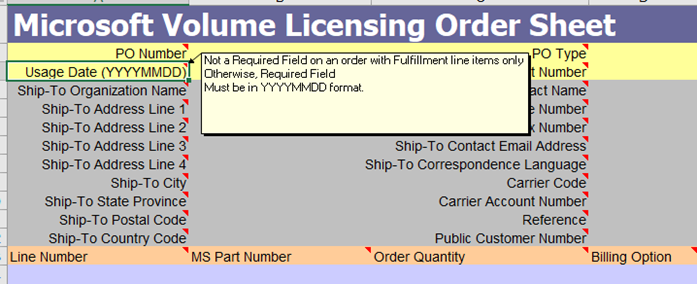
The ship-to address is required for a PO containing one or more fulfillment part numbers. The following ship-to fields are mandatory:
- Ship-To Organization Name
- Ship-To Address Line 1
- Ship-To City
- Ship-To Postal Code (requirement varies by country)
- Ship-To Country Code
- Ship-To Contact Name
- Ship-To Contact Phone Number
- Ship-To Contact Email Address
- Ship-To Correspondence Language
Enter one or more Detail lines. Note the following fields:
- MS Part Number is required.
- Order Quantity must be a number greater than zero.
- Billing Option is required for license part numbers. This field should be blank for fulfillment part numbers.
- Offering Type defaults based on the part number entered (default occurs when the file is uploaded).
- Usage Country is required.
- Special Deals Number isn’t required.
- Unit Type is only required if you’re purchasing OLS products. You can use the code “MT,” which stands for “months.”
- Unit Quantity is only required if you’re purchasing OLS products. The following codes are valid: (a)”12”, which stands for one year and (b)”CT”, which stands for “coterminous.”
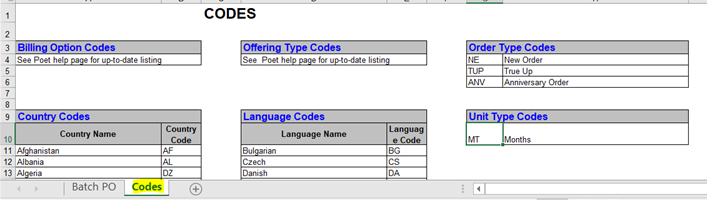
Codes tab
You can use a maximum of 999 detail lines for a single PO.
You need to use codes for the Ship-To Country, Ship-To Correspondence Language, Billing Option, Offering Type, Usage Country, Unit Type, and Unit Quantity fields.
You can find a list of the valid codes for each field in the Codes worksheet included in the template file. Select the Codes tab to activate the worksheet and locate the appropriate codes.
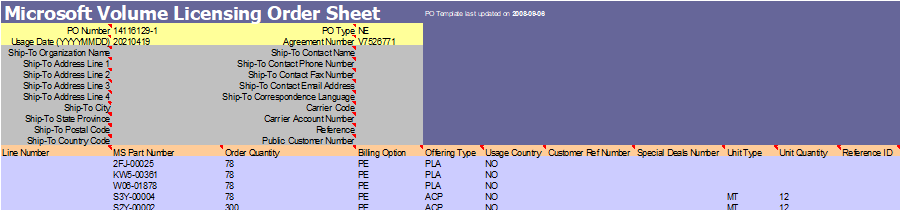
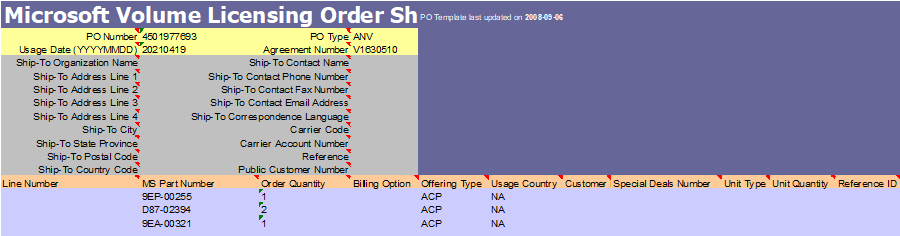
PO examples
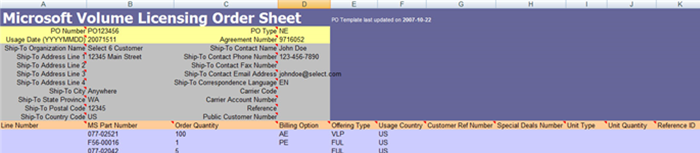
Unique PO
Here’s an example of a unique PO with three lines:
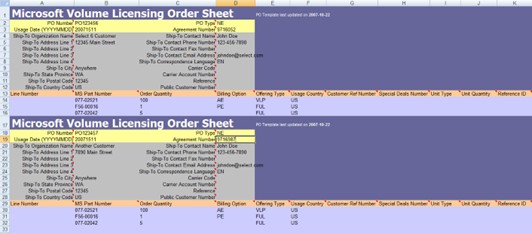
Multiple POs
You can submit multiple POs in a single batch. To add POs to the same batch, copy the PO field headings (range A1:G13), and paste them directly under the last detail line of the previous order. Repeat as needed.
Campus and School Agreement
Here’s a CASA PO example with OLS SKU:

Open Value
Here’s an OV PO example with OLS SKU:
Open Value Subscription
Here’s an OV non-anniversary order, platform SKU additional SKUs, and OLS SKU: