Note
Access to this page requires authorization. You can try signing in or changing directories.
Access to this page requires authorization. You can try changing directories.
Debugging Tools for Windows supports kernel debugging over a USB cable using Ethernet Emulation Mode (EEM) This topic describes how to set up USB EEM using the kdnet.exe utility.
The computer that runs the debugger is called the host computer, and the computer being debugged is called the target computer.
Kernel-Mode USB EEM device requirements
The following is required:
On the target computer, a Synopsys USB 3.0 controller connected to an USB type C port.
On the host computer, an externally accessible USB 3.0 port is required.
Windows 10 October 2020 Update (20H2) or later
The KDNET-EEM-USB transport can be configured for:
- PCI debug device. These debug devices are set using dbgsettings::busparams=seg.bus.dev.fun.
- ACPI-DBG2 Table debug devices. These debug devices are set using dbgsettings::busparams=1|2|3, which 1|2|3 points to specific the ACPI DBG2-Table array entry containing the debug device configuration.
Cable requirements
- A standard USB 3.0 Type C to Type A cable is required to connect the host type A port to the target type C port.
Binary transport files
Binaries kd_0C_8086.dll for x64, and kd_8003_5143.dll for ARM are used to support the KDNET-EEM-USB debugger transport.
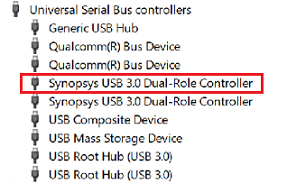
Confirm that a supported USB controller is available on the target
On the target computer, launch Device Manager.
Confirm that the Synopsys USB 3.0 Dual-Role Controller is listed.
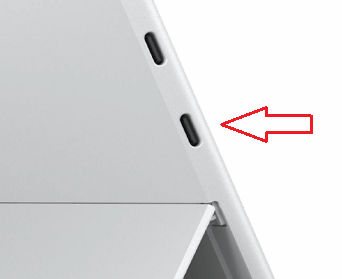
Determine the debugging port when multiple ports are available
After you have identified a port that supports debugging, the next step is to locate the physical USB connector that is associated with that port.
For example, on the Surface Pro X, use the lower of the two USB C ports is used for KDNET EEM debugging.
Use kdnet.exe to confirm device support and view the busparams value
Intel / AMD 64 devices
The BCDEDIT debug options are stored in the Boot Configuration Data (BCD) store. For more information, see BCDEdit /debug.
ARM devices
ARM devices use ACPI DBG2 table for configuring the debugger, where the busparams points to the DBG2 table entry. To specify the debugging port that will be used, busparm is used. Typically just the first busparam is used and it’s either 0 or 1 depending on the device. Typically, devices don't use busparams=0, since the 0 DBG2 table entry is normally reserved for the serial device COM. For more information on the ACPI DBG2 table, see Microsoft Debug Port Table 2 (DBG2).
Use kdnet.exe to configure KDNET EEM USB
Use the kdnet.exe utility to display the parameter information for controllers that support KDNET-EEM-USB transport debugging.
Confirm that the Windows Debugging Tools are installed on the host and target system. For information on downloading and installing the debugger tools, see Debugging Tools for Windows.
Locate the kdnet.exe utility. By default, the files are located here.
C:\Program Files (x86)\Windows Kits\10\Debuggers\x64On the target computer, open a Command Prompt window as Administrator. Enter this command to verify that the target computer has a supported network adapter and to view the busparams value.
C:\KDNET>kdnet.exe

Network debugging is not supported on any of the NICs in this machine.
KDNET supports NICs from Intel, Broadcom, Realtek, Atheros, Emulex, Mellanox
and Cisco.

Network debugging is supported on the following USB controllers:
busparams=1, Device-mode USB controller with Vendor ID: 5143 (Default)
busparams=2, Device-mode USB controller with Vendor ID: 5143
busparams=3, Device-mode USB controller with Vendor ID: 5143
busparams=4, Device-mode USB controller with Vendor ID: 5143

This Microsoft hypervisor supports using KDNET in guest VMs.
As the output from kdnet.exe indicates that a supported USB controller with a busparams value of 1 is available, we can proceed.
Setting Up the Target Computer
Use the kdnet.exe utility to configure the debugger settings on the target PC, by following these steps.
Important
Before using bcdedit to change boot information you may need to temporarily suspend Windows security features such as BitLocker and Secure Boot on the test PC. You can re-enable Bit Locker and Secure Boot once you’re done using BCDEdit to update the boot information. Appropriately manage the test PC, when the security features are disabled.
Use the command shown below to set the, busparams value, the IP address and the port of the host system and generated a unique connection key. The 169.254.255.255 IP address is used for all USB EMM connections.
Pick a unique port address for each target/host pair that you work with, within the recommended range of 50000-50039. 50005 is shown in the example.
   C:\>kdnet.exe 169.254.255.255 50005

   Enabling network debugging on Intel(R) 82577LM Gigabit Network Connection.
   Key=2steg4fzbj2sz.23418vzkd4ko3.1g34ou07z4pev.1sp3yo9yz874p
Copy the returned key into a notepad .txt file. In the example shown, the generated key has a value of:
2steg4fzbj2sz.23418vzkd4ko3.1g34ou07z4pev.1sp3yo9yz874pUse the BCDEdit command to check that the parameters are as expected. For more information, see BCDEdit /dbgsettings
   C:\>bcdedit /dbgsettings

   busparams               1
   key                     2steg4fzbj2sz.23418vzkd4ko3.1g34ou07z4pev.1sp3yo9yz874p
   debugtype               NET
   hostip                  169.254.255.255
   port                    50005
   dhcp                    No
   The operation completed successfully.
Disable the firewall on the host
On the host, disable the firewall for the debugger.
Connecting WinDbg to the target for kernel debugging
On the host computer, open WinDbg. On the File menu, choose Kernel Debug. In the Kernel Debugging dialog box, open the Net tab. Paste in your port number and key that you saved to in the notepad .txt file earlier. Select OK.
You can also start a WinDbg session by opening a Command Prompt window and entering the following command, where is the port you selected above, and is the key that was returned by kdnet.exe above. Paste in the key in that you saved to in the notepad .txt file earlier.
windbg -k -d net:port=<YourDebugPort>,key=<YourKey>
Reboot the target computer
Once the debugger is connected, reboot the target computer. One way to do reboot the PC, is to use the shutdown -r -t 0 command from an administrator's command prompt.
After the target PC restarts, the debugger should connect automatically.
Troubleshooting
Troubleshooting Target
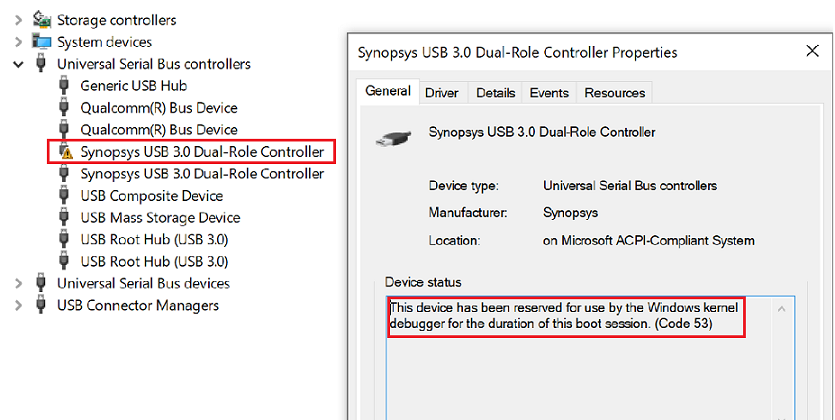
Confirm that the Windows KDNET-USB-EMM Network Adapter is present under Network Adapters in Windows Device Manager.
The device properties show when the controller is reserved for use by the Windows kernel debugger.
Troubleshooting Host
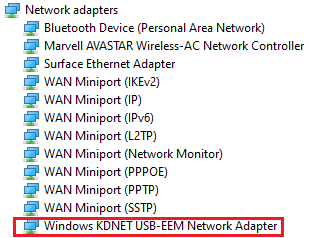
Confirm that the Windows KDNET-USB-EMM Network Adapter is present under Network Adapters in Windows Device Manager.
On the host the KDNET-EEM connection using the USB Type A port is shown.
Intel PCI - Connection retries messages on the debugger console windows and cannot break-in into the target - SkipPciProbeDebugDevice
If you encounter the following message in KDNET debugger console, cannot initiate a break-in into the target, or experience issues with certain commands (e.g., kdfiles), it may be due to KDNET receiving an out-of-sequence ping packet."
... Retry sending the same data packet for 128 times.

The transport connection between host kernel debugger and target Windows seems lost.
please try resync with target, recycle the host debugger, or reboot the target Windows.
This issue can happen because the pci.sys driver is incorrectly probing the debug device. To eliminate the errors, create the following registry entry on the TARGET device at an administrator command prompt.
reg add HKEY_LOCAL_MACHINE\SYSTEM\CurrentControlSet\SERVICES\kdnet /v SkipPciProbeDebugDevice /t REG_DWORD /d 1 /f
Then restart the target machine.
shutdown /r /t 0
Once the device reboots then the errors should disappear, and commands should work as expected.
See also
Setting Up KDNET Network Kernel Debugging Automatically
Setting Up KDNET Network Kernel Debugging Manually