Note
Access to this page requires authorization. You can try signing in or changing directories.
Access to this page requires authorization. You can try changing directories.
The MITT software package includes tests for validating data transfers to a UART controller and its driver. The MITT board's UART interface acts as a UART loopback device.
Before you begin
- Get a MITT board and a UART adapter board. See Buy hardware for using MITT.
- Download the MITT software package. Install it on the system under test.
- Install MITT firmware on the MITT board. See Get started with MITT.
Hardware setup

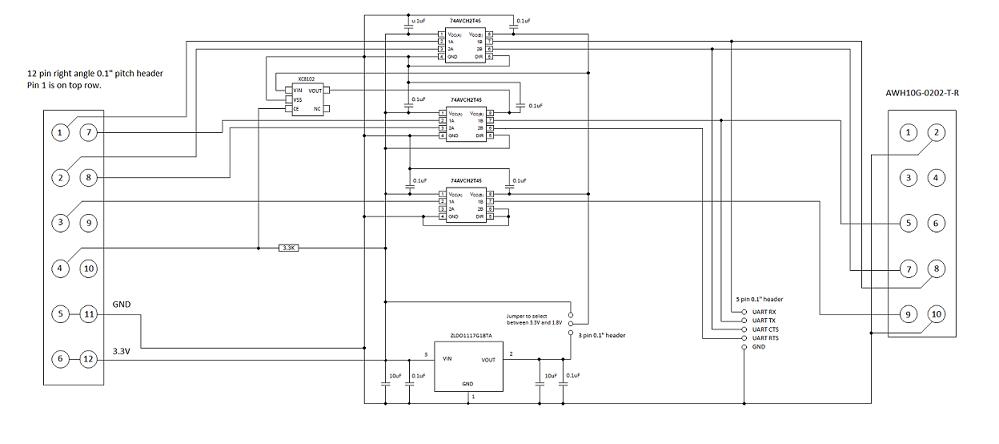
You need external PIN-outs to connect the UART interface on the MITT board to the UART controller of the system under test. If the UART controller exposes PIN-outs, connect directly to JB1 of the board.
Connect these lines:
UART interface on the MITT board UART controller on the system under test TX RX RTS CTS RX TX CTS RTS The UART adapter board provides a jumper for selecting the correct voltage. Only 3.3V signal is supported for direct connect (without the adapter board).

Test driver and ACPI configuration
To modify the ACPI tables, install Windows Hardware Certification Kit (HCK) 8.1. Perform these steps on the system under test that has the UART controller:
Perform the system changes that are described under the Device.BusController.UART.HCKTestability requirement.
Update the ACPI table for UART test drivers based on the template provided under \\<hckcontrollername>\Tests\<architecture>\UART\Sample-UART.asl or use this example. You can use the Microsoft ASL compiler.
Device(UART) {
    Name (_HID, "UTK0001")
    Name (_CID, "UARTTest")
    Name (_UID,0)
    Method (_CRS, 0x0, NotSerialized) {
        Name (
            RBUF,
            ResourceTemplate () {
                UARTSerialBus (
                    115200, // Baud Rate = 115200
                    DataBitsEight,
                    StopBitsOne,
                    0xC0,
                    LittleEndian,
                    ParityTypeNone,
                    FlowControlHardware,
                    32,
                    32,
                    "\\_SB.UAR4",,,,
                )
            }
        )
    Return(RBUF)
    }
}
Install the UARTTest test peripheral driver from \\<hckcontrollername>\Tests\<architecture>\UART by running this command:
pnputil -a UARTTest.inf
UART automation tests
Perform steps described in Test driver and ACPI configuration.
Create a folder on the system under test.
Copy these files from %ProgramFiles(x86)%\Windows Kits\8.1\Testing\Runtimes\TAEF to the folder.
- Wex.Common.dll
- Wex.Communication.dll
- Wex.Logger.dll
Copy UtsSanity.exe and muttutil.dll from the MITT software package.
View all commands available, launch UtsSanity.exe -? and refer to the command line options available:
Note
The –mitt option is required to run the tests while the MITT board is connected.
Example 1: To run the tests at 115200 bps (default)
C:\\uart> UtsSanity.exe –mittExample 2: To run the tests at 3Mbps:
C:\\uart> UtsSanity.exe -mitt –baudRate 3000000
UART adapter schematic
