Note
Access to this page requires authorization. You can try signing in or changing directories.
Access to this page requires authorization. You can try changing directories.
This article provides installation information about Netmon and the USB ETW parsers.
Install Netmon from the Microsoft Download Center, and then install USB ETW parsers from Windows Driver Kit (WDK). The USB ETW parsers are supported in Netmon Version 3.3 and later versions.
To install the Netmon tool and the Netmon USB parser
Determine whether your machine is running 32-bit Windows or 64-bit Windows:
- Open the Start menu, right-click Computer, and view Properties.
- Look at the System type field.
If your system type is 32-bit Operating System, you'll use the x86 download. If your system type is 64-bit Operating System and your processor is Itanium, you'll use the ia64 download. For other processor types, use the x64 or AMD64 download.
Install Netmon:
- Navigate to the Windows Network Monitor page in the Microsoft Download Center.
- Select the Download button.
- Choose one or more appropriate .exe files for your system in the download pop-up window and select the Download button.
- After the download completes, run the .exe file to start the Setup Wizard.
- Select Typical when you're asked to choose the setup type.
Install the WDK from Windows Driver Kit (WDK)).
Allow execution of PowerShell scripts:
On the Start screen, type
powershell, right-click on the Windows PowerShell result, and select Run as administrator.In the PowerShell window, type this command:
Set-ExecutionPolicy RemoteSigned -ForceClose the PowerShell window.
Open a PowerShell window (you don't need to Run as administrator) and run the following commands. Adjust the path if you installed the kit to a different location:
cd "C:\Program Files (x86)\Windows Kits\10\Tools\10.0.22621.0\x86\Network Monitor Parsers\usb"
..\NplAutoProfile.ps1
Restart Netmon to apply the changes.
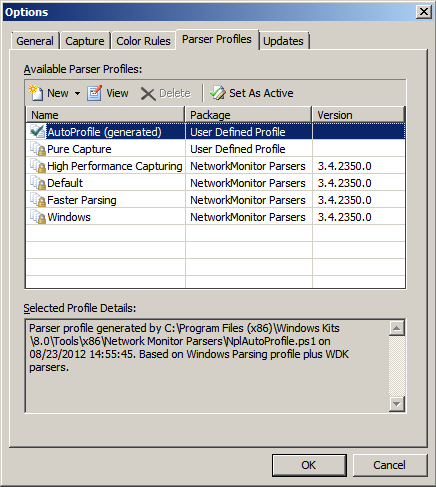
Verify that the profile is active in Netmon.
On the Tools menu, select Options.
On the Parser Profiles tab, make sure that AutoProfile (generated) is set as active. Your settings should be similar to this image.
Select OK.
Netmon is now configured for use with a USB ETW trace file. For more information, see How to view a USB ETW trace in Netmon.