Note
Access to this page requires authorization. You can try signing in or changing directories.
Access to this page requires authorization. You can try changing directories.
Energy efficiency is increasingly important in enterprise and data center environments, and it adds another set of tradeoffs to the mix of configuration options. When managing servers, it’s important to ensure that they are running as efficiently as possible while meeting the performance needs of their workloads. Windows Server is optimized for excellent energy efficiency with minimum performance impact across a wide range of customer workloads. Processor Power Management (PPM) Tuning for the Windows Server Balanced Power Plan describes the workloads used for tuning the default parameters in multiple Windows Server versions, and provides suggestions for customized tunings.
This section expands on energy-efficiency tradeoffs to help you make informed decisions if you need to adjust the default power settings on your server. However, the majority of server hardware and workloads should not require administrator power tuning when running Windows Server.
Choosing the tuning metrics
When you tune your server for energy savings, you must also consider performance. Tuning affects performance and power, sometimes in disproportionate amounts. For each possible adjustment, consider your power budget and performance goals to determine whether the trade-off is acceptable.
Windows Server default parameter tuning uses Energy Efficiency as a key metric to balance power and performance. Energy efficiency is the ratio of work that is done to the average power that is required during a specified amount of time.

You can use this metric to set practical goals that respect the tradeoff between power and performance. In contrast, a goal of 10 percent energy savings across the data center fails to capture the corresponding effects on performance and vice versa.
Similarly, if you tune your server to increase performance by 5 percent, and that results in 10 percent higher energy consumption, the total result might or might not be acceptable for your business goals. The energy efficiency metric allows for more informed decision making than power or performance metrics alone.
Measuring system energy consumption
You should establish a baseline power measurement before you tune your server for energy efficiency.
If your server has the necessary support, you can use the power metering and budgeting features in Windows Server 2016 to view system-level energy consumption by using Performance Monitor.
One way to determine whether your server has support for metering and budgeting is to review the Windows Server Catalog. If your server model qualifies for the new Enhanced Power Management qualification in the Windows Hardware Certification Program, it is guaranteed to support the metering and budgeting functionality.
Another way to check for metering support is to manually look for the counters in Performance Monitor. Open Performance Monitor, select Add Counters, and then locate the Power Meter counter group.
If named instances of power meters appear in the box labeled Instances of Selected Object, your platform supports metering. The Power counter that shows power in watts appears in the selected counter group. The exact derivation of the power data value is not specified. For example, it could be an instantaneous power draw or an average power draw over some time interval.
If your server platform does not support metering, you can use a physical metering device connected to the power supply input to measure system power draw or energy consumption.
To establish a baseline, you should measure the average power required at various system load points, from idle to 100 percent (maximum throughput) to generate a load line. The following figure shows load lines for three sample configurations:
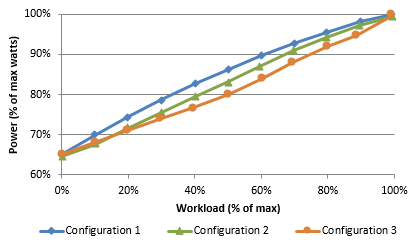
You can use load lines to evaluate and compare the performance and energy consumption of configurations at all load points. In this particular example, it is easy to see what the best configuration is. However, there can easily be scenarios where one configuration works best for heavy workloads and one works best for light workloads.
You need to thoroughly understand your workload requirements to choose an optimal configuration. Don't assume that when you find a good configuration, it will always remain optimal. You should measure system utilization and energy consumption on a regular basis and after changes in workloads, workload levels, or server hardware.
Diagnosing energy efficiency issues
PowerCfg.exe supports a command-line option that you can use to analyze the idle energy efficiency of your server. When you run PowerCfg.exe with the /energy option, the tool performs a 60-second test to detect potential energy efficiency issues. The tool generates a simple HTML report in the current directory.
Important
To ensure an accurate analysis, make sure that all local apps are closed before you run PowerCfg.exe.
Shortened timer tick rates, drivers that lack power management support, and excessive CPU utilization are a few of the behavioral issues that are detected by the powercfg /energy command. This tool provides a simple way to identify and fix power management issues, potentially resulting in significant cost savings in a large datacenter.
For more info about PowerCfg.exe, see Powercfg command-line options.
Using power plans in Windows Server
Windows Server 2016 has three built-in power plans designed to meet different sets of business needs. These plans provide a simple way for you to customize a server to meet power or performance goals. The following table describes the plans, lists the common scenarios in which to use each plan, and gives some implementation details for each plan.
| Plan | Description | Common applicable scenarios | Implementation highlights |
|---|---|---|---|
| Balanced (recommended) | Default setting. Targets good energy efficiency with minimal performance impact. | General computing | Matches capacity to demand. Energy-saving features balance power and performance. |
| High Performance | Increases performance at the cost of high energy consumption. Power and thermal limitations, operating expenses, and reliability considerations apply. | Low latency apps and app code that is sensitive to processor performance changes | Processors are always locked at the highest performance state (including "turbo" frequencies). All cores are unparked. Thermal output may be significant. |
| Power Saver | Limits performance to save energy and reduce operating cost. Not recommended without thorough testing to make sure performance is adequate. | Deployments with limited power budgets and thermal constraints | Caps processor frequency at a percentage of maximum (if supported), and enables other energy-saving features. |
These power plans exist in Windows for alternating current (AC) and direct current (DC) powered systems, but we will assume that servers are always using an AC power source.
For more info on power plans and power policy configurations, see Powercfg command-line options.
Note
Some server manufactures have their own power management options available through the BIOS settings. If the operating system does not have control over the power management, changing the power plans in Windows will not affect system power and performance.
Tuning processor power management parameters
Each power plan represents a combination of numerous underlying power management parameters. The built-in plans are three collections of recommended settings that cover a wide variety of workloads and scenarios. However, we recognize that these plans will not meet every customer's needs.
The following sections describe ways to tune some specific processor power management parameters to meet goals not addressed by the three built-in plans. If you need to understand a wider array of power parameters, see Powercfg command-line options.
Intel Hardware Controlled P-states (HWP)
Starting from Intel Broadwell processors running WS2016, Windows PPM uses Intel’s Hardware Controlled P-states (HWP). HWP is a new capability for a cooperative hardware and software performance control. When HWP is enabled, CPU monitors activity and scalability, and selects frequency at hardware time scale. OS is no longer required to monitor activity and select frequency at regular intervals. Switching to HWP has several benefits:
- Quickly respond to bursty workloads. Windows PPM check interval is set as 30ms as default and can be reduced as minimal as 15ms. However, HWP can adjust frequency at quick as every 1ms.
- CPU has better knowledge of the hardware power efficiency of each P-state. It can make a better choice of processor frequency to achieve the best power efficiency.
- CPU can take other hardware usage, e.g., memory, GPU, etc., into account to achieve best power efficiency under certain TDP (Thermal Design Power).
Windows can still set the minimum and maximum processor states to limit the range of frequencies that the processors can execute. It can also set the following Processor energy performance preference policy (EPP) parameter to indicate HWP to favor power or performance.
- Processor energy performance preference policy to set balance between power and performance. Lower value favors performance, and higher value favors power. The value can be between 0 and 100. The default value 50 that is to balance power and performance.
The following commands decrease the EPP value to 0 on current power plan to totally favor performance over power:
Powercfg -setacvalueindex scheme_current sub_processor PERFEPP 0
Powercfg -setactive scheme_current
Minimum and maximum processor performance state
Processors change between performance states (P-states) very quickly to match supply to demand, delivering performance where necessary and saving energy when possible. If your server has specific high-performance or minimum-power-consumption requirements, you might consider configuring the Minimum Processor Performance State parameter or the Maximum Processor Performance State parameter.
The values for the Minimum Processor Performance State and Maximum Processor Performance State parameters are expressed as a percentage of maximum processor frequency, with a value in the range 0 – 100.
If your server requires ultra-low latency, invariant CPU frequency (e.g., for repeatable testing), or the highest performance levels, you might not want the processors switching to lower-performance states. For such a server, you can cap the minimum processor performance state at 100 percent by using the following commands:
Powercfg -setacvalueindex scheme_current sub_processor PROCTHROTTLEMIN 100
Powercfg -setactive scheme_current
If your server requires lower energy consumption, you might want to cap the processor performance state at a percentage of maximum. For example, you can restrict the processor to 75 percent of its maximum frequency by using the following commands:
Powercfg -setacvalueindex scheme_current sub_processor PROCTHROTTLEMAX 75
Powercfg -setactive scheme_current
Note
Capping processor performance at a percentage of maximum requires processor support. Check the processor documentation to determine whether such support exists, or view the Performance Monitor counter % of maximum frequency in the Processor group to see if any frequency caps were applied.
Processor responsiveness override
The CPU utilization-based power management algorithms typically uses an average CPU utilization within a time check window to determine if frequency needs to increase or decrease. That might hurt the latency of disk I/O or network heavy workloads. A logical processor could be idle while waiting for disk I/O completion or network packets, which makes the overall CPU utilization low. As a result, power management will choose a low frequency for this processor. This issue exists on HWP-based power management as well. The DPCs and threads handling the IO completion or network packets are in the critical path and should not run at low speed. To resolve this issue, Windows PPM takes the number of DPCs into account. When the DPC count is above certain threshold in the past monitoring window, PPM will enter an IO responsiveness period and raises the frequency floor to a higher level. The frequency floor will be reset when the DPC count is low enough for some time. The behavior can be tuned by the following parameters.
| Parameter | Description | Default Value | Min Value | Max Value |
|---|---|---|---|---|
| Processor responsiveness override enable threshold | Count of DPCs within a perf check above which processor responsiveness overrides should be enabled | 10 | 0 | N/A |
| Processor responsiveness override disable threshold | Count of DPCs within a perf check below which processor responsiveness overrides should be disabled | 5 | 0 | N/A |
| Processor responsiveness override enable time | Count of consecutive perf checks which must meet the enable threshold before processor responsiveness overrides are enabled | 1 | 1 | 100 |
| Processor responsiveness override disable time | Count of consecutive perf checks which must meet the disable threshold before processor responsiveness overrides are disabled | 3 | 1 | 100 |
| Processor responsiveness override performance floor | Minimum allowed processor performance when processor responsiveness overrides are enabled | 100 | 0 | 100 |
| Processor responsiveness override energy performance preference ceiling | Maximum energy performance preference policy value when processor responsiveness overrides are enabled | 100 | 0 | 100 |
For example, if your server workload is not sensitive to the latency and wants to loose the responsiveness override to favor power, you can increase the Processor responsiveness override enable threshold and Processor responsiveness override enable time, decrease the Processor responsiveness override disable threshold and Processor responsiveness override disable time. Then the system will be hard to enter responsiveness override state. The default value of Processor responsiveness override performance floor is set as 100 so that the responsiveness override period will run at maximum frequency. You can also decrease the processor performance floor and reduce the Processor responsiveness override energy performance preference ceiling to let HWP to adjust the frequency. The following are the sample commands to set the parameters for current active power plan.
Powercfg -setacvalueindex scheme_current sub_processor RESPENABLETHRESHOLD 100
Powercfg -setacvalueindex scheme_current sub_processor RESPDISABLETHRESHOLD 1
Powercfg -setacvalueindex scheme_current sub_processor RESPENABLETIME 10
Powercfg -setacvalueindex scheme_current sub_processor RESPDISABLETIME 1
Powercfg -setacvalueindex scheme_current sub_processor RESPPERFFLOOR 5
Powercfg -setacvalueindex scheme_current sub_processor RESPEPPCEILING 50
Powercfg -setactive scheme_current
Processor performance boost mode
This parameter tuning only applies to Non-HWP systems.
Intel Turbo Boost and AMD Turbo CORE technologies are features that allow processors to achieve additional performance when it is most useful (that is, at high system loads). However, this feature increases CPU core energy consumption, so Windows Server 2016 configures Turbo technologies based on the power policy that is in use and the specific processor implementation.
Turbo is enabled for High Performance power plans on all Intel and AMD processors and it is disabled for Power Saver power plans. For Balanced power plans on systems that rely on traditional P-state-based frequency management, Turbo is enabled by default only if the platform supports the EPB register.
Note
The EPB register is only supported in Intel Westmere and later processors.
For Intel Nehalem and AMD processors, Turbo is disabled by default on P-state-based platforms. However, if a system supports Collaborative Processor Performance Control (CPPC), which is a new alternative mode of performance communication between the operating system and the hardware (defined in ACPI 5.0), Turbo may be engaged if the Windows operating system dynamically requests the hardware to deliver the highest possible performance levels.
To enable or disable the Turbo Boost feature, the Processor Performance Boost Mode parameter must be configured by the administrator or by the default parameter settings for the chosen power plan. Processor Performance Boost Mode has five allowable values, as shown in Table 5.
For P-state-based control, the choices are Disabled, Enabled (Turbo is available to the hardware whenever nominal performance is requested), and Efficient (Turbo is available only if the EPB register is implemented).
For CPPC-based control, the choices are Disabled, Efficient Enabled (Windows specifies the exact amount of Turbo to provide), and Aggressive (Windows asks for "maximum performance" to enable Turbo).
In Windows Server 2016, the default value for Boost Mode is 3.
| Name | P-state-based behavior | CPPC behavior |
|---|---|---|
| 0 (Disabled) | Disabled | Disabled |
| 1 (Enabled) | Enabled | Efficient Enabled |
| 2 (Aggressive) | Enabled | Aggressive |
| 3 (Efficient Enabled) | Efficient | Efficient Enabled |
| 4 (Efficient Aggressive) | Efficient | Aggressive |
The following commands enable Processor Performance Boost Mode on the current power plan (specify the policy by using a GUID alias):
Powercfg -setacvalueindex scheme_current sub_processor PERFBOOSTMODE 1
Powercfg -setactive scheme_current
Important
You must run the powercfg -setactive command to enable the new settings. You do not need to reboot the server.
To set this value for power plans other than the currently selected plan, you can use aliases such as SCHEME_MAX (Power Saver), SCHEME_MIN (High Performance), and SCHEME_BALANCED (Balanced) in place of SCHEME_CURRENT. Replace "scheme current" in the powercfg -setactive commands previously shown with the desired alias to enable that power plan.
For example, to adjust the Boost Mode in the Power Saver plan and make that Power Saver is the current plan, run the following commands:
Powercfg -setacvalueindex scheme_max sub_processor PERFBOOSTMODE 1
Powercfg -setactive scheme_max
Processor performance increase and decrease of thresholds and policies
This parameter tuning only applies to Non-HWP systems.
The speed at which a processor performance state increases or decreases is controlled by multiple parameters. The following four parameters have the most visible impact:
Processor Performance Increase Threshold defines the utilization value above which a processor's performance state will increase. Larger values slow the rate of increase for the performance state in response to increased activities.
Processor Performance Decrease Threshold defines the utilization value below which a processor's performance state will decrease. Larger values increase the rate of decrease for the performance state during idle periods.
Processor Performance Increase Policy and Processor Performance Decrease Policy determine which performance state should be set when a change happens. "Single" policy means it chooses the next state. "Rocket" means the maximum or minimal power performance state. "Ideal" tries to find a balance between power and performance.
For example, if your server requires ultra-low latency while still wanting to benefit from low power during idle periods, you could quicken the performance state increase for any increase in load and slow the decrease when load goes down. The following commands set the increase policy to "Rocket" for a faster state increase, and set the decrease policy to "Single". The increase and decrease thresholds are set to 10 and 8 respectively.
Powercfg.exe -setacvalueindex scheme_current sub_processor PERFINCPOL 2
Powercfg.exe -setacvalueindex scheme_current sub_processor PERFDECPOL 1
Powercfg.exe -setacvalueindex scheme_current sub_processor PERFINCTHRESHOLD 10
Powercfg.exe -setacvalueindex scheme_current sub_processor PERFDECTHRESHOLD 8
Powercfg.exe /setactive scheme_current
Processor performance core parking maximum and minimum cores
Core parking is a feature that was introduced in Windows Server 2008 R2. The processor power management (PPM) engine and the scheduler work together to dynamically adjust the number of cores that are available to run threads. The PPM engine chooses a minimum number of cores for the threads that will be scheduled.
Cores that are parked generally do not have any threads scheduled, and they will drop into very low power states when they are not processing interrupts, DPCs, or other strictly affinitized work. The remaining cores are responsible for the remainder of the workload. Core parking can potentially increase energy efficiency during lower usage.
For most servers, the default core-parking behavior provides a reasonable balance of throughput and energy efficiency. On processors where core parking may not show as much benefit on generic workloads, it can be disabled by default.
If your server has specific core parking requirements, you can control the number of cores that are available to park by using the Processor Performance Core Parking Maximum Cores parameter or the Processor Performance Core Parking Minimum Cores parameter in Windows Server 2016.
One scenario that core parking isn't always optimal for is when there are one or more active threads affinitized to a non-trivial subset of CPUs in a NUMA node (that is, more than 1 CPU, but less than the entire set of CPUs on the node). When the core parking algorithm is picking cores to unpark (assuming an increase in workload intensity occurs), it may not always pick the cores within the active affinitized subset (or subsets) to unpark, and thus may end up unparking cores that won't actually be utilized.
The values for these parameters are percentages in the range 0 – 100. The Processor Performance Core Parking Maximum Cores parameter controls the maximum percentage of cores that can be unparked (available to run threads) at any time, while the Processor Performance Core Parking Minimum Cores parameter controls the minimum percentage of cores that can be unparked. To turn off core parking, set the Processor Performance Core Parking Minimum Cores parameter to 100 percent by using the following commands:
Powercfg -setacvalueindex scheme_current sub_processor CPMINCORES 100
Powercfg -setactive scheme_current
To reduce the number of schedulable cores to 50 percent of the maximum count, set the Processor Performance Core Parking Maximum Cores parameter to 50 as follows:
Powercfg -setacvalueindex scheme_current sub_processor CPMAXCORES 50
Powercfg -setactive scheme_current
Processor performance core parking utility distribution
Utility Distribution is an algorithmic optimization in Windows Server 2016 that is designed to improve power efficiency for some workloads. It tracks unmovable CPU activity (that is, DPCs, interrupts, or strictly affinitized threads), and it predicts the future work on each processor based on the assumption that any movable work can be distributed equally across all unparked cores.
Utility Distribution is enabled by default for the Balanced power plan for some processors. It can reduce processor power consumption by lowering the requested CPU frequencies of workloads that are in a reasonably steady state. However, Utility Distribution is not necessarily a good algorithmic choice for workloads that are subject to high activity bursts or for programs where the workload quickly and randomly shifts across processors.
For such workloads, we recommend disabling Utility Distribution by using the following commands:
Powercfg -setacvalueindex scheme_current sub_processor DISTRIBUTEUTIL 0
Powercfg -setactive scheme_current