Note
Access to this page requires authorization. You can try signing in or changing directories.
Access to this page requires authorization. You can try changing directories.
A failover cluster is a group of independent computers that work together to increase the availability of applications and services. The clustered servers, called nodes, are connected by both physical cables and software. If one of the cluster nodes fails, another node begins to provide service, which is a process known as failover. Because of this process, users experience minimal disruptions in service. For more information about how to use failover clusters in Azure Local, see Create an Azure Local cluster using Windows Admin Center.
This guide describes how to install and configure a general purpose file server failover cluster with two nodes. With these instructions, you can learn about failover clusters and familiarize yourself with the Failover Cluster Management snap-in interface in Windows Server.
How two-node file server clusters work
Servers in a failover cluster can function in many different roles, including file server, Hyper-V server, or database server. They can also provide high availability for various other services and applications.
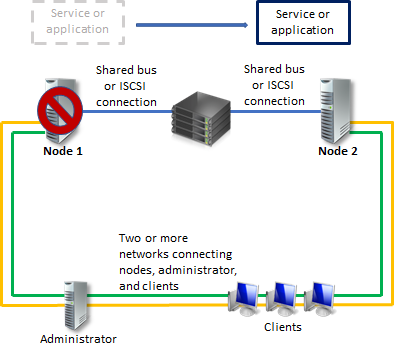
A failover cluster usually includes a storage unit that's physically connected to all servers within the cluster, although only one server at a time can access the volumes in the storage. The following diagram shows a two-node failover cluster connected to a storage unit.
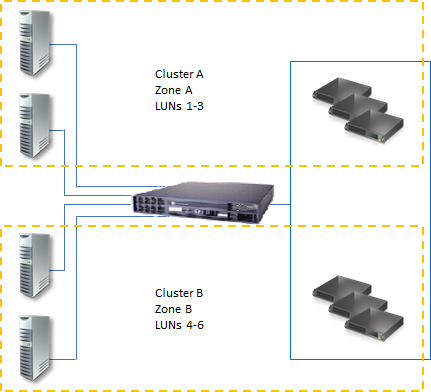
Storage volumes or logical unit numbers (LUNs) exposed to the nodes in a cluster must not be exposed to other servers, including servers in another cluster. The following diagram shows an example of what isolated LUNs look like in a deployment.
To guarantee maximum availability for any server, it's important to follow best practices for server management. For example, you should carefully manage the physical environment of the servers by testing changes before fully implementing them and tracking software updates and configuration changes on all clustered servers.
The following scenario describes one of the possible ways to configure a file server failover cluster. The files the server shares are located on the cluster storage, meaning either node can act as the file server that shares them.
Prerequisites
You must meet the following prerequisites for your failover cluster to meet the criteria for an officially supported deployment:
All hardware and software components must meet the qualifications for the appropriate logo. For Windows Server, need the Certified for Windows Server logo. For more information about what hardware and software systems have been certified, see the Windows Server Catalog.
The fully configured solution (servers, network, and storage) must pass all tests in the validation workflow, which is included with the failover cluster snap-in.
In order to use a two-node failover cluster, you also need to meet the prerequisites in the following sections.
Servers
For servers, you should follow these recommendations:
We recommend using matching computers with the same or similar components.
Servers for a two-node failover cluster should run the same version of Windows Server.
Servers for a two-node failover cluster should also have the same software updates.
Network adapters and cables
The network hardware, like other components in the failover cluster solution, must be compatible with Windows Server.
If you use iSCSI, you must dedicate the network adapters to either network communication or iSCSI, not both.
In the network infrastructure that connects your cluster nodes, avoid having single points of failure. There are two ways you can avoid having a single point of failure:
Connect your cluster nodes with multiple, distinct networks.
Connect your cluster nodes with one network constructed with teamed network adapters, redundant switches, redundant routers, or similar hardware that removes single points of failure.
Note
If you connect the cluster nodes with a single network, the network will pass the redundancy requirement in the Validate a Configuration workflow. However, the report will include a warning that the network shouldn't have a single point of failure.
Device Controllers or appropriate adapters for storage
If you're using a Serial Attached Small Computer System Interface (SCSI) or Fibre Channel, in all clustered servers, all components of the storage stack should be identical. The multipath I/O (MPIO) software and Device Specific Module (DSM) software components must be identical. We recommend the mass-storage device controllers that you attach to cluster storage, including the host bus adapter (HBA), HBA drivers, and HBA firmware, are also identical. If you don't have identical HBAs, you should verify with the storage vendor that you're following their supported or recommended configurations.
If you're using an internet Small Computer Systems Interface (iSCSI), each clustered server must have one or more network adapters or host bus adapters that are dedicated to the iSCSI storage. You shouldn't use the network you're already using for iSCSI for network communication. In all clustered servers, the network adapters you use to connect to the iSCSI storage target should be identical, and we recommend that you use Gigabit Ethernet or higher.
Storage
You must use shared storage that's certified for Windows Server.
For a two-node failover cluster, the storage should contain at least two separate volumes (LUNs) if you're using a witness disk for quorum. The witness disk is a disk in the cluster storage that's designated to hold a copy of the cluster configuration database.
For this two-node cluster example, the quorum configuration is Node and Disk Majority. Node and Disk Majority means that the nodes and witness disk each contain copies of the cluster configuration. The cluster has quorum as long as at most of these copies are available. The other volume, the LUN, contains the files that you plant to share to users.
Here are some other storage requirements you should consider:
You must use basic disks to use the native disk support included in failover clustering, not dynamic disks.
We recommend that you format partitions with NTFS. For witness disks, you must format the partition with NTFS instead.
For the partition style of the disk, you can use either primary boot record (MBR) or GUID partition table (GPT).
The storage must respond correctly to specific SCSI commands. Storage must also follow the standard called SCSI Primary Commands-3 (SPC-3). In particular, the storage must support Persistent Reservations as specified in the SPC-3 standard.
The miniport driver the storage uses must be compatible with Microsoft Storport storage drivers.
Network infrastructure and domain account requirements
In order to use two-node failover clusters, you also need the following infrastructure and domain permissions:
When you use identical network adapters for a network, you must also use identical communication settings on those adapters (for example, Speed, Duplex Mode, Flow Control, and Media Type). Also, compare the settings between the network adapter and the switch it connects to and make sure that no settings are in conflict.
If you have private networks that aren't routed to the rest of your network infrastructure, make sure each private network uses a unique subnet. You have to make sure the subnets are unique even if you've already given each network adapter a unique IP address. For example, if you have one cluster node in a central office and another in a branch office with a separate physical network, don't specify 10.0.0.0/24 for the subnet of both networks even if you give each adapter a unique IP address.
For more information about how to set up your network adapters, see Prerequisites.
The servers in your cluster must use Domain Name System (DNS) for name resolution. You can also use the DNS dynamic update protocol.
All servers in your cluster must be in the same Active Directory domain. Your servers should also have the same domain role, either as a member server or domain controller. We recommend you use the member server role.
We recommend that your clustered servers be member servers. If they are, you need an extra server that acts as the domain controller in the domain that contains your failover cluster.
You can connect one or more networked clients to your failover cluster as needed for testing. While testing, you can observe the effect connecting to the cluster has on a client when you move or fail over the clustered file server from one cluster node to the other.
When you first create a cluster or add servers to it, you must sign in to the domain with an account with administrator rights and permissions for all servers in that cluster. The account you use doesn't need to be a Domain Admins account, but can be a Domain Users account that is in the Administrators group on each clustered server. If the account isn't a Domain Admins account, then you need to give the account or the group it's a member of the Create Computer Objects and Read All Properties permissions in the domain organizational unit (OU) that you plan to add it to.
Shared folders in a failover cluster
The following list describes shared folder configuration functionality integrated into failover clustering:
Display is scoped to clustered shared folders only. You can't mix them with non-clustered shared folders. When a user views shared folders by specifying the path of a clustered file server, the display includes only the shared folders that are part of the specific file server role. It excludes non-clustered shared folders and shares part of separate file server roles that happen to be on a node of the cluster.
You can use access-based enumeration to hide a specified folder from users' view. Instead of allowing users to see the folder but not access anything on it, you can choose to prevent them from seeing the folder at all. You can configure access-based enumeration for a clustered shared folder just like you would for a non-clustered shared folder.
You can configure offline access (caching) for a clustered shared folder just like you would for a non-clustered shared folder.
Whether you use the failover cluster interface, Windows Explorer, or the Share and Storage Management snap-in, Windows always recognizes whether the disk is part of cluster storage. If you've already configured a clustered disk in Failover Cluster Management as part of a clustered file server, you can use any of the previously mentioned interfaces to create a share on the disk. If you haven't already configured this disk as part of your clustered file server, you can't mistakenly create a share on it. Instead, an error indicates that you need to configure the disk as part of a clustered file server before you can share it.
The File Server role in Windows Server includes the optional role service called Services for Network File System (NFS). By installing the role service and configuring shared folders with Services for NFS, you can create a clustered file server that supports UNIX-based clients.
Deploying storage area networks with failover clusters
When deploying a storage area network (SAN) with a failover cluster, you must follow these guidelines:
Use the Windows Server Catalog site to confirm the vendor's storage, including drivers, firmware, and software, are certified for Windows Server.
Isolate storage devices, one cluster per device. Servers from different clusters must not be able to access the same storage devices. In most cases, you should isolate a LUN you use for one set of cluster servers from all other servers by using LUN masking or zoning.
Consider using multipath I/O software. In a highly available storage fabric, you can deploy failover clusters with multiple host bus adapters by using multipath I/O software. This configuration provides the highest level of redundancy and availability. However, you must base your multipath solution on Microsoft Multipath I/O (MPIO). Your storage hardware vendor can also supply an MPIO device-specific module (DSM) for your hardware, although Windows Server includes one or more DSMs as part of the operating system.
Install a two-node file server cluster
Follow the directions in the following sections to install a two-node file server cluster.
If you've already installed the cluster nodes and want to configure a file server failover cluster, see Configure a two-node file server cluster.
Step 1: Connect the cluster servers to the networks and storage
For a failover cluster network, avoid having single points of failure. To encourage redundancy instead, you can connect your cluster nodes by multiple, distinct networks. You can also connect your cluster nodes with one network constructed with teamed network adapters, redundant switches, redundant routers, or similar hardware that removes single points of failure. If you use a network for iSCSI, you must create this network along with the other networks.
For a two-node file server cluster, when you connect the servers to the cluster storage, you must expose at least two volumes (LUNs). You can expose more volumes as needed for thorough testing of your configuration. Don't expose the clustered volumes to servers that aren't in the cluster.
To connect the cluster servers to the networks and storage:
Review the details about networks in the Prerequisites and Network infrastructure and domain account requirements.
Connect and configure the networks that you plan to have the servers in the cluster use.
If your test configuration includes clients or a non-clustered domain controller, make sure these computers can connect to the clustered servers through at least one network.
Follow the manufacturer's instructions for physically connecting the servers to the storage.
Ensure that the disks (LUNs) you want to use in the cluster are exposed to the servers that you plant to cluster, and only those servers. You can use any of the following interfaces to expose disks or LUNs:
The interface provided by the manufacturer of the storage.
If you're using iSCSI, use an appropriate iSCSI interface.
If you purchased software that controls the format or function of the disk, follow the vendor's instructions about how to use that software with Windows Server.
On one of the servers that you want to cluster, go to Start > Administrative Tools > Computer Management > Disk Management.
- If the User Account Control dialog box appears, confirm that the action it displays is what you want, then select Continue.
In Disk Management, confirm that the cluster disks are visible.
(Optional) If you want a storage volume larger than 2 terabytes and you're using the Windows interface to control the format of the disk, convert that disk to the partition style called GUID partition table (GPT). To convert the disk:
Back up any data on the disk.
Delete all volumes on the disk.
In Disk Management, right-click the disk (not a partition) and select Convert to GPT Disk.
For volumes smaller than 2 terabytes, instead of using GPT, you can use the partition style called master boot record (MBR).
Check the format of any exposed volume or LUN. We recommend you use NTFS for the format. For the witness disk, you must use NTFS.
Step 2: Install the file server role and failover cluster feature
Next, you need to install the file server role and failover cluster feature.
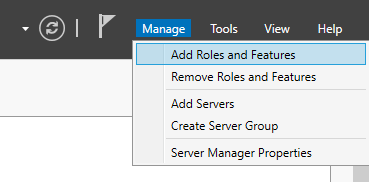
Open Server Manager, then open the Manage drop-down menu and select Add Roles and Features.
If the Before you begin window opens, select Next.
For the Installation Type, select Role-based or feature-based installation.
Select Next.
Select Select a server from the server pool and the name of the machine you plan to use.
Select Next.
For the Server Role, select File and Storage Services > File and iSCSI Services > File Server.
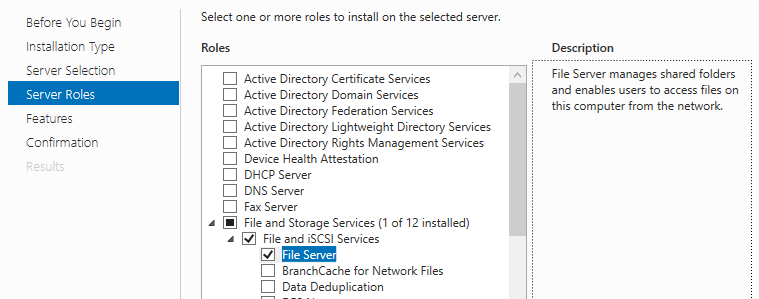
Select Next.
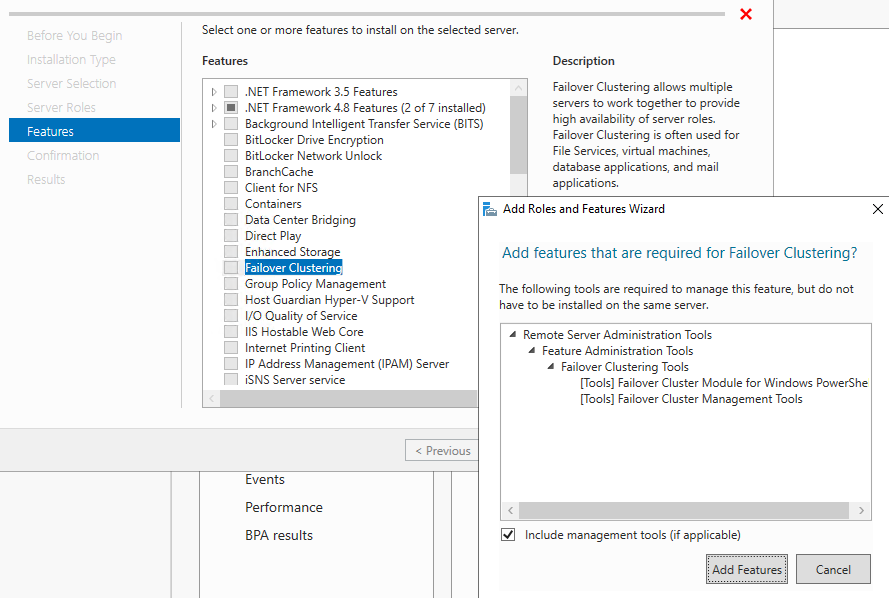
In Features, select Failover Clustering > Include management tools (if applicable) > Add Features, then select Next.
On the Confirmation page, select Install.
Once the installation finishes, restart the computer.
Repeat this process on the second server machine.
Step 3: Validate the cluster configuration
Before creating a cluster, we highly recommend that you validate your configuration. Validation helps you confirm that the configuration of your servers, network, and storage meets a set of specific requirements for failover clusters.
Open Server Manager, then open the Tools drop-down menu and select Failover Cluster Manager.
In Failover Cluster Manager, go to the middle column under Management and select Validate Configuration.
If the Before you begin window opens, select Next.
In the Select Servers or a Cluster window, enter the names of the two machines that you plan to make the new nodes for the cluster. For example, if your planned node names are NODE1 and NODE2, enter those names and select Add. You can also select the Browse button to search Active Directory for the names of existing nodes you can use. Once both nodes are listed under Selected Servers, select Next.
In the Testing Options window, select Run all tests (recommended), then select Next.
On the Confirmation page is a list of tests the service runs for validation. Select Next and wait for the tests to finish.
Once testing is done, the Summary page should appear. To see more information about the tests and what their output means, select More about cluster validation tests.
Select View Report and read the test results.
Make any necessary changes in the configuration and rerun the tests. To view test results after you've exited this workflow, go to SystemRoot > Cluster > Reports > Validation Report date and time.html.
If you need more information about cluster validation after you've exited the workflow, go to Failover Cluster Management > Help > Help Topics > Contents > Help > Validating a Failover Cluster Configuration.
For more information about validation tests for failover clusters, see Validating a Failover Cluster Configuration.
Step 4: Create the cluster
To create a cluster from the machines you configured:
Open Server Manager, then open the Tools drop-down menu and select Failover Cluster Manager.
In Failover Cluster Manager, go to the middle column under Management and select Create Cluster.
If the Before you begin window opens, select Next.
In the Select Servers window, enter the names of the two machines that you plan to make the new nodes for the cluster. For example, if your planned node names are NODE1 and NODE2, enter those names and select Add. You can also select the Browse button to search Active Directory for the names of existing nodes you can use. Once both nodes are listed under Selected Servers, select Next.
In the Access Point for Administering the Cluster window, enter the name of the cluster you plan to use. This name isn't the name you use to connect to your file shares, but is for administrating the cluster only.
Note
If you're using static IP Addresses, you need to manually select which network to use and enter its IP Address into the cluster name field. If you're using DHCP for your IP Addresses, the IP Address is configured automatically.
Select Next.
On the Confirmation page, make sure your configuration is correct, then select Next to create the cluster.
Once the creation process is done, the Summary page should show you information about your configuration. You can select View Report to see more detailed information.
Configure a file server failover cluster
To configure a file server failover cluster:
Open Server Manager, then open the Tools drop-down menu and select Failover Cluster Manager.
When you open the Failover Cluster Manager, you should see the name of the cluster you created. If not, go to the middle column under Management and select Connect to Cluster. Enter the name of your cluster and select OK.
In the console tree, select > next to your cluster name to view the items it contains.
Right-click Roles, then select Configuration Role.
If the Before you begin window opens, select Next.
In the list of roles, select File Server, then select Next.
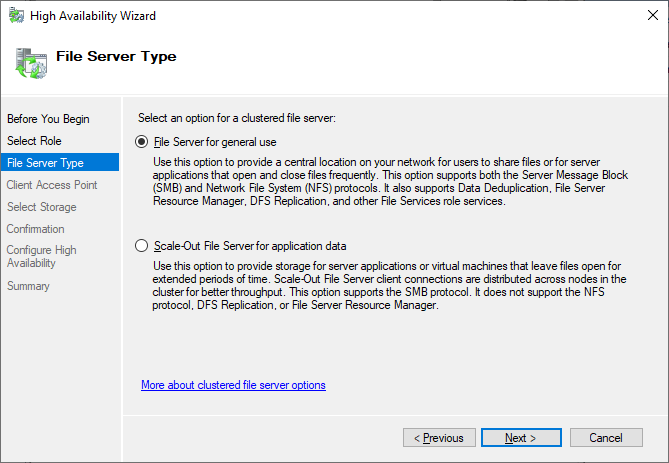
For the File Server Type, select File Server for general use, then select Next.
In the Client Access Point window, enter the name of the file server you plan to use. This name isn't the name of the cluster, but the name you use for file share connectivity. For example, if you want to connect to
\\SERVER, you would enter SERVER.Note
If you're using static IP Addresses, you need to manually select which network to use and enter its IP Address into the cluster name field. If you're using DHCP for your IP Addresses, the IP Address is configured automatically.P Addresses, the IP Address will be configured automatically for you.
Select Next.
In the Select Storage window, select the extra drive (not the witness) that you plan to use to hold your file share.
Select Next.
On the Confirmation page, make sure your configuration looks correct, then select Next.
On the Summary page, you should see a brief summary of the configuration you created. For more detailed information, select View Report.
Note
If the service didn't add the role or the role doesn't work as intended, the Cluster Name Object (CNO) may not have permission to create objects in Active Directory. The File Server role requires a Computer object with the same name as the Client Access Point.
Under Roles in the console tree, you should see the new role you created listed as the name you created. Select the name to highlight it, then look at the Actions pane on the right side of the screen and select Add a share.
Enter the following information into the Add a share workflow:
Share type.
Intended share folder path.
Share name.
Configure any other settings you need, such as access-based enumeration, caching, encryption, and so on.
If you're choosing file-level permissions that aren't default, specify those permissions as well.
On the Confirmation page, make sure your configuration looks correct, then select Create to create the file server share.
On the Results page, if the service created the share successfully, select Close. If not, you should see a list of errors you can troubleshoot.
Select Close.
Repeat this process for any other shares you plan to deploy.